
by Joche Ojeda | May 23, 2023 | XPO
RDBMS stands for Relational Database Management System. It is a type of database management system that is based on the relational model, which organizes data into tables with rows and columns, and uses relationships between tables to link data together.
In an RDBMS, data is stored in tables, with each table representing a specific type of data (such as customers, orders, or products). Each table has columns that represent the attributes of the data, and rows that represent individual instances of the data. Relationships between tables can be established using keys, allowing data from multiple tables to be linked and retrieved in a single query.
RDBMSs provide a variety of features and tools for managing, querying, and manipulating data stored in the database, including data validation, constraint enforcement, transaction management, backup and recovery, reporting and analysis capabilities. They are widely used in enterprise applications, web applications, and other systems that require the management of large amounts of structured data.
Examples of popular RDBMSs include Oracle, Microsoft SQL Server, MySQL, and PostgreSQL.
A Relational Database Management System (RDBMS) uses Data Manipulation Language (DML) and Data Definition Language (DDL) queries to interact with the data stored in the database. The specific syntax of the queries will vary depending on the database system being used.
DML queries are used to retrieve, insert, update, and delete data in the database. The most used DML queries are:
- SELECT: Retrieves data from one or more tables in the database.
- INSERT: Adds a new row of data to a table in the database.
- UPDATE: Modifies existing data in a table in the database.
- DELETE: Deletes data from a table in the database.
DDL queries are used to create, modify, and delete database structures, such as tables, indexes, and constraints. The most used DDL queries are:
- CREATE: Creates a new database object, such as a table or index.
- ALTER: Modifies the structure of an existing database object.
- DROP: Deletes a database object.
For example, the following is a DDL query to create a table named customers:
CREATE TABLE customers (

  id INT PRIMARY KEY AUTO_INCREMENT,

  name VARCHAR(255),

  email VARCHAR(255),

  address VARCHAR(255)

);
And the following is a DML query to insert a new customer into the customers table:
INSERT INTO customers (name, email, address)

VALUES ('John Doe', 'johndoe@example.com', '123 Main St');
In the next article we will be talking about the origin of data access in net framework a.k.a ADO.NET
See you then )))
We are excited to announce that we are currently in the process of writing a comprehensive book about DevExpress XPO. As we work on this project, we believe it is essential to involve our readers and gather their valuable feedback. Therefore, we have decided to share articles from the book as we complete them, giving you an opportunity to provide input and suggestions that we can consider for inclusion in the final release. Keep in mind that the content presented is subject to change. We greatly appreciate your participation in this collaborative effort.

by Joche Ojeda | May 17, 2023 | AlchemyDotNet, C#
Alright, it’s time to start writing some code, but first, let’s decide how this project will be organized.
So far, the repository structure that I’ve found most appealing is the one I used for the SyncFramework (https://github.com/egarim/SyncFramework). Here is a representation with bullet points:
- Repo Folder: This is the parent folder that will contain all the code from our project. o Git Files: These are Ignore and attributes files.
- Clean.bat: This is a batch file that deletes all child BIN and OBJ folders to ensure our repository does not contain binary files (sometimes the ‘clean’ command from Visual Studio does not clear the outputs completely).
- CHANGES.MD: This is a Github markdown file that contains the history of changes in the code.
- README.MD: This is the landing page of the current repository where we can write some basic instructions and other important information about the project.
- src (folder): This is where the actual code resides.
Before I conclude this post, I want to discuss versioning. The main idea here is this: the project AlchemyDotNet.Core will start at version 1.0.0, and the version will change when there is a fix or an update to the core specification. We will only move to a new version like 2.0.0 when the specification introduces breaking changes. This means that we will be on version 1 for a very long time.
Link to the repo
https://github.com/egarim/Alchemy.Net
Previous posts
Alchemy Framework: 1 – Creating a framework for import data

by Joche Ojeda | May 15, 2023 | Uncategorized
Last Friday, I received a message from a dear friend and colleague, Pedro Hernandez. He asked me if I had the latest compiled version of the XPO import framework we created in our office. As it turned out, I did not have it readily available and had to search extensively for it.
While conducting this search across my computers, repositories, and virtual machines, I was inspired to create another import framework — yes, another piece of code to maintain.
Most of the time, my research projects begin in the same manner, typically after a conversation with my close friend Jose Javier Columbie. As always, he would say something like this: “Jose, do you think this can be possible? Why don’t you give it a try? If we succeed, that will be el batazo (like hitting a home run).”
In this specific case, that conversation didn’t happen. However, I could hear his words echoing in my mind.
Furthermore, I want this project to be community-driven, not just a technical experiment I have to maintain alone. I truly believe in the power of a community.
First Step
So, let’s begin. I’ll start with my favorite part: naming the project. I spent all weekend pondering this, attempting to condense the concept and associate it with a literary term or a Latin word (these are my preferred methods for naming a project).
Let’s define what the ultimate goal is. In an import process, the aim is to take information from a source ‘A’, translate or transform the information, and then store it in a target ‘B’.
Growing up, I was an avid reader – and I mean, I read a lot. (Now, I’ve switched to audiobooks.) Therefore, after defining what this project is about, naming it became incredibly easy.
noun
noun: alchemy
- the medieval forerunner of chemistry, concerned with the transmutation of matter, in particular with attempts to convert base metals into gold or find a universal elixir.
“occult sciences, such as alchemy and astrology”
Origin
late Middle English: via Old French and medieval Latin from Arabic al-kīmiyā’, from al ‘the’ + kīmiyā’ (from Greek khēmia, khēmeia ‘art of transmuting metals’).
The alchemy Framework
Alchemy is a framework created for DotNet, designed to import data from a data source to a data target. These sources and targets can be anything from a text file, CSV file, a database, ORMs, and so on.
The framework consists of a set of contracts, interfaces, and base classes. When implemented, these allow you to import and transform data between various sources and targets.
The requirement in a few words
As stated in the framework’s description, the requirement is only to define the contracts that represent the sources and targets, as well as a job configuration that describes how the information flows from one source to a target. The concrete implementations are not important at this point and should be discussed individually for each case.
The design patterns.
For this project, we will use the SOLID design principles and dependency injection. This will enable us to easily replace small functionalities, allowing us to mix and match different implementations depending on the data source and data target.
by Joche Ojeda | May 5, 2023 | Application Framework, XAF, XPO, XPO Database Replication
I will explain what XAF is just for the sake of the consistency of this article, XAF is a low code application framework for line of business applications that runs on NET framework (windows forms and web forms) and in dotnet (windows forms, Blazor and Web API)
XAF is laser focus on productivity, DevExpress team has created several modules that encapsulate design patterns and common tasks needed on L.O.B apps.
The starting point in XAF is to provide a domain model using an ORMs like XPO or Entity framework and then XAF will create an application for you using the target platform of choice.
It’s a common misunderstanding that you need to use and ORM in order to provide a domain model to XAF
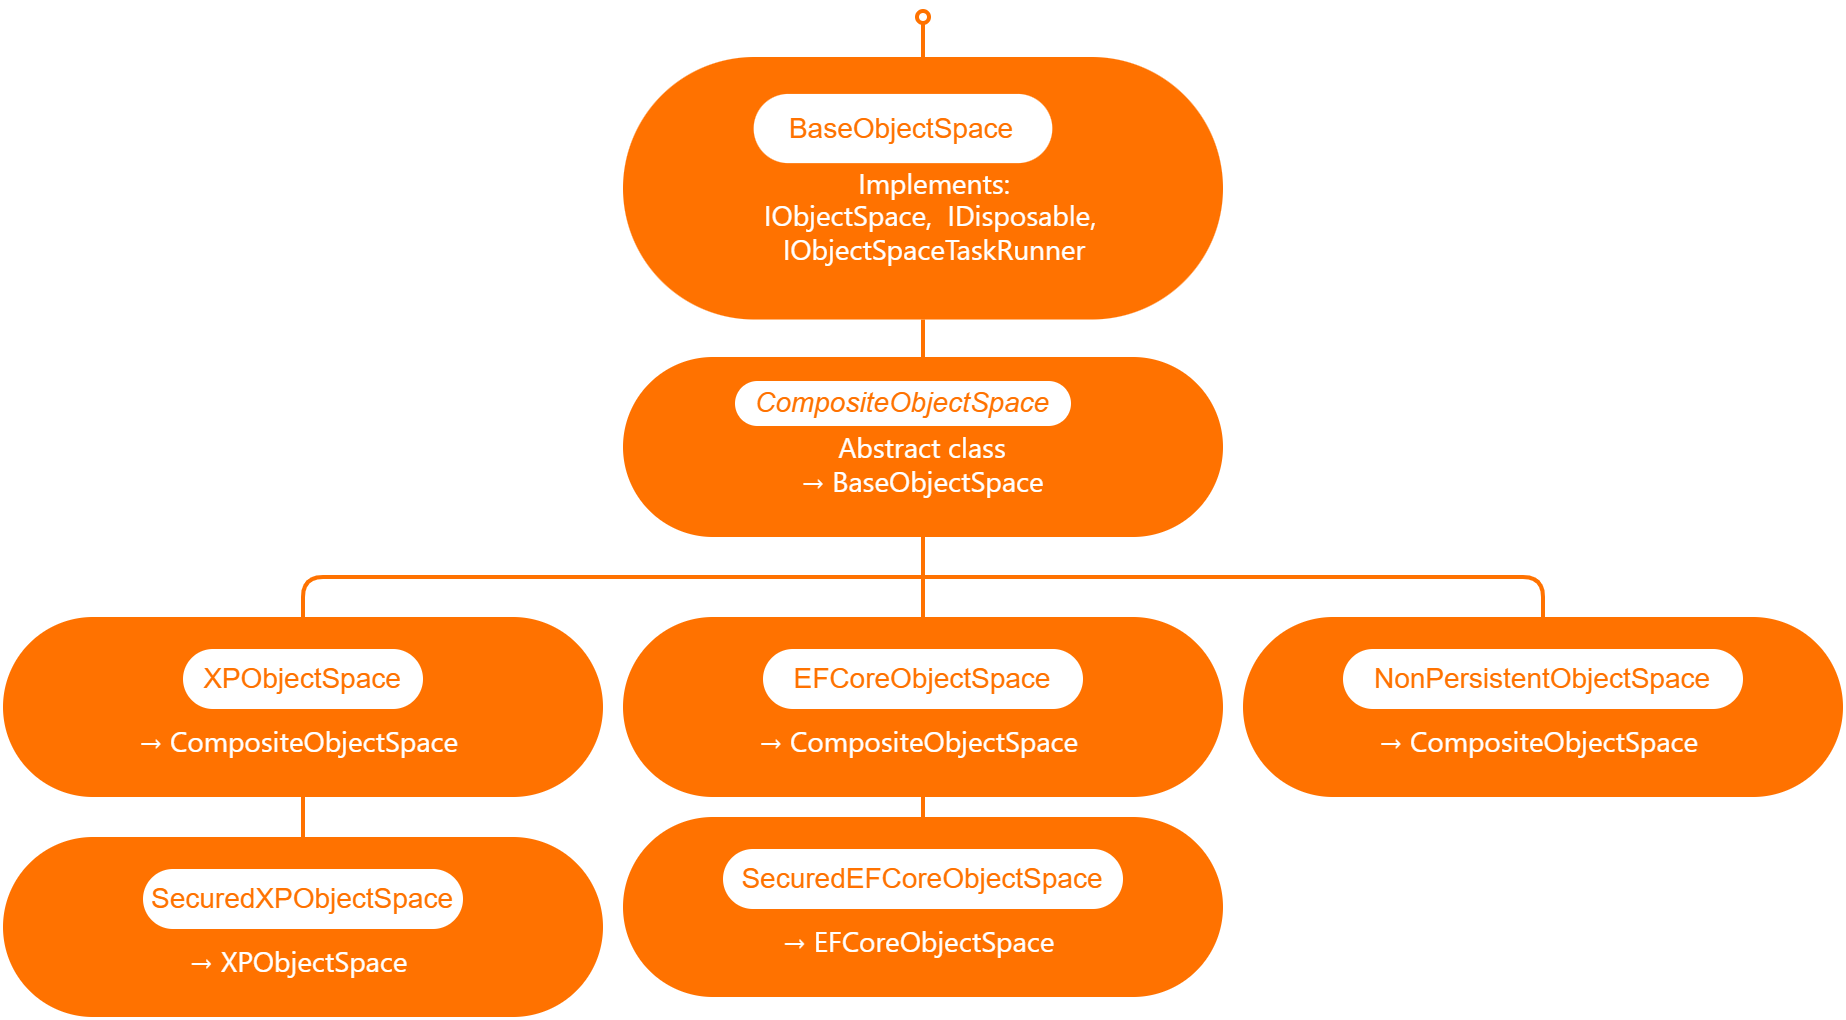
DevExpress team has created ObjectSpace abstraction so XAF can be extended to use different data access technologies ( you can read more about it here https://docs.devexpress.com/eXpressAppFramework/DevExpress.ExpressApp.BaseObjectSpace)
Out of the box XAF provide 3 branches of object spaces as show is the graph below.
XPObjectSpace: this is the object space that allows you to use XPO as a data access technology.
EfCoreObjectSpace: this is the object space that allows you to use Microsoft Entity Framework as a data access technology.
NonPersistenObjectSpace: this object space is interesting as it provides the domain model needed for XAF to generate the views and interact with the data is not attached to an ORM technology so it’s up to us to provide the data, also this type of object space can be used in combination with XPObjectSpace and EfCoreObjectSpace
When querying external data sources, you also need to solve the problem of filtering and sorting data in order to provide a full solution, for that reason DevExpress team provide us with the DynamicCollection class, that is a proxy collection that allows you to filter and sort an original collection without changing it.
Now that we know the parts involved in presenting data in a XAF application, we can define the required flow.
    [DefaultClassOptions]
    [DefaultProperty(nameof(Article.Title))]
    [DevExpress.ExpressApp.ConditionalAppearance.Appearance("", Enabled = false, TargetItems = "*")]
    [DevExpress.ExpressApp.DC.DomainComponent]
    public class Article : NonPersistentObjectBase {
        internal Article() { }
    public override void Setup(XafApplication application) {
        base.Setup(application);
        // Manage various aspects of the application UI and behavior at the module level.
        application.SetupComplete += Application_SetupComplete;
    }
- Wire the application object space created event.
private void Application_SetupComplete(object sender, EventArgs e) {
    Application.ObjectSpaceCreated += Application_ObjectSpaceCreated;
}
private void Application_ObjectSpaceCreated(object sender, ObjectSpaceCreatedEventArgs e) {
    var npos = e.ObjectSpace as NonPersistentObjectSpace;
    if (npos != null) {
        new ArticleAdapter(npos);
        new ContactAdapter(npos);
    }
}
public ArticleAdapter(NonPersistentObjectSpace npos) {
     this.objectSpace = npos;
     objectSpace.ObjectsGetting += ObjectSpace_ObjectsGetting;
 }
private void ObjectSpace_ObjectsGetting(object sender, ObjectsGettingEventArgs e) {
     if(e.ObjectType == typeof(Article)) {
         var collection = new DynamicCollection(objectSpace, e.ObjectType, e.Criteria, e.Sorting, e.InTransaction);
         collection.FetchObjects += DynamicCollection_FetchObjects;
         e.Objects = collection;
     }
 }
 private void DynamicCollection_FetchObjects(object sender, FetchObjectsEventArgs e) {
     if(e.ObjectType == typeof(Article)) {
         e.Objects = articles;
         e.ShapeData = true;
     }
 }
Full source code here
In conclusion the ObjectSpace abstraction ensures that different data access technologies can be employed, while the DynamicCollection class allows for seamless filtering and sorting of data from external sources. By following the outlined steps, developers can create robust, adaptable, and efficient applications with XAF, ultimately saving time and effort while maximizing application performance.

by Joche Ojeda | Mar 29, 2023 | C#, Linux, netcore, Oqtane, Postgres, Ubuntu
A stack in software development refers to a collection of technologies, tools, and frameworks that are used together to build and run a complete application or solution. A typical stack consists of components that handle different aspects of the software development process, including frontend, backend, databases, and sometimes even the hosting environment.
A stack is often categorized into different layers based on the functionality they provide:
- Frontend: This layer is responsible for the user interface (UI) and user experience (UX) of an application. It consists of client-side technologies like HTML, CSS, and JavaScript, as well as libraries or frameworks such as React, Angular, or Vue.js.
- Backend: This layer handles the server-side logic, processing user requests, and managing interactions with databases and other services. Backend technologies can include programming languages like Python, Ruby, Java, or PHP, and frameworks like Django, Ruby on Rails, or Spring.
- Database: This layer is responsible for storing and managing the application’s data. Databases can be relational (e.g., MySQL, PostgreSQL, or Microsoft SQL Server) or NoSQL (e.g., MongoDB, Cassandra, or Redis), depending on the application’s data structure and requirements.
- Hosting Environment: This layer refers to the infrastructure where the application is deployed and run. It can include on-premises servers, cloud-based platforms like Amazon Web Services (AWS), Google Cloud Platform (GCP), or Microsoft Azure, or container orchestration platforms like Kubernetes or Docker Swarm.
Developers often refer to specific combinations of these technologies as named stacks. Some examples include:
- LAMP: Linux (operating system), Apache (web server), MySQL (database), and PHP (backend programming language).
- MEAN: MongoDB (database), Express.js (backend framework), Angular (frontend framework), and Node.js (runtime environment).
- MERN: MongoDB (database), Express.js (backend framework), React (frontend library), and Node.js (runtime environment).
Selecting a stack depends on factors such as project requirements, team expertise, performance, and scalability needs. By using a well-defined stack, developers can streamline the development process, improve collaboration, and ensure that all components work together efficiently.
The P.O.U.N.D. Stack is an innovative software development stack that combines Postgres, Oqtane, Ubuntu, and DotNet to create powerful, modern, and scalable applications. This stack is designed to leverage the strengths of each technology, providing developers with an integrated and efficient environment for building web applications.
- Postgres (P): As the database layer, Postgres offers robust performance, scalability, and support for advanced data types, such as GIS and JSON. Its open-source nature and active community make it a reliable choice for handling the storage and management of application data.
- Oqtane (O): Serving as the frontend framework, Oqtane is built on top of the Blazor technology in .NET, allowing for the creation of modern, responsive, and feature-rich user interfaces. With Oqtane, developers can create modular and extensible applications, while also benefiting from built-in features such as authentication, authorization, and multi-tenancy.
- Ubuntu (U): As the operating system and hosting environment, Ubuntu provides a stable, secure, and easy-to-use platform for deploying and running applications. It is widely supported and offers excellent compatibility with a variety of hardware and cloud platforms, making it an ideal choice for hosting P.O.U.N.D. Stack applications.
- DotNet (D): The backend layer is powered by the .NET framework, which offers a versatile and high-performance environment for server-side development. With support for multiple programming languages (such as C#, F#, and VB.NET), powerful libraries, and a large ecosystem, .NET allows developers to build scalable and efficient backend logic for their applications.
In summary, the P.O.U.N.D. Stack brings together the power of Postgres, Oqtane, Ubuntu, and DotNet to deliver a comprehensive and efficient development stack. By leveraging the unique capabilities of each technology, developers can build modern, scalable, and high-performance web applications that cater to diverse business needs.

by Joche Ojeda | Mar 29, 2023 | Application Framework, Uncategorized, XAF, XPO
based on my experience with numerous application frameworks, I regard XAF as the most efficient in delivering robust solutions quickly and with minimal code. Our company has trained over 100 software firms in utilizing eXpressApp Framework (XAF) and XPO, leading me to believe that the issue typically stems from three factors:
The illusion of productivity
Many software developers perceive themselves as more productive when not using frameworks, as they often associate productivity with the volume of code they produce. This frequently involves reinventing the wheel, and more code does not necessarily bring them closer to their goals.
Grasping the business requirements
This factor is connected to the first, as an unclear or poorly understood business requirement can lead programmers to focus on trivial tasks, such as adding a row to a database, instead of tackling complex business scenarios. As a result, the application framework might be seen as an obstacle by the development team, since it already addresses basic tasks and forces them to confront challenging business problems early on, which they may then attribute to the framework.
Familiarity with both the application framework and the business problem
These two aspects are the primary challenges in Line-of-Business (LOB) software development. The general principle is that one must be equally well-versed in the business problem and the application framework. The worst-case scenario arises when there is limited technical knowledge and high business demands, which, surprisingly, is the most common situation.
In conclusion, the efficiency and effectiveness of application frameworks, such as XAF, in delivering robust solutions with minimal code are often undervalued due to misconceptions and challenges that developers face. Overcoming the illusion of productivity, ensuring a clear understanding of business requirements, and achieving a balance between technical and business expertise are crucial for harnessing the full potential of application frameworks. By addressing these challenges, development teams can unlock the true power of XAF and similar frameworks, streamlining the development process and paving the way for more successful software solutions that cater to complex business needs.

by Joche Ojeda | Mar 27, 2023 | Apache, Linux, Ubuntu, Uncategorized, WebServers
Cloud Storage
Cloud storage is useful for mobile and web apps because it provides an efficient and scalable way to store and retrieve data from anywhere in the world.
With cloud storage, mobile and web apps can easily scale their storage needs up or down depending on usage patterns. This means that developers don’t need to worry about running out of storage space or having to invest in expensive hardware to handle increased storage needs.
Files stored in the cloud can be accessed from anywhere in the world, as long as there is an internet connection. This makes it easy for mobile and web apps to store and retrieve data from different locations and devices.
Cloud services are typically offered as pay-as-you-go pricing model, which means that developers only pay for the storage and resources they actually use. This makes cloud storage an affordable option for mobile and web apps, especially those with limited budgets. also cloud providers typically have robust security measures in place to protect data from unauthorized access and ensure data privacy.
Amazon S3
Amazon S3 (Simple Storage Service) is a cloud-based storage service provided by Amazon Web Services (AWS). It is not an open-source technology, meaning that the source code of the service is not available for modification or redistribution by users. Instead, it is a proprietary technology owned and operated by AWS.
S3 Compatible services
An S3 compatible service is a cloud-based storage service that is designed to be compatible with the Amazon S3 (Simple Storage Service) API. This means that it provides a similar interface and functionality as Amazon S3, allowing users to easily migrate data and applications between the two services.
Some examples of S3 compatible services include:
- Wasabi: A cloud storage service that provides an S3-compatible interface with no egress fees or API request fees.
- DigitalOcean Spaces: A cloud storage service from DigitalOcean that provides an S3-compatible API with a simple pricing model.
- Google Cloud Storage: A cloud storage service from Google Cloud Platform that provides an S3-compatible API along with additional features like object versioning and lifecycle management.
- IBM Cloud Object Storage: A cloud storage service from IBM that provides an S3-compatible API along with features like built-in encryption and multi-region support.
- Contabo: is a cheap alternative with unlimited free transfer to AWS S3 and other vendors. Billing is simple and month-to-month at all-inclusive rate and you can easily migrate from S3
Simple Storage Service gives you a URL for each file by assigning a unique URL to each object stored in the S3 bucket. The URL includes the bucket name, the key (or path) to the object, and the S3 endpoint, which is used to access the object.
For example, if you have an S3 bucket named “my-bucket” and a file named “my-file.jpg” stored in the bucket, the URL to access the file would be:
https://my-bucket.s3.amazonaws.com/my-file.jpg
As you can see the URL includes the domain name of your cloud provider but even when there is nothing technically wrong with it, can bring some disadvantages.
Some common problems on how URLs are created in S3 storage
Here are some of the of disadvantages of not using a custom domain with Amazon S3 storage can cause several problems, including:
- URL appearance: When you access an S3 bucket using the default endpoint, the URL contains the bucket name and the Amazon S3 endpoint. The resulting URL can be long and difficult to remember, which can cause issues with branding and user experience.
- SEO: Using the default S3 endpoint can also negatively impact your search engine optimization (SEO) efforts, as search engines may view the URL as less trustworthy or relevant.
- SSL certificate: If you access an S3 bucket using the default endpoint, the SSL certificate presented to the user will be issued for the Amazon S3 endpoint, rather than your custom domain name. This can cause warnings to appear in the user’s browser, which can negatively impact trust and user experience.
- CORS: If you are using cross-origin resource sharing (CORS) to allow access to your S3 bucket from other domains, the default S3 endpoint may not allow those requests due to security restrictions.
- Maintenance: If you are using the default S3 endpoint, any changes to the S3 bucket or endpoint URLs may require updates to all references to the S3 bucket, which can be time-consuming and error-prone.
Overall, using a custom domain with an S3 storage can provide several benefits, including improved branding, better user experience, and stronger SEO.
There are several ways to provide a solution for the custom domain problem, most of the solutions you will find on the internet are related to cloud providers like Cloud Flare but in this article I want to propose a different approach of showing how this can be fixed using apache web server as a proxy, my goal is not to provide a step by step guide on how to setup a proxy but to provide the conceptual framework to understand how the proxy works
What is Apache
The Apache HTTP Server, commonly referred to as Apache web server, is a free and open-source cross-platform web server software developed and maintained by the Apache Software Foundation. It is one of the most widely used web servers in the world, serving as the backbone for many popular websites and web applications.
Apache web server is designed to be highly configurable and extensible, with a modular architecture that allows users to add or remove functionality as needed. It supports a wide range of features, including dynamic content generation, SSL/TLS encryption, proxying and caching, and authentication and authorization.
Apache web server is also highly portable, running on a wide range of operating systems including Windows, Linux, macOS, and Unix. It can be configured using a variety of tools and languages, including configuration files, command-line utilities, and programming languages such as Perl, PHP, and Python.
Overall, Apache web server is a versatile and powerful web server that provides a stable and reliable platform for serving web content and applications.
What is an Apache proxy
An Apache proxy, also known as an Apache reverse proxy, is a module of the Apache HTTP Server that allows the server to act as an intermediary between clients and other servers.
With an Apache proxy, incoming requests from clients are forwarded to one or more backend servers, which handle the request and return a response. The Apache proxy then forwards the response back to the client.
This can be useful for a variety of reasons, including load balancing, caching, and security. For example, an Apache proxy can be used to distribute incoming traffic across multiple backend servers to improve performance and availability. It can also be used to cache responses from backend servers to reduce the load on those servers and improve response times.
In addition, an Apache proxy can be used to add an extra layer of security to incoming traffic, by acting as a firewall and only allowing traffic from trusted sources.
Setting up an Apache proxy involves configuring the Apache HTTP Server to act as a reverse proxy and directing traffic to one or more backend servers. This can be done using the Apache mod_proxy module, which provides the necessary functionality to act as a reverse proxy.
Apache proxy flow
                  +-------------------+      +-------------+
+----------+      | Apache Web Server |      |Amazon S3     |
|          |      |   (Virtual Host)  |      |             |
|  Client  +----> |   example.com     +----> |  bucket-name|
|          |      |   (HTTPS)         |      |             |
+----------+      +-------------------+      +-------------+
Apache proxy configuration
#this is the configuration of the virtual hosting
SuexecUserGroup "#1010" "#1010"
ServerName files.jocheojeda.com
DocumentRoot /home/files/public_html
ErrorLog /var/log/virtualmin/files.jocheojeda.com_error_log
CustomLog /var/log/virtualmin/files.jocheojeda.com_access_log combined
ScriptAlias /cgi-bin/ /home/files/cgi-bin/
ScriptAlias /awstats/ /home/files/cgi-bin/
DirectoryIndex index.php index.php4 index.php5 index.htm index.html
<Directory /home/files/public_html>
    Options -Indexes +IncludesNOEXEC +SymLinksIfOwnerMatch +ExecCGI
    Require all granted
    AllowOverride All Options=ExecCGI,Includes,IncludesNOEXEC,Indexes,MultiViews,SymLinksIfOwnerMatch
    AddType application/x-httpd-php .php
    AddHandler fcgid-script .php
    AddHandler fcgid-script .php7.4
    FCGIWrapper /home/files/fcgi-bin/php7.4.fcgi .php
    FCGIWrapper /home/files/fcgi-bin/php7.4.fcgi .php7.4
</Directory>
<Directory /home/files/cgi-bin>
    Require all granted
    AllowOverride All Options=ExecCGI,Includes,IncludesNOEXEC,Indexes,MultiViews,SymLinksIfOwnerMatch
</Directory>
ProxyPass /.well-known !
RewriteEngine on
RemoveHandler .php
RemoveHandler .php7.4
FcgidMaxRequestLen 1073741824
<Files awstats.pl>
    AuthName "files.jocheojeda.com statistics"
    AuthType Basic
    AuthUserFile /home/files/.awstats-htpasswd
    require valid-user
</Files>
#these 2 likes are the one who forward the traffic from the custom domain files.jocheojeda.com to the contabo storage
ProxyPass / https://usc1.contabostorage.com/ade25b1c43c1457b87f0716a629d0ff8:files.jocheojeda/
ProxyPassReverse / https://usc1.contabostorage.com/ade25b1c43c1457b87f0716a629d0ff8:files.jocheojeda/
SSLProxyEngine on
Where the magic happens
You only need 2 lines in the configuration when you already have an apache virtual hosting already running to proxy the request from the client to the S3 storage service
ProxyPass / https://usc1.contabostorage.com/ade25b1c43c1457b87f0716a629d0ff8:files.jocheojeda/
ProxyPassReverse / https://usc1.contabostorage.com/ade25b1c43c1457b87f0716a629d0ff8:files.jocheojeda/ SSLProxyEngine on
Conclusions
As you can see is really easy to fix the problem of custom domains for an S3 storage, specially if you already have an apache webserver with virtual hosting running

by Joche Ojeda | Mar 24, 2023 | Linux, netcore, Oqtane, Ubuntu
In this post we will learn how to publish Oqtane as a Linux service, but before we continue let’s do a recap of what we have learned so far
- How to compile Oqtane for an O.S other than Windows: HTTPs://www.jocheojeda.com/2023/03/20/1-compiling-oqtane-3-4-to-target-ubuntu-linux/
- The process of publish Oqtane installation files :https://www.jocheojeda.com/2023/03/20/2-publishing-oqtane-3-4-to-target-ubuntu-linux/
- How to change the binding URLs for kestrel, so we can run multiple instances of Oqtane :https://www.jocheojeda.com/2023/03/21/3-running-multiple-instances-of-oqtane-for-virtual-hosting-environments-in-apache-webserver/
At this moment, you might be asking yourself why should we run oqtane as a service? well this can be really long to answer but I’ll try to make it as short as possible.
The first thing that we need to understand is the difference between IIS (Internet Information Services for windows) and Apache or NGINX
In an IIS web service, the activation process refers to the series of steps that occur when a client request is received by the web server, and the corresponding web service code is executed to process the request and generate a response. The activation process in IIS typically involves the following steps:
- Client request: A client, such as a web browser or another application, sends an HTTP request to the IIS web server, targeting a specific web service endpoint (e.g., a URL).
- Routing: The IIS server routes the request to the appropriate web service application based on the requested URL and other configuration settings.
- Application pool: The request is handled by an application pool, which is a group of worker processes (w3wp.exe) that manage the execution of one or more web applications. Application pools provide isolation and resource management for web applications, helping to improve the overall performance and stability of the IIS server.
- Worker process: A worker process within the application pool receives the request and begins processing it. If there is no available worker process, the application pool may create a new one, or queue the request until a worker process is available.
- HTTP pipeline: The worker process processes the request through the IIS HTTP pipeline, which is a series of events and modules that handle various aspects of the request, such as authentication, caching, and logging.
- Handler mapping: Based on the request’s file extension or URL pattern, IIS maps the request to a specific handler, which is a component responsible for processing the request and generating a response. In the case of a web service, this handler is typically an ASP.NET handler or another custom handler.
- Service activation: The handler activates the web service, instantiating the required objects and executing the service’s code to process the client request. This may involve parsing input data, performing calculations, accessing databases, or interacting with other services.
- Response generation: The web service generates an appropriate response, such as an XML or JSON document, and returns it to the handler.
- HTTP pipeline (response): The response travels back through the HTTP pipeline, where additional processing, such as caching or compression, may occur.
- Client response: The IIS server sends the generated response back to the client, completing the activation process.
The activation process in IIS is designed to provide a robust and efficient way to handle client requests, offering features like application isolation, resource management, and extensibility through custom handlers and modules.
+-------------+       +-------------+       +-----------------+       +-------------+       +------------------+
|             |       |             |       |                 |       |             |       |                  |
|  Client     +------->    IIS      +-------> Application Pool +-------> Worker     +------->  Web Service     |
|(Web browser,|       |  Web Server |       |                 |       |  Process    |       |                  |
|  app, etc.) |       |             |       | (w3wp.exe)      |       |             |       |                  |
+------+------+       +-------+------+       +--------+--------+       +------+------+       +------+-----------+
       ^                      |                       |                         |                       |
       |                      |                       |                         |                       |
       |                      v                       v                         v                       v
       |               +-------+------+       +--------+--------+       +------+------+       +------+-----------+
       |               |             |       |                 |       |             |       |                  |
       +---------------+   HTTP      |       |  Handler        |       |  HTTP       |       |  Response        |
                       |  Pipeline   |       |  Mapping        |       |  Pipeline   |       | (XML, JSON, etc.)|
                       | (Request)   |       |                 |       |  (Response) |       |                  |
                       |             |       |                 |       |             |       |                  |
                       +-------------+       +-----------------+       +-------------+       +------------------+
Now, let’s discuss the Apache web server. Unlike IIS, Apache does not have an activation process specifically designed for .NET applications. This implies that the server is unable to initiate a new process to handle incoming requests or restart the process in the event of a crash.
According to Microsoft documentation, hosting an ASP.NET Core application on servers other than IIS involves using a reverse proxy server. In this setup, the ASP.NET Core app runs on the built-in web server, Kestrel, which is only accessible via localhost. An external web server, such as Apache or NGINX, acts as a reverse proxy, forwarding requests between the client and the ASP.NET Core app seamlessly.
+-----------+     +-----------+     +-----------+     +---------------------+
|           |     |           |     |           |     |                     |
|  Client   +----->  Reverse  +----->  Kestrel  +----->  ASP.NET Core       |
| (Browser, |     |  Proxy    |     | (Built-in |     |  Application        |
|   App)    |     | (Apache,  |     |  Server)  |     |                     |
|           |     |  NGINX)   |     |           |     |                     |
+-----+-----+     +-----+-----+     +-----+-----+     +---------------------+
      ^                 ^                 ^                 ^
      |                 |                 |                 |
      +-----------------+-----------------+-----------------+
- The client (browser, app, etc.) sends a request to the reverse proxy server (Apache, NGINX, etc.).
- The reverse proxy server forwards the request to the Kestrel server, which is the built-in web server for the ASP.NET Core application.
- The Kestrel server processes the request and passes it to the ASP.NET Core application.
- The ASP.NET Core application processes the request and generates a response.
- The response is sent back to the Kestrel server.
- The Kestrel server forwards the response to the reverse proxy server.
- The reverse proxy server sends the response back to the client.
As demonstrated, handling requests and maintaining the application’s availability are two distinct processes in non-IIS servers, such as our scenario with an Ubuntu 22.04 server and Apache. Consequently, we must explore strategies for keeping our application process continuously running on an Ubuntu server.
On Microsoft official documentation on how to publish AspNetCore Apps in Linux, there is a section called “Monitoring the app” which describe how to create a Linux service that is able to restart automatically if the application crashes. Here is the link to the official documentation https://learn.microsoft.com/en-us/aspnet/core/host-and-deploy/linux-apache?view=aspnetcore-7.0#monitor-the-app
In Ubuntu Linux, services (also known as daemons) are background processes that run continuously and perform specific tasks, such as listening for incoming connections, managing system resources, or running scheduled tasks. They are designed to start automatically during system boot, run in the background, and stop during system shutdown.
Ubuntu uses the systemd system and service manager as its default init system, which is responsible for bootstrapping the user space and managing system services. Here’s how services work in Ubuntu Linux using systemd:
- Service unit files: Each service has a corresponding unit file with a
.service extension, typically located in /lib/systemd/system/ or /etc/systemd/system/. These files contain the configuration and instructions for starting, stopping, and managing the service.
- Service management: You can manage services using the
systemctl command. Some common tasks include starting, stopping, enabling, disabling, and checking the status of services. For example:
- Start a service:
sudo systemctl start service-name
- Stop a service:
sudo systemctl stop service-name
- Enable a service to start at boot:
sudo systemctl enable service-name
- Disable a service from starting at boot:
sudo systemctl disable service-name
- Check the status of a service:
systemctl status service-name
- Logging:
systemd services use the journalctl command for logging, which allows you to view and manage logs for services and the entire system. You can access logs for a specific service by running journalctl -u service-name.
- Custom services: You can create custom services by writing your own service unit files and placing them in the
/etc/systemd/system/ directory. This is useful when you want to run your own applications or scripts as services.
To maintain the availability of an application process on an Ubuntu server, you can create a custom service using systemd. This will enable the application to start automatically during system boot, restart if it crashes, and be managed using standard systemctl commands.
Most linux users will the create the unit (service file) using a command line text editor, this can be a bit challenging for a DotNet programmer since we are used to user interfaces. In our company (Xari) we often deploy AspNetCore applications to linux servers, we do it so often that I had to create a tool to generate the unit files, the tool is publicly available at https://linux4dotnet.jocheojeda.com/
Using the tool you just need to fill the gaps and it will generate the text of each file that you need to use, so here are the files that I generated for my test of running oqtane in an ubuntu server
InstalService.sh
sudo apt-get update -y
sudo apt-get install -y libgdiplus
chmod +x /home/oqtane/Oqtane.Framework.3.4.0.Install/Oqtane.Server
chmod +x /home/oqtane/Oqtane.Framework.3.4.0.Install/UninstallService.sh
chmod +x /home/oqtane/Oqtane.Framework.3.4.0.Install/Start.sh
chmod +x /home/oqtane/Oqtane.Framework.3.4.0.Install/Stop.sh
chmod +x /home/oqtane/Oqtane.Framework.3.4.0.Install/Status.sh
sudo yes | cp /home/oqtane/Oqtane.Framework.3.4.0.Install/Oqtane.Server.service /etc/systemd/system/
sudo systemctl enable Oqtane.Server.service
sudo systemctl start Oqtane.Server.service
sudo systemctl status Oqtane.Server.service
Oqtane.Server.Service
[Unit]
Description=Oqtane.Server

[Service]
WorkingDirectory=/home/oqtane/Oqtane.Framework.3.4.0.Install
ExecStart=/home/oqtane/Oqtane.Framework.3.4.0.Install/Oqtane.Server
Restart=always
#Restart service after 10 seconds if the dotnet service crashes
RestartSec=10
KillSignal=SIGINT
SyslogIdentifier=Oqtane.Server
User=oqtane
Environment=ASPNETCORE_ENVIRONMENT=Production

[Install]
WantedBy=user. Target
Start.sh
sudo systemctl start Oqtane.Server.service
Stop.sh
sudo systemctl stop Oqtane.Server.service
Status.sh
sudo systemctl status OqtaneServer.service
Uninstall.sh
sudo systemctl stop Oqtane.Server.service
sudo systemctl disable Oqtane.Server.service
sudo rm /etc/systemd/system/Oqtane.Server.service
ps -ef | grep Oqtane.Server | grep -v grep | awk '{print }' | xargs kill
And last but not least the install instructions ))
These are the commands you need to run to install the app as a linux service
1) Go to the app directory
cd /home/oqtane/Oqtane.Framework.3.4.0.Install
2) First change the permissions of the InstallService.sh
chmod +x InstallService.sh
3) Run the installation file
./InstallService.sh


If you are using virtualmin(appache) and you want to for https redirection, here are the instructions
Virtualmin --> Services --> Configure Website(the one on port 80) --> Edit Directives
Under 'RewriteEngine On' add the next line
RewriteRule ^/(.*) https://%{HTTP_HOST}/$1 [R]
Restart Apache
Now we only need to copy the generated files to the Oqtane folder and run “InstallService.sh” and “voila” your oqtane app is a linux service now, you can check the results here https://oqtane.jocheojeda.com/
by Joche Ojeda | Mar 21, 2023 | Linux, netcore, Oqtane, Ubuntu, Uncategorized
Virtual hosting is a technique used by Apache (and other web servers) to host multiple websites on a single server. With virtual hosting, a single physical server can host multiple virtual servers, each with its own domain name, IP address, and content.
Virtual hosting can be implemented in two ways:
- Name-based virtual hosting: In this approach, the server uses the domain name provided in the HTTP request to determine which virtual host should serve the request. For example, if a user requests a page from “example.com”, the server will use the virtual host configured for that domain and serve the appropriate content.
- IP-based virtual hosting: In this approach, each virtual host is assigned a separate IP address, and the server uses the IP address in the HTTP request to determine which virtual host should serve the request. For example, if a user requests a page from the IP address assigned to “example.com”, the server will use the virtual host configured for that IP address and serve the appropriate content.
Virtual hosting allows a server to serve multiple websites, each with its own domain name and content, using a single physical server. This makes hosting more efficient and cost-effective, especially for smaller websites that don’t require dedicated servers.
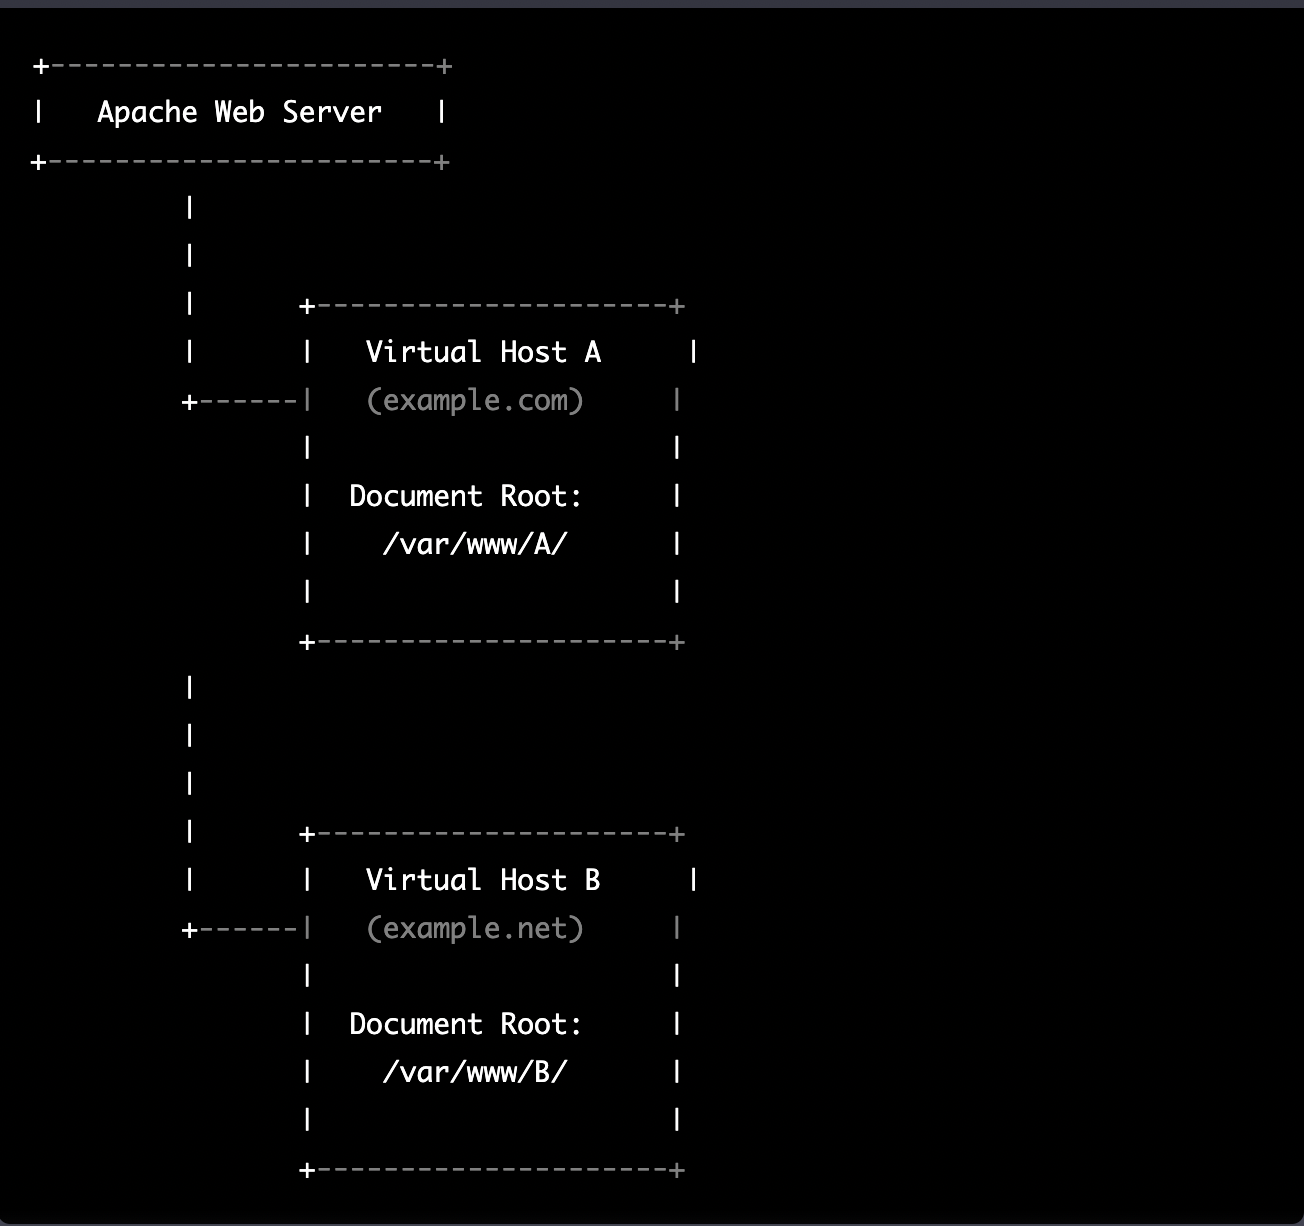
The following diagram represents the most common virtual hosting setup
+-----------------------+
|   Apache Web Server   |
+-----------------------+
         |
         |
         |      +---------------------+
         |      |   Virtual Host A     |
         +------|   (example.com)     |
                |                     |
                |  Document Root:     |
                |    /var/www/A/      |
                |                     |
                +---------------------+
         |
         |
         |
         |      +---------------------+
         |      |   Virtual Host B     |
         +------|   (example.net)     |
                |                     |
                |  Document Root:     |
                |    /var/www/B/      |
                |                     |
                +---------------------+
ASP.NET Core and Blazor applications have the capability to run their own in-process web server, Kestrel. Kestrel can be bound to a specific IP address or port number, enabling the applications to be hosted in virtual environments. To accomplish this, each application can be bound to a unique port number.
+-----------------------+
|   Apache Web Server   |
+-----------------------+
         |
         |
         |      +---------------------+
         |      |   Virtual Host A    |
         +------|   (example.com)     |
                |                     |
                |  Proxy to:          |
                |http://localhost:8016|
                |                     |
                +---------------------+
         |
         |
         |      +---------------------+
         |      |   Virtual Host B    |
         +------|   (example.net)     |
                |                     |
                |  Proxy to:          |
                |http://localhost:8017|
                |                     |
                +---------------------+
As shown in the diagram, physical folders for the document root are no longer utilized. Rather, a proxy is created to the Kestrel web server, which runs our ASP.NET Core applications
To bind our ASP.NET Core applications to a specific IP address or port number, there are multiple methods available. Detailed documentation on this subject can be found at the following link: https://learn.microsoft.com/en-us/aspnet/core/fundamentals/servers/kestrel/endpoints?view=aspnetcore-7.0#configureiconfiguration
There are various approaches that can be used based on the specific use case. For the sake of simplicity in this example, we will be utilizing the configuration method. This involves appending the configuration JSON for the Kestrel web server, as shown in the following example.
{
  "Kestrel": {
    "Endpoints": {
      "Http": {
        "Url": "http://localhost:8016"
      }
    }
  }
}
So here is how our configuration files should look like
Example.com (Host A)
{
  "Runtime": "Server",
  "RenderMode": "ServerPrerendered",
  "Database": {
    "DefaultDBType": "Oqtane.Database.PostgreSQL.PostgreSQLDatabase, Oqtane.Database.PostgreSQL"
  },
  "ConnectionStrings": {
    "DefaultConnection": "Server=127.0.0.1;Port=5432;Database=example.com;User ID=example.com;Password=1234567890;"
  },
  "Kestrel": {
  "Endpoints": {
    "Http": {
      "Url": "http://localhost:8016"
    }
   }
  },
  "Installation": {
    "DefaultAlias": "",
    "HostPassword": "",
    "HostEmail": "",
    "SiteTemplate": "",
    "DefaultTheme": "",
    "DefaultContainer": ""
  },
  "Localization": {
    "DefaultCulture": "en"
  },
  "AvailableDatabases": [
    {
      "Name": "LocalDB",
      "ControlType": "Oqtane.Installer.Controls.LocalDBConfig, Oqtane.Client",
      "DBType": "Oqtane.Database.SqlServer.SqlServerDatabase, Oqtane.Database.SqlServer"
    },
    {
      "Name": "SQL Server",
      "ControlType": "Oqtane.Installer.Controls.SqlServerConfig, Oqtane.Client",
      "DBType": "Oqtane.Database.SqlServer.SqlServerDatabase, Oqtane.Database.SqlServer"
    },
    {
      "Name": "SQLite",
      "ControlType": "Oqtane.Installer.Controls.SqliteConfig, Oqtane.Client",
      "DBType": "Oqtane.Database.Sqlite.SqliteDatabase, Oqtane.Database.Sqlite"
    },
    {
      "Name": "MySQL",
      "ControlType": "Oqtane.Installer.Controls.MySQLConfig, Oqtane.Client",
      "DBType": "Oqtane.Database.MySQL.MySQLDatabase, Oqtane.Database.MySQL"
    },
    {
      "Name": "PostgreSQL",
      "ControlType": "Oqtane.Installer.Controls.PostgreSQLConfig, Oqtane.Client",
      "DBType": "Oqtane.Database.PostgreSQL.PostgreSQLDatabase, Oqtane.Database.PostgreSQL"
    }
  ],
  "Logging": {
    "FileLogger": {
      "LogLevel": {
        "Default": "Error"
      }
    },
    "LogLevel": {
      "Default": "Information"
    }
  },
  "InstallationId": "f5789fa4-895c-45d7-bc26-03eb166e008a"
}
Example.net (Host B)
{
  "Runtime": "Server",
  "RenderMode": "ServerPrerendered",
  "Database": {
    "DefaultDBType": "Oqtane.Database.PostgreSQL.PostgreSQLDatabase, Oqtane.Database.PostgreSQL"
  },
  "ConnectionStrings": {
    "DefaultConnection": "Server=127.0.0.1;Port=5432;Database=example.net;User ID=example.net;Password=1234567890;"
  },
  {
    "Kestrel": {
    "Endpoints": {
      "Http": {
        "Url": "http://localhost:8017"
      }
     }
    }
  },
  "Installation": {
    "DefaultAlias": "",
    "HostPassword": "",
    "HostEmail": "",
    "SiteTemplate": "",
    "DefaultTheme": "",
    "DefaultContainer": ""
  },
  "Localization": {
    "DefaultCulture": "en"
  },
  "AvailableDatabases": [
    {
      "Name": "LocalDB",
      "ControlType": "Oqtane.Installer.Controls.LocalDBConfig, Oqtane.Client",
      "DBType": "Oqtane.Database.SqlServer.SqlServerDatabase, Oqtane.Database.SqlServer"
    },
    {
      "Name": "SQL Server",
      "ControlType": "Oqtane.Installer.Controls.SqlServerConfig, Oqtane.Client",
      "DBType": "Oqtane.Database.SqlServer.SqlServerDatabase, Oqtane.Database.SqlServer"
    },
    {
      "Name": "SQLite",
      "ControlType": "Oqtane.Installer.Controls.SqliteConfig, Oqtane.Client",
      "DBType": "Oqtane.Database.Sqlite.SqliteDatabase, Oqtane.Database.Sqlite"
    },
    {
      "Name": "MySQL",
      "ControlType": "Oqtane.Installer.Controls.MySQLConfig, Oqtane.Client",
      "DBType": "Oqtane.Database.MySQL.MySQLDatabase, Oqtane.Database.MySQL"
    },
    {
      "Name": "PostgreSQL",
      "ControlType": "Oqtane.Installer.Controls.PostgreSQLConfig, Oqtane.Client",
      "DBType": "Oqtane.Database.PostgreSQL.PostgreSQLDatabase, Oqtane.Database.PostgreSQL"
    }
  ],
  "Logging": {
    "FileLogger": {
      "LogLevel": {
        "Default": "Error"
      }
    },
    "LogLevel": {
      "Default": "Information"
    }
  },
  "InstallationId": "f5789fa4-895c-45d7-bc26-03eb166e008a"
}
As demonstrated, utilizing Oqtane in virtual hosting environments is a straightforward process. There is no need to recompile the source code, as configuring the application for virtual hosting can be easily accomplished through a single configuration section in the appsettings.json file.
by Joche Ojeda | Mar 20, 2023 | netcore, Oqtane, Uncategorized
In the preceding blog post, we explored the process of running Oqtane on Ubuntu Linux and successfully confirmed its functionality. Now, let us delve deeper and proceed to package the installation binaries specifically tailored for Ubuntu Linux deployment.
As a frequent publisher of Blazor applications to Linux servers, I find the process to be quite straightforward. Utilizing the .NET CLI, one can simply execute the following command to publish the app for Linux:
dotnet publish --runtime linux-x64
On this occasion, my customary approach to publishing encountered an obstacle, indicating additional steps were required. Consequently, I submitted an issue to the Oqtane GitHub repository, where Leigh Pointer from the Oqtane community kindly provided guidance in the correct direction. The GitHub issue can be viewed here.
The first file that I changed was
del "*.nupkg"
del "*.zip"
dotnet clean -c Release ..\Oqtane.Databases.sln
dotnet clean -c Release ..\Oqtane.sln
dotnet build -c Release ..\Oqtane.Databases.sln
dotnet build -c Release ..\Oqtane.sln
nuget.exe pack Oqtane.Client.nuspec
nuget.exe pack Oqtane.Server.nuspec
nuget.exe pack Oqtane.Shared.nuspec
nuget.exe pack Oqtane.Framework.nuspec
del /F/Q/S "..\Oqtane.Server\bin\Release\net6.0\publish" > NUL
rmdir /Q/S "..\Oqtane.Server\bin\Release\net6.0\publish"
dotnet publish ..\Oqtane.Server\Oqtane.Server.csproj /p:Configuration=Release
del /F/Q/S "..\Oqtane.Server\bin\Release\net6.0\publish\wwwroot\Content" > NUL
rmdir /Q/S "..\Oqtane.Server\bin\Release\net6.0\publish\wwwroot\Content"
setlocal ENABLEDELAYEDEXPANSION
set retain=Oqtane.Modules.Admin.Login,Oqtane.Modules.HtmlText,Templates
for /D %%i in ("..\Oqtane.Server\bin\Release\net6.0\publish\wwwroot\Modules\*") do (
set /A found=0
for %%j in (%retain%) do (
if "%%~nxi" == "%%j" set /A found=1
)
if not !found! == 1 rmdir /Q/S "%%i"
)
set retain=Oqtane.Themes.BlazorTheme,Oqtane.Themes.OqtaneTheme,Templates
for /D %%i in ("..\Oqtane.Server\bin\Release\net6.0\publish\wwwroot\Themes\*") do (
set /A found=0
for %%j in (%retain%) do (
if "%%~nxi" == "%%j" set /A found=1
)
if not !found! == 1 rmdir /Q/S "%%i"
)
del "..\Oqtane.Server\bin\Release\net6.0\publish\appsettings.json"
ren "..\Oqtane.Server\bin\Release\net6.0\publish\appsettings.release.json" "appsettings.json"
C:\Windows\System32\WindowsPowerShell\v1.0\powershell.exe ".\install.ps1"
del "..\Oqtane.Server\bin\Release\net6.0\publish\appsettings.json"
del "..\Oqtane.Server\bin\Release\net6.0\publish\web.config"
C:\Windows\System32\WindowsPowerShell\v1.0\powershell.exe ".\upgrade.ps1"
dotnet clean -c Release ..\Oqtane.Updater.sln
dotnet build -c Release ..\Oqtane.Updater.sln
dotnet publish ..\Oqtane.Updater\Oqtane.Updater.csproj /p:Configuration=Release
nuget.exe pack Oqtane.Updater.nuspec
pause
and this is my modified version
del "*.nupkg"
del "*.zip"
dotnet clean -c Release ..\Oqtane.Databases.sln
dotnet clean -c Release ..\Oqtane.sln
dotnet build -c Release ..\Oqtane.Databases.sln
dotnet build -c Release ..\Oqtane.sln
nuget.exe pack Oqtane.Client.nuspec
nuget.exe pack Oqtane.Server.nuspec
nuget.exe pack Oqtane.Shared.nuspec
nuget.exe pack Oqtane.Framework.nuspec
del /F/Q/S "..\Oqtane.Server\bin\Release\net6.0\publish" > NUL
rmdir /Q/S "..\Oqtane.Server\bin\Release\net6.0\publish"
dotnet publish ..\Oqtane.Server\Oqtane.Server.csproj /p:Configuration=Release --runtime linux-x64 --self-contained true
del /F/Q/S "..\Oqtane.Server\bin\Release\net6.0\publish\wwwroot\Content" > NUL
rmdir /Q/S "..\Oqtane.Server\bin\Release\net6.0\publish\wwwroot\Content"
setlocal ENABLEDELAYEDEXPANSION
set retain=Oqtane.Modules.Admin.Login,Oqtane.Modules.HtmlText,Templates
for /D %%i in ("..\Oqtane.Server\bin\Release\net6.0\publish\wwwroot\Modules\*") do (
set /A found=0
for %%j in (%retain%) do (
if "%%~nxi" == "%%j" set /A found=1
)
if not !found! == 1 rmdir /Q/S "%%i"
)
set retain=Oqtane.Themes.BlazorTheme,Oqtane.Themes.OqtaneTheme,Templates
for /D %%i in ("..\Oqtane.Server\bin\Release\net6.0\publish\wwwroot\Themes\*") do (
set /A found=0
for %%j in (%retain%) do (
if "%%~nxi" == "%%j" set /A found=1
)
if not !found! == 1 rmdir /Q/S "%%i"
)
del "..\Oqtane.Server\bin\Release\net6.0\publish\appsettings.json"
ren "..\Oqtane.Server\bin\Release\net6.0\publish\appsettings.release.json" "appsettings.json"
C:\Windows\System32\WindowsPowerShell\v1.0\powershell.exe ".\install.ps1"
del "..\Oqtane.Server\bin\Release\net6.0\publish\appsettings.json"
del "..\Oqtane.Server\bin\Release\net6.0\publish\web.config"
C:\Windows\System32\WindowsPowerShell\v1.0\powershell.exe ".\upgrade.ps1"
dotnet clean -c Release ..\Oqtane.Updater.sln
dotnet build -c Release ..\Oqtane.Updater.sln
dotnet publish ..\Oqtane.Updater\Oqtane.Updater.csproj /p:Configuration=Release --runtime linux-x64 --self-contained true
pause
The script is basically the same I just appended the runtime target parameter and the self contained parameter, lie this: “-runtime linux-x64 –self-contained true” in the 2 lines specified below
line 13: dotnet publish ..\Oqtane.Server\Oqtane.Server.csproj /p:Configuration=Release --runtime linux-x64 --self-contained true
line 41: dotnet publish ..\Oqtane.Updater\Oqtane.Updater.csproj /p:Configuration=Release --runtime linux-x64 --self-contained true
After I changed the publishing parameters the path of the published files changed, now they are in a folder that with the same name of the target runtime, that means that I need to update 2 more files “install.ps1” and “upgrade.ps1”
install.ps1
Compress-Archive -Path "..\Oqtane.Server\bin\Release\net6.0\linux-x64\publish\*" -DestinationPath "Oqtane.Framework.3.4.0.Install.zip" -Force
upgrade.ps1
Compress-Archive -Path "..\Oqtane.Server\bin\Release\net6.0\linux-x64\publish\*" -DestinationPath "Oqtane.Framework.3.4.0.Upgrade.zip" -Force
So after those little changes we are ready to compile oqtane to target Linux runtime as a self contained app