4 – Running Oqtane as a Ubuntu Linux service

In this post we will learn how to publish Oqtane as a Linux service, but before we continue let’s do a recap of what we have learned so far
- How to compile Oqtane for an O.S other than Windows: HTTPs://www.jocheojeda.com/2023/03/20/1-compiling-oqtane-3-4-to-target-ubuntu-linux/
- The process of publish Oqtane installation files :https://www.jocheojeda.com/2023/03/20/2-publishing-oqtane-3-4-to-target-ubuntu-linux/
- How to change the binding URLs for kestrel, so we can run multiple instances of Oqtane :https://www.jocheojeda.com/2023/03/21/3-running-multiple-instances-of-oqtane-for-virtual-hosting-environments-in-apache-webserver/
At this moment, you might be asking yourself why should we run oqtane as a service? well this can be really long to answer but I’ll try to make it as short as possible.
The first thing that we need to understand is the difference between IIS (Internet Information Services for windows) and Apache or NGINX
In an IIS web service, the activation process refers to the series of steps that occur when a client request is received by the web server, and the corresponding web service code is executed to process the request and generate a response. The activation process in IIS typically involves the following steps:
- Client request: A client, such as a web browser or another application, sends an HTTP request to the IIS web server, targeting a specific web service endpoint (e.g., a URL).
- Routing: The IIS server routes the request to the appropriate web service application based on the requested URL and other configuration settings.
- Application pool: The request is handled by an application pool, which is a group of worker processes (w3wp.exe) that manage the execution of one or more web applications. Application pools provide isolation and resource management for web applications, helping to improve the overall performance and stability of the IIS server.
- Worker process: A worker process within the application pool receives the request and begins processing it. If there is no available worker process, the application pool may create a new one, or queue the request until a worker process is available.
- HTTP pipeline: The worker process processes the request through the IIS HTTP pipeline, which is a series of events and modules that handle various aspects of the request, such as authentication, caching, and logging.
- Handler mapping: Based on the request’s file extension or URL pattern, IIS maps the request to a specific handler, which is a component responsible for processing the request and generating a response. In the case of a web service, this handler is typically an ASP.NET handler or another custom handler.
- Service activation: The handler activates the web service, instantiating the required objects and executing the service’s code to process the client request. This may involve parsing input data, performing calculations, accessing databases, or interacting with other services.
- Response generation: The web service generates an appropriate response, such as an XML or JSON document, and returns it to the handler.
- HTTP pipeline (response): The response travels back through the HTTP pipeline, where additional processing, such as caching or compression, may occur.
- Client response: The IIS server sends the generated response back to the client, completing the activation process.
The activation process in IIS is designed to provide a robust and efficient way to handle client requests, offering features like application isolation, resource management, and extensibility through custom handlers and modules.
+-------------+       +-------------+       +-----------------+       +-------------+       +------------------+
|             |       |             |       |                 |       |             |       |                  |
|  Client     +------->    IIS      +-------> Application Pool +-------> Worker     +------->  Web Service     |
|(Web browser,|       |  Web Server |       |                 |       |  Process    |       |                  |
|  app, etc.) |       |             |       | (w3wp.exe)      |       |             |       |                  |
+------+------+       +-------+------+       +--------+--------+       +------+------+       +------+-----------+
       ^                      |                       |                         |                       |
       |                      |                       |                         |                       |
       |                      v                       v                         v                       v
       |               +-------+------+       +--------+--------+       +------+------+       +------+-----------+
       |               |             |       |                 |       |             |       |                  |
       +---------------+   HTTP      |       |  Handler        |       |  HTTP       |       |  Response        |
                       |  Pipeline   |       |  Mapping        |       |  Pipeline   |       | (XML, JSON, etc.)|
                       | (Request)   |       |                 |       |  (Response) |       |                  |
                       |             |       |                 |       |             |       |                  |
                       +-------------+       +-----------------+       +-------------+       +------------------+
Now, let’s discuss the Apache web server. Unlike IIS, Apache does not have an activation process specifically designed for .NET applications. This implies that the server is unable to initiate a new process to handle incoming requests or restart the process in the event of a crash.
According to Microsoft documentation, hosting an ASP.NET Core application on servers other than IIS involves using a reverse proxy server. In this setup, the ASP.NET Core app runs on the built-in web server, Kestrel, which is only accessible via localhost. An external web server, such as Apache or NGINX, acts as a reverse proxy, forwarding requests between the client and the ASP.NET Core app seamlessly.
+-----------+     +-----------+     +-----------+     +---------------------+
|           |     |           |     |           |     |                     |
|  Client   +----->  Reverse  +----->  Kestrel  +----->  ASP.NET Core       |
| (Browser, |     |  Proxy    |     | (Built-in |     |  Application        |
|   App)    |     | (Apache,  |     |  Server)  |     |                     |
|           |     |  NGINX)   |     |           |     |                     |
+-----+-----+     +-----+-----+     +-----+-----+     +---------------------+
      ^                 ^                 ^                 ^
      |                 |                 |                 |
      +-----------------+-----------------+-----------------+
- The client (browser, app, etc.) sends a request to the reverse proxy server (Apache, NGINX, etc.).
- The reverse proxy server forwards the request to the Kestrel server, which is the built-in web server for the ASP.NET Core application.
- The Kestrel server processes the request and passes it to the ASP.NET Core application.
- The ASP.NET Core application processes the request and generates a response.
- The response is sent back to the Kestrel server.
- The Kestrel server forwards the response to the reverse proxy server.
- The reverse proxy server sends the response back to the client.
As demonstrated, handling requests and maintaining the application’s availability are two distinct processes in non-IIS servers, such as our scenario with an Ubuntu 22.04 server and Apache. Consequently, we must explore strategies for keeping our application process continuously running on an Ubuntu server.
On Microsoft official documentation on how to publish AspNetCore Apps in Linux, there is a section called “Monitoring the app” which describe how to create a Linux service that is able to restart automatically if the application crashes. Here is the link to the official documentation https://learn.microsoft.com/en-us/aspnet/core/host-and-deploy/linux-apache?view=aspnetcore-7.0#monitor-the-app
In Ubuntu Linux, services (also known as daemons) are background processes that run continuously and perform specific tasks, such as listening for incoming connections, managing system resources, or running scheduled tasks. They are designed to start automatically during system boot, run in the background, and stop during system shutdown.
Ubuntu uses the systemd system and service manager as its default init system, which is responsible for bootstrapping the user space and managing system services. Here’s how services work in Ubuntu Linux using systemd:
- Service unit files: Each service has a corresponding unit file with a
.serviceextension, typically located in/lib/systemd/system/or/etc/systemd/system/. These files contain the configuration and instructions for starting, stopping, and managing the service. - Service management: You can manage services using the
systemctlcommand. Some common tasks include starting, stopping, enabling, disabling, and checking the status of services. For example:- Start a service:
sudo systemctl start service-name - Stop a service:
sudo systemctl stop service-name - Enable a service to start at boot:
sudo systemctl enable service-name - Disable a service from starting at boot:
sudo systemctl disable service-name - Check the status of a service:
systemctl status service-name
- Start a service:
- Logging:
systemdservices use thejournalctlcommand for logging, which allows you to view and manage logs for services and the entire system. You can access logs for a specific service by runningjournalctl -u service-name. - Custom services: You can create custom services by writing your own service unit files and placing them in the
/etc/systemd/system/directory. This is useful when you want to run your own applications or scripts as services.
To maintain the availability of an application process on an Ubuntu server, you can create a custom service using systemd. This will enable the application to start automatically during system boot, restart if it crashes, and be managed using standard systemctl commands.
Most linux users will the create the unit (service file) using a command line text editor, this can be a bit challenging for a DotNet programmer since we are used to user interfaces. In our company (Xari) we often deploy AspNetCore applications to linux servers, we do it so often that I had to create a tool to generate the unit files, the tool is publicly available at https://linux4dotnet.jocheojeda.com/
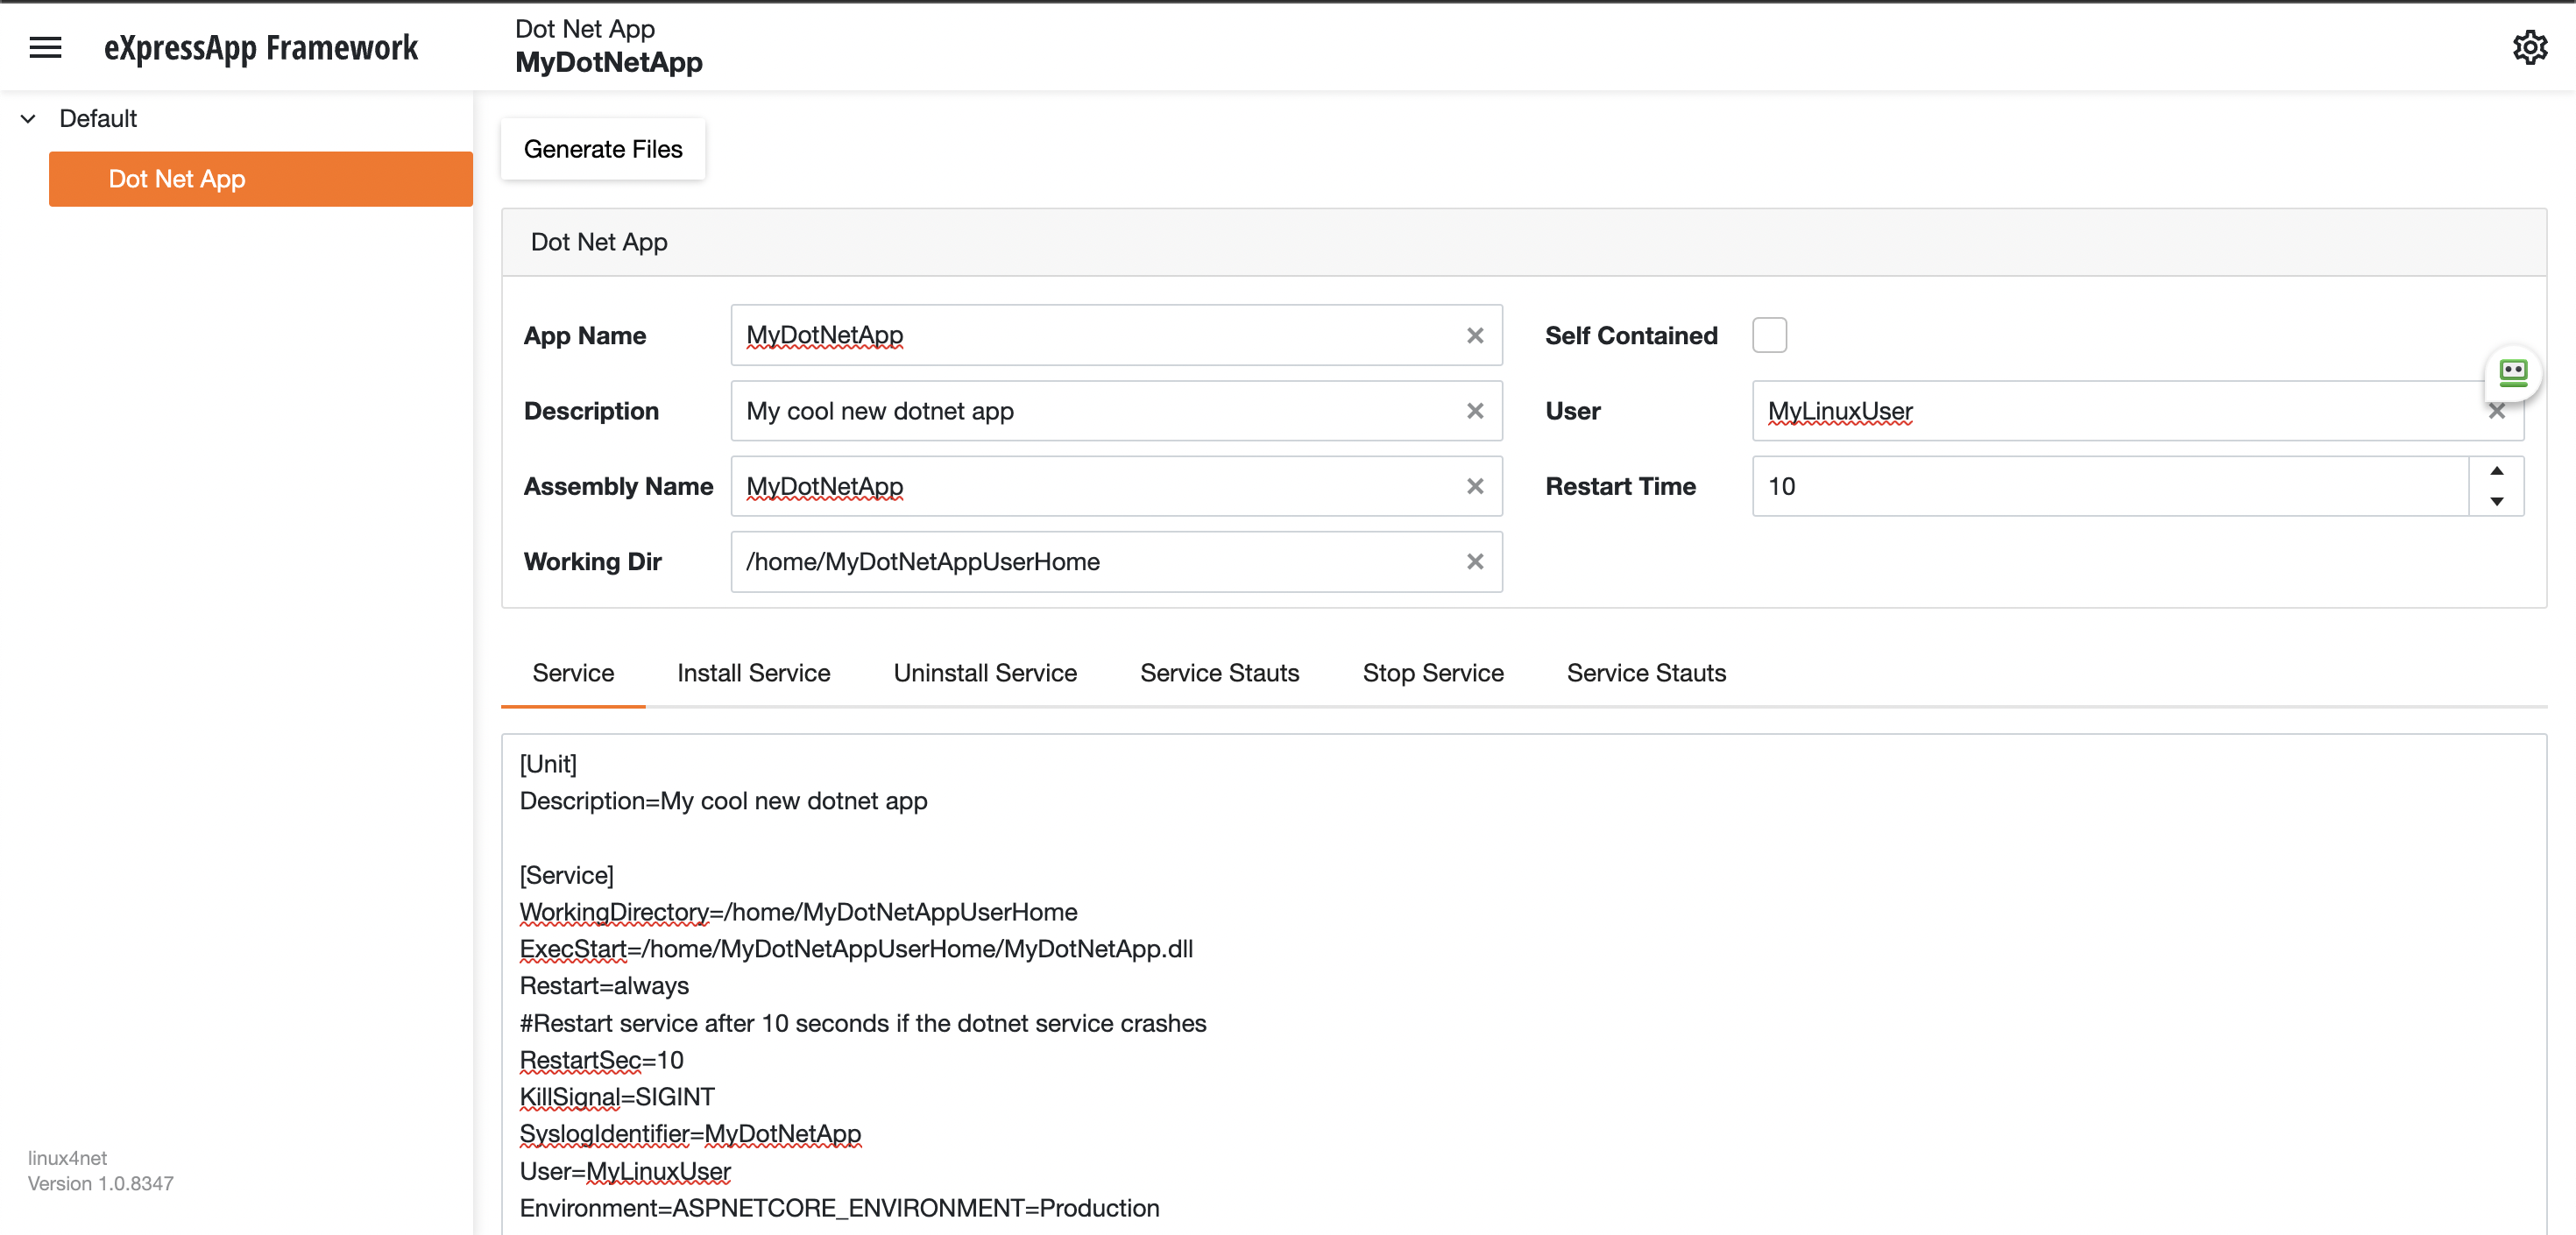
Using the tool you just need to fill the gaps and it will generate the text of each file that you need to use, so here are the files that I generated for my test of running oqtane in an ubuntu server
InstalService.sh
sudo apt-get update -y
sudo apt-get install -y libgdiplus
chmod +x /home/oqtane/Oqtane.Framework.3.4.0.Install/Oqtane.Server
chmod +x /home/oqtane/Oqtane.Framework.3.4.0.Install/UninstallService.sh
chmod +x /home/oqtane/Oqtane.Framework.3.4.0.Install/Start.sh
chmod +x /home/oqtane/Oqtane.Framework.3.4.0.Install/Stop.sh
chmod +x /home/oqtane/Oqtane.Framework.3.4.0.Install/Status.sh
sudo yes | cp /home/oqtane/Oqtane.Framework.3.4.0.Install/Oqtane.Server.service /etc/systemd/system/
sudo systemctl enable Oqtane.Server.service
sudo systemctl start Oqtane.Server.service
sudo systemctl status Oqtane.Server.service
Oqtane.Server.Service
[Unit]
Description=Oqtane.Server

[Service]
WorkingDirectory=/home/oqtane/Oqtane.Framework.3.4.0.Install
ExecStart=/home/oqtane/Oqtane.Framework.3.4.0.Install/Oqtane.Server
Restart=always
#Restart service after 10 seconds if the dotnet service crashes
RestartSec=10
KillSignal=SIGINT
SyslogIdentifier=Oqtane.Server
User=oqtane
Environment=ASPNETCORE_ENVIRONMENT=Production

[Install]
WantedBy=user. Target
Start.sh
sudo systemctl start Oqtane.Server.service
Stop.sh
sudo systemctl stop Oqtane.Server.service
Status.sh
sudo systemctl status OqtaneServer.service
Uninstall.sh
sudo systemctl stop Oqtane.Server.service
sudo systemctl disable Oqtane.Server.service
sudo rm /etc/systemd/system/Oqtane.Server.service
ps -ef | grep Oqtane.Server | grep -v grep | awk '{print }' | xargs kill
And last but not least the install instructions ))
These are the commands you need to run to install the app as a linux service
1) Go to the app directory
cd /home/oqtane/Oqtane.Framework.3.4.0.Install
2) First change the permissions of the InstallService.sh
chmod +x InstallService.sh
3) Run the installation file
./InstallService.sh


If you are using virtualmin(appache) and you want to for https redirection, here are the instructions
Virtualmin --> Services --> Configure Website(the one on port 80) --> Edit Directives
Under 'RewriteEngine On' add the next line
RewriteRule ^/(.*) https://%{HTTP_HOST}/$1 [R]
Restart Apache
Now we only need to copy the generated files to the Oqtane folder and run “InstallService.sh” and “voila” your oqtane app is a linux service now, you can check the results here https://oqtane.jocheojeda.com/