3 – Running multiple instances of oqtane for virtual hosting environments in apache webserver
Virtual hosting is a technique used by Apache (and other web servers) to host multiple websites on a single server. With virtual hosting, a single physical server can host multiple virtual servers, each with its own domain name, IP address, and content.
Virtual hosting can be implemented in two ways:
- Name-based virtual hosting: In this approach, the server uses the domain name provided in the HTTP request to determine which virtual host should serve the request. For example, if a user requests a page from “example.com”, the server will use the virtual host configured for that domain and serve the appropriate content.
- IP-based virtual hosting: In this approach, each virtual host is assigned a separate IP address, and the server uses the IP address in the HTTP request to determine which virtual host should serve the request. For example, if a user requests a page from the IP address assigned to “example.com”, the server will use the virtual host configured for that IP address and serve the appropriate content.
Virtual hosting allows a server to serve multiple websites, each with its own domain name and content, using a single physical server. This makes hosting more efficient and cost-effective, especially for smaller websites that don’t require dedicated servers.
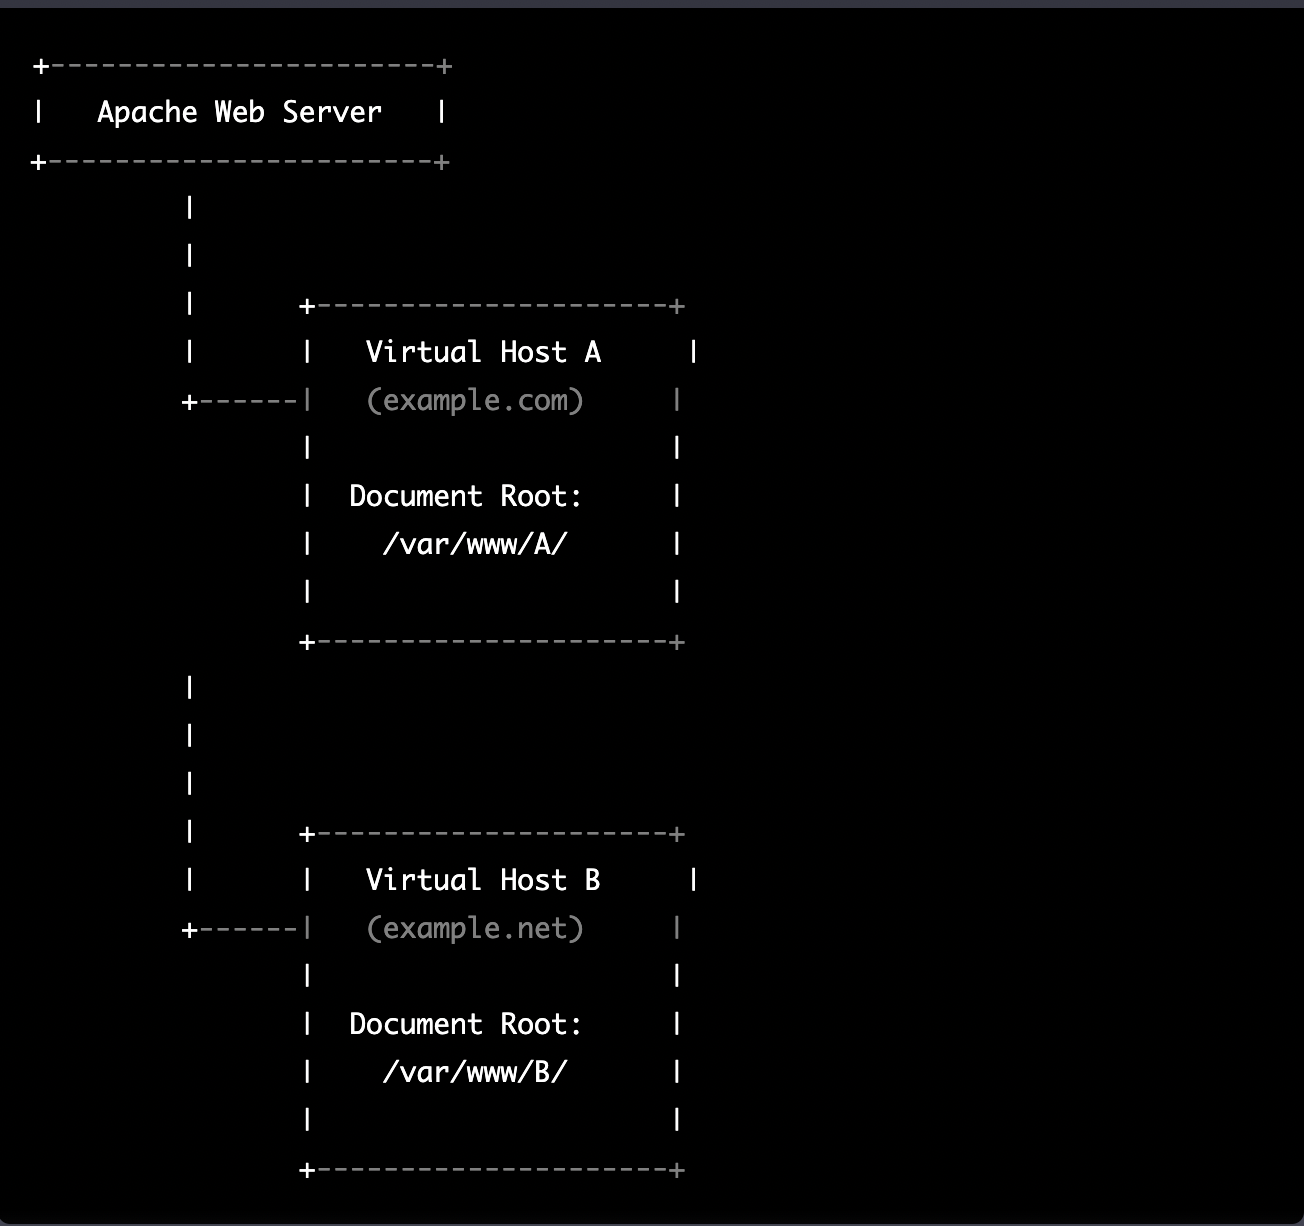
The following diagram represents the most common virtual hosting setup
+-----------------------+
|   Apache Web Server   |
+-----------------------+
         |
         |
         |      +---------------------+
         |      |   Virtual Host A     |
         +------|   (example.com)     |
                |                     |
                |  Document Root:     |
                |    /var/www/A/      |
                |                     |
                +---------------------+
         |
         |
         |
         |      +---------------------+
         |      |   Virtual Host B     |
         +------|   (example.net)     |
                |                     |
                |  Document Root:     |
                |    /var/www/B/      |
                |                     |
                +---------------------+
ASP.NET Core and Blazor applications have the capability to run their own in-process web server, Kestrel. Kestrel can be bound to a specific IP address or port number, enabling the applications to be hosted in virtual environments. To accomplish this, each application can be bound to a unique port number.
+-----------------------+
|   Apache Web Server   |
+-----------------------+
         |
         |
         |      +---------------------+
         |      |   Virtual Host A    |
         +------|   (example.com)     |
                |                     |
                |  Proxy to:          |
                |http://localhost:8016|
                |                     |
                +---------------------+
         |
         |
         |      +---------------------+
         |      |   Virtual Host B    |
         +------|   (example.net)     |
                |                     |
                |  Proxy to:          |
                |http://localhost:8017|
                |                     |
                +---------------------+
As shown in the diagram, physical folders for the document root are no longer utilized. Rather, a proxy is created to the Kestrel web server, which runs our ASP.NET Core applications
To bind our ASP.NET Core applications to a specific IP address or port number, there are multiple methods available. Detailed documentation on this subject can be found at the following link: https://learn.microsoft.com/en-us/aspnet/core/fundamentals/servers/kestrel/endpoints?view=aspnetcore-7.0#configureiconfiguration
There are various approaches that can be used based on the specific use case. For the sake of simplicity in this example, we will be utilizing the configuration method. This involves appending the configuration JSON for the Kestrel web server, as shown in the following example.
{
  "Kestrel": {
    "Endpoints": {
      "Http": {
        "Url": "http://localhost:8016"
      }
    }
  }
}
So here is how our configuration files should look like
Example.com (Host A)
{
  "Runtime": "Server",
  "RenderMode": "ServerPrerendered",
  "Database": {
    "DefaultDBType": "Oqtane.Database.PostgreSQL.PostgreSQLDatabase, Oqtane.Database.PostgreSQL"
  },
  "ConnectionStrings": {
    "DefaultConnection": "Server=127.0.0.1;Port=5432;Database=example.com;User ID=example.com;Password=1234567890;"
  },
  "Kestrel": {
  "Endpoints": {
    "Http": {
      "Url": "http://localhost:8016"
    }
   }
  },
  "Installation": {
    "DefaultAlias": "",
    "HostPassword": "",
    "HostEmail": "",
    "SiteTemplate": "",
    "DefaultTheme": "",
    "DefaultContainer": ""
  },
  "Localization": {
    "DefaultCulture": "en"
  },
  "AvailableDatabases": [
    {
      "Name": "LocalDB",
      "ControlType": "Oqtane.Installer.Controls.LocalDBConfig, Oqtane.Client",
      "DBType": "Oqtane.Database.SqlServer.SqlServerDatabase, Oqtane.Database.SqlServer"
    },
    {
      "Name": "SQL Server",
      "ControlType": "Oqtane.Installer.Controls.SqlServerConfig, Oqtane.Client",
      "DBType": "Oqtane.Database.SqlServer.SqlServerDatabase, Oqtane.Database.SqlServer"
    },
    {
      "Name": "SQLite",
      "ControlType": "Oqtane.Installer.Controls.SqliteConfig, Oqtane.Client",
      "DBType": "Oqtane.Database.Sqlite.SqliteDatabase, Oqtane.Database.Sqlite"
    },
    {
      "Name": "MySQL",
      "ControlType": "Oqtane.Installer.Controls.MySQLConfig, Oqtane.Client",
      "DBType": "Oqtane.Database.MySQL.MySQLDatabase, Oqtane.Database.MySQL"
    },
    {
      "Name": "PostgreSQL",
      "ControlType": "Oqtane.Installer.Controls.PostgreSQLConfig, Oqtane.Client",
      "DBType": "Oqtane.Database.PostgreSQL.PostgreSQLDatabase, Oqtane.Database.PostgreSQL"
    }
  ],
  "Logging": {
    "FileLogger": {
      "LogLevel": {
        "Default": "Error"
      }
    },
    "LogLevel": {
      "Default": "Information"
    }
  },
  "InstallationId": "f5789fa4-895c-45d7-bc26-03eb166e008a"
}
Example.net (Host B)
{
  "Runtime": "Server",
  "RenderMode": "ServerPrerendered",
  "Database": {
    "DefaultDBType": "Oqtane.Database.PostgreSQL.PostgreSQLDatabase, Oqtane.Database.PostgreSQL"
  },
  "ConnectionStrings": {
    "DefaultConnection": "Server=127.0.0.1;Port=5432;Database=example.net;User ID=example.net;Password=1234567890;"
  },
  {
    "Kestrel": {
    "Endpoints": {
      "Http": {
        "Url": "http://localhost:8017"
      }
     }
    }
  },
  "Installation": {
    "DefaultAlias": "",
    "HostPassword": "",
    "HostEmail": "",
    "SiteTemplate": "",
    "DefaultTheme": "",
    "DefaultContainer": ""
  },
  "Localization": {
    "DefaultCulture": "en"
  },
  "AvailableDatabases": [
    {
      "Name": "LocalDB",
      "ControlType": "Oqtane.Installer.Controls.LocalDBConfig, Oqtane.Client",
      "DBType": "Oqtane.Database.SqlServer.SqlServerDatabase, Oqtane.Database.SqlServer"
    },
    {
      "Name": "SQL Server",
      "ControlType": "Oqtane.Installer.Controls.SqlServerConfig, Oqtane.Client",
      "DBType": "Oqtane.Database.SqlServer.SqlServerDatabase, Oqtane.Database.SqlServer"
    },
    {
      "Name": "SQLite",
      "ControlType": "Oqtane.Installer.Controls.SqliteConfig, Oqtane.Client",
      "DBType": "Oqtane.Database.Sqlite.SqliteDatabase, Oqtane.Database.Sqlite"
    },
    {
      "Name": "MySQL",
      "ControlType": "Oqtane.Installer.Controls.MySQLConfig, Oqtane.Client",
      "DBType": "Oqtane.Database.MySQL.MySQLDatabase, Oqtane.Database.MySQL"
    },
    {
      "Name": "PostgreSQL",
      "ControlType": "Oqtane.Installer.Controls.PostgreSQLConfig, Oqtane.Client",
      "DBType": "Oqtane.Database.PostgreSQL.PostgreSQLDatabase, Oqtane.Database.PostgreSQL"
    }
  ],
  "Logging": {
    "FileLogger": {
      "LogLevel": {
        "Default": "Error"
      }
    },
    "LogLevel": {
      "Default": "Information"
    }
  },
  "InstallationId": "f5789fa4-895c-45d7-bc26-03eb166e008a"
}
As demonstrated, utilizing Oqtane in virtual hosting environments is a straightforward process. There is no need to recompile the source code, as configuring the application for virtual hosting can be easily accomplished through a single configuration section in the appsettings.json file.