
by Joche Ojeda | Mar 27, 2023 | Apache, Linux, Ubuntu, Uncategorized, WebServers
Cloud Storage
Cloud storage is useful for mobile and web apps because it provides an efficient and scalable way to store and retrieve data from anywhere in the world.
With cloud storage, mobile and web apps can easily scale their storage needs up or down depending on usage patterns. This means that developers don’t need to worry about running out of storage space or having to invest in expensive hardware to handle increased storage needs.
Files stored in the cloud can be accessed from anywhere in the world, as long as there is an internet connection. This makes it easy for mobile and web apps to store and retrieve data from different locations and devices.
Cloud services are typically offered as pay-as-you-go pricing model, which means that developers only pay for the storage and resources they actually use. This makes cloud storage an affordable option for mobile and web apps, especially those with limited budgets. also cloud providers typically have robust security measures in place to protect data from unauthorized access and ensure data privacy.
Amazon S3
Amazon S3 (Simple Storage Service) is a cloud-based storage service provided by Amazon Web Services (AWS). It is not an open-source technology, meaning that the source code of the service is not available for modification or redistribution by users. Instead, it is a proprietary technology owned and operated by AWS.
S3 Compatible services
An S3 compatible service is a cloud-based storage service that is designed to be compatible with the Amazon S3 (Simple Storage Service) API. This means that it provides a similar interface and functionality as Amazon S3, allowing users to easily migrate data and applications between the two services.
Some examples of S3 compatible services include:
- Wasabi: A cloud storage service that provides an S3-compatible interface with no egress fees or API request fees.
- DigitalOcean Spaces: A cloud storage service from DigitalOcean that provides an S3-compatible API with a simple pricing model.
- Google Cloud Storage: A cloud storage service from Google Cloud Platform that provides an S3-compatible API along with additional features like object versioning and lifecycle management.
- IBM Cloud Object Storage: A cloud storage service from IBM that provides an S3-compatible API along with features like built-in encryption and multi-region support.
- Contabo: is a cheap alternative with unlimited free transfer to AWS S3 and other vendors. Billing is simple and month-to-month at all-inclusive rate and you can easily migrate from S3
Simple Storage Service gives you a URL for each file by assigning a unique URL to each object stored in the S3 bucket. The URL includes the bucket name, the key (or path) to the object, and the S3 endpoint, which is used to access the object.
For example, if you have an S3 bucket named “my-bucket” and a file named “my-file.jpg” stored in the bucket, the URL to access the file would be:
https://my-bucket.s3.amazonaws.com/my-file.jpg
As you can see the URL includes the domain name of your cloud provider but even when there is nothing technically wrong with it, can bring some disadvantages.
Some common problems on how URLs are created in S3 storage
Here are some of the of disadvantages of not using a custom domain with Amazon S3 storage can cause several problems, including:
- URL appearance: When you access an S3 bucket using the default endpoint, the URL contains the bucket name and the Amazon S3 endpoint. The resulting URL can be long and difficult to remember, which can cause issues with branding and user experience.
- SEO: Using the default S3 endpoint can also negatively impact your search engine optimization (SEO) efforts, as search engines may view the URL as less trustworthy or relevant.
- SSL certificate: If you access an S3 bucket using the default endpoint, the SSL certificate presented to the user will be issued for the Amazon S3 endpoint, rather than your custom domain name. This can cause warnings to appear in the user’s browser, which can negatively impact trust and user experience.
- CORS: If you are using cross-origin resource sharing (CORS) to allow access to your S3 bucket from other domains, the default S3 endpoint may not allow those requests due to security restrictions.
- Maintenance: If you are using the default S3 endpoint, any changes to the S3 bucket or endpoint URLs may require updates to all references to the S3 bucket, which can be time-consuming and error-prone.
Overall, using a custom domain with an S3 storage can provide several benefits, including improved branding, better user experience, and stronger SEO.
There are several ways to provide a solution for the custom domain problem, most of the solutions you will find on the internet are related to cloud providers like Cloud Flare but in this article I want to propose a different approach of showing how this can be fixed using apache web server as a proxy, my goal is not to provide a step by step guide on how to setup a proxy but to provide the conceptual framework to understand how the proxy works
What is Apache
The Apache HTTP Server, commonly referred to as Apache web server, is a free and open-source cross-platform web server software developed and maintained by the Apache Software Foundation. It is one of the most widely used web servers in the world, serving as the backbone for many popular websites and web applications.
Apache web server is designed to be highly configurable and extensible, with a modular architecture that allows users to add or remove functionality as needed. It supports a wide range of features, including dynamic content generation, SSL/TLS encryption, proxying and caching, and authentication and authorization.
Apache web server is also highly portable, running on a wide range of operating systems including Windows, Linux, macOS, and Unix. It can be configured using a variety of tools and languages, including configuration files, command-line utilities, and programming languages such as Perl, PHP, and Python.
Overall, Apache web server is a versatile and powerful web server that provides a stable and reliable platform for serving web content and applications.
What is an Apache proxy
An Apache proxy, also known as an Apache reverse proxy, is a module of the Apache HTTP Server that allows the server to act as an intermediary between clients and other servers.
With an Apache proxy, incoming requests from clients are forwarded to one or more backend servers, which handle the request and return a response. The Apache proxy then forwards the response back to the client.
This can be useful for a variety of reasons, including load balancing, caching, and security. For example, an Apache proxy can be used to distribute incoming traffic across multiple backend servers to improve performance and availability. It can also be used to cache responses from backend servers to reduce the load on those servers and improve response times.
In addition, an Apache proxy can be used to add an extra layer of security to incoming traffic, by acting as a firewall and only allowing traffic from trusted sources.
Setting up an Apache proxy involves configuring the Apache HTTP Server to act as a reverse proxy and directing traffic to one or more backend servers. This can be done using the Apache mod_proxy module, which provides the necessary functionality to act as a reverse proxy.
Apache proxy flow
                  +-------------------+      +-------------+
+----------+      | Apache Web Server |      |Amazon S3     |
|          |      |   (Virtual Host)  |      |             |
|  Client  +----> |   example.com     +----> |  bucket-name|
|          |      |   (HTTPS)         |      |             |
+----------+      +-------------------+      +-------------+
Apache proxy configuration
#this is the configuration of the virtual hosting
SuexecUserGroup "#1010" "#1010"
ServerName files.jocheojeda.com
DocumentRoot /home/files/public_html
ErrorLog /var/log/virtualmin/files.jocheojeda.com_error_log
CustomLog /var/log/virtualmin/files.jocheojeda.com_access_log combined
ScriptAlias /cgi-bin/ /home/files/cgi-bin/
ScriptAlias /awstats/ /home/files/cgi-bin/
DirectoryIndex index.php index.php4 index.php5 index.htm index.html
<Directory /home/files/public_html>
    Options -Indexes +IncludesNOEXEC +SymLinksIfOwnerMatch +ExecCGI
    Require all granted
    AllowOverride All Options=ExecCGI,Includes,IncludesNOEXEC,Indexes,MultiViews,SymLinksIfOwnerMatch
    AddType application/x-httpd-php .php
    AddHandler fcgid-script .php
    AddHandler fcgid-script .php7.4
    FCGIWrapper /home/files/fcgi-bin/php7.4.fcgi .php
    FCGIWrapper /home/files/fcgi-bin/php7.4.fcgi .php7.4
</Directory>
<Directory /home/files/cgi-bin>
    Require all granted
    AllowOverride All Options=ExecCGI,Includes,IncludesNOEXEC,Indexes,MultiViews,SymLinksIfOwnerMatch
</Directory>
ProxyPass /.well-known !
RewriteEngine on
RemoveHandler .php
RemoveHandler .php7.4
FcgidMaxRequestLen 1073741824
<Files awstats.pl>
    AuthName "files.jocheojeda.com statistics"
    AuthType Basic
    AuthUserFile /home/files/.awstats-htpasswd
    require valid-user
</Files>
#these 2 likes are the one who forward the traffic from the custom domain files.jocheojeda.com to the contabo storage
ProxyPass / https://usc1.contabostorage.com/ade25b1c43c1457b87f0716a629d0ff8:files.jocheojeda/
ProxyPassReverse / https://usc1.contabostorage.com/ade25b1c43c1457b87f0716a629d0ff8:files.jocheojeda/
SSLProxyEngine on
Where the magic happens
You only need 2 lines in the configuration when you already have an apache virtual hosting already running to proxy the request from the client to the S3 storage service
ProxyPass / https://usc1.contabostorage.com/ade25b1c43c1457b87f0716a629d0ff8:files.jocheojeda/
ProxyPassReverse / https://usc1.contabostorage.com/ade25b1c43c1457b87f0716a629d0ff8:files.jocheojeda/ SSLProxyEngine on
Conclusions
As you can see is really easy to fix the problem of custom domains for an S3 storage, specially if you already have an apache webserver with virtual hosting running

by Joche Ojeda | Mar 24, 2023 | Linux, netcore, Oqtane, Ubuntu
In this post we will learn how to publish Oqtane as a Linux service, but before we continue let’s do a recap of what we have learned so far
- How to compile Oqtane for an O.S other than Windows: HTTPs://www.jocheojeda.com/2023/03/20/1-compiling-oqtane-3-4-to-target-ubuntu-linux/
- The process of publish Oqtane installation files :https://www.jocheojeda.com/2023/03/20/2-publishing-oqtane-3-4-to-target-ubuntu-linux/
- How to change the binding URLs for kestrel, so we can run multiple instances of Oqtane :https://www.jocheojeda.com/2023/03/21/3-running-multiple-instances-of-oqtane-for-virtual-hosting-environments-in-apache-webserver/
At this moment, you might be asking yourself why should we run oqtane as a service? well this can be really long to answer but I’ll try to make it as short as possible.
The first thing that we need to understand is the difference between IIS (Internet Information Services for windows) and Apache or NGINX
In an IIS web service, the activation process refers to the series of steps that occur when a client request is received by the web server, and the corresponding web service code is executed to process the request and generate a response. The activation process in IIS typically involves the following steps:
- Client request: A client, such as a web browser or another application, sends an HTTP request to the IIS web server, targeting a specific web service endpoint (e.g., a URL).
- Routing: The IIS server routes the request to the appropriate web service application based on the requested URL and other configuration settings.
- Application pool: The request is handled by an application pool, which is a group of worker processes (w3wp.exe) that manage the execution of one or more web applications. Application pools provide isolation and resource management for web applications, helping to improve the overall performance and stability of the IIS server.
- Worker process: A worker process within the application pool receives the request and begins processing it. If there is no available worker process, the application pool may create a new one, or queue the request until a worker process is available.
- HTTP pipeline: The worker process processes the request through the IIS HTTP pipeline, which is a series of events and modules that handle various aspects of the request, such as authentication, caching, and logging.
- Handler mapping: Based on the request’s file extension or URL pattern, IIS maps the request to a specific handler, which is a component responsible for processing the request and generating a response. In the case of a web service, this handler is typically an ASP.NET handler or another custom handler.
- Service activation: The handler activates the web service, instantiating the required objects and executing the service’s code to process the client request. This may involve parsing input data, performing calculations, accessing databases, or interacting with other services.
- Response generation: The web service generates an appropriate response, such as an XML or JSON document, and returns it to the handler.
- HTTP pipeline (response): The response travels back through the HTTP pipeline, where additional processing, such as caching or compression, may occur.
- Client response: The IIS server sends the generated response back to the client, completing the activation process.
The activation process in IIS is designed to provide a robust and efficient way to handle client requests, offering features like application isolation, resource management, and extensibility through custom handlers and modules.
+-------------+       +-------------+       +-----------------+       +-------------+       +------------------+
|             |       |             |       |                 |       |             |       |                  |
|  Client     +------->    IIS      +-------> Application Pool +-------> Worker     +------->  Web Service     |
|(Web browser,|       |  Web Server |       |                 |       |  Process    |       |                  |
|  app, etc.) |       |             |       | (w3wp.exe)      |       |             |       |                  |
+------+------+       +-------+------+       +--------+--------+       +------+------+       +------+-----------+
       ^                      |                       |                         |                       |
       |                      |                       |                         |                       |
       |                      v                       v                         v                       v
       |               +-------+------+       +--------+--------+       +------+------+       +------+-----------+
       |               |             |       |                 |       |             |       |                  |
       +---------------+   HTTP      |       |  Handler        |       |  HTTP       |       |  Response        |
                       |  Pipeline   |       |  Mapping        |       |  Pipeline   |       | (XML, JSON, etc.)|
                       | (Request)   |       |                 |       |  (Response) |       |                  |
                       |             |       |                 |       |             |       |                  |
                       +-------------+       +-----------------+       +-------------+       +------------------+
Now, let’s discuss the Apache web server. Unlike IIS, Apache does not have an activation process specifically designed for .NET applications. This implies that the server is unable to initiate a new process to handle incoming requests or restart the process in the event of a crash.
According to Microsoft documentation, hosting an ASP.NET Core application on servers other than IIS involves using a reverse proxy server. In this setup, the ASP.NET Core app runs on the built-in web server, Kestrel, which is only accessible via localhost. An external web server, such as Apache or NGINX, acts as a reverse proxy, forwarding requests between the client and the ASP.NET Core app seamlessly.
+-----------+     +-----------+     +-----------+     +---------------------+
|           |     |           |     |           |     |                     |
|  Client   +----->  Reverse  +----->  Kestrel  +----->  ASP.NET Core       |
| (Browser, |     |  Proxy    |     | (Built-in |     |  Application        |
|   App)    |     | (Apache,  |     |  Server)  |     |                     |
|           |     |  NGINX)   |     |           |     |                     |
+-----+-----+     +-----+-----+     +-----+-----+     +---------------------+
      ^                 ^                 ^                 ^
      |                 |                 |                 |
      +-----------------+-----------------+-----------------+
- The client (browser, app, etc.) sends a request to the reverse proxy server (Apache, NGINX, etc.).
- The reverse proxy server forwards the request to the Kestrel server, which is the built-in web server for the ASP.NET Core application.
- The Kestrel server processes the request and passes it to the ASP.NET Core application.
- The ASP.NET Core application processes the request and generates a response.
- The response is sent back to the Kestrel server.
- The Kestrel server forwards the response to the reverse proxy server.
- The reverse proxy server sends the response back to the client.
As demonstrated, handling requests and maintaining the application’s availability are two distinct processes in non-IIS servers, such as our scenario with an Ubuntu 22.04 server and Apache. Consequently, we must explore strategies for keeping our application process continuously running on an Ubuntu server.
On Microsoft official documentation on how to publish AspNetCore Apps in Linux, there is a section called “Monitoring the app” which describe how to create a Linux service that is able to restart automatically if the application crashes. Here is the link to the official documentation https://learn.microsoft.com/en-us/aspnet/core/host-and-deploy/linux-apache?view=aspnetcore-7.0#monitor-the-app
In Ubuntu Linux, services (also known as daemons) are background processes that run continuously and perform specific tasks, such as listening for incoming connections, managing system resources, or running scheduled tasks. They are designed to start automatically during system boot, run in the background, and stop during system shutdown.
Ubuntu uses the systemd system and service manager as its default init system, which is responsible for bootstrapping the user space and managing system services. Here’s how services work in Ubuntu Linux using systemd:
- Service unit files: Each service has a corresponding unit file with a
.service extension, typically located in /lib/systemd/system/ or /etc/systemd/system/. These files contain the configuration and instructions for starting, stopping, and managing the service.
- Service management: You can manage services using the
systemctl command. Some common tasks include starting, stopping, enabling, disabling, and checking the status of services. For example:
- Start a service:
sudo systemctl start service-name
- Stop a service:
sudo systemctl stop service-name
- Enable a service to start at boot:
sudo systemctl enable service-name
- Disable a service from starting at boot:
sudo systemctl disable service-name
- Check the status of a service:
systemctl status service-name
- Logging:
systemd services use the journalctl command for logging, which allows you to view and manage logs for services and the entire system. You can access logs for a specific service by running journalctl -u service-name.
- Custom services: You can create custom services by writing your own service unit files and placing them in the
/etc/systemd/system/ directory. This is useful when you want to run your own applications or scripts as services.
To maintain the availability of an application process on an Ubuntu server, you can create a custom service using systemd. This will enable the application to start automatically during system boot, restart if it crashes, and be managed using standard systemctl commands.
Most linux users will the create the unit (service file) using a command line text editor, this can be a bit challenging for a DotNet programmer since we are used to user interfaces. In our company (Xari) we often deploy AspNetCore applications to linux servers, we do it so often that I had to create a tool to generate the unit files, the tool is publicly available at https://linux4dotnet.jocheojeda.com/
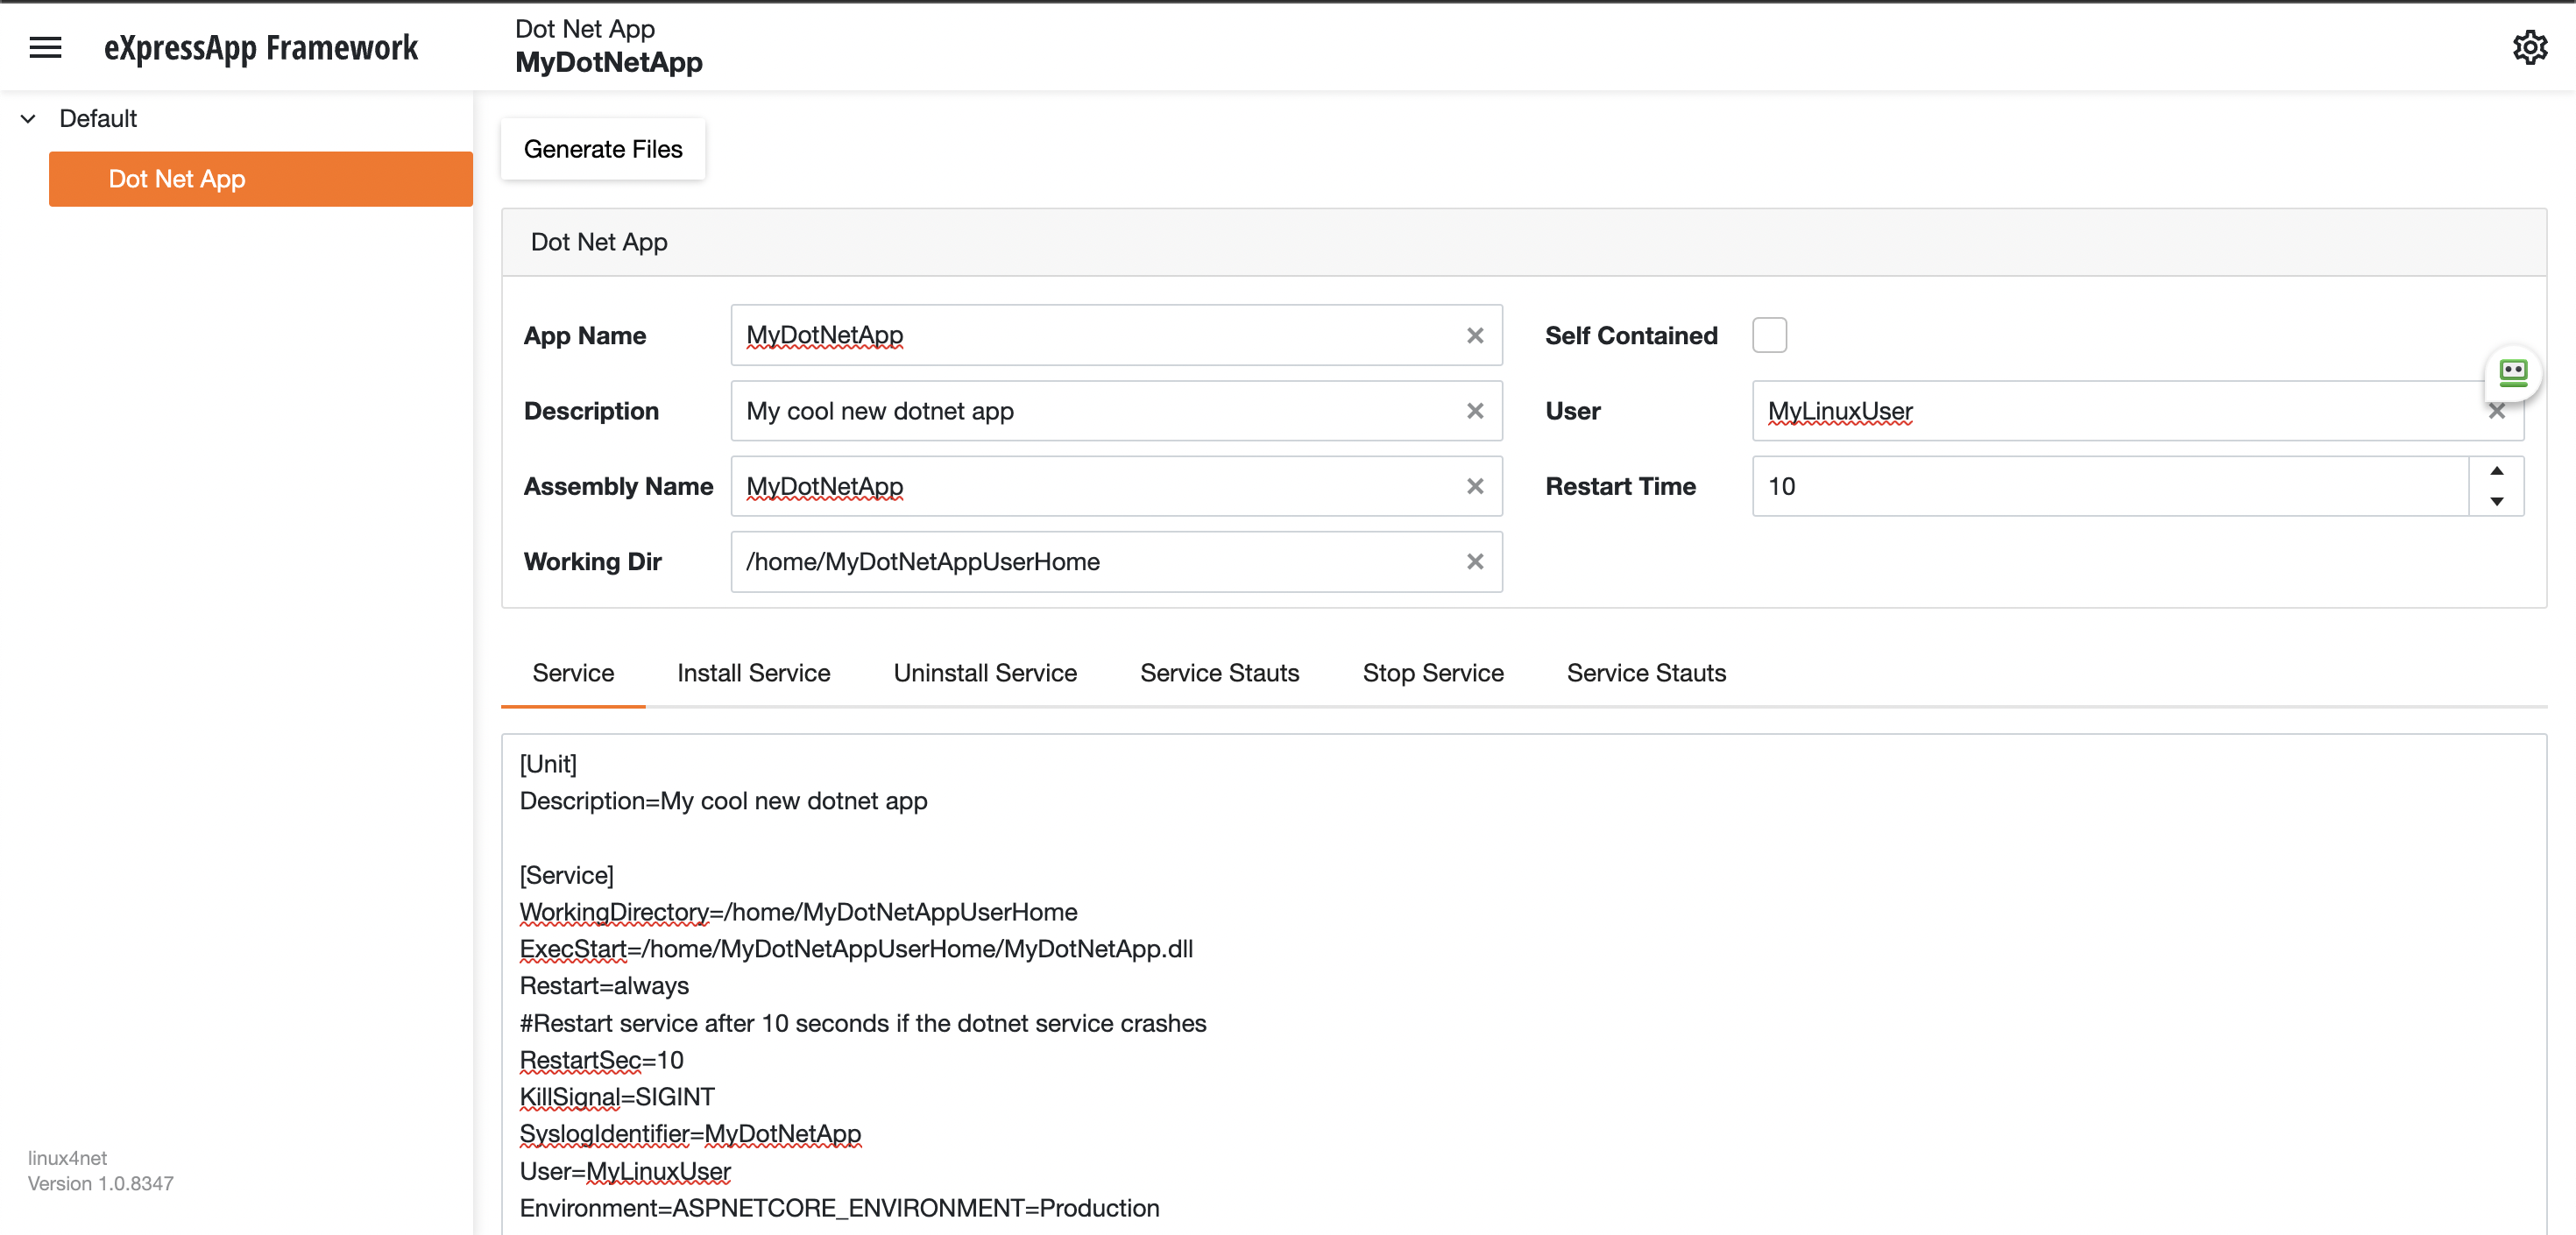
Using the tool you just need to fill the gaps and it will generate the text of each file that you need to use, so here are the files that I generated for my test of running oqtane in an ubuntu server
InstalService.sh
sudo apt-get update -y
sudo apt-get install -y libgdiplus
chmod +x /home/oqtane/Oqtane.Framework.3.4.0.Install/Oqtane.Server
chmod +x /home/oqtane/Oqtane.Framework.3.4.0.Install/UninstallService.sh
chmod +x /home/oqtane/Oqtane.Framework.3.4.0.Install/Start.sh
chmod +x /home/oqtane/Oqtane.Framework.3.4.0.Install/Stop.sh
chmod +x /home/oqtane/Oqtane.Framework.3.4.0.Install/Status.sh
sudo yes | cp /home/oqtane/Oqtane.Framework.3.4.0.Install/Oqtane.Server.service /etc/systemd/system/
sudo systemctl enable Oqtane.Server.service
sudo systemctl start Oqtane.Server.service
sudo systemctl status Oqtane.Server.service
Oqtane.Server.Service
[Unit]
Description=Oqtane.Server

[Service]
WorkingDirectory=/home/oqtane/Oqtane.Framework.3.4.0.Install
ExecStart=/home/oqtane/Oqtane.Framework.3.4.0.Install/Oqtane.Server
Restart=always
#Restart service after 10 seconds if the dotnet service crashes
RestartSec=10
KillSignal=SIGINT
SyslogIdentifier=Oqtane.Server
User=oqtane
Environment=ASPNETCORE_ENVIRONMENT=Production

[Install]
WantedBy=user. Target
Start.sh
sudo systemctl start Oqtane.Server.service
Stop.sh
sudo systemctl stop Oqtane.Server.service
Status.sh
sudo systemctl status OqtaneServer.service
Uninstall.sh
sudo systemctl stop Oqtane.Server.service
sudo systemctl disable Oqtane.Server.service
sudo rm /etc/systemd/system/Oqtane.Server.service
ps -ef | grep Oqtane.Server | grep -v grep | awk '{print }' | xargs kill
And last but not least the install instructions ))
These are the commands you need to run to install the app as a linux service
1) Go to the app directory
cd /home/oqtane/Oqtane.Framework.3.4.0.Install
2) First change the permissions of the InstallService.sh
chmod +x InstallService.sh
3) Run the installation file
./InstallService.sh


If you are using virtualmin(appache) and you want to for https redirection, here are the instructions
Virtualmin --> Services --> Configure Website(the one on port 80) --> Edit Directives
Under 'RewriteEngine On' add the next line
RewriteRule ^/(.*) https://%{HTTP_HOST}/$1 [R]
Restart Apache
Now we only need to copy the generated files to the Oqtane folder and run “InstallService.sh” and “voila” your oqtane app is a linux service now, you can check the results here https://oqtane.jocheojeda.com/
by Joche Ojeda | Oct 29, 2020 | Linux, netcore, Ubuntu, XAF
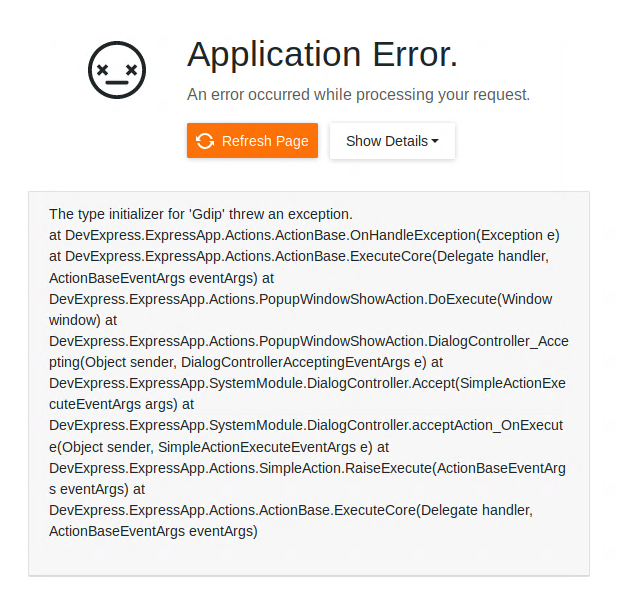
If you are running Xaf Blazor in ubuntu 18.04 you might have seen the following exception
The type initializer for ‘Gdip’ threw an exception.
at DevExpress.ExpressApp.Actions.ActionBase.OnHandleException(Exception e) at DevExpress.ExpressApp.Actions.ActionBase.ExecuteCore(Delegate handler, ActionBaseEventArgs eventArgs) at DevExpress.ExpressApp.Actions.PopupWindowShowAction.DoExecute(Window window) at DevExpress.ExpressApp.Actions.PopupWindowShowAction.DialogController_Accepting(Object sender, DialogControllerAcceptingEventArgs e) at DevExpress.ExpressApp.SystemModule.DialogController.Accept(SimpleActionExecuteEventArgs args) at DevExpress.ExpressApp.SystemModule.DialogController.acceptAction_OnExecute(Object sender, SimpleActionExecuteEventArgs e) at DevExpress.ExpressApp.Actions.SimpleAction.RaiseExecute(ActionBaseEventArgs eventArgs) at DevExpress.ExpressApp.Actions.ActionBase.ExecuteCore(Delegate handler, ActionBaseEventArgs eventArgs)
The error is caused by missing dependency, so the DotNet runtime itself will throw that exception. Also, I want to highlight that the exception is not related to XAF, you can read more about this problem here https://github.com/dotnet/runtime/issues/27200
To get the missing dependency just open a console and run the following commands
sudo apt-get update -y

sudo apt-get install -y libgdiplus

by Joche Ojeda | Sep 14, 2020 | Linux, netcore, Ubuntu
Here are some recommendations to host your new shiny aspnet core app on Linux in this case in Ubuntu 18.04
First, create a user with the name aspnetapp
sudo adduser myaspnetapp
after executing the command, you will have a new folder in your home directory the folder will have the same name as your username so in this case “myaspnetapp”
now let’s SSH to with the new user you just created you can do that using your favorite SSH client, for example, if you are using windows you can use putty
when you log in with the new user you will be in its home folder, now we can create a folder called app with the following command
mkdir app
your folder structure should look like this now
/home/myaspnetapp/app
Now we are ready to upload the files. By now should have already compiled and publish your application to run in Linux, if you have not done that yet then you should take a look to this article https://www.jocheojeda.com/2019/06/10/how-to-create-a-self-contained-netcore-3-console-application/
There are many options to upload a zip file but I think is the best way is to use the secure copy command from linux “scp”, I won’t explain how you should call the scp command but if you are using windows you can run that command from the WSL console and if you are using Linux the command is already built-in, anyway here is an article about it https://linuxize.com/post/how-to-use-scp-command-to-securely-transfer-files/
Here I will write an example of how the scp command should look like and you adjust it to your needs
scp publish.zip myaspnetapp@200.35.15.25:/home/myaspnetapp/app
so that command above will do the following, it will copy the file publish.zip from the local folder to a server running on the following the IP 200.35.15.25 and the folder “/home/myaspnetapp/app”
now let’s unzip the content of the folder zip with the following command
unzip publish.zip
What we have done so far:
- We have created a user in the OS
- We have created a folder to host our application within the user home folder
- We have uploaded a zip file containing our application the folder “/home/myaspnetapp/app”
Now that the app is already in the server we need to change the permission of the folder where the app lives to 0777, you can learn more about Linux file system permissions here https://www.guru99.com/file-permissions.html
Creating a service to monitor the app
The next step to monitor our app is to use systemd is an init system that provides many powerful features for starting, stopping, and managing processes.
Let’s start by creating a service file in the following path “/etc/systemd/system/”
You can do that with the following command:
sudo nano /etc/systemd/system/MyExecutableFile.service
here is how the content of the file should look like
[Unit]

Description=A description of your app


[Service]

WorkingDirectory=/home/myaspnetapp /app

ExecStart= /home/ myaspnetapp /app/MyExecutableFile

Restart=always

# Restart service after 10 seconds if the dotnet service crashes:

RestartSec=10

KillSignal=SIGINT

SyslogIdentifier= MyExecutableFile

User=apache

Environment=ASPNETCORE_ENVIRONMENT=Production


[Install]

WantedBy=multi-user.target
Here is a little explanation of what you might need to change if the file above
WorkingDirectory: this is the working directory, usually is the same where the app lives
ExecStart: This is the executable file how what will you write here will depend on your application if its self-contained you just need to write the name the full path of the executable file otherwise you need to write the path to the dotnet runtime and then the path to your dll as show below:
/usr/local/bin/dotnet /var/www/helloapp/helloapp.dll
RestartSec: this is the time to wait before trying to restart the app after if the process crashes
SyslogIdentifier: the app identifier for sys logs
User: this is really important since the app will run under this user privileges, so you need to make sure that the user exists and that is able to access the files needed to start the app
That is all that we need for the service file now we need to go back to the console and enable our new service, you can do that with the following command
sudo systemctl enable MyExecutableFile.service
To start and stop the service you can use the following commands
//To Start
sudo systemctl start MyExecutableFile.service

//To Stop
sudo systemctl status MyExecutableFile.service

by Joche Ojeda | Sep 11, 2020 | Linux, Ubuntu
Lately, I have been playing a lot with TestCafe which is a testing tool for website, there are 2 parts of TestCafe, the first part is TestCafe studio which is a tests editor tool where you can create or edit new tests that will be eventually used in the TestCafe test runner, both TestCafe and the test runner runs on Windows, MacOS, and Linux.
So what we are going to do today is to install TestCafe on Ubuntu Linux 18.04, in this tutorial we will only install the test runner because, in the end, my main goal is to use TestCafe to emulate the load on a server, so let’s get started
First, we need to install NodeJS and NPM, this is kind of tricky depending on your OS version, for example, if you run this command :
sudo apt -y install nodejs
in Ubunto 18.04 you will end up installing NodeJS version 8 something… that’s too old for what we need to do, so first let’s install the latest version of NodeJS, in this case, this is version 12
Installing NodeJS and NPM
1) First, let’s update our repository information
sudo apt update
sudo apt -y upgrade
2) Manually add Node.js APT Repository
sudo apt update
sudo apt -y install curl dirmngr apt-transport-https lsb-release ca-certificates
curl -sL https://deb.nodesource.com/setup_12.x | sudo -E bash -
3) now let’s install NodeJS
sudo apt -y install nodejs
4) This step is optional, if you want to verify the versions of NodeJS and NPM you can use the following commands:
node --version
npm --version
Installing TestCafe
To install TestCafe you only need to execute one command, so here it is
npm install -g testcafe
That was easy !!!
That is everything for this post, see you!!!