
by Joche Ojeda | Oct 5, 2025 | Blazor, Oqtane
I’m returning to work with Oqtane, and to be honest, we’re exploring new frameworks at the office that will help us expand our market reach. We specialize in a specific type of development and don’t want to move too far away from .NET in general. We’ve used Oqtane in the past—I’ve even installed it on Linux—but I want to conduct fresh research: try it again, get a feel for it, and potentially move some production-sized projects to it.
There’s a lot to understand about Oqtane, especially because it’s a truly layered development framework where you need to work across different layers. This will be the first article in a series that serves both as a guide and as personal mental notes of things I don’t want to forget the next time I develop prototypes or production sites with Oqtane.
The first topic we’ll review is how to install Oqtane and start it up. Here are the steps I usually follow.
Choosing Your Development Approach
The first question you should ask yourself is: How do you want to develop? There are a few ways to do it, and I’ve watched every video about Oqtane over the last two weeks. Here are your three main options:
Option 1: Clone or Download from GitHub (Main Branch)
The old way was to simply go to GitHub and clone or download the source from the main branch, which is actually the development branch. This approach allows you to see all the ins and outs of the framework—how each module is created and registered, how they use repositories, and so on.
However, this may be overwhelming at the beginning. To be honest, since Oqtane has several layers, I got confused many times and wrote code in the wrong layer more than once.
Option 2: Download a Specific Version from Releases
You can also download just the version you want from the releases section on GitHub. This gives you a stable, versioned codebase to work with.
Option 3: Use .NET Templates (Recommended for Beginners)
Now they have .NET new templates available. If you’re a beginner, I strongly suggest installing the .NET templates and using dotnet new because the structure is much more simplified.
However, if you want to understand the ins and outs of the application framework and how it works, I strongly recommend taking a look at the source code.
Installation Resources
Source Code Repository
You can get the source code at this GitHub repository:
https://github.com/oqtane/oqtane.framework
In the README of that repository, you’ll find instructions for installing the templates.
Using the Templates
Here’s an example of how to install and use the templates:
dotnet new install Oqtane.Application.Template
dotnet new oqtane-app -o MyCompany.MyProject
cd MyCompany.MyProject
dotnet build
cd Server
dotnet run
Release Versions
In the releases section, you can find the source code for each specific version:
https://github.com/oqtane/oqtane.framework/releases
Solution Structure
The solution structure differs depending on which installation method you choose:
Solution structure when created with the templates:
MyTests/
├── Client/                    # Blazor WebAssembly Client Project
├── Server/                    # ASP.NET Core Server Project
├── Shared/                    # Shared Models and Contracts
├── MyTests.sln               # Solution File
└── README.md                 # Solution Documentation
Solution structure when using the downloaded source:
OqtaneFramework/
├── .github/                      # GitHub configuration and issue templates
├── Oqtane.Application/           # .NET Template for creating new Oqtane apps
├── Oqtane.Client/                # Core Blazor WebAssembly client framework
├── Oqtane.Server/                # Core ASP.NET server framework
├── Oqtane.Shared/                # Shared contracts, models, and interfaces
├── Oqtane.Maui/                  # MAUI mobile application support
├── Oqtane.Package/               # NuGet packaging and distribution tools
├── Oqtane.Updater/               # Framework update/upgrade utilities
├── screenshots/                  # Marketing and documentation images
├── Oqtane.sln                    # Main solution file
├── Oqtane.Maui.sln              # MAUI solution file
├── Oqtane.Updater.sln           # Updater solution file
└── Configuration Files           # Build, deployment, and Git configs
In the source you will also find the source of around 27+ admin modules, which is a great way to learn how to create your own modules.
- Dashboard
- Files (file management)
- Jobs (background job scheduler)
- Languages (localization)
- Login/Register/Reset (authentication)
- Logs (system logging viewer)
- ModuleDefinitions (module registry)
- Modules (module instance management)
- Pages (page/route management)
- Profiles (user profiles)
- RecycleBin (soft delete management)
- Roles (role-based access)
- Search/SearchResults
- Settings (system configuration)
- Site/Sites (multi-tenancy)
- SQL (database query tool)
- SystemInfo (diagnostics)
- Themes (theme management)
- Upgrade (version upgrades)
- UrlMappings (URL rewriting)
- Users (user management)
- Visitors (analytics)
Wrapping Up
That’s it for this first article! We’ve covered the basics of getting Oqtane installed and understanding the different approaches you can take depending on your experience level and project needs.
In the next article, we’ll dive into starting up the application and picking a database provider. This is where things get interesting, as Oqtane supports multiple database options, and understanding how to configure them properly is crucial for getting your project off the ground.
Stay tuned, and happy coding!
This is part 1 of a series documenting my journey with Oqtane. Check back soon for the next installment.
by Joche Ojeda | Sep 23, 2025 | Oqtane, Vibe Code, Vibe document
Most of us have fallen into the trap of what I like to call vibe coding. It’s that moment when you’re excited about an idea, you open your editor, call on your favorite AI assistant, and just… vibe. You throw half-baked requirements at the model, it spits out a lot of code, and for a while, it feels like progress.
The problem is, vibe coding usually leads to garbage code, wasted time, and mounting frustration. I know this because I recently spent six hours vibe coding a feature I could have completed in under ten minutes—once I stopped vibing and started documenting.
What Is Vibe Coding?
Vibe coding is coding without a plan. It’s asking an AI to build something from incomplete context, hoping it magically fills in the blanks.
It can look like:
- Pasting vague prompts into an LLM: “Build me an activity stream module.”
- Copy-pasting stack overflow snippets without really understanding them.
- Letting AI hallucinate structures, dependencies, and business rules you never specified.
And it feels productive, because you see code flying across your screen. But what’s really happening is that the AI is guessing. It compiles imaginary versions of your system in its “head,” tries different routes, and produces lots of words that look like solutions but don’t actually fit your framework or needs. The result: chaos disguised as progress.
My Oqtane Activity Stream Story
Here’s a concrete example.
I wanted to build an activity stream—basically, a social-network-style feed—on top of Oqtane, a .NET-based CMS. Now, I know the domain of activity streams really well, but I decided to test how far I could get if I let AI build an Oqtane module for me as if I knew nothing about the framework.
For six hours, I vibe coded. I kept prompting the AI with fragments like:
- “Make an Oqtane module for an activity feed.”
- “Add a timeline of user events.”
- “Hook this up to Oqtane’s structure.”
And the AI did what it does best: it generated code. Lots of it. But the code didn’t fit the Oqtane module lifecycle. It missed important patterns, created unnecessary complexity, and left me stuck in a trial-and-error spiral.
Six hours later, I had nothing usable. Just a pile of messy code and a headache.
The Switch to Vibe Documenting
Then I stepped back. Instead of continuing to let the AI guess, I wrote down what I already knew:
- How an Oqtane module is structured.
- What the activity stream needed to display.
- The key integration points with the CMS.
In other words, I documented the requirements as if I were teaching someone new to Oqtane. Then, I fed that documentation to the AI.
The result? In about eight minutes, I had a clean, working Oqtane module for my activity stream. No trial and error. No hallucinated patterns. Just code that fit perfectly into the framework.
Why Documentation Beats Guesswork
The lesson was obvious: the AI is only as good as the clarity of its input. Documentation gives it structure, reducing the entropy of the problem. Without it, you’re effectively asking the AI to be psychic. With it, you’re giving the AI a blueprint it can execute on with precision.
Think about it this way:
- Vibe coding = lots of code, little progress.
- Vibe documenting = clear plan, fast progress.
The irony is that documentation often feels slower up front—but it saves exponential time later. In my case, it turned six wasted hours into eight minutes of actual productivity.
The Human Programmer’s Role
This experience reinforced something important: the human programmer isn’t going anywhere. Our role is to act as the bridge between vague ideas and structured requirements.
We’re the ones who take messy, half-formed thoughts and turn them into clear steps. That’s not just busywork—that’s the essence of engineering. Once those steps exist, the AI can handle the grunt work of coding far more effectively than it can guess at our intentions.
In other words: humans reduce chaos; AI executes clarity.
The Guru Lesson
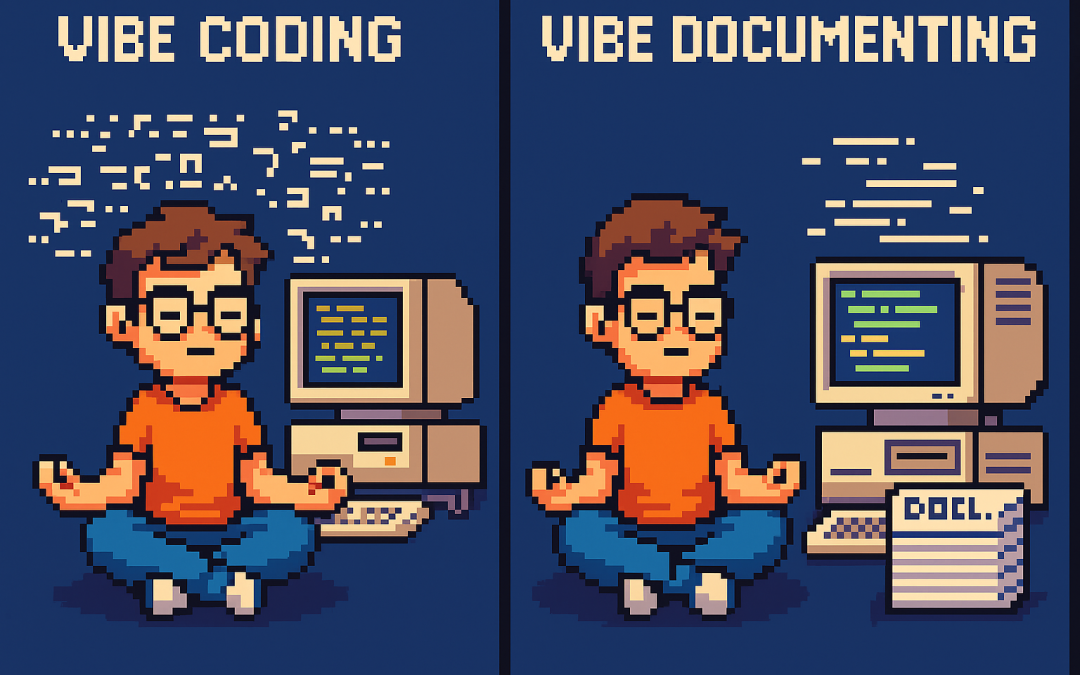
I like to think of it as a guru’s journey. On one side, the vibe coder sits cross-legged in front of a retro computer, letting chaotic lines of code swirl around them. On the other, the vibe documenter floats serenely, armed with neat stacks of documentation, watching clean code flow effortlessly.
The wisdom is simple: don’t vibe code. Vibe document. It’s the difference between six hours of chaos and eight minutes of clarity.
Conclusion
AI coding assistants are incredible, but they’re not mind readers. If you skip documentation, you’ll spend hours wrestling with hallucinated code. If you take the time to document, you’ll unlock the real power of AI: rapid, reliable execution.
So the next time you feel the urge to vibe code, pause. Write down your requirements. Document your framework. Then let the AI do what it does best: build from clarity.
Because vibe coding wastes time—but vibe documenting saves it.

by Joche Ojeda | Mar 29, 2023 | C#, Linux, netcore, Oqtane, Postgres, Ubuntu
A stack in software development refers to a collection of technologies, tools, and frameworks that are used together to build and run a complete application or solution. A typical stack consists of components that handle different aspects of the software development process, including frontend, backend, databases, and sometimes even the hosting environment.
A stack is often categorized into different layers based on the functionality they provide:
- Frontend: This layer is responsible for the user interface (UI) and user experience (UX) of an application. It consists of client-side technologies like HTML, CSS, and JavaScript, as well as libraries or frameworks such as React, Angular, or Vue.js.
- Backend: This layer handles the server-side logic, processing user requests, and managing interactions with databases and other services. Backend technologies can include programming languages like Python, Ruby, Java, or PHP, and frameworks like Django, Ruby on Rails, or Spring.
- Database: This layer is responsible for storing and managing the application’s data. Databases can be relational (e.g., MySQL, PostgreSQL, or Microsoft SQL Server) or NoSQL (e.g., MongoDB, Cassandra, or Redis), depending on the application’s data structure and requirements.
- Hosting Environment: This layer refers to the infrastructure where the application is deployed and run. It can include on-premises servers, cloud-based platforms like Amazon Web Services (AWS), Google Cloud Platform (GCP), or Microsoft Azure, or container orchestration platforms like Kubernetes or Docker Swarm.
Developers often refer to specific combinations of these technologies as named stacks. Some examples include:
- LAMP: Linux (operating system), Apache (web server), MySQL (database), and PHP (backend programming language).
- MEAN: MongoDB (database), Express.js (backend framework), Angular (frontend framework), and Node.js (runtime environment).
- MERN: MongoDB (database), Express.js (backend framework), React (frontend library), and Node.js (runtime environment).
Selecting a stack depends on factors such as project requirements, team expertise, performance, and scalability needs. By using a well-defined stack, developers can streamline the development process, improve collaboration, and ensure that all components work together efficiently.
The P.O.U.N.D. Stack is an innovative software development stack that combines Postgres, Oqtane, Ubuntu, and DotNet to create powerful, modern, and scalable applications. This stack is designed to leverage the strengths of each technology, providing developers with an integrated and efficient environment for building web applications.
- Postgres (P): As the database layer, Postgres offers robust performance, scalability, and support for advanced data types, such as GIS and JSON. Its open-source nature and active community make it a reliable choice for handling the storage and management of application data.
- Oqtane (O): Serving as the frontend framework, Oqtane is built on top of the Blazor technology in .NET, allowing for the creation of modern, responsive, and feature-rich user interfaces. With Oqtane, developers can create modular and extensible applications, while also benefiting from built-in features such as authentication, authorization, and multi-tenancy.
- Ubuntu (U): As the operating system and hosting environment, Ubuntu provides a stable, secure, and easy-to-use platform for deploying and running applications. It is widely supported and offers excellent compatibility with a variety of hardware and cloud platforms, making it an ideal choice for hosting P.O.U.N.D. Stack applications.
- DotNet (D): The backend layer is powered by the .NET framework, which offers a versatile and high-performance environment for server-side development. With support for multiple programming languages (such as C#, F#, and VB.NET), powerful libraries, and a large ecosystem, .NET allows developers to build scalable and efficient backend logic for their applications.
In summary, the P.O.U.N.D. Stack brings together the power of Postgres, Oqtane, Ubuntu, and DotNet to deliver a comprehensive and efficient development stack. By leveraging the unique capabilities of each technology, developers can build modern, scalable, and high-performance web applications that cater to diverse business needs.

by Joche Ojeda | Mar 24, 2023 | Linux, netcore, Oqtane, Ubuntu
In this post we will learn how to publish Oqtane as a Linux service, but before we continue let’s do a recap of what we have learned so far
- How to compile Oqtane for an O.S other than Windows: HTTPs://www.jocheojeda.com/2023/03/20/1-compiling-oqtane-3-4-to-target-ubuntu-linux/
- The process of publish Oqtane installation files :https://www.jocheojeda.com/2023/03/20/2-publishing-oqtane-3-4-to-target-ubuntu-linux/
- How to change the binding URLs for kestrel, so we can run multiple instances of Oqtane :https://www.jocheojeda.com/2023/03/21/3-running-multiple-instances-of-oqtane-for-virtual-hosting-environments-in-apache-webserver/
At this moment, you might be asking yourself why should we run oqtane as a service? well this can be really long to answer but I’ll try to make it as short as possible.
The first thing that we need to understand is the difference between IIS (Internet Information Services for windows) and Apache or NGINX
In an IIS web service, the activation process refers to the series of steps that occur when a client request is received by the web server, and the corresponding web service code is executed to process the request and generate a response. The activation process in IIS typically involves the following steps:
- Client request: A client, such as a web browser or another application, sends an HTTP request to the IIS web server, targeting a specific web service endpoint (e.g., a URL).
- Routing: The IIS server routes the request to the appropriate web service application based on the requested URL and other configuration settings.
- Application pool: The request is handled by an application pool, which is a group of worker processes (w3wp.exe) that manage the execution of one or more web applications. Application pools provide isolation and resource management for web applications, helping to improve the overall performance and stability of the IIS server.
- Worker process: A worker process within the application pool receives the request and begins processing it. If there is no available worker process, the application pool may create a new one, or queue the request until a worker process is available.
- HTTP pipeline: The worker process processes the request through the IIS HTTP pipeline, which is a series of events and modules that handle various aspects of the request, such as authentication, caching, and logging.
- Handler mapping: Based on the request’s file extension or URL pattern, IIS maps the request to a specific handler, which is a component responsible for processing the request and generating a response. In the case of a web service, this handler is typically an ASP.NET handler or another custom handler.
- Service activation: The handler activates the web service, instantiating the required objects and executing the service’s code to process the client request. This may involve parsing input data, performing calculations, accessing databases, or interacting with other services.
- Response generation: The web service generates an appropriate response, such as an XML or JSON document, and returns it to the handler.
- HTTP pipeline (response): The response travels back through the HTTP pipeline, where additional processing, such as caching or compression, may occur.
- Client response: The IIS server sends the generated response back to the client, completing the activation process.
The activation process in IIS is designed to provide a robust and efficient way to handle client requests, offering features like application isolation, resource management, and extensibility through custom handlers and modules.
+-------------+       +-------------+       +-----------------+       +-------------+       +------------------+
|             |       |             |       |                 |       |             |       |                  |
|  Client     +------->    IIS      +-------> Application Pool +-------> Worker     +------->  Web Service     |
|(Web browser,|       |  Web Server |       |                 |       |  Process    |       |                  |
|  app, etc.) |       |             |       | (w3wp.exe)      |       |             |       |                  |
+------+------+       +-------+------+       +--------+--------+       +------+------+       +------+-----------+
       ^                      |                       |                         |                       |
       |                      |                       |                         |                       |
       |                      v                       v                         v                       v
       |               +-------+------+       +--------+--------+       +------+------+       +------+-----------+
       |               |             |       |                 |       |             |       |                  |
       +---------------+   HTTP      |       |  Handler        |       |  HTTP       |       |  Response        |
                       |  Pipeline   |       |  Mapping        |       |  Pipeline   |       | (XML, JSON, etc.)|
                       | (Request)   |       |                 |       |  (Response) |       |                  |
                       |             |       |                 |       |             |       |                  |
                       +-------------+       +-----------------+       +-------------+       +------------------+
Now, let’s discuss the Apache web server. Unlike IIS, Apache does not have an activation process specifically designed for .NET applications. This implies that the server is unable to initiate a new process to handle incoming requests or restart the process in the event of a crash.
According to Microsoft documentation, hosting an ASP.NET Core application on servers other than IIS involves using a reverse proxy server. In this setup, the ASP.NET Core app runs on the built-in web server, Kestrel, which is only accessible via localhost. An external web server, such as Apache or NGINX, acts as a reverse proxy, forwarding requests between the client and the ASP.NET Core app seamlessly.
+-----------+     +-----------+     +-----------+     +---------------------+
|           |     |           |     |           |     |                     |
|  Client   +----->  Reverse  +----->  Kestrel  +----->  ASP.NET Core       |
| (Browser, |     |  Proxy    |     | (Built-in |     |  Application        |
|   App)    |     | (Apache,  |     |  Server)  |     |                     |
|           |     |  NGINX)   |     |           |     |                     |
+-----+-----+     +-----+-----+     +-----+-----+     +---------------------+
      ^                 ^                 ^                 ^
      |                 |                 |                 |
      +-----------------+-----------------+-----------------+
- The client (browser, app, etc.) sends a request to the reverse proxy server (Apache, NGINX, etc.).
- The reverse proxy server forwards the request to the Kestrel server, which is the built-in web server for the ASP.NET Core application.
- The Kestrel server processes the request and passes it to the ASP.NET Core application.
- The ASP.NET Core application processes the request and generates a response.
- The response is sent back to the Kestrel server.
- The Kestrel server forwards the response to the reverse proxy server.
- The reverse proxy server sends the response back to the client.
As demonstrated, handling requests and maintaining the application’s availability are two distinct processes in non-IIS servers, such as our scenario with an Ubuntu 22.04 server and Apache. Consequently, we must explore strategies for keeping our application process continuously running on an Ubuntu server.
On Microsoft official documentation on how to publish AspNetCore Apps in Linux, there is a section called “Monitoring the app” which describe how to create a Linux service that is able to restart automatically if the application crashes. Here is the link to the official documentation https://learn.microsoft.com/en-us/aspnet/core/host-and-deploy/linux-apache?view=aspnetcore-7.0#monitor-the-app
In Ubuntu Linux, services (also known as daemons) are background processes that run continuously and perform specific tasks, such as listening for incoming connections, managing system resources, or running scheduled tasks. They are designed to start automatically during system boot, run in the background, and stop during system shutdown.
Ubuntu uses the systemd system and service manager as its default init system, which is responsible for bootstrapping the user space and managing system services. Here’s how services work in Ubuntu Linux using systemd:
- Service unit files: Each service has a corresponding unit file with a
.service extension, typically located in /lib/systemd/system/ or /etc/systemd/system/. These files contain the configuration and instructions for starting, stopping, and managing the service.
- Service management: You can manage services using the
systemctl command. Some common tasks include starting, stopping, enabling, disabling, and checking the status of services. For example:
- Start a service:
sudo systemctl start service-name
- Stop a service:
sudo systemctl stop service-name
- Enable a service to start at boot:
sudo systemctl enable service-name
- Disable a service from starting at boot:
sudo systemctl disable service-name
- Check the status of a service:
systemctl status service-name
- Logging:
systemd services use the journalctl command for logging, which allows you to view and manage logs for services and the entire system. You can access logs for a specific service by running journalctl -u service-name.
- Custom services: You can create custom services by writing your own service unit files and placing them in the
/etc/systemd/system/ directory. This is useful when you want to run your own applications or scripts as services.
To maintain the availability of an application process on an Ubuntu server, you can create a custom service using systemd. This will enable the application to start automatically during system boot, restart if it crashes, and be managed using standard systemctl commands.
Most linux users will the create the unit (service file) using a command line text editor, this can be a bit challenging for a DotNet programmer since we are used to user interfaces. In our company (Xari) we often deploy AspNetCore applications to linux servers, we do it so often that I had to create a tool to generate the unit files, the tool is publicly available at https://linux4dotnet.jocheojeda.com/
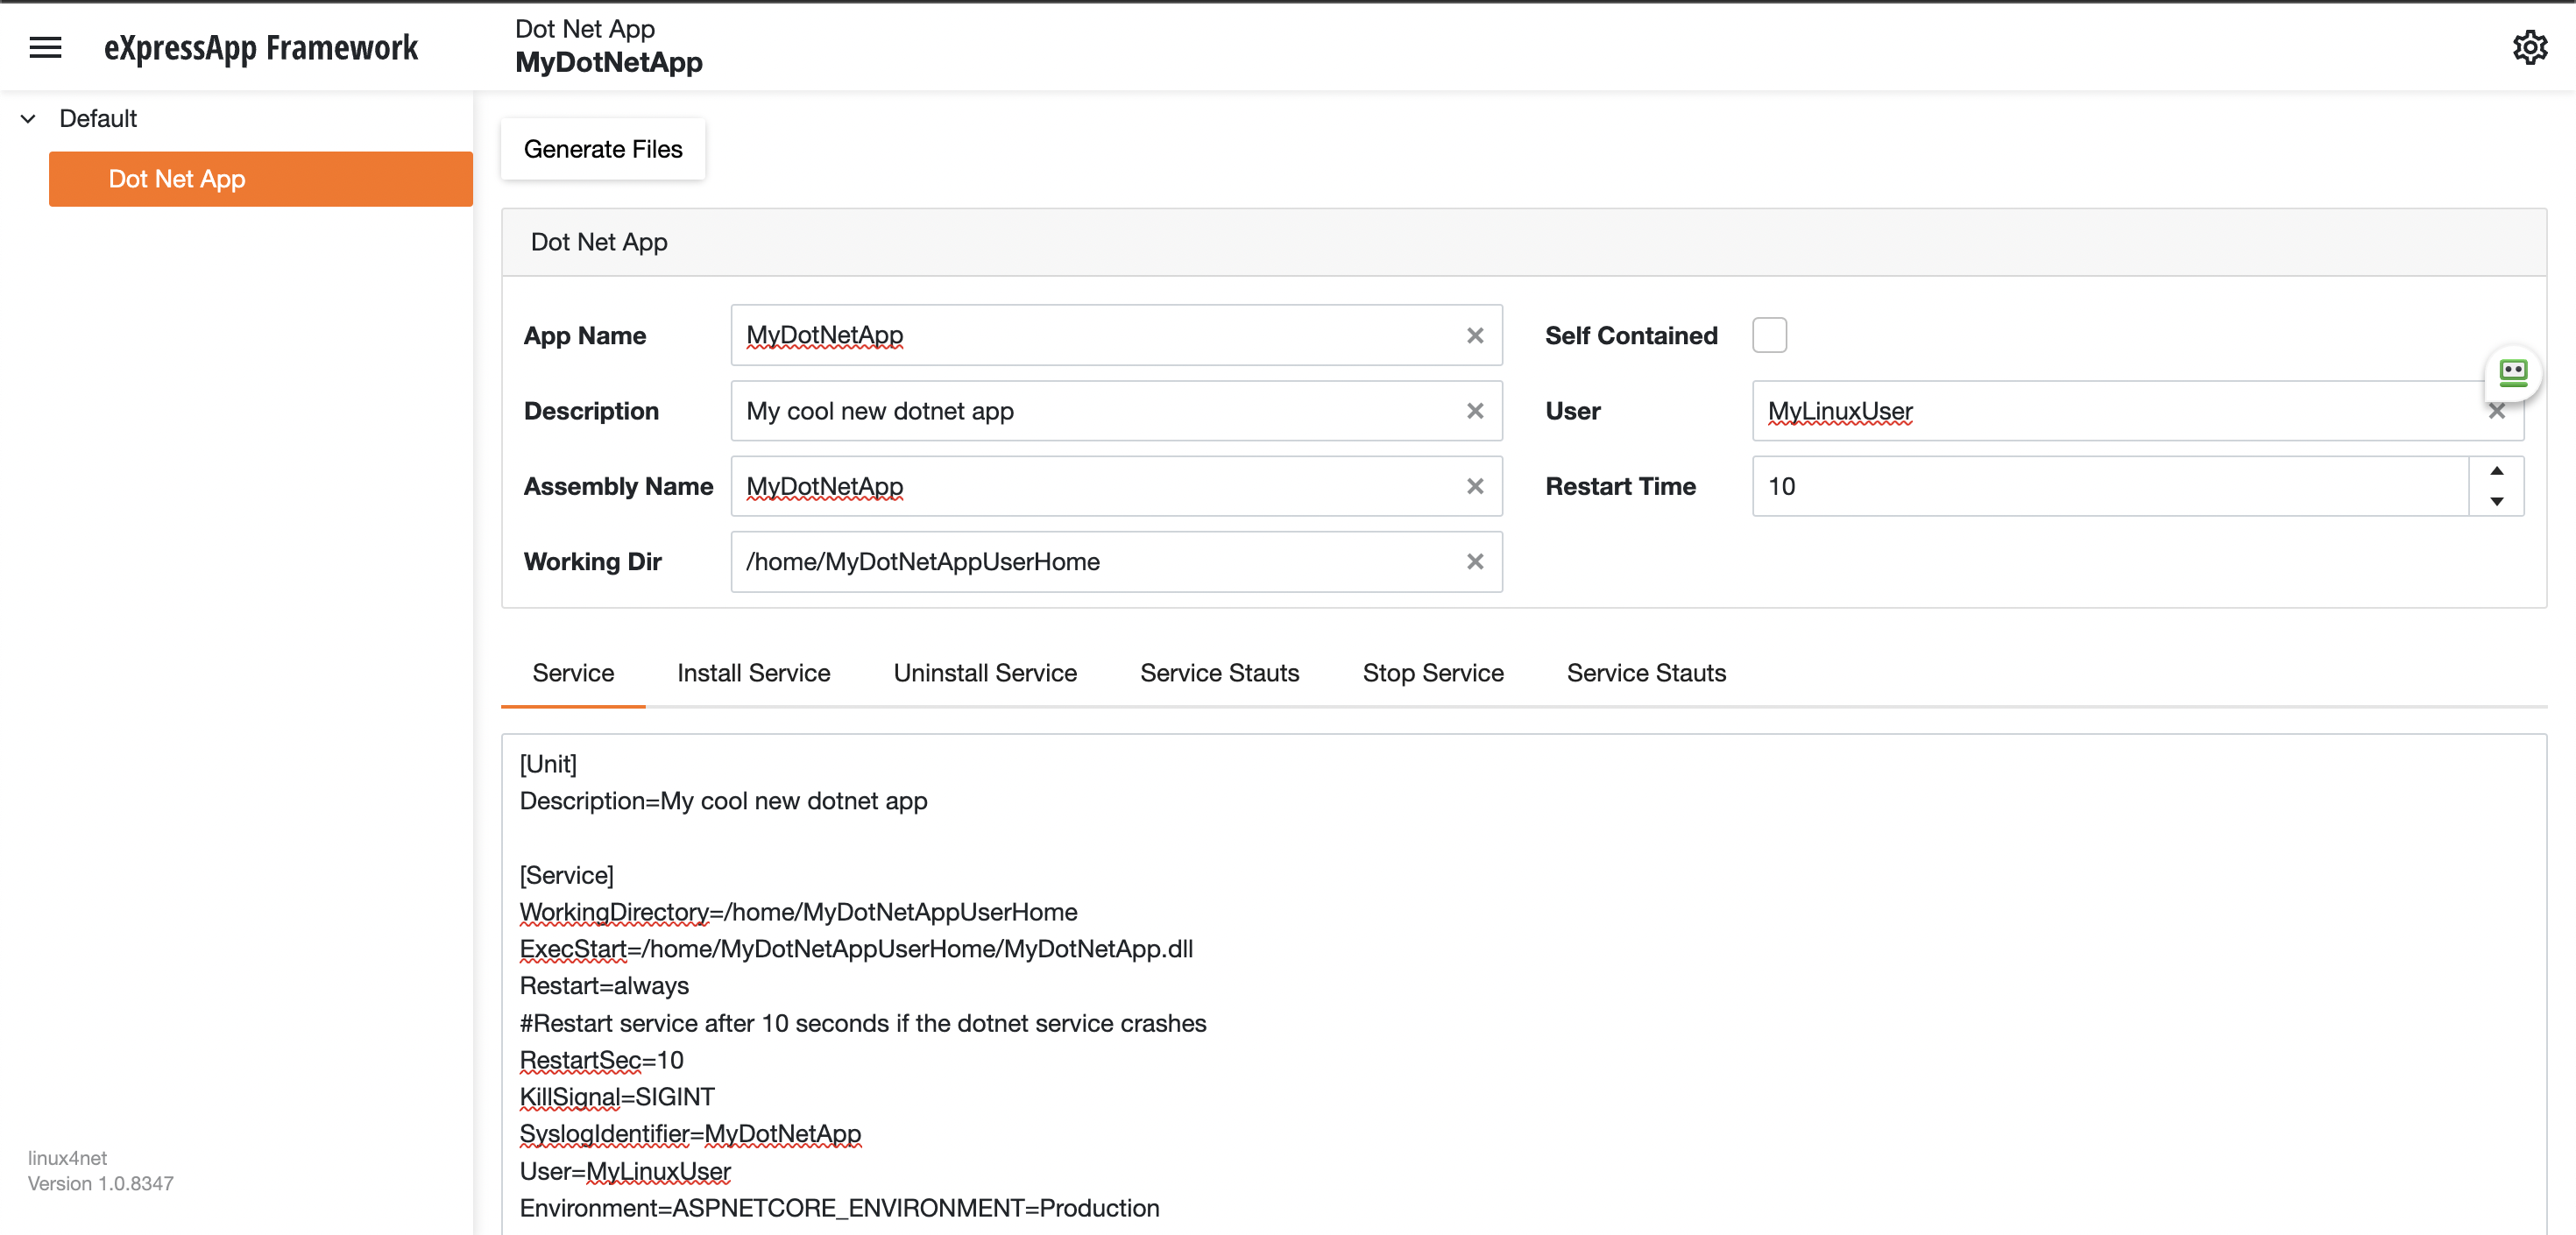
Using the tool you just need to fill the gaps and it will generate the text of each file that you need to use, so here are the files that I generated for my test of running oqtane in an ubuntu server
InstalService.sh
sudo apt-get update -y
sudo apt-get install -y libgdiplus
chmod +x /home/oqtane/Oqtane.Framework.3.4.0.Install/Oqtane.Server
chmod +x /home/oqtane/Oqtane.Framework.3.4.0.Install/UninstallService.sh
chmod +x /home/oqtane/Oqtane.Framework.3.4.0.Install/Start.sh
chmod +x /home/oqtane/Oqtane.Framework.3.4.0.Install/Stop.sh
chmod +x /home/oqtane/Oqtane.Framework.3.4.0.Install/Status.sh
sudo yes | cp /home/oqtane/Oqtane.Framework.3.4.0.Install/Oqtane.Server.service /etc/systemd/system/
sudo systemctl enable Oqtane.Server.service
sudo systemctl start Oqtane.Server.service
sudo systemctl status Oqtane.Server.service
Oqtane.Server.Service
[Unit]
Description=Oqtane.Server

[Service]
WorkingDirectory=/home/oqtane/Oqtane.Framework.3.4.0.Install
ExecStart=/home/oqtane/Oqtane.Framework.3.4.0.Install/Oqtane.Server
Restart=always
#Restart service after 10 seconds if the dotnet service crashes
RestartSec=10
KillSignal=SIGINT
SyslogIdentifier=Oqtane.Server
User=oqtane
Environment=ASPNETCORE_ENVIRONMENT=Production

[Install]
WantedBy=user. Target
Start.sh
sudo systemctl start Oqtane.Server.service
Stop.sh
sudo systemctl stop Oqtane.Server.service
Status.sh
sudo systemctl status OqtaneServer.service
Uninstall.sh
sudo systemctl stop Oqtane.Server.service
sudo systemctl disable Oqtane.Server.service
sudo rm /etc/systemd/system/Oqtane.Server.service
ps -ef | grep Oqtane.Server | grep -v grep | awk '{print }' | xargs kill
And last but not least the install instructions ))
These are the commands you need to run to install the app as a linux service
1) Go to the app directory
cd /home/oqtane/Oqtane.Framework.3.4.0.Install
2) First change the permissions of the InstallService.sh
chmod +x InstallService.sh
3) Run the installation file
./InstallService.sh


If you are using virtualmin(appache) and you want to for https redirection, here are the instructions
Virtualmin --> Services --> Configure Website(the one on port 80) --> Edit Directives
Under 'RewriteEngine On' add the next line
RewriteRule ^/(.*) https://%{HTTP_HOST}/$1 [R]
Restart Apache
Now we only need to copy the generated files to the Oqtane folder and run “InstallService.sh” and “voila” your oqtane app is a linux service now, you can check the results here https://oqtane.jocheojeda.com/
by Joche Ojeda | Mar 21, 2023 | Linux, netcore, Oqtane, Ubuntu, Uncategorized
Virtual hosting is a technique used by Apache (and other web servers) to host multiple websites on a single server. With virtual hosting, a single physical server can host multiple virtual servers, each with its own domain name, IP address, and content.
Virtual hosting can be implemented in two ways:
- Name-based virtual hosting: In this approach, the server uses the domain name provided in the HTTP request to determine which virtual host should serve the request. For example, if a user requests a page from “example.com”, the server will use the virtual host configured for that domain and serve the appropriate content.
- IP-based virtual hosting: In this approach, each virtual host is assigned a separate IP address, and the server uses the IP address in the HTTP request to determine which virtual host should serve the request. For example, if a user requests a page from the IP address assigned to “example.com”, the server will use the virtual host configured for that IP address and serve the appropriate content.
Virtual hosting allows a server to serve multiple websites, each with its own domain name and content, using a single physical server. This makes hosting more efficient and cost-effective, especially for smaller websites that don’t require dedicated servers.
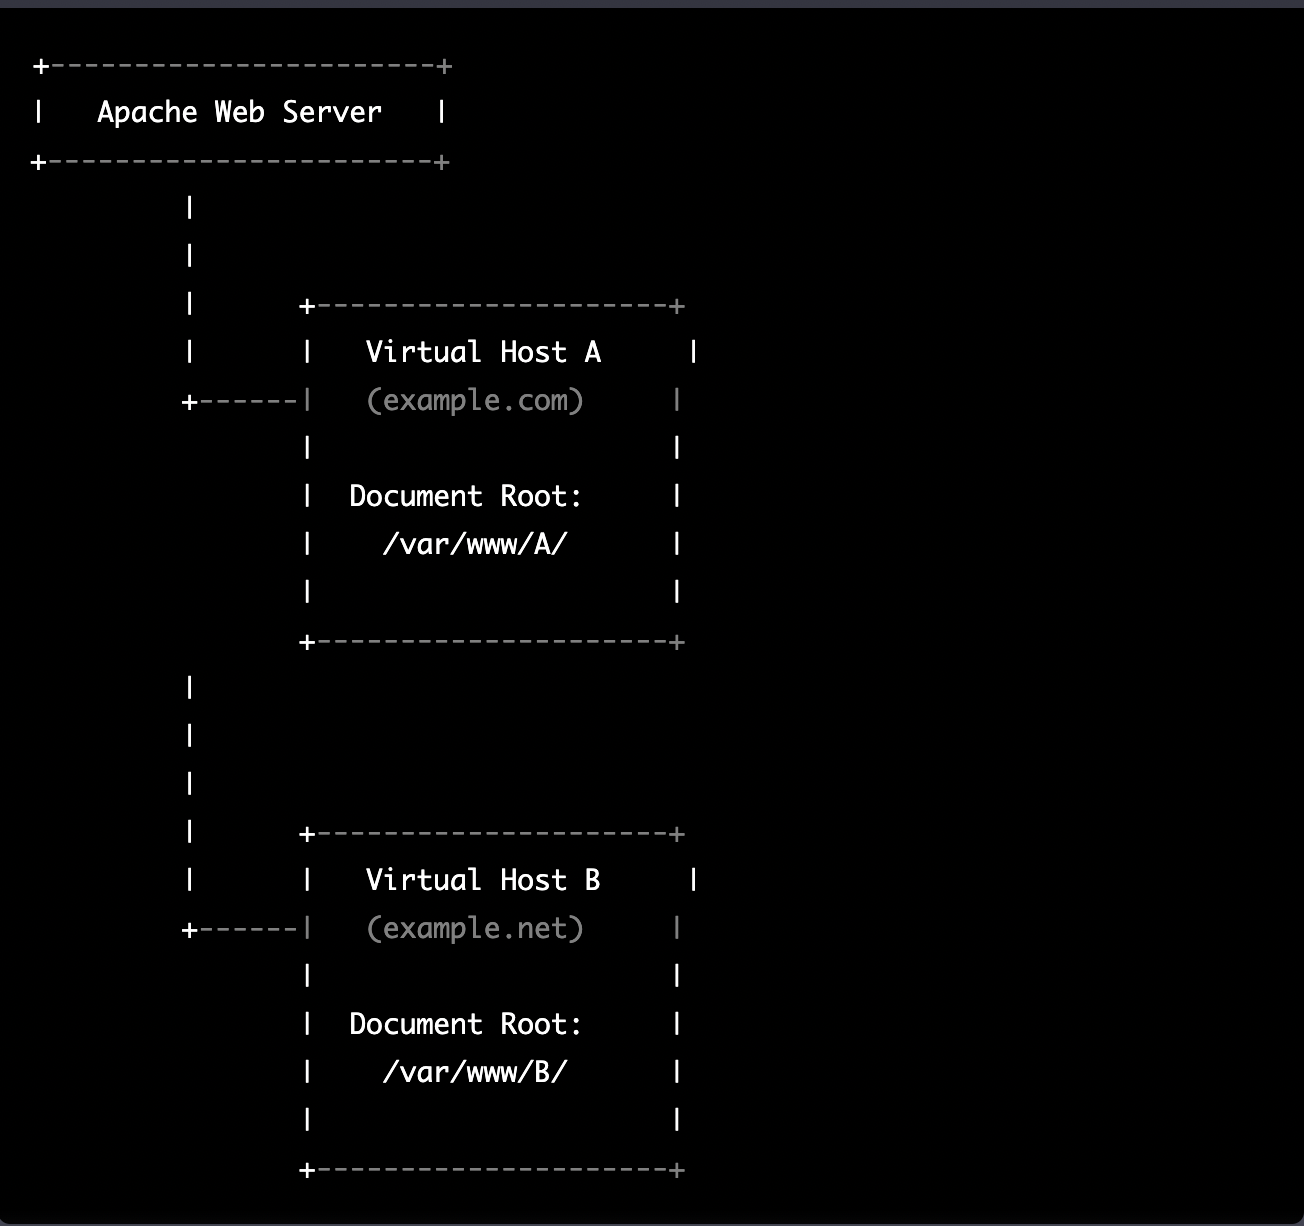
The following diagram represents the most common virtual hosting setup
+-----------------------+
|   Apache Web Server   |
+-----------------------+
         |
         |
         |      +---------------------+
         |      |   Virtual Host A     |
         +------|   (example.com)     |
                |                     |
                |  Document Root:     |
                |    /var/www/A/      |
                |                     |
                +---------------------+
         |
         |
         |
         |      +---------------------+
         |      |   Virtual Host B     |
         +------|   (example.net)     |
                |                     |
                |  Document Root:     |
                |    /var/www/B/      |
                |                     |
                +---------------------+
ASP.NET Core and Blazor applications have the capability to run their own in-process web server, Kestrel. Kestrel can be bound to a specific IP address or port number, enabling the applications to be hosted in virtual environments. To accomplish this, each application can be bound to a unique port number.
+-----------------------+
|   Apache Web Server   |
+-----------------------+
         |
         |
         |      +---------------------+
         |      |   Virtual Host A    |
         +------|   (example.com)     |
                |                     |
                |  Proxy to:          |
                |http://localhost:8016|
                |                     |
                +---------------------+
         |
         |
         |      +---------------------+
         |      |   Virtual Host B    |
         +------|   (example.net)     |
                |                     |
                |  Proxy to:          |
                |http://localhost:8017|
                |                     |
                +---------------------+
As shown in the diagram, physical folders for the document root are no longer utilized. Rather, a proxy is created to the Kestrel web server, which runs our ASP.NET Core applications
To bind our ASP.NET Core applications to a specific IP address or port number, there are multiple methods available. Detailed documentation on this subject can be found at the following link: https://learn.microsoft.com/en-us/aspnet/core/fundamentals/servers/kestrel/endpoints?view=aspnetcore-7.0#configureiconfiguration
There are various approaches that can be used based on the specific use case. For the sake of simplicity in this example, we will be utilizing the configuration method. This involves appending the configuration JSON for the Kestrel web server, as shown in the following example.
{
  "Kestrel": {
    "Endpoints": {
      "Http": {
        "Url": "http://localhost:8016"
      }
    }
  }
}
So here is how our configuration files should look like
Example.com (Host A)
{
  "Runtime": "Server",
  "RenderMode": "ServerPrerendered",
  "Database": {
    "DefaultDBType": "Oqtane.Database.PostgreSQL.PostgreSQLDatabase, Oqtane.Database.PostgreSQL"
  },
  "ConnectionStrings": {
    "DefaultConnection": "Server=127.0.0.1;Port=5432;Database=example.com;User ID=example.com;Password=1234567890;"
  },
  "Kestrel": {
  "Endpoints": {
    "Http": {
      "Url": "http://localhost:8016"
    }
   }
  },
  "Installation": {
    "DefaultAlias": "",
    "HostPassword": "",
    "HostEmail": "",
    "SiteTemplate": "",
    "DefaultTheme": "",
    "DefaultContainer": ""
  },
  "Localization": {
    "DefaultCulture": "en"
  },
  "AvailableDatabases": [
    {
      "Name": "LocalDB",
      "ControlType": "Oqtane.Installer.Controls.LocalDBConfig, Oqtane.Client",
      "DBType": "Oqtane.Database.SqlServer.SqlServerDatabase, Oqtane.Database.SqlServer"
    },
    {
      "Name": "SQL Server",
      "ControlType": "Oqtane.Installer.Controls.SqlServerConfig, Oqtane.Client",
      "DBType": "Oqtane.Database.SqlServer.SqlServerDatabase, Oqtane.Database.SqlServer"
    },
    {
      "Name": "SQLite",
      "ControlType": "Oqtane.Installer.Controls.SqliteConfig, Oqtane.Client",
      "DBType": "Oqtane.Database.Sqlite.SqliteDatabase, Oqtane.Database.Sqlite"
    },
    {
      "Name": "MySQL",
      "ControlType": "Oqtane.Installer.Controls.MySQLConfig, Oqtane.Client",
      "DBType": "Oqtane.Database.MySQL.MySQLDatabase, Oqtane.Database.MySQL"
    },
    {
      "Name": "PostgreSQL",
      "ControlType": "Oqtane.Installer.Controls.PostgreSQLConfig, Oqtane.Client",
      "DBType": "Oqtane.Database.PostgreSQL.PostgreSQLDatabase, Oqtane.Database.PostgreSQL"
    }
  ],
  "Logging": {
    "FileLogger": {
      "LogLevel": {
        "Default": "Error"
      }
    },
    "LogLevel": {
      "Default": "Information"
    }
  },
  "InstallationId": "f5789fa4-895c-45d7-bc26-03eb166e008a"
}
Example.net (Host B)
{
  "Runtime": "Server",
  "RenderMode": "ServerPrerendered",
  "Database": {
    "DefaultDBType": "Oqtane.Database.PostgreSQL.PostgreSQLDatabase, Oqtane.Database.PostgreSQL"
  },
  "ConnectionStrings": {
    "DefaultConnection": "Server=127.0.0.1;Port=5432;Database=example.net;User ID=example.net;Password=1234567890;"
  },
  {
    "Kestrel": {
    "Endpoints": {
      "Http": {
        "Url": "http://localhost:8017"
      }
     }
    }
  },
  "Installation": {
    "DefaultAlias": "",
    "HostPassword": "",
    "HostEmail": "",
    "SiteTemplate": "",
    "DefaultTheme": "",
    "DefaultContainer": ""
  },
  "Localization": {
    "DefaultCulture": "en"
  },
  "AvailableDatabases": [
    {
      "Name": "LocalDB",
      "ControlType": "Oqtane.Installer.Controls.LocalDBConfig, Oqtane.Client",
      "DBType": "Oqtane.Database.SqlServer.SqlServerDatabase, Oqtane.Database.SqlServer"
    },
    {
      "Name": "SQL Server",
      "ControlType": "Oqtane.Installer.Controls.SqlServerConfig, Oqtane.Client",
      "DBType": "Oqtane.Database.SqlServer.SqlServerDatabase, Oqtane.Database.SqlServer"
    },
    {
      "Name": "SQLite",
      "ControlType": "Oqtane.Installer.Controls.SqliteConfig, Oqtane.Client",
      "DBType": "Oqtane.Database.Sqlite.SqliteDatabase, Oqtane.Database.Sqlite"
    },
    {
      "Name": "MySQL",
      "ControlType": "Oqtane.Installer.Controls.MySQLConfig, Oqtane.Client",
      "DBType": "Oqtane.Database.MySQL.MySQLDatabase, Oqtane.Database.MySQL"
    },
    {
      "Name": "PostgreSQL",
      "ControlType": "Oqtane.Installer.Controls.PostgreSQLConfig, Oqtane.Client",
      "DBType": "Oqtane.Database.PostgreSQL.PostgreSQLDatabase, Oqtane.Database.PostgreSQL"
    }
  ],
  "Logging": {
    "FileLogger": {
      "LogLevel": {
        "Default": "Error"
      }
    },
    "LogLevel": {
      "Default": "Information"
    }
  },
  "InstallationId": "f5789fa4-895c-45d7-bc26-03eb166e008a"
}
As demonstrated, utilizing Oqtane in virtual hosting environments is a straightforward process. There is no need to recompile the source code, as configuring the application for virtual hosting can be easily accomplished through a single configuration section in the appsettings.json file.
by Joche Ojeda | Mar 20, 2023 | netcore, Oqtane, Uncategorized
In the preceding blog post, we explored the process of running Oqtane on Ubuntu Linux and successfully confirmed its functionality. Now, let us delve deeper and proceed to package the installation binaries specifically tailored for Ubuntu Linux deployment.
As a frequent publisher of Blazor applications to Linux servers, I find the process to be quite straightforward. Utilizing the .NET CLI, one can simply execute the following command to publish the app for Linux:
dotnet publish --runtime linux-x64
On this occasion, my customary approach to publishing encountered an obstacle, indicating additional steps were required. Consequently, I submitted an issue to the Oqtane GitHub repository, where Leigh Pointer from the Oqtane community kindly provided guidance in the correct direction. The GitHub issue can be viewed here.
The first file that I changed was
del "*.nupkg"
del "*.zip"
dotnet clean -c Release ..\Oqtane.Databases.sln
dotnet clean -c Release ..\Oqtane.sln
dotnet build -c Release ..\Oqtane.Databases.sln
dotnet build -c Release ..\Oqtane.sln
nuget.exe pack Oqtane.Client.nuspec
nuget.exe pack Oqtane.Server.nuspec
nuget.exe pack Oqtane.Shared.nuspec
nuget.exe pack Oqtane.Framework.nuspec
del /F/Q/S "..\Oqtane.Server\bin\Release\net6.0\publish" > NUL
rmdir /Q/S "..\Oqtane.Server\bin\Release\net6.0\publish"
dotnet publish ..\Oqtane.Server\Oqtane.Server.csproj /p:Configuration=Release
del /F/Q/S "..\Oqtane.Server\bin\Release\net6.0\publish\wwwroot\Content" > NUL
rmdir /Q/S "..\Oqtane.Server\bin\Release\net6.0\publish\wwwroot\Content"
setlocal ENABLEDELAYEDEXPANSION
set retain=Oqtane.Modules.Admin.Login,Oqtane.Modules.HtmlText,Templates
for /D %%i in ("..\Oqtane.Server\bin\Release\net6.0\publish\wwwroot\Modules\*") do (
set /A found=0
for %%j in (%retain%) do (
if "%%~nxi" == "%%j" set /A found=1
)
if not !found! == 1 rmdir /Q/S "%%i"
)
set retain=Oqtane.Themes.BlazorTheme,Oqtane.Themes.OqtaneTheme,Templates
for /D %%i in ("..\Oqtane.Server\bin\Release\net6.0\publish\wwwroot\Themes\*") do (
set /A found=0
for %%j in (%retain%) do (
if "%%~nxi" == "%%j" set /A found=1
)
if not !found! == 1 rmdir /Q/S "%%i"
)
del "..\Oqtane.Server\bin\Release\net6.0\publish\appsettings.json"
ren "..\Oqtane.Server\bin\Release\net6.0\publish\appsettings.release.json" "appsettings.json"
C:\Windows\System32\WindowsPowerShell\v1.0\powershell.exe ".\install.ps1"
del "..\Oqtane.Server\bin\Release\net6.0\publish\appsettings.json"
del "..\Oqtane.Server\bin\Release\net6.0\publish\web.config"
C:\Windows\System32\WindowsPowerShell\v1.0\powershell.exe ".\upgrade.ps1"
dotnet clean -c Release ..\Oqtane.Updater.sln
dotnet build -c Release ..\Oqtane.Updater.sln
dotnet publish ..\Oqtane.Updater\Oqtane.Updater.csproj /p:Configuration=Release
nuget.exe pack Oqtane.Updater.nuspec
pause
and this is my modified version
del "*.nupkg"
del "*.zip"
dotnet clean -c Release ..\Oqtane.Databases.sln
dotnet clean -c Release ..\Oqtane.sln
dotnet build -c Release ..\Oqtane.Databases.sln
dotnet build -c Release ..\Oqtane.sln
nuget.exe pack Oqtane.Client.nuspec
nuget.exe pack Oqtane.Server.nuspec
nuget.exe pack Oqtane.Shared.nuspec
nuget.exe pack Oqtane.Framework.nuspec
del /F/Q/S "..\Oqtane.Server\bin\Release\net6.0\publish" > NUL
rmdir /Q/S "..\Oqtane.Server\bin\Release\net6.0\publish"
dotnet publish ..\Oqtane.Server\Oqtane.Server.csproj /p:Configuration=Release --runtime linux-x64 --self-contained true
del /F/Q/S "..\Oqtane.Server\bin\Release\net6.0\publish\wwwroot\Content" > NUL
rmdir /Q/S "..\Oqtane.Server\bin\Release\net6.0\publish\wwwroot\Content"
setlocal ENABLEDELAYEDEXPANSION
set retain=Oqtane.Modules.Admin.Login,Oqtane.Modules.HtmlText,Templates
for /D %%i in ("..\Oqtane.Server\bin\Release\net6.0\publish\wwwroot\Modules\*") do (
set /A found=0
for %%j in (%retain%) do (
if "%%~nxi" == "%%j" set /A found=1
)
if not !found! == 1 rmdir /Q/S "%%i"
)
set retain=Oqtane.Themes.BlazorTheme,Oqtane.Themes.OqtaneTheme,Templates
for /D %%i in ("..\Oqtane.Server\bin\Release\net6.0\publish\wwwroot\Themes\*") do (
set /A found=0
for %%j in (%retain%) do (
if "%%~nxi" == "%%j" set /A found=1
)
if not !found! == 1 rmdir /Q/S "%%i"
)
del "..\Oqtane.Server\bin\Release\net6.0\publish\appsettings.json"
ren "..\Oqtane.Server\bin\Release\net6.0\publish\appsettings.release.json" "appsettings.json"
C:\Windows\System32\WindowsPowerShell\v1.0\powershell.exe ".\install.ps1"
del "..\Oqtane.Server\bin\Release\net6.0\publish\appsettings.json"
del "..\Oqtane.Server\bin\Release\net6.0\publish\web.config"
C:\Windows\System32\WindowsPowerShell\v1.0\powershell.exe ".\upgrade.ps1"
dotnet clean -c Release ..\Oqtane.Updater.sln
dotnet build -c Release ..\Oqtane.Updater.sln
dotnet publish ..\Oqtane.Updater\Oqtane.Updater.csproj /p:Configuration=Release --runtime linux-x64 --self-contained true
pause
The script is basically the same I just appended the runtime target parameter and the self contained parameter, lie this: “-runtime linux-x64 –self-contained true” in the 2 lines specified below
line 13: dotnet publish ..\Oqtane.Server\Oqtane.Server.csproj /p:Configuration=Release --runtime linux-x64 --self-contained true
line 41: dotnet publish ..\Oqtane.Updater\Oqtane.Updater.csproj /p:Configuration=Release --runtime linux-x64 --self-contained true
After I changed the publishing parameters the path of the published files changed, now they are in a folder that with the same name of the target runtime, that means that I need to update 2 more files “install.ps1” and “upgrade.ps1”
install.ps1
Compress-Archive -Path "..\Oqtane.Server\bin\Release\net6.0\linux-x64\publish\*" -DestinationPath "Oqtane.Framework.3.4.0.Install.zip" -Force
upgrade.ps1
Compress-Archive -Path "..\Oqtane.Server\bin\Release\net6.0\linux-x64\publish\*" -DestinationPath "Oqtane.Framework.3.4.0.Upgrade.zip" -Force
So after those little changes we are ready to compile oqtane to target Linux runtime as a self contained app