In the preceding blog post, we explored the process of running Oqtane on Ubuntu Linux and successfully confirmed its functionality. Now, let us delve deeper and proceed to package the installation binaries specifically tailored for Ubuntu Linux deployment.
As a frequent publisher of Blazor applications to Linux servers, I find the process to be quite straightforward. Utilizing the .NET CLI, one can simply execute the following command to publish the app for Linux:
dotnet publish --runtime linux-x64
On this occasion, my customary approach to publishing encountered an obstacle, indicating additional steps were required. Consequently, I submitted an issue to the Oqtane GitHub repository, where Leigh Pointer from the Oqtane community kindly provided guidance in the correct direction. The GitHub issue can be viewed here.
The first file that I changed was
del "*.nupkg"
del "*.zip"
dotnet clean -c Release ..\Oqtane.Databases.sln
dotnet clean -c Release ..\Oqtane.sln
dotnet build -c Release ..\Oqtane.Databases.sln
dotnet build -c Release ..\Oqtane.sln
nuget.exe pack Oqtane.Client.nuspec
nuget.exe pack Oqtane.Server.nuspec
nuget.exe pack Oqtane.Shared.nuspec
nuget.exe pack Oqtane.Framework.nuspec
del /F/Q/S "..\Oqtane.Server\bin\Release\net6.0\publish" > NUL
rmdir /Q/S "..\Oqtane.Server\bin\Release\net6.0\publish"
dotnet publish ..\Oqtane.Server\Oqtane.Server.csproj /p:Configuration=Release
del /F/Q/S "..\Oqtane.Server\bin\Release\net6.0\publish\wwwroot\Content" > NUL
rmdir /Q/S "..\Oqtane.Server\bin\Release\net6.0\publish\wwwroot\Content"
setlocal ENABLEDELAYEDEXPANSION
set retain=Oqtane.Modules.Admin.Login,Oqtane.Modules.HtmlText,Templates
for /D %%i in ("..\Oqtane.Server\bin\Release\net6.0\publish\wwwroot\Modules\*") do (
set /A found=0
for %%j in (%retain%) do (
if "%%~nxi" == "%%j" set /A found=1
)
if not !found! == 1 rmdir /Q/S "%%i"
)
set retain=Oqtane.Themes.BlazorTheme,Oqtane.Themes.OqtaneTheme,Templates
for /D %%i in ("..\Oqtane.Server\bin\Release\net6.0\publish\wwwroot\Themes\*") do (
set /A found=0
for %%j in (%retain%) do (
if "%%~nxi" == "%%j" set /A found=1
)
if not !found! == 1 rmdir /Q/S "%%i"
)
del "..\Oqtane.Server\bin\Release\net6.0\publish\appsettings.json"
ren "..\Oqtane.Server\bin\Release\net6.0\publish\appsettings.release.json" "appsettings.json"
C:\Windows\System32\WindowsPowerShell\v1.0\powershell.exe ".\install.ps1"
del "..\Oqtane.Server\bin\Release\net6.0\publish\appsettings.json"
del "..\Oqtane.Server\bin\Release\net6.0\publish\web.config"
C:\Windows\System32\WindowsPowerShell\v1.0\powershell.exe ".\upgrade.ps1"
dotnet clean -c Release ..\Oqtane.Updater.sln
dotnet build -c Release ..\Oqtane.Updater.sln
dotnet publish ..\Oqtane.Updater\Oqtane.Updater.csproj /p:Configuration=Release
nuget.exe pack Oqtane.Updater.nuspec
pause
and this is my modified version
del "*.nupkg"
del "*.zip"
dotnet clean -c Release ..\Oqtane.Databases.sln
dotnet clean -c Release ..\Oqtane.sln
dotnet build -c Release ..\Oqtane.Databases.sln
dotnet build -c Release ..\Oqtane.sln
nuget.exe pack Oqtane.Client.nuspec
nuget.exe pack Oqtane.Server.nuspec
nuget.exe pack Oqtane.Shared.nuspec
nuget.exe pack Oqtane.Framework.nuspec
del /F/Q/S "..\Oqtane.Server\bin\Release\net6.0\publish" > NUL
rmdir /Q/S "..\Oqtane.Server\bin\Release\net6.0\publish"
dotnet publish ..\Oqtane.Server\Oqtane.Server.csproj /p:Configuration=Release --runtime linux-x64 --self-contained true
del /F/Q/S "..\Oqtane.Server\bin\Release\net6.0\publish\wwwroot\Content" > NUL
rmdir /Q/S "..\Oqtane.Server\bin\Release\net6.0\publish\wwwroot\Content"
setlocal ENABLEDELAYEDEXPANSION
set retain=Oqtane.Modules.Admin.Login,Oqtane.Modules.HtmlText,Templates
for /D %%i in ("..\Oqtane.Server\bin\Release\net6.0\publish\wwwroot\Modules\*") do (
set /A found=0
for %%j in (%retain%) do (
if "%%~nxi" == "%%j" set /A found=1
)
if not !found! == 1 rmdir /Q/S "%%i"
)
set retain=Oqtane.Themes.BlazorTheme,Oqtane.Themes.OqtaneTheme,Templates
for /D %%i in ("..\Oqtane.Server\bin\Release\net6.0\publish\wwwroot\Themes\*") do (
set /A found=0
for %%j in (%retain%) do (
if "%%~nxi" == "%%j" set /A found=1
)
if not !found! == 1 rmdir /Q/S "%%i"
)
del "..\Oqtane.Server\bin\Release\net6.0\publish\appsettings.json"
ren "..\Oqtane.Server\bin\Release\net6.0\publish\appsettings.release.json" "appsettings.json"
C:\Windows\System32\WindowsPowerShell\v1.0\powershell.exe ".\install.ps1"
del "..\Oqtane.Server\bin\Release\net6.0\publish\appsettings.json"
del "..\Oqtane.Server\bin\Release\net6.0\publish\web.config"
C:\Windows\System32\WindowsPowerShell\v1.0\powershell.exe ".\upgrade.ps1"
dotnet clean -c Release ..\Oqtane.Updater.sln
dotnet build -c Release ..\Oqtane.Updater.sln
dotnet publish ..\Oqtane.Updater\Oqtane.Updater.csproj /p:Configuration=Release --runtime linux-x64 --self-contained true
pause
The script is basically the same I just appended the runtime target parameter and the self contained parameter, lie this: “-runtime linux-x64 –self-contained true” in the 2 lines specified below
line 13: dotnet publish ..\Oqtane.Server\Oqtane.Server.csproj /p:Configuration=Release --runtime linux-x64 --self-contained true
line 41: dotnet publish ..\Oqtane.Updater\Oqtane.Updater.csproj /p:Configuration=Release --runtime linux-x64 --self-contained true
After I changed the publishing parameters the path of the published files changed, now they are in a folder that with the same name of the target runtime, that means that I need to update 2 more files “install.ps1” and “upgrade.ps1”
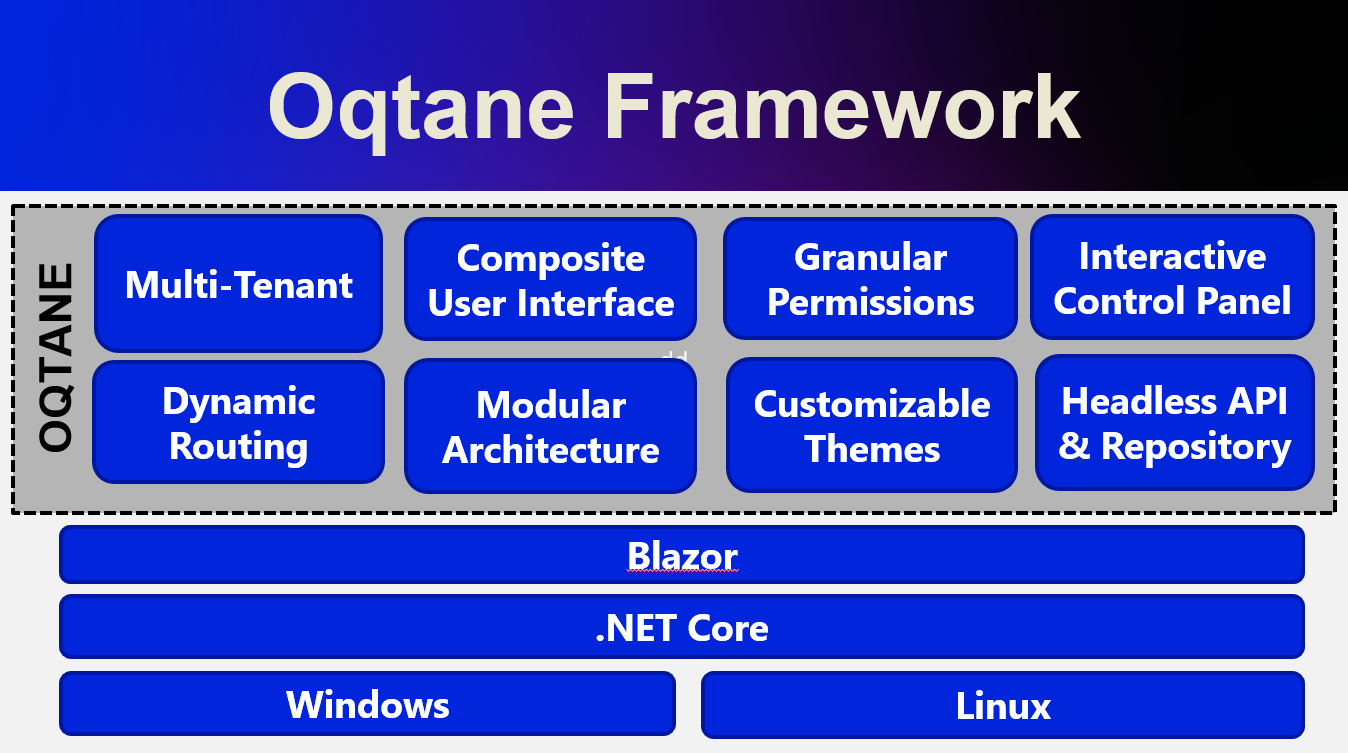
Oqtane is an open-source, modular application framework built on top of ASP.NET Core, a popular web development platform created by Microsoft. Oqtane is inspired by DotNetNuke (DNN), another content management system and web application framework, but it is designed specifically to take advantage of the benefits of ASP.NET Core, such as cross-platform compatibility, improved performance, and modern architectural patterns.
Since Oqtane is built on ASP.NET Core, it leverages the underlying features of the platform, such as support for C# and Razor syntax, dependency injection, and Model-View-Controller (MVC) architecture. As a result, developers familiar with ASP.NET Core will find it easier to work with Oqtane.
Oqtane allows developers to build customizable, extensible, and scalable web applications by providing a modular infrastructure that supports the development of plug-and-play components, such as themes, modules, and extensions. It offers a range of features, including user authentication and authorization, multi-tenancy, a content management system, and a built-in administration dashboard.
Currently, the Oqtane documentation primarily outlines the installation process on an IIS server, which is exclusive to Windows operating systems. However, as previously mentioned, Oqtane is built upon the versatile .NET Core framework, which boasts compatibility with a variety of operating systems, including Linux.
Embracing .NET Core on Linux has been a passion of mine ever since its inception. I have diligently sought to acquire the knowledge necessary to effectively run .NET applications on Linux, immersing myself in every aspect of this cross-platform journey.
Motivated to explore the potential of running Oqtane on Ubuntu 22.04 with PostgreSQL (a previously unsupported database system by Oqtane), I set forth with two primary objectives. The first is to determine the feasibility of compiling the code and executing it in alignment with the guidelines provided in Oqtane’s documentation. My second is to generate Linux-compatible binaries, enabling deployment on a Linux server.
In accordance with the “Getting Started” section of Oqtane’s GitHub repository, three prerequisites must be met. The first requirement, installing the .NET 6 SDK, is effortlessly accomplished on a Linux machine by executing a mere two commands, thus equipping the system with both the SDK and runtime.
The second requirement is “Install the latest edition (v17.0 or higher) of Visual Studio 2022 with the ASP.NET and web development workload enabled.” that is not possible because we are using Linux, we can use visual studio code, but for the sake of simplicity we will just use the dotnet CLI.
Third and last step is to clone or download the development branch of oqtane , to keep it simple we will just download the source
After we have download the source, we should navigate to the folder where oqtane server project lives, that is usually “Oqtane.Server” inside the solution folder, once there start a terminal and run the following command
dotnet run Oqtane.Server.csproj
Then you will see something like this
After that you can navigate to http://localhost:44357 and you will se this page
Congratulations, you have successfully compiled and run Oqtane for Ubuntu Linux
In the next post I will include the details to generate oqtane release binaries for Linux
Running an application as a service in macOS can be accomplished using a tool called launchd. launchd is a system-wide daemon manager that is built into macOS. It can be used to run applications automatically at startup, or on a schedule. In this article, we’ll show you how to run an application as a service using launchd, and explain the difference between LaunchDaemons and LaunchAgents.
Step 1: Create a launchd plist file The first step in running an application as a service using launchd is to create a property list file called a “launchd plist”. This file defines the service and its settings, including the name, program to run, and any environment variables or other settings. The plist file is an XML file and should have the extension .plist. An example of a plist file is the following:
Step 2: Copy the plist file to the appropriate directory Once the plist file is created, you will need to copy it to the appropriate directory. There are two main directories for launchd plist files: /Library/LaunchDaemons/ and /Library/LaunchAgents/.
The difference between LaunchDaemons and LaunchAgents is that LaunchDaemons are used to run background services that do not require a user to be logged in, while LaunchAgents are used to run applications that are associated with a specific user account.
For example, if you want to run a service that starts automatically at boot time and runs in the background, you would copy the plist file to /Library/LaunchDaemons/. If you want to run an application that starts automatically when a user logs in, you would copy the plist file to /Library/LaunchAgents/.
Step 3: Load the service Once the plist file is in the appropriate directory, use the launchctl command to load the service. For example:
Step 4: Verify that the service is running You can use the launchctl command to check the status of the service:
launchctl list
This will show all the services that are currently running, and their status.
In summary, launchd is a powerful tool built into macOS that allows you to run applications as services. To use launchd, you need to create a plist file that defines the service and its settings, then copy it to the appropriate directory, and load it using the launchctl command. The difference between LaunchDaemons and LaunchAgents is that the former are used to run background services that do not require a user to be logged in, while the latter are used to run applications that are associated with a specific user account.
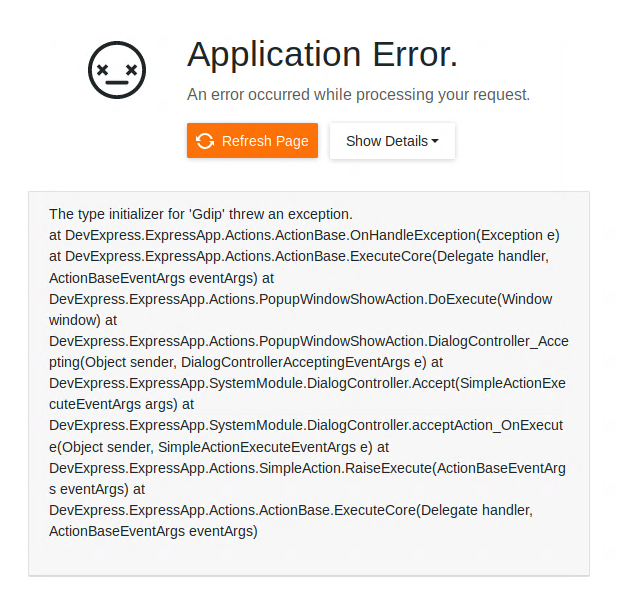
If you are running Xaf Blazor in ubuntu 18.04 you might have seen the following exception
The type initializer for ‘Gdip’ threw an exception.
at DevExpress.ExpressApp.Actions.ActionBase.OnHandleException(Exception e) at DevExpress.ExpressApp.Actions.ActionBase.ExecuteCore(Delegate handler, ActionBaseEventArgs eventArgs) at DevExpress.ExpressApp.Actions.PopupWindowShowAction.DoExecute(Window window) at DevExpress.ExpressApp.Actions.PopupWindowShowAction.DialogController_Accepting(Object sender, DialogControllerAcceptingEventArgs e) at DevExpress.ExpressApp.SystemModule.DialogController.Accept(SimpleActionExecuteEventArgs args) at DevExpress.ExpressApp.SystemModule.DialogController.acceptAction_OnExecute(Object sender, SimpleActionExecuteEventArgs e) at DevExpress.ExpressApp.Actions.SimpleAction.RaiseExecute(ActionBaseEventArgs eventArgs) at DevExpress.ExpressApp.Actions.ActionBase.ExecuteCore(Delegate handler, ActionBaseEventArgs eventArgs)
The error is caused by missing dependency, so the DotNet runtime itself will throw that exception. Also, I want to highlight that the exception is not related to XAF, you can read more about this problem here https://github.com/dotnet/runtime/issues/27200
To get the missing dependency just open a console and run the following commands
Here are some recommendations to host your new shiny aspnet core app on Linux in this case in Ubuntu 18.04
First, create a user with the name aspnetapp
sudo adduser myaspnetapp
after executing the command, you will have a new folder in your home directory the folder will have the same name as your username so in this case “myaspnetapp”
now let’s SSH to with the new user you just created you can do that using your favorite SSH client, for example, if you are using windows you can use putty
when you log in with the new user you will be in its home folder, now we can create a folder called app with the following command
There are many options to upload a zip file but I think is the best way is to use the secure copy command from linux “scp”, I won’t explain how you should call the scp command but if you are using windows you can run that command from the WSL console and if you are using Linux the command is already built-in, anyway here is an article about it https://linuxize.com/post/how-to-use-scp-command-to-securely-transfer-files/
Here I will write an example of how the scp command should look like and you adjust it to your needs
so that command above will do the following, it will copy the file publish.zip from the local folder to a server running on the following the IP 200.35.15.25 and the folder “/home/myaspnetapp/app”
now let’s unzip the content of the folder zip with the following command
unzip publish.zip
What we have done so far:
We have created a user in the OS
We have created a folder to host our application within the user home folder
We have uploaded a zip file containing our application the folder “/home/myaspnetapp/app”
Now that the app is already in the server we need to change the permission of the folder where the app lives to 0777, you can learn more about Linux file system permissions here https://www.guru99.com/file-permissions.html
Creating a service to monitor the app
The next step to monitor our app is to use systemd is an init system that provides many powerful features for starting, stopping, and managing processes.
Let’s start by creating a service file in the following path “/etc/systemd/system/”
here is how the content of the file should look like
[Unit]

Description=A description of your app


[Service]

WorkingDirectory=/home/myaspnetapp /app

ExecStart= /home/ myaspnetapp /app/MyExecutableFile

Restart=always

# Restart service after 10 seconds if the dotnet service crashes:

RestartSec=10

KillSignal=SIGINT

SyslogIdentifier= MyExecutableFile

User=apache

Environment=ASPNETCORE_ENVIRONMENT=Production


[Install]

WantedBy=multi-user.target
Here is a little explanation of what you might need to change if the file above
WorkingDirectory: this is the working directory, usually is the same where the app lives
ExecStart: This is the executable file how what will you write here will depend on your application if its self-contained you just need to write the name the full path of the executable file otherwise you need to write the path to the dotnet runtime and then the path to your dll as show below:
RestartSec: this is the time to wait before trying to restart the app after if the process crashes
SyslogIdentifier: the app identifier for sys logs
User: this is really important since the app will run under this user privileges, so you need to make sure that the user exists and that is able to access the files needed to start the app
That is all that we need for the service file now we need to go back to the console and enable our new service, you can do that with the following command
sudo systemctl enable MyExecutableFile.service
To start and stop the service you can use the following commands
I have been using XPO from DevExpress since day one. For me is the best O.R.M in the dot net world, so when I got the news that XPO was going to be free of charge I was really happy because that means I can use it in every project without adding cost for my customers.
Nowadays all my customer needs some type of mobile development, so I have decided to master the combination of XPO and Xamarin
Now there is a problem when using XPO and Xamarin and that is the network topology, database connections are no designed for WAN networks.
Let’s take MS SQL server as an example, here are the supported communication protocols
TCP/IP.
Named Pipes
To quote what Microsoft web site said about using the protocols above in a WAN network
In a fast-local area network (LAN) environment, Transmission Control Protocol/Internet Protocol (TCP/IP) Sockets and Named Pipes clients are comparable with regard to performance. However, the performance difference between the TCP/IP Sockets and Named Pipes clients becomes apparent with slower networks, such as across wide area networks (WANs) or dial-up networks. This is because of the different ways the interprocess communication (IPC) mechanisms communicate between peers.”
So, what other options do we have? Well if you are using the full DotNet framework you can use WCF.
So, it looks like WCF is the solution here since is mature and robust communication framework but there is a problem, the implementation of WCF for mono touch (Xamarin iOS) and mono droid (Xamarin Android)
You can read about Xamarin limitations in the following links
I don’t want to go into details about how the limitation of each platform affects XPO and WCF but basically the main limitation is the ability to use reflection and emit new code which is needed to generate the WCF client, also in WCF there are problems in the serialization behaviors.
So basically, what we need to do is to replace the WCF layer with some other technology to communicate to the database server
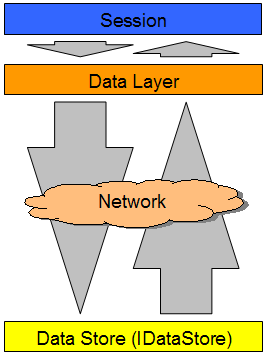
The technology I’ve selected for this AspNetCore which I would say is a really nice technology that is modern, multi-platform and easy to use. Here below you can see what is the architecture of the solution
AspNetCore
Rest API
So, what we need basically is to be able to communicate the data layer with the data store through a network architecture.
The network architecture that I have chosen is a rest API which is one of the strong fronts of AspNetCore. The rest API will work as the server that forward the communication from XPO to the Database and vice versa, you can find a project template of the server implementation here https://www.jocheojeda.com/download/560/ this implementation references one nuget where I have written the communication code, you can fine the nuget here https://nuget.bitframeworks.com/feeds/main/BIT.Xpo.AgnosticDataStore.Server/19.1.5.1