by Joche Ojeda | Oct 30, 2024 | Uncategorized
Lately, I’ve been working extensively on interacting with LLMs using the Semantic Kernel framework. My experiments usually start as NUnit test projects, where I prototype my ideas.
Once an experiment is successful, I move it to XAF. Recently, I faced challenges with executing asynchronous code and updating the XAF UI. This process is tricky because some solutions might appear to work but fail under certain conditions.
Goals
Here’s what I aim to achieve:
- Execute asynchronous code within the execute handler of an action.
- Notify the UI and access the current view, object, and object space.
- Run multiple operations on a background thread.
For more background, check out these links on async executions within XAF actions:
WebForms
Blazor
Complete source code for this test can be found on GitHub.
Common Cases
1. Blocking the UI Thread (this will not work)
If you don’t make your action async, attempting to get the awaiter will block the UI thread, freezing your application.
ActionBlockUIThread = new SimpleAction(this, nameof(ActionBlockUIThread), "View");
ActionBlockUIThread.Execute += ActionBlockUIThread_Execute;

protected virtual void ActionBlockUIThread_Execute(object sender, SimpleActionExecuteEventArgs e) {
    var Tasks = GetTaskList();
    StringBuilder Results = new StringBuilder();
    foreach (var item in Tasks) {
        Results.AppendLine(item.Invoke().GetAwaiter().GetResult().ToString());
    }
    MessageOptions options = new MessageOptions { Duration = 2000, Message = Results.ToString(), Type = InformationType.Success };
    Application.ShowViewStrategy.ShowMessage(options);
}
2. Using Async Modifier (somehow works)
Marking your handler as async prevents blocking but keeps the UI responsive, which can allow the user to modify or navigate away from the current view, causing exceptions.
protected virtual async void ActionWithAsyncModifier_Execute(object sender, SimpleActionExecuteEventArgs e) {
    var Tasks = GetTaskList();
    StringBuilder Results = new StringBuilder();
    foreach (var item in Tasks) {
        var CurrentResult = await item.Invoke();
        Results.AppendLine(CurrentResult.ToString());
    }
    MessageOptions options = new MessageOptions { Duration = 2000, Message = Results.ToString(), Type = InformationType.Success };
    Application.ShowViewStrategy.ShowMessage(options);
}
A slightly modified Blazor version of this code also illustrates similar issues.
Executing Object Space Operations Inside Async Action, things that can happen
This approach still leaves the UI responsive, risking disposal of object space if the user navigates away, if that happens you will end up with an exception
protected virtual async void ActionWithAsyncModifierAndOsOperations_Execute(object sender, SimpleActionExecuteEventArgs e) {
    var Instance = GetInstance();
    var Tasks = GetTaskList();
    StringBuilder Results = new StringBuilder();
    foreach (var item in Tasks) {
        var CurrentResult = await item.Invoke();
        Results.AppendLine(CurrentResult.ToString());
    }
    Instance.Result = Results.ToString();
    ViewCommit();
    MessageOptions options = new MessageOptions { Duration = 3000, Message = Instance.Result, Type = InformationType.Success };
    Application.ShowViewStrategy.ShowMessage(options);
}
Proposed Solution
My solution utilizes a background worker to handle async operations while locking the UI thread with a loading indicator. This allows us to react to progress on the UI thread.
Async Background Worker Example
Here’s how the AsyncBackgroundWorker is set up and used:
protected virtual void AsyncActionWithAsyncBackgroundWorker_Execute(object sender, SimpleActionExecuteEventArgs e) {
    var tasks = GetTaskList();
    var worker = new AsyncBackgroundWorker
Handling Background Worker Events
protected virtual void ProcessingDone(Dictionary<int, object> results) {
    // Interact with UI and object space
}

protected virtual void OnReportProgress(int progress, string status, object result) {
    MessageOptions options = new MessageOptions { Duration = 2000, Message = status, Type = InformationType.Success };
    Application.ShowViewStrategy.ShowMessage(options);
}
Blazor Implementation
The Blazor version manages UI locking by showing a loading indicator and reporting progress through the UI thread:
source here: https://github.com/egarim/XafAsyncActions/blob/master/XafAsyncActions.Blazor.Server/Controllers/MyViewControllerBlazor.cs
protected async override void AsyncActionWithAsyncBackgroundWorker_Execute(object sender, SimpleActionExecuteEventArgs e) {
    loading.Hold("Loading");
    base.AsyncActionWithAsyncBackgroundWorker_Execute(sender, e);
}

protected async override void ProcessingDone(Dictionary<int, object> results) {
    base.ProcessingDone(results);
    loading.Release("Loading");
}
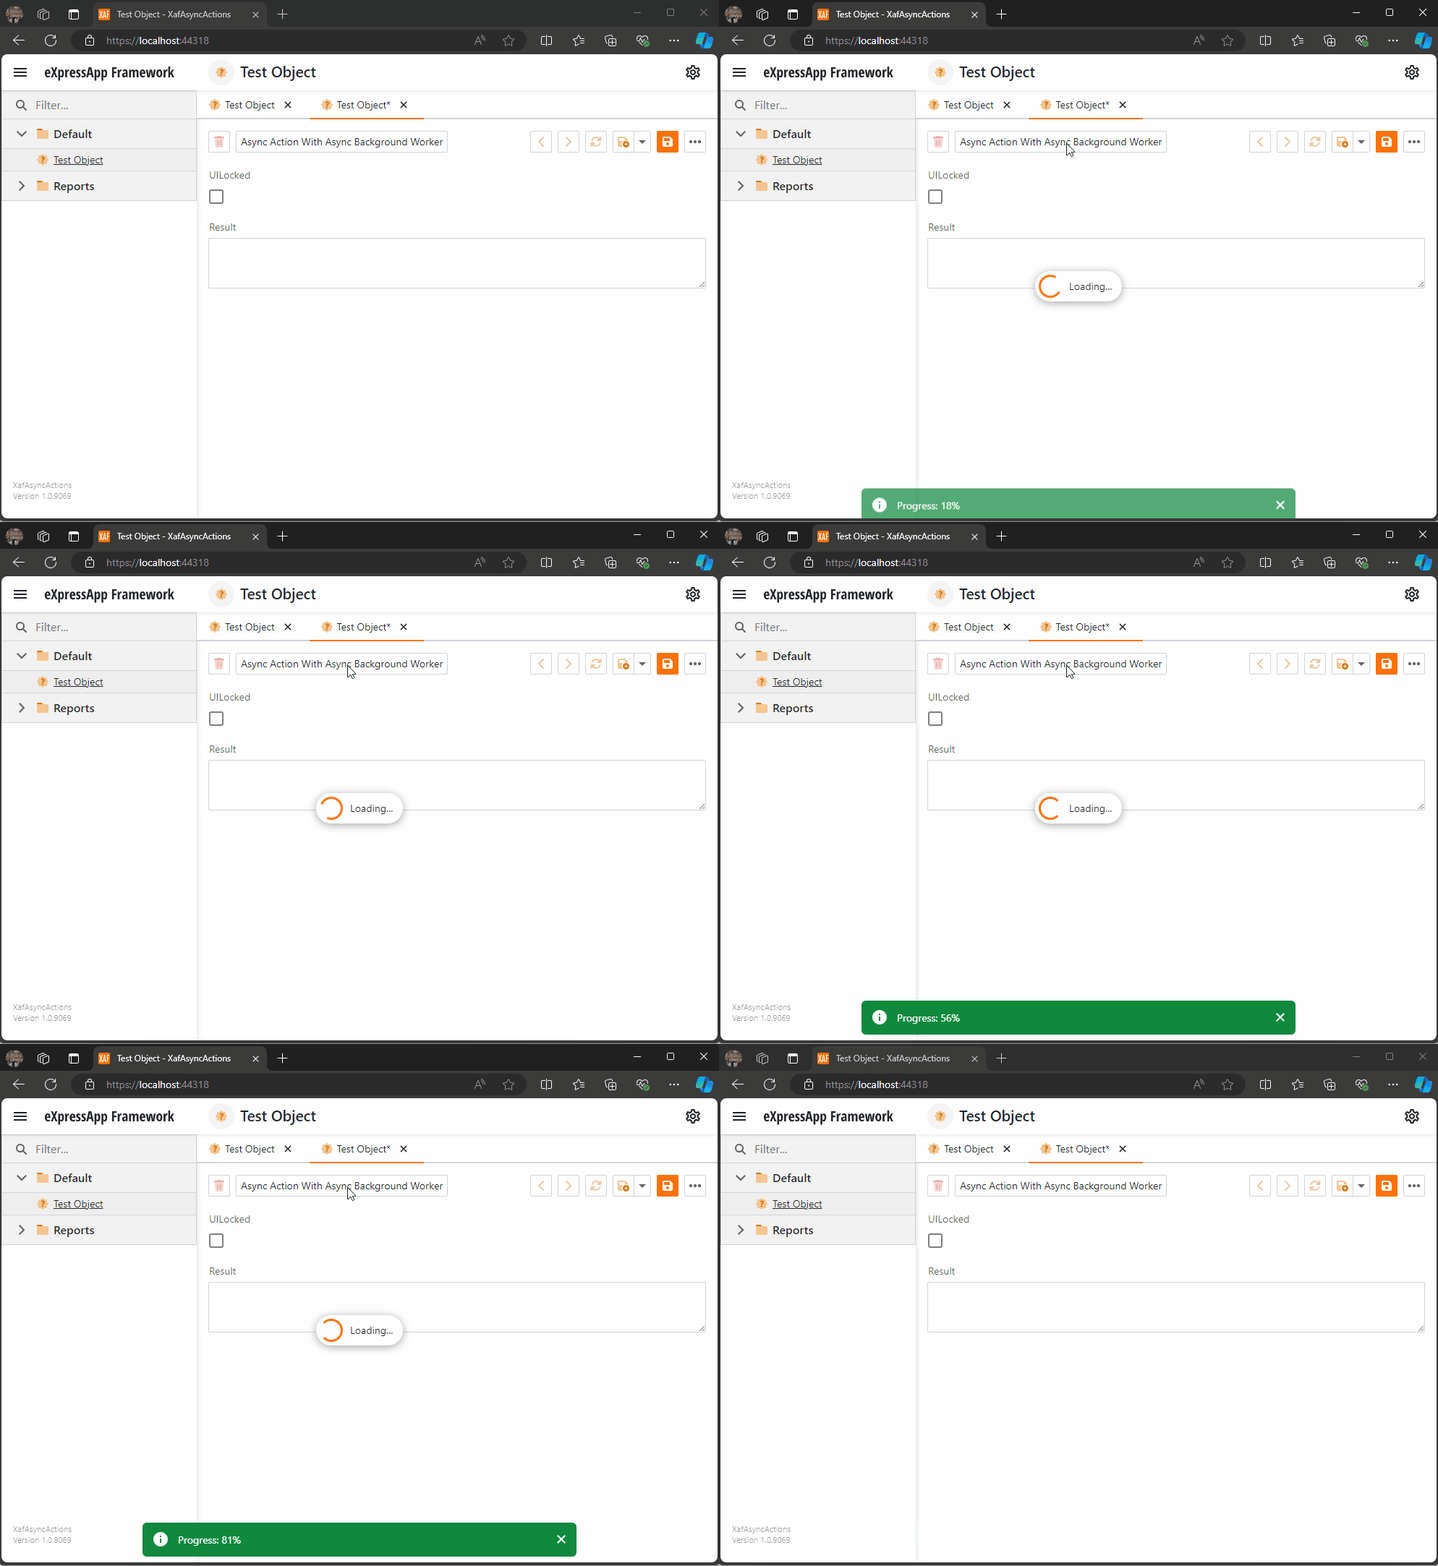
When you run this implementation, it will look like this

As you can see the task are being run on the background worker and every time a task is finish is reported back to the U.I thread where we can execute a notification (this is actually optional)
When all the tasks are finished, I hide the loading indicator, and the user can interact with the view again
I hope this article clarifies async execution in XAF. I will update the repository as new scenarios arise.
by Joche Ojeda | Oct 21, 2024 | A.I, Semantic Kernel
A few weeks ago, I received the exciting news that DevExpress had released a new chat component (you can read more about it here). This was a big deal for me because I had been experimenting with the Semantic Kernel for almost a year. Most of my experiments fell into three categories:
- NUnit projects with no UI (useful when you need to prove a concept).
- XAF ASP.NET projects using a large textbox (String with unlimited size in XAF) to emulate a chat control.
- XAF applications using a custom chat component that I developed—which, honestly, didn’t look great because I’m more of a backend developer than a UI specialist. Still, the component did the job.
Once I got my hands on the new Chat component, the first thing I did was write a property editor to easily integrate it into XAF. You can read more about property editors in XAF here.
With the Chat component property editor in place, I had the necessary tool to accelerate my experiments with the Semantic Kernel (learn more about the Semantic Kernel here).
The Current Experiment
A few weeks ago, I wrote an implementation of the Semantic Kernel Memory Store using DevExpress’s XPO as the data storage solution. You can read about that implementation here. The next step was to integrate this Semantic Memory Store into XAF, and that’s now done. Details about that process can be found here.
What We Have So Far
- A Chat component property editor for XAF.
- A Semantic Kernel Memory Store for XPO that’s compatible with XAF.
With these two pieces, we can create an interesting prototype. The goals for this experiment are:
- Saving “memories” into a domain object (via XPO).
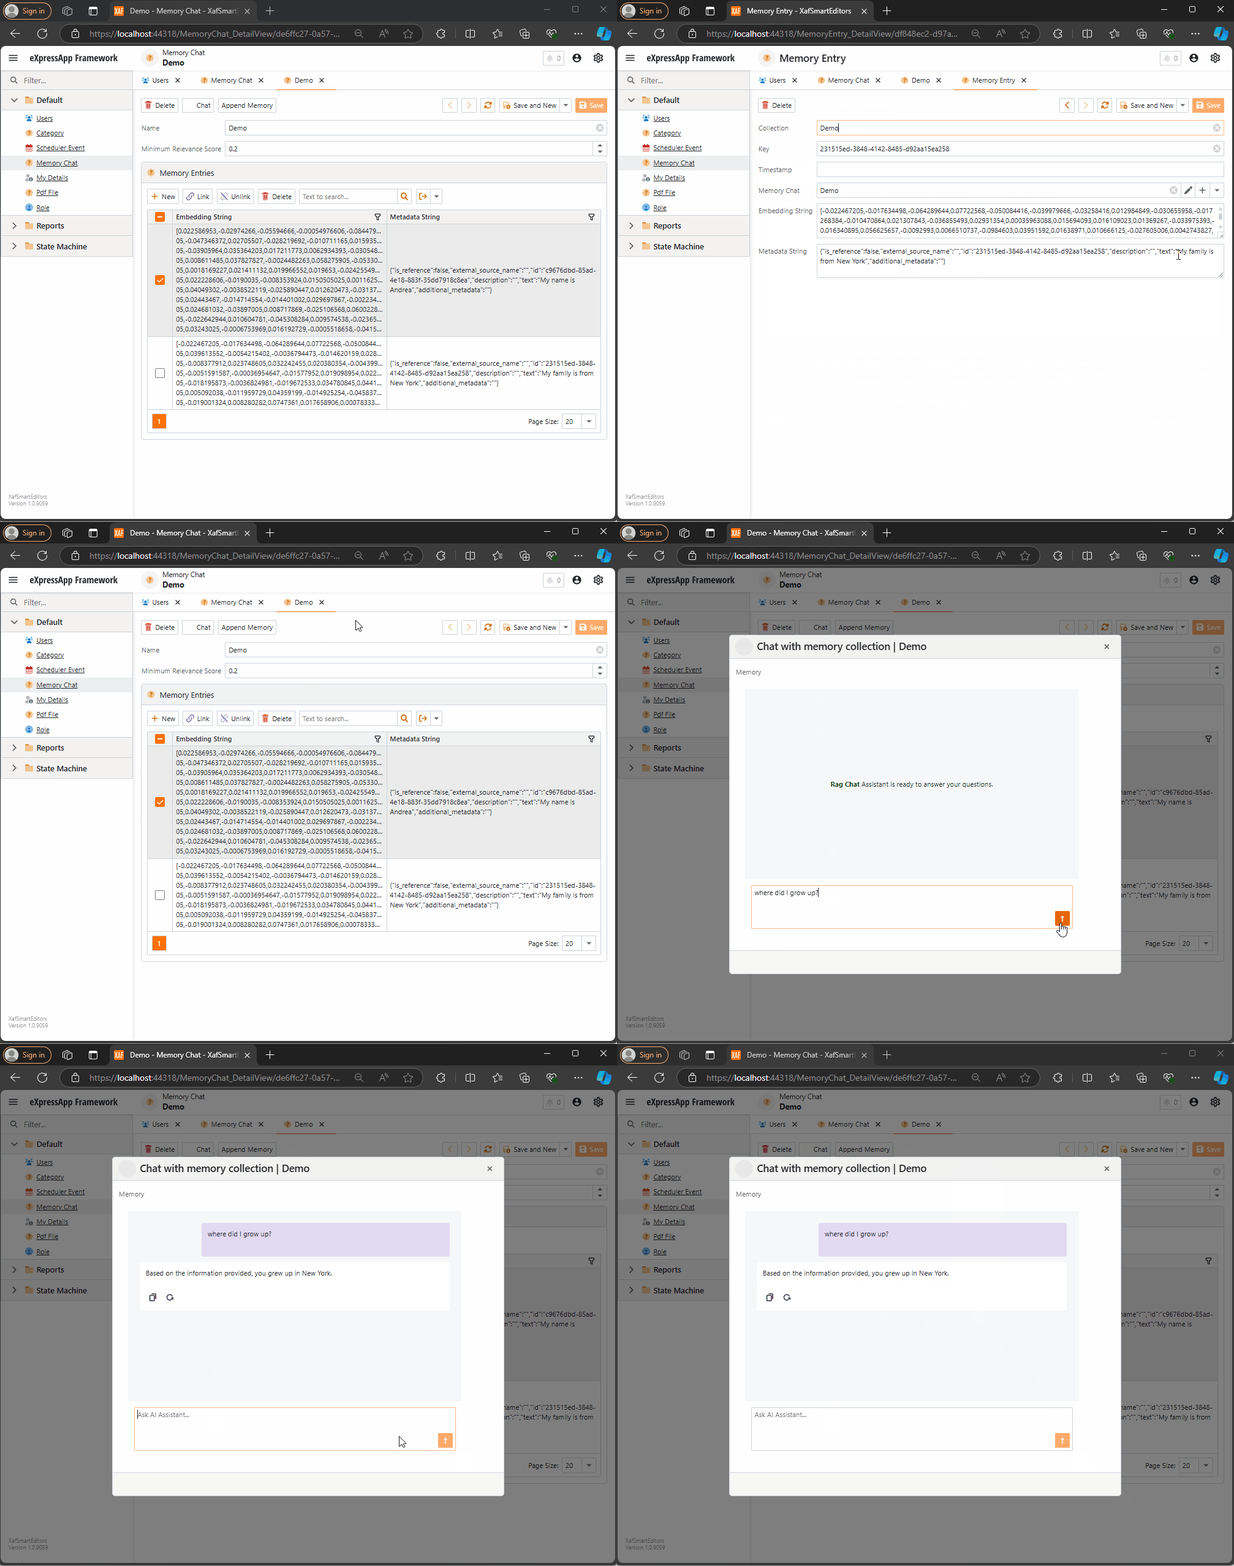
- Querying these memories through the Chat component property editor, using Semantic Kernel chat completions (compatible with all OpenAI APIs).
Step 1: Memory Collection Object
The first thing we need is an object that represents a collection of memories. Here’s the implementation:
[DefaultClassOptions]
public class MemoryChat : BaseObject
{
    public MemoryChat(Session session) : base(session) {}

    public override void AfterConstruction()
    {
        base.AfterConstruction();
        this.MinimumRelevanceScore = 0.20;
    }

    double minimumRelevanceScore;
    string name;

    [Size(SizeAttribute.DefaultStringMappingFieldSize)]
    public string Name
    {
        get => name;
        set => SetPropertyValue(nameof(Name), ref name, value);
    }

    public double MinimumRelevanceScore
    {
        get => minimumRelevanceScore;
        set => SetPropertyValue(nameof(MinimumRelevanceScore), ref minimumRelevanceScore, value);
    }

    [Association("MemoryChat-MemoryEntries")]
    public XPCollection<MemoryEntry> MemoryEntries
    {
        get => GetCollection<MemoryEntry>(nameof(MemoryEntries));
    }
}
This is a simple object. The two main properties are the MinimumRelevanceScore, which is used for similarity searches with embeddings, and the collection of MemoryEntries, where different memories are stored.
Step 2: Adding Memories
The next task is to easily append memories to that collection. I decided to use a non-persistent object displayed in a popup view with a large text area. When the user confirms the action in the dialog, the text gets vectorized and stored as a memory in the collection. You can see the implementation of the view controller here.
Let me highlight the important parts.
When we create the view for the popup window:
private void AppendMemory_CustomizePopupWindowParams(object sender, CustomizePopupWindowParamsEventArgs e)
{
    var os = this.Application.CreateObjectSpace(typeof(TextMemory));
    var textMemory = os.CreateObject<TextMemory>();
    e.View = this.Application.CreateDetailView(os, textMemory);
}
The goal is to show a large textbox where the user can type any text. When they confirm, the text is vectorized and stored as a memory.
Next, storing the memory:
private async void AppendMemory_Execute(object sender, PopupWindowShowActionExecuteEventArgs e)
{
    var textMemory = e.PopupWindowViewSelectedObjects[0] as TextMemory;
    var currentMemoryChat = e.SelectedObjects[0] as MemoryChat;

    var store = XpoMemoryStore.ConnectAsync(xafEntryManager).GetAwaiter().GetResult();
    var semanticTextMemory = GetSemanticTextMemory(store);
    await semanticTextMemory.SaveInformationAsync(currentMemoryChat.Name, id: Guid.NewGuid().ToString(), text: textMemory.Content);
}
Here, the GetSemanticTextMemory method plays a key role:
private static SemanticTextMemory GetSemanticTextMemory(XpoMemoryStore store)
{
    var embeddingModelId = "text-embedding-3-small";
    var getKey = () => Environment.GetEnvironmentVariable("OpenAiTestKey", EnvironmentVariableTarget.Machine);

    var kernel = Kernel.CreateBuilder()
        .AddOpenAIChatCompletion(ChatModelId, getKey.Invoke())
        .AddOpenAITextEmbeddingGeneration(embeddingModelId, getKey.Invoke())
        .Build();

    var embeddingGenerator = new OpenAITextEmbeddingGenerationService(embeddingModelId, getKey.Invoke());
    return new SemanticTextMemory(store, embeddingGenerator);
}
This method sets up an embedding generator used to create semantic memories.
Step 3: Querying Memories
To query the stored memories, I created a non-persistent type that interacts with the chat component:
public interface IMemoryData
{
    IChatCompletionService ChatCompletionService { get; set; }
    SemanticTextMemory SemanticTextMemory { get; set; }
    string CollectionName { get; set; }
    string Prompt { get; set; }
    double MinimumRelevanceScore { get; set; }
}
This interface provides the necessary services to interact with the chat component, including ChatCompletionService and SemanticTextMemory.
Step 4: Handling Messages
Lastly, we handle message-sent callbacks, as explained in this article:
async Task MessageSent(MessageSentEventArgs args)
{
    ChatHistory.AddUserMessage(args.Content);

    var answers = Value.SemanticTextMemory.SearchAsync(
        collection: Value.CollectionName,
        query: args.Content,
        limit: 1,
        minRelevanceScore: Value.MinimumRelevanceScore,
        withEmbeddings: true
    );

    string answerValue = "No answer";
    await foreach (var answer in answers)
    {
        answerValue = answer.Metadata.Text;
    }

    string messageContent = answerValue == "No answer"
        ? "There are no memories containing the requested information."
        : await Value.ChatCompletionService.GetChatMessageContentAsync($"You are an assistant queried for information. Use this data: {answerValue} to answer the question: {args.Content}.");

    ChatHistory.AddAssistantMessage(messageContent);
    args.SendMessage(new Message(MessageRole.Assistant, messageContent));
}
Here, we intercept the message, query the SemanticTextMemory, and use the results to generate an answer with the chat completion service.
This was a long post, but I hope it’s useful for you all. Until next time—XAF OUT!
You can find the full implementation on this repo

by Joche Ojeda | Oct 15, 2024 | A.I, Semantic Kernel, XAF, XPO
A few weeks ago, I forked the Semantic Kernel repository to experiment with it. One of my first experiments was to create a memory provider for XPO. The task was not too difficult; basically, I needed to implement the IMemoryStore interface, add some XPO boilerplate code, and just like that, we extended the Semantic Kernel memory store to support 10+ databases. You can check out the code for the XpoMemoryStore here.
My initial goal in creating the XpoMemoryStore was simply to see if XPO would be a good fit for handling embeddings. Spoiler alert: it was! To understand the basic functionality of the plugin, you can take a look at the integration test here.
As you can see, usage is straightforward. You start by connecting to the database that handles embedding collections, and all you need is a valid XPO connection string:
using XpoMemoryStore db = await XpoMemoryStore.ConnectAsync("XPO connection string");
In my original design, everything worked fine, but I faced some challenges when trying to use my new XpoMemoryStore in XAF. Here’s what I encountered:
- The implementation of XpoMemoryStore uses its own data layer, which can lead to issues. This needs to be rewritten to use the same data layer as XAF.
- The XpoEntry implementation cannot be extended. In some use cases, you might want to use a different object to store the embeddings, perhaps one that has an association with another object.
To address these problems, I introduced the IXpoEntryManager interface. The goal of this interface is to handle object creation and queries.
public interface IXpoEntryManager
{
    T CreateObject();
    public event EventHandler ObjectCreatedEvent;
    void Commit();
    IQueryable GetQuery(bool inTransaction = true);
    void Delete(object instance);
    void Dispose();
}
Now, object creation is handled through the CreateObject<T> method, allowing the underlying implementation to be changed to use a UnitOfWork or ObjectSpace. There’s also the ObjectCreatedEvent event, which lets you access the newly created object in case you need to associate it with another object. Lastly, the GetQuery<T> method enables redirecting the search for records to a different type.
I’ll keep updating the code as needed. If you’d like to discuss AI, XAF, or .NET, feel free to schedule a meeting: Schedule a Meeting with us.
Until next time, XAF out!
Related Article
https://www.jocheojeda.com/2024/09/04/using-the-imemorystore-interface-and-devexpress-xpo-orm-to-implement-a-custom-memory-store-for-semantic-kernel/
by Joche Ojeda | Oct 10, 2024 | A.I, PropertyEditors, XAF
The New Era of Smart Editors: Developer Express and AI Integration
The new era of smart editors is already here. Developer Express has introduced AI functionality in many of their controls for .NET (Windows Forms, Blazor, WPF, MAUI).
This advancement will eventually come to XAF, but in the meantime, here at XARI, we are experimenting with XAF integrations to add value to our customers.
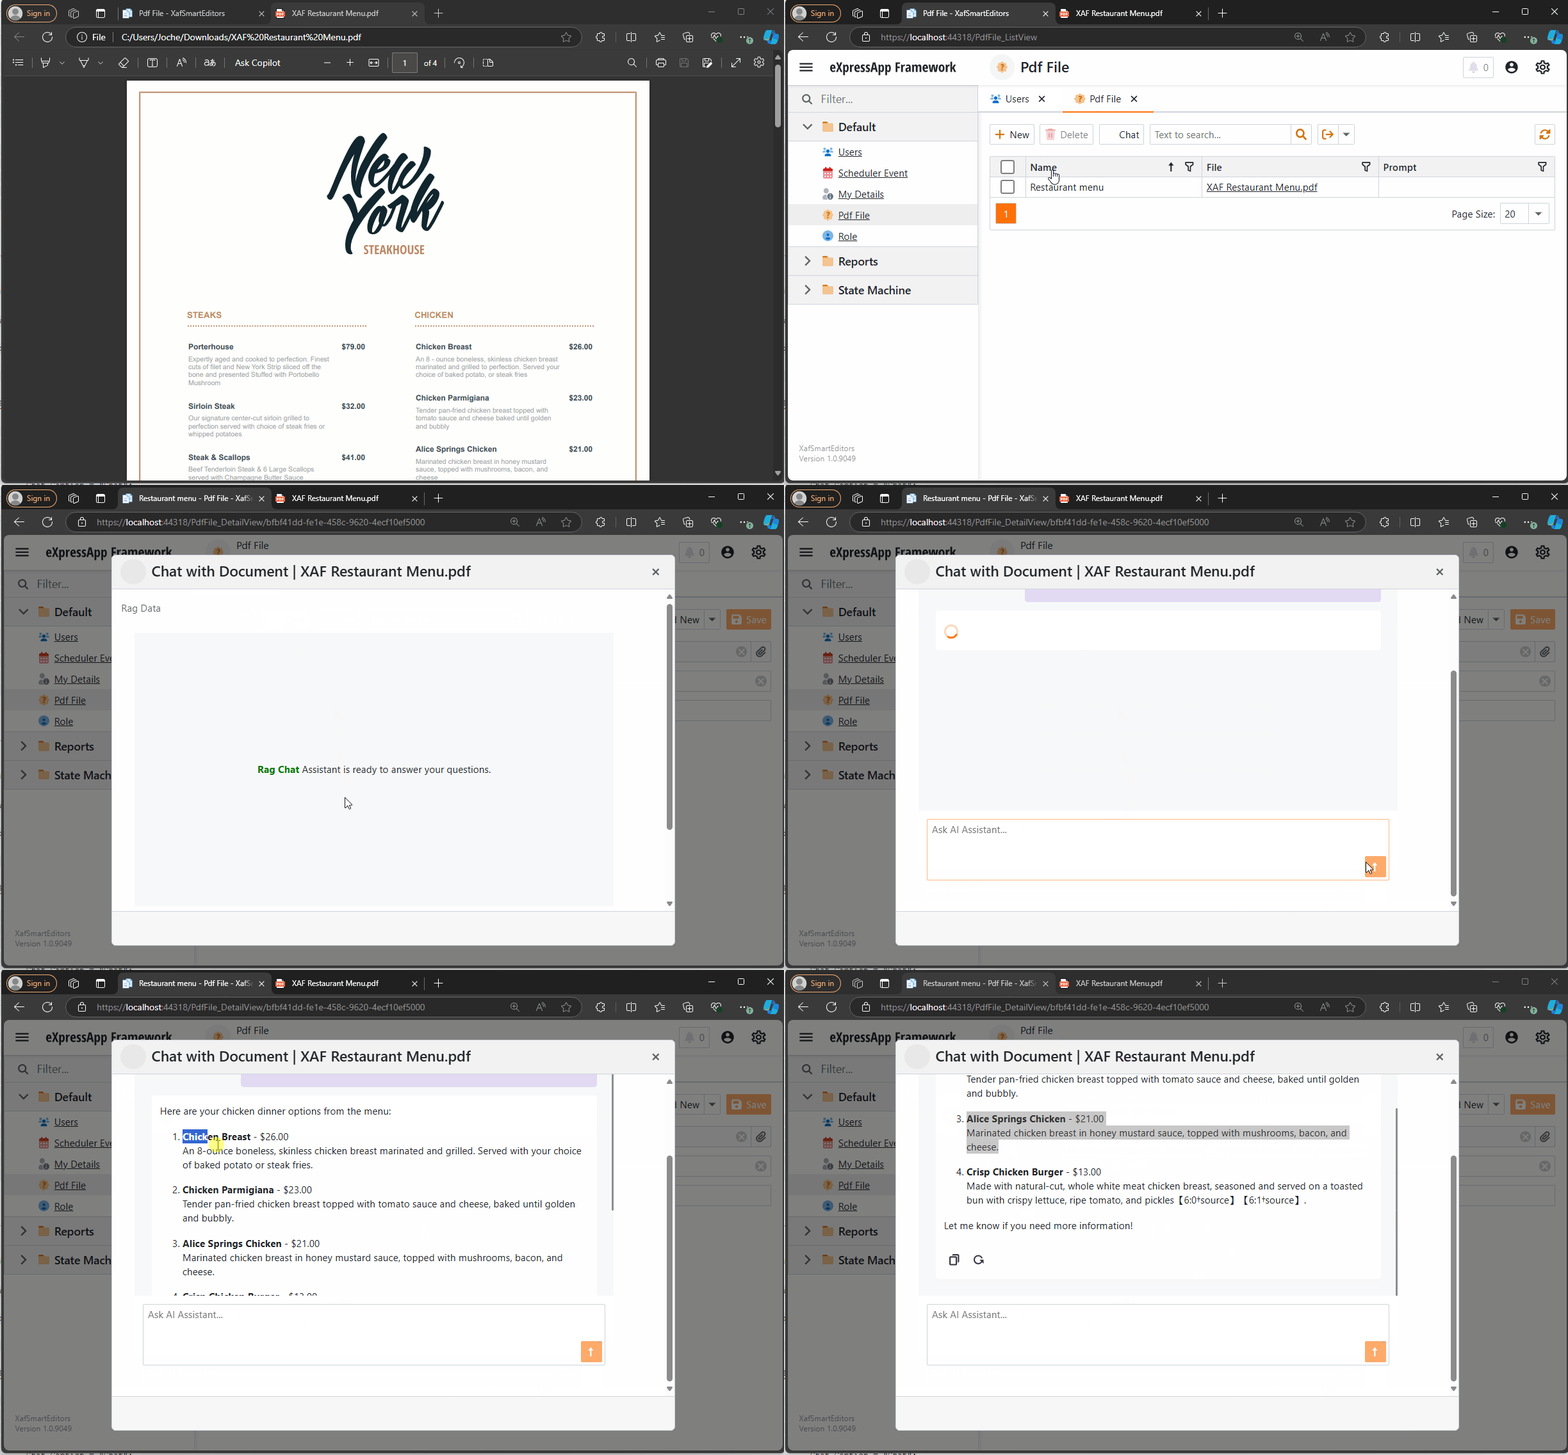
In this article, we are going to integrate the new chat component into an XAF application, and our first use case will be RAG (Retrieval-Augmented Generation). RAG is a system that combines external data sources with AI-generated responses, improving accuracy and relevance in answers by retrieving information from a document set or knowledge base and using it in conjunction with AI predictions.
To achieve this integration, we will follow the steps outlined in this tutorial:
Implement a Property Editor Based on Custom Components (Blazor)
Implementing the Property Editor
When I implement my own property editor, I usually avoid doing so for primitive types because, in most cases, my property editor will need more information than a simple primitive value. For this implementation, I want to handle a custom value in my property editor. I typically create an interface to represent the type, ensuring compatibility with both XPO and EF Core.
namespace XafSmartEditors.Razor.RagChat
{
    public interface IRagData
    {
        Stream FileContent { get; set; }
        string Prompt { get; set; }
        string FileName { get; set; }
    }
}
Non-Persistent Implementation
After defining the type for my editor, I need to create a non-persistent implementation:
namespace XafSmartEditors.Razor.RagChat
{
    [DomainComponent]
    public class IRagDataImp : IRagData, IXafEntityObject, INotifyPropertyChanged
    {
        private void OnPropertyChanged([CallerMemberName] string propertyName = null)
        {
            PropertyChanged?.Invoke(this, new PropertyChangedEventArgs(propertyName));
        }

        public IRagDataImp()
        {
            Oid = Guid.NewGuid();
        }

        [DevExpress.ExpressApp.Data.Key]
        [Browsable(false)]
        public Guid Oid { get; set; }

        private string prompt;
        private string fileName;
        private Stream fileContent;

        public Stream FileContent
        {
            get => fileContent;
            set
            {
                if (fileContent == value) return;
                fileContent = value;
                OnPropertyChanged();
            }
        }

        public string FileName
        {
            get => fileName;
            set
            {
                if (fileName == value) return;
                fileName = value;
                OnPropertyChanged();
            }
        }

        public string Prompt
        {
            get => prompt;
            set
            {
                if (prompt == value) return;
                prompt = value;
                OnPropertyChanged();
            }
        }

        // IXafEntityObject members
        void IXafEntityObject.OnCreated() { }
        void IXafEntityObject.OnLoaded() { }
        void IXafEntityObject.OnSaving() { }

        public event PropertyChangedEventHandler PropertyChanged;
    }
}
Creating the Blazor Chat Component
Now, it’s time to create our Blazor component and add the new DevExpress chat component for Blazor:
<DxAIChat CssClass="my-chat" Initialized="Initialized"
          RenderMode="AnswerRenderMode.Markdown"
          UseStreaming="true"
          SizeMode="SizeMode.Medium">
    <EmptyMessageAreaTemplate>
        <div class="my-chat-ui-description">
            <span style="font-weight: bold; color: #008000;">Rag Chat</span> Assistant is ready to answer your questions.
        </div>
    </EmptyMessageAreaTemplate>
    <MessageContentTemplate>
        <div class="my-chat-content">
            @ToHtml(context.Content)
        </div>
    </MessageContentTemplate>
</DxAIChat>

@code {
    IRagData _value;
    [Parameter]
    public IRagData Value
    {
        get => _value;
        set => _value = value;
    }

    async Task Initialized(IAIChat chat)
    {
        await chat.UseAssistantAsync(new OpenAIAssistantOptions(
            this.Value.FileName,
            this.Value.FileContent,
            this.Value.Prompt
        ));
    }

    MarkupString ToHtml(string text)
    {
        return (MarkupString)Markdown.ToHtml(text);
    }
}
The main takeaway from this component is that it receives a parameter named Value of type IRagData, and we use this value to initialize the IAIChat service in the Initialized method.
Creating the Component Model
With the interface and domain component in place, we can now create the component model to communicate the value of our domain object with the Blazor component:
namespace XafSmartEditors.Razor.RagChat
{
    public class RagDataComponentModel : ComponentModelBase
    {
        public IRagData Value
        {
            get => GetPropertyValue<IRagData>();
            set => SetPropertyValue(value);
        }

        public EventCallback<IRagData> ValueChanged
        {
            get => GetPropertyValue<EventCallback<IRagData>>();
            set => SetPropertyValue(value);
        }

        public override Type ComponentType => typeof(RagChat);
    }
}
Creating the Property Editor
Finally, let’s create the property editor class that serves as a bridge between XAF and the new component:
namespace XafSmartEditors.Blazor.Server.Editors
{
    [PropertyEditor(typeof(IRagData), true)]
    public class IRagDataPropertyEditor : BlazorPropertyEditorBase, IComplexViewItem
    {
        private IObjectSpace _objectSpace;
        private XafApplication _application;

        public IRagDataPropertyEditor(Type objectType, IModelMemberViewItem model) : base(objectType, model) { }

        public void Setup(IObjectSpace objectSpace, XafApplication application)
        {
            _objectSpace = objectSpace;
            _application = application;
        }

        public override RagDataComponentModel ComponentModel => (RagDataComponentModel)base.ComponentModel;

        protected override IComponentModel CreateComponentModel()
        {
            var model = new RagDataComponentModel();

            model.ValueChanged = EventCallback.Factory.Create<IRagData>(this, value =>
            {
                model.Value = value;
                OnControlValueChanged();
                WriteValue();
            });

            return model;
        }

        protected override void ReadValueCore()
        {
            base.ReadValueCore();
            ComponentModel.Value = (IRagData)PropertyValue;
        }

        protected override object GetControlValueCore() => ComponentModel.Value;

        protected override void ApplyReadOnly()
        {
            base.ApplyReadOnly();
            ComponentModel?.SetAttribute("readonly", !AllowEdit);
        }
    }
}
Bringing It All Together
Now, let’s create a domain object that can feed the content of a file to our chat component:
namespace XafSmartEditors.Module.BusinessObjects
{
    [DefaultClassOptions]
    public class PdfFile : BaseObject
    {
        public PdfFile(Session session) : base(session) { }

        string prompt;
        string name;
        FileData file;

        public FileData File
        {
            get => file;
            set => SetPropertyValue(nameof(File), ref file, value);
        }

        public string Name
        {
            get => name;
            set => SetPropertyValue(nameof(Name), ref name, value);
        }

        public string Prompt
        {
            get => prompt;
            set => SetPropertyValue(nameof(Prompt), ref prompt, value);
        }
    }
}
Creating the Controller
We are almost done! Now, we need to create a controller with a popup action:
namespace XafSmartEditors.Module.Controllers
{
    public class OpenChatController : ViewController
    {
        Popup

WindowShowAction Chat;

        public OpenChatController()
        {
            this.TargetObjectType = typeof(PdfFile);
            Chat = new PopupWindowShowAction(this, "ChatAction", "View");
            Chat.Caption = "Chat";
            Chat.ImageName = "artificial_intelligence";
            Chat.Execute += Chat_Execute;
            Chat.CustomizePopupWindowParams += Chat_CustomizePopupWindowParams;
        }

        private void Chat_Execute(object sender, PopupWindowShowActionExecuteEventArgs e) { }

        private void Chat_CustomizePopupWindowParams(object sender, CustomizePopupWindowParamsEventArgs e)
        {
            PdfFile pdfFile = this.View.CurrentObject as PdfFile;
            var os = this.Application.CreateObjectSpace(typeof(ChatView));
            var chatView = os.CreateObject<ChatView>();

            MemoryStream memoryStream = new MemoryStream();
            pdfFile.File.SaveToStream(memoryStream);
            memoryStream.Seek(0, SeekOrigin.Begin);

            chatView.RagData = os.CreateObject<IRagDataImp>();
            chatView.RagData.FileName = pdfFile.File.FileName;
            chatView.RagData.Prompt = !string.IsNullOrEmpty(pdfFile.Prompt) ? pdfFile.Prompt : DefaultPrompt;
            chatView.RagData.FileContent = memoryStream;

            DetailView detailView = this.Application.CreateDetailView(os, chatView);
            detailView.Caption = $"Chat with Document | {pdfFile.File.FileName.Trim()}";

            e.View = detailView;
        }
    }
}
Conclusion
That’s everything we need to create a RAG system using XAF and the new DevExpress Chat component. You can find the complete source code here: GitHub Repository.
If you want to meet and discuss AI, XAF, and .NET, feel free to schedule a meeting: Schedule a Meeting.
Until next time, XAF out!

by Joche Ojeda | Jul 28, 2024 | PropertyEditors, XAF
Introduction
The eXpressApp Framework (XAF) from DevExpress is a versatile application framework that supports multiple UI platforms, including Windows Forms and Blazor. Maintaining separate property editors for each platform can be cumbersome. This article explores how to create unified property editors for both Windows Forms and Blazor by leveraging WebView for Windows Forms and the Monaco Editor, the editor used in Visual Studio Code.
Blazor Implementation
Windows forms Implementation
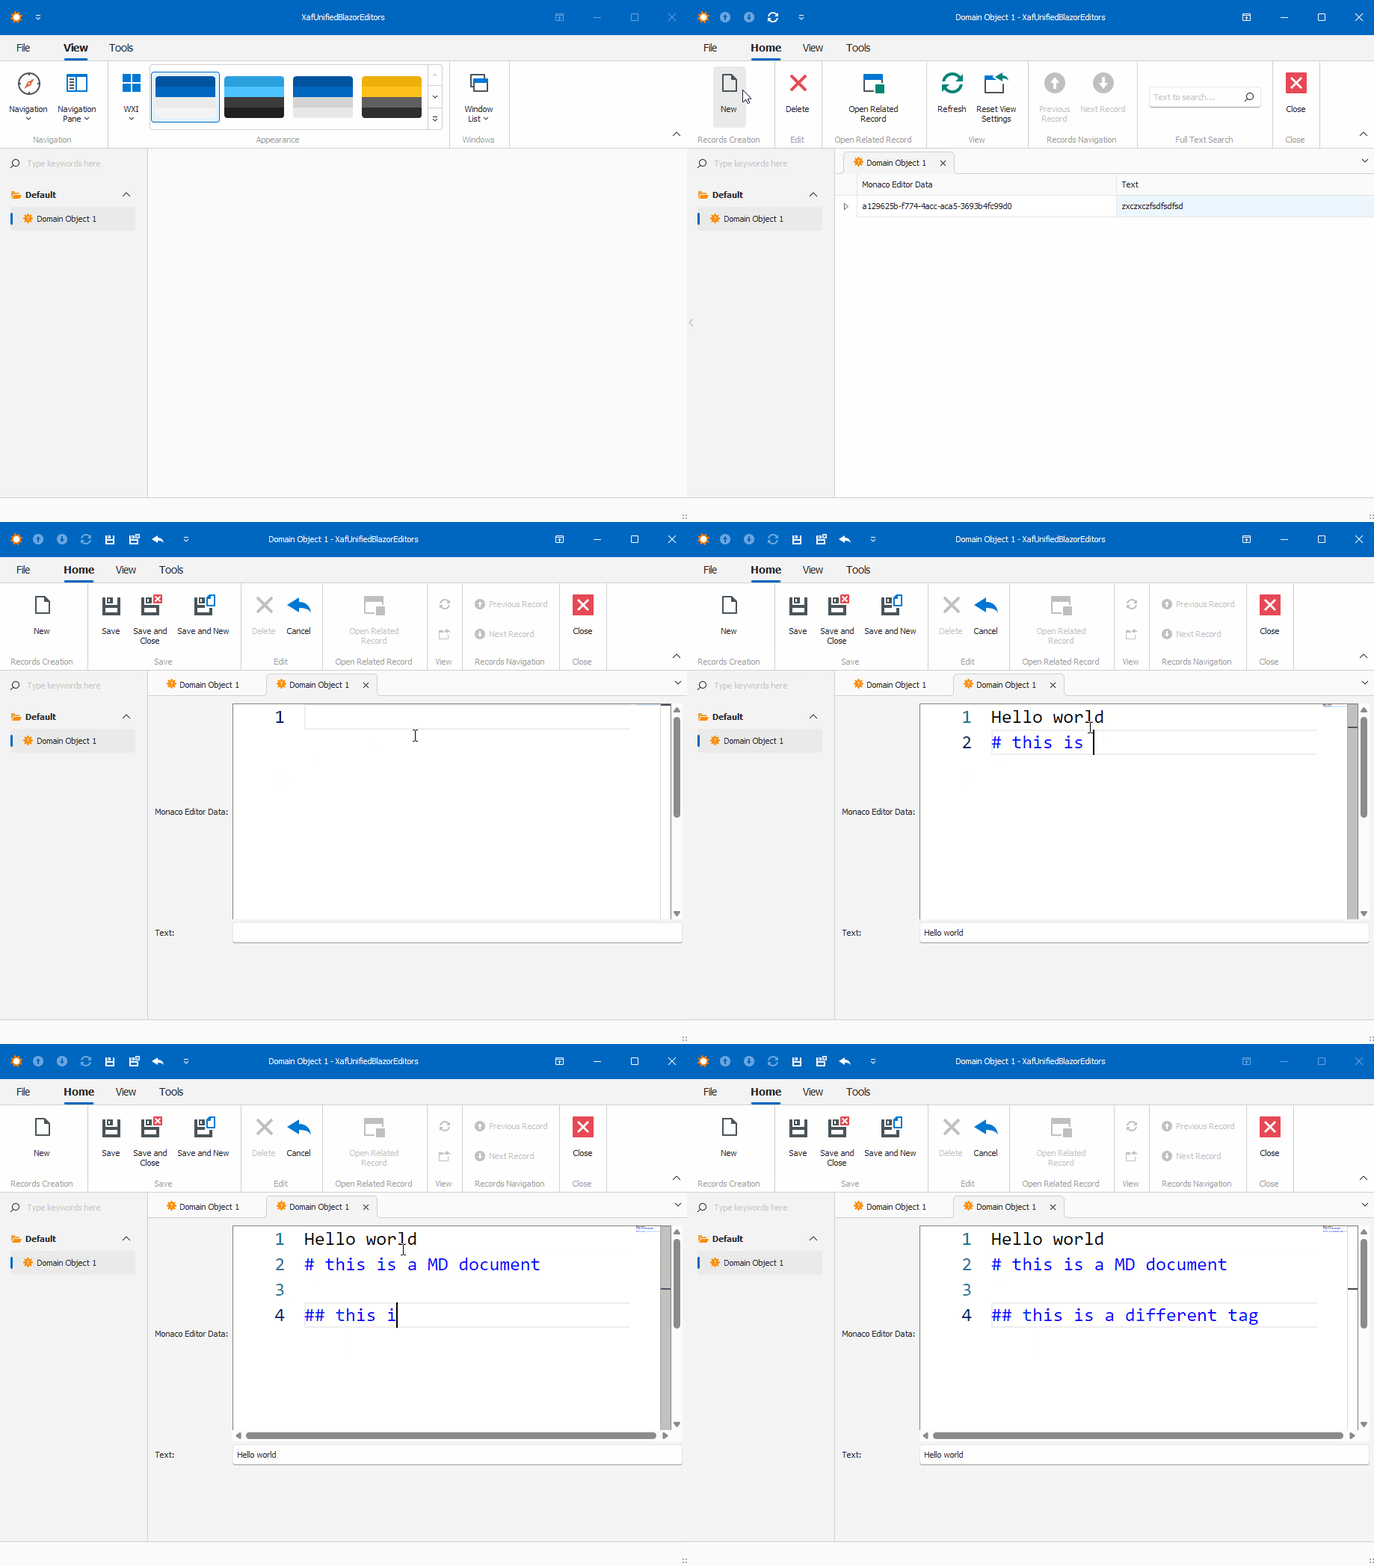
Prerequisites
Before we begin, ensure you have the following installed:
- Visual Studio 2022 or later
- .NET 8.0 SDK or later
- DevExpress XAF 22.2 or later
Step 1: Create a XAF Application for Windows Forms and Blazor
- Create a New Solution:
- Open Visual Studio and create a new solution.
- Add two projects to this solution:
- A Windows Forms project.
- A Blazor project.
- Set Up XAF:
- Follow the DevExpress documentation to set up XAF in both projects. Official documentation here
Step 2: Create a Razor Class Library
- Create a Razor Class Library:
- Add a new Razor Class Library project to the solution.
- Name it XafVsCodeEditor.
- Design the Monaco Editor Component:
We are done with the shared library that we will reference in both Blazor and Windows projects.
Step 3: Integrate the Razor Class Library into Windows Forms
- Add NuGet References:
- In the Windows Forms project, add the following NuGet packages:
- Microsoft.AspNetCore.Components.WebView.WindowsForms
- XafVsCodeEditor (the Razor Class Library created earlier).
- You can see all the references in the csproj file.
- Change the Project Type: In order to add the ability to host Blazor components, we need to change the project SDK from Microsoft.NET.Sdk to Microsoft.NET.Sdk.Razor.
- Add Required Files:
- wwwroot: folder to host CSS, JavaScript, and the index.html.
- _Imports.razor: this file adds global imports. Source here.
- index.html: one of the most important files because it hosts a special blazor.webview.js to interact with the WebView. See here.
Official Microsoft tutorial is available here.
Step 4: Implementing the XAF Property Editors
I’m not going to show the full steps to create the property editors. Instead, I will focus on the most important parts of the editor. Let’s start with Windows.
In Windows Forms, the most important method is when you create the instance of the control, in this case, the WebView. As you can see, this is where you instantiate the services that will be passed as a parameter to the component, in our case, the data model. You can find the full implementation of the property editor for Windows here and the official DevExpress documentation here.
protected override object CreateControlCore()
{
    control = new BlazorWebView();
    control.Dock = DockStyle.Fill;
    var services = new ServiceCollection();
    services.AddWindowsFormsBlazorWebView();
    control.HostPage = "wwwroot\\index.html";
    var tags = MonacoEditorTagHelper.AddScriptTags;
    control.Services = services.BuildServiceProvider();
    parameters = new Dictionary<string, object>();
    if (PropertyValue == null)
    {
        PropertyValue = new MonacoEditorData() { Language = "markdown" };
    }
    parameters.Add("Value", PropertyValue);
    control.RootComponents.Add<MonacoEditorComponent>("#app", parameters);
    control.Size = new System.Drawing.Size(300, 300);
    return control;
}
Now, for the property editor for Blazor, you can find the full source code here and the official DevExpress documentation here.
protected override IComponentModel CreateComponentModel()
{
    var model = new MonacoEditorDataModel();
    model.ValueChanged = EventCallback.Factory.Create<IMonacoEditorData>(this, value => {
        model.Value = value;
        OnControlValueChanged();
        WriteValue();
    });
    return model;
}
One of the most important things to notice here is that in version 24 of XAF, Blazor property editors have been simplified so they require fewer layers of code. The magical databinding happens because in the data model there should be a property of the same value and type as one of the parameters in the Blazor component.
Step 5: Running the Application
Before we run our solution, we need to add a domain object that implements a property of type IMonacoData, which is the interface we associated with our property editor. Here is a sample domain object that has a property of type MonacoEditorData:
[DefaultClassOptions]
public class DomainObject1 : BaseObject, IXafEntityObject
{
    public DomainObject1(Session session) : base(session) { }
    public override void AfterConstruction()
    {
        base.AfterConstruction();
    }

    MonacoEditorData monacoEditorData;
    string text;

    public MonacoEditorData MonacoEditorData
    {
        get => monacoEditorData;
        set => SetPropertyValue(nameof(MonacoEditorData), ref monacoEditorData, value);
    }

    [Size(SizeAttribute.DefaultStringMappingFieldSize)]
    public string Text
    {
        get => text;
        set => SetPropertyValue(nameof(Text), ref text, value);
    }

    public void OnCreated()
    {
        this.MonacoEditorData = new MonacoEditorData("markdown", "");
        MonacoEditorData.PropertyChanged += SourceEditor_PropertyChanged;
    }

    void IXafEntityObject.OnSaving()
    {
        this.Text = this.MonacoEditorData.Code;
    }

    void IXafEntityObject.OnLoaded()
    {
        this.MonacoEditorData = new MonacoEditorData("markdown", this.Text);
        MonacoEditorData.PropertyChanged += SourceEditor_PropertyChanged;
    }

    private void SourceEditor_PropertyChanged(object sender, PropertyChangedEventArgs e)
    {
        this.Text = this.MonacoEditorData.Code;
    }
}
As you can see, DomainObject1 implements the interface IXafEntityObject. We are using the interface events to load and save the content of the editor to the text property.
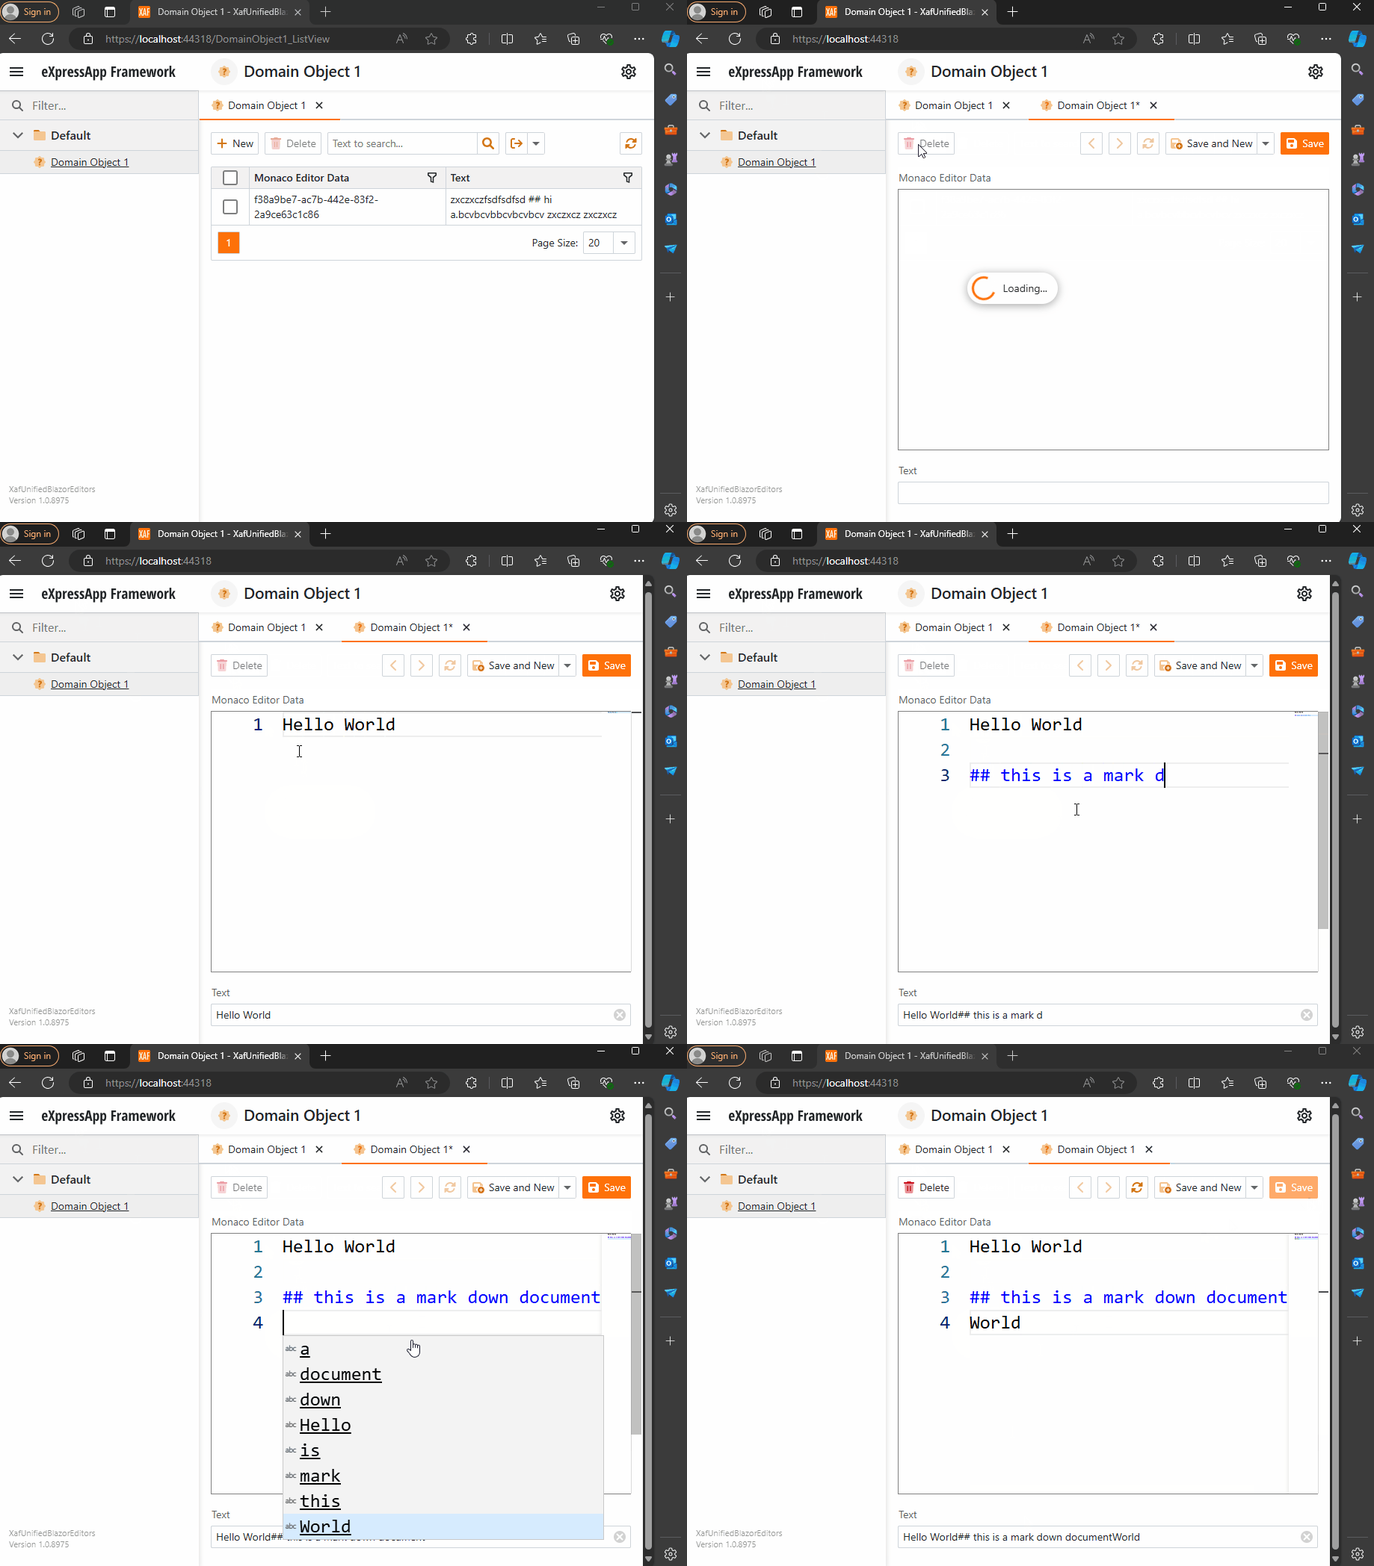
Now, build and run the solution. You should now have a Windows Forms application that hosts a Blazor property editor using WebView and the Monaco Editor, as well as a Blazor application using the same property editor.
You can find a working example here.
Conclusion
By leveraging WebView and the Monaco Editor, you can create unified property editors for both Windows Forms and Blazor in XAF applications. This approach simplifies maintenance and provides a consistent user experience across different platforms. With the flexibility of Blazor and the robustness of Windows Forms, you can build powerful and versatile property editors that cater to a wide range of user needs.


