
DNS and Virtual Hosting: A Personal Journey
DNS and Virtual Hosting: A Personal Journey
In this article, I’m going to talk about a topic I’ve been working on lately because I’m creating a course on how to host ASP.NET Core applications on Linux. This is a trick that I learned a really long time ago.
I was talking with one of my students, Lance, who asked me when I learned all this hosting and server stuff. It’s actually a nice story.
My Early Server Adventures
When I was around 16 years old, I got a book on networking and figured out how to find free public IPs on my Internet provider’s network. A few years later, when I was 19, I got a book on Windows 2000 Server and managed to get a copy of that Windows version.
I had a great combination of resources:
- Public IPs that I was “borrowing” from my Internet provider
- A copy of Windows Server
- An extra machine (at that time, we only had one computer at home, unlike now where I have about 5 computers)
I formatted the extra computer using Windows Server 2000 and set up DNS using a program called Simple DNS. I also set up the IIS web server. Finally, for the first time in my life, I could host a domain from a computer at home.
In El Salvador, .sv domains were free at that time—you just needed to fill out a form and you could get them for free for many years. Now they’re quite expensive, around $50, compared to normal domains.
The Magic of Virtual Hosting
What I learned was that you can host multiple websites or web applications sharing the same IP without having to change ports by using a hostname or domain name instead.
Here’s how DNS works: When you have an internet connection, it has several parts—the IP address, the public mask, the gateway, and the DNS servers. The DNS servers essentially house a simple file where they have translations: this domain (like HotCoder.com) translates to this IP address. They make IP addresses human-readable.
Once requests go to the server side, the server checks which domain name is being requested and then picks from all the websites being hosted on that server and responds accordingly.
Creating DNS records was tricky the first time. I spent a lot of time reading about it. The internet wasn’t like it is now—we didn’t have AI to help us. I had to figure it out with books, and growing up in El Salvador, we didn’t always have the newest or most accurate books available.
The Hosts File: A Local DNS
In the most basic setup, you need a record which says “this domain goes to this IP,” and then maybe a CNAME record that does something similar. That’s what DNS servers do—they maintain these translation tables.
Each computer also has its own translation table, which is a text file. In Windows, it’s called the “hosts” file. If you’ve used computers for development, you probably know that there’s an IP address reserved for localhost: 127.0.0.1. When you type “localhost” in the browser, it translates to that IP address.
This translation doesn’t require an external network request. Instead, your computer checks the hosts file, where you can set up the same domain-to-IP translations locally. This is how you can test domains without actually buying them. You can say “google.com will be forwarded to this IP address” which can be on your own computer.
A Real-World Application
I used this principle just this morning. I have an old MSI computer from 2018—still a solid machine with an i7 processor and 64GB of RAM. I reformatted it last week and set up the Hyper-V server. Inside Hyper-V, I set up an Ubuntu machine to emulate hosting, and installed a virtual hosting manager called Webmin.
I know I could do everything via command line, but why write a lot of text when you can use a user interface?
Recently, we’ve been having problems with our servers. My business partner Javier (who’s like a brother to me) mentioned that we have many test servers without clear documentation of what’s inside each one. We decided to format some of them to make them clean test servers again.
One of our servers that was failing happens to host my blog—the very one you’re reading right now! Yesterday, Javier messaged me early in the morning (7 AM for me in Europe, around 9 PM for him in America) to tell me my blog was down. There seemed to be a problem with the server that I couldn’t immediately identify.
We decided to move to a bigger server. I created a backup of the virtual server (something I’ll discuss in a different post) and moved it to the Hyper-V virtual machine on my MSI computer. I didn’t want to redirect my real IP address and DNS servers to my home computer—that would be messy and prevent access to my blog temporarily.
Instead, I modified the hosts file on my computer to point to the private internal IP of that virtual server. This allowed me to test everything locally before making any public DNS changes.
Understanding DNS: A Practical Example
Let me explain how DNS actually works with a simple example using the domain jocheojeda.com and an IP address of 203.0.113.42.
How DNS Resolution Works with ISP DNS Servers
When you type jocheojeda.com in your browser, here’s what happens:
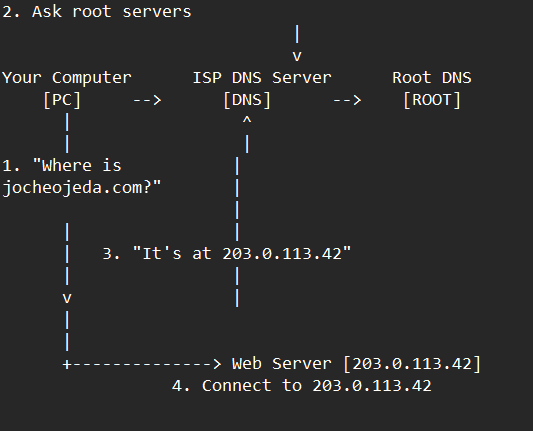
- Your browser asks your operating system to resolve
jocheojeda.com - Your OS checks its local DNS cache, doesn’t find it, and then asks your ISP’s DNS server
- If the ISP’s DNS server doesn’t know, it asks the root DNS servers, which direct it to the appropriate Top-Level Domain (TLD) servers for
.com - The TLD servers direct the ISP DNS to the authoritative DNS servers for
jocheojeda.com - The authoritative DNS server responds with the A record:
jocheojeda.com -> 203.0.113.42 - Your ISP DNS server caches this information and passes it back to your computer
- Your browser can now connect directly to the web server at
203.0.113.42
DNS Records Explained
A Record (Address Record)
An A record maps a domain name directly to an IPv4 address:
jocheojeda.com. IN A 203.0.113.42This tells DNS servers that when someone asks for jocheojeda.com, they should be directed to the server at 203.0.113.42.
CNAME Record (Canonical Name)
A CNAME record maps one domain name to another domain name:
www.jocheojeda.com.    IN    CNAME    jocheojeda.com.
blog.jocheojeda.com.   IN    CNAME    jocheojeda.com.
This means that www.jocheojeda.com and blog.jocheojeda.com are aliases for jocheojeda.com. When someone visits either of these subdomains, DNS will first resolve them to jocheojeda.com, and then resolve that to 203.0.113.42.
Using the Windows Hosts File
Now, let’s see what happens when you use the hosts file instead:
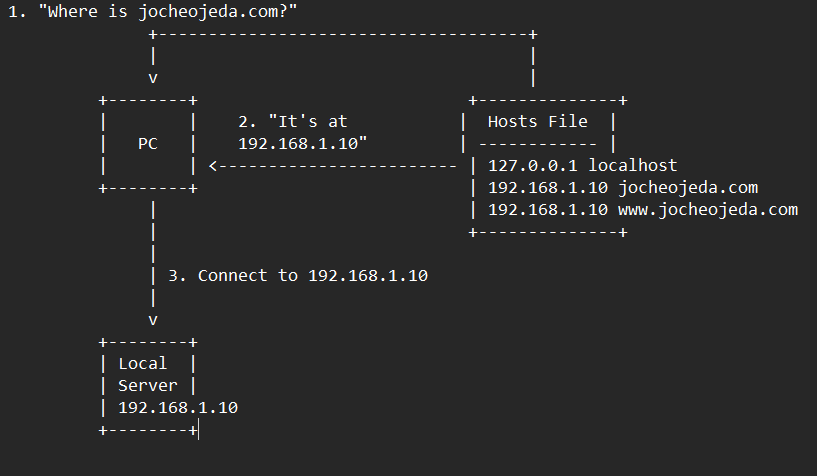
When using the hosts file:
- Your browser asks your operating system to resolve
jocheojeda.com - Your OS checks the hosts file first, before any external DNS servers
- It finds an entry:
192.168.1.10 jocheojeda.com - The OS immediately returns the IP
192.168.1.10to your browser - Your browser connects to
192.168.1.10instead of the actual public IP - The external DNS servers are never consulted
The Windows hosts file is located at C:\Windows\System32\drivers\etc\hosts. A typical entry might look like:
# For local development
192.168.1.10    jocheojeda.com
192.168.1.10    www.jocheojeda.com
192.168.1.10    api.jocheojeda.com
This is incredibly useful for:
- Testing websites locally before going live
- Testing different server configurations without changing public DNS
- Redirecting domains during development or troubleshooting
- Blocking certain websites by pointing them to 127.0.0.1
Why This Matters for Development
By modifying your hosts file, you can work on multiple websites locally, all running on the same machine but accessible via different domain names. This perfectly mimics how virtual hosting works on real servers, but without needing to change any public DNS records.
This technique saved me when my blog server was failing. I could test everything locally using my actual domain name in the browser, making sure everything was working correctly before changing any public DNS settings.
Conclusion
Understanding DNS and how to manipulate it locally via the hosts file is a powerful skill for any developer or system administrator. It allows you to test complex multi-domain setups without affecting your live environment, and can be a lifesaver when troubleshooting server issues.
In future posts, I’ll dive deeper into server virtualization and how to efficiently manage multiple web applications on a single server.
About Us
YouTube
https://www.youtube.com/c/JocheOjedaXAFXAMARINC
Our sites
Let’s discuss your XAF
https://www.udemy.com/course/microsoft-ai-extensions/
Our free A.I courses on Udemy
- Introduction to Microsoft A.I Extensions
https://www.udemy.com/course/microsoft-ai-extensions/ - Introduction to Microsoft Semantic Kernel
https://www.udemy.com/course/semantic-kernel