
by Joche Ojeda | Mar 11, 2025 | network
DNS and Virtual Hosting: A Personal Journey
In this article, I’m going to talk about a topic I’ve been working on lately because I’m creating a course on how to host ASP.NET Core applications on Linux. This is a trick that I learned a really long time ago.
I was talking with one of my students, Lance, who asked me when I learned all this hosting and server stuff. It’s actually a nice story.
My Early Server Adventures
When I was around 16 years old, I got a book on networking and figured out how to find free public IPs on my Internet provider’s network. A few years later, when I was 19, I got a book on Windows 2000 Server and managed to get a copy of that Windows version.
I had a great combination of resources:
- Public IPs that I was “borrowing” from my Internet provider
- A copy of Windows Server
- An extra machine (at that time, we only had one computer at home, unlike now where I have about 5 computers)
I formatted the extra computer using Windows Server 2000 and set up DNS using a program called Simple DNS. I also set up the IIS web server. Finally, for the first time in my life, I could host a domain from a computer at home.
In El Salvador, .sv domains were free at that time—you just needed to fill out a form and you could get them for free for many years. Now they’re quite expensive, around $50, compared to normal domains.
The Magic of Virtual Hosting
What I learned was that you can host multiple websites or web applications sharing the same IP without having to change ports by using a hostname or domain name instead.
Here’s how DNS works: When you have an internet connection, it has several parts—the IP address, the public mask, the gateway, and the DNS servers. The DNS servers essentially house a simple file where they have translations: this domain (like HotCoder.com) translates to this IP address. They make IP addresses human-readable.
Once requests go to the server side, the server checks which domain name is being requested and then picks from all the websites being hosted on that server and responds accordingly.
Creating DNS records was tricky the first time. I spent a lot of time reading about it. The internet wasn’t like it is now—we didn’t have AI to help us. I had to figure it out with books, and growing up in El Salvador, we didn’t always have the newest or most accurate books available.
The Hosts File: A Local DNS
In the most basic setup, you need a record which says “this domain goes to this IP,” and then maybe a CNAME record that does something similar. That’s what DNS servers do—they maintain these translation tables.
Each computer also has its own translation table, which is a text file. In Windows, it’s called the “hosts” file. If you’ve used computers for development, you probably know that there’s an IP address reserved for localhost: 127.0.0.1. When you type “localhost” in the browser, it translates to that IP address.
This translation doesn’t require an external network request. Instead, your computer checks the hosts file, where you can set up the same domain-to-IP translations locally. This is how you can test domains without actually buying them. You can say “google.com will be forwarded to this IP address” which can be on your own computer.
A Real-World Application
I used this principle just this morning. I have an old MSI computer from 2018—still a solid machine with an i7 processor and 64GB of RAM. I reformatted it last week and set up the Hyper-V server. Inside Hyper-V, I set up an Ubuntu machine to emulate hosting, and installed a virtual hosting manager called Webmin.
I know I could do everything via command line, but why write a lot of text when you can use a user interface?
Recently, we’ve been having problems with our servers. My business partner Javier (who’s like a brother to me) mentioned that we have many test servers without clear documentation of what’s inside each one. We decided to format some of them to make them clean test servers again.
One of our servers that was failing happens to host my blog—the very one you’re reading right now! Yesterday, Javier messaged me early in the morning (7 AM for me in Europe, around 9 PM for him in America) to tell me my blog was down. There seemed to be a problem with the server that I couldn’t immediately identify.
We decided to move to a bigger server. I created a backup of the virtual server (something I’ll discuss in a different post) and moved it to the Hyper-V virtual machine on my MSI computer. I didn’t want to redirect my real IP address and DNS servers to my home computer—that would be messy and prevent access to my blog temporarily.
Instead, I modified the hosts file on my computer to point to the private internal IP of that virtual server. This allowed me to test everything locally before making any public DNS changes.
Understanding DNS: A Practical Example
Let me explain how DNS actually works with a simple example using the domain jocheojeda.com and an IP address of 203.0.113.42.
How DNS Resolution Works with ISP DNS Servers
When you type jocheojeda.com in your browser, here’s what happens:
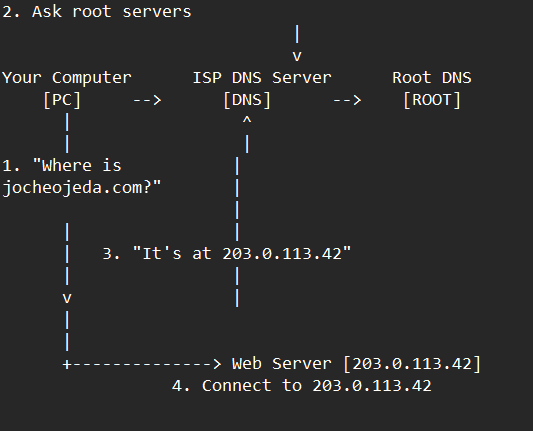
- Your browser asks your operating system to resolve
jocheojeda.com
- Your OS checks its local DNS cache, doesn’t find it, and then asks your ISP’s DNS server
- If the ISP’s DNS server doesn’t know, it asks the root DNS servers, which direct it to the appropriate Top-Level Domain (TLD) servers for
.com
- The TLD servers direct the ISP DNS to the authoritative DNS servers for
jocheojeda.com
- The authoritative DNS server responds with the A record:
jocheojeda.com -> 203.0.113.42
- Your ISP DNS server caches this information and passes it back to your computer
- Your browser can now connect directly to the web server at
203.0.113.42
DNS Records Explained
A Record (Address Record)
An A record maps a domain name directly to an IPv4 address:
jocheojeda.com. IN A 203.0.113.42
This tells DNS servers that when someone asks for jocheojeda.com, they should be directed to the server at 203.0.113.42.
CNAME Record (Canonical Name)
A CNAME record maps one domain name to another domain name:
www.jocheojeda.com.    IN    CNAME    jocheojeda.com.
blog.jocheojeda.com.   IN    CNAME    jocheojeda.com.
This means that www.jocheojeda.com and blog.jocheojeda.com are aliases for jocheojeda.com. When someone visits either of these subdomains, DNS will first resolve them to jocheojeda.com, and then resolve that to 203.0.113.42.
Using the Windows Hosts File
Now, let’s see what happens when you use the hosts file instead:
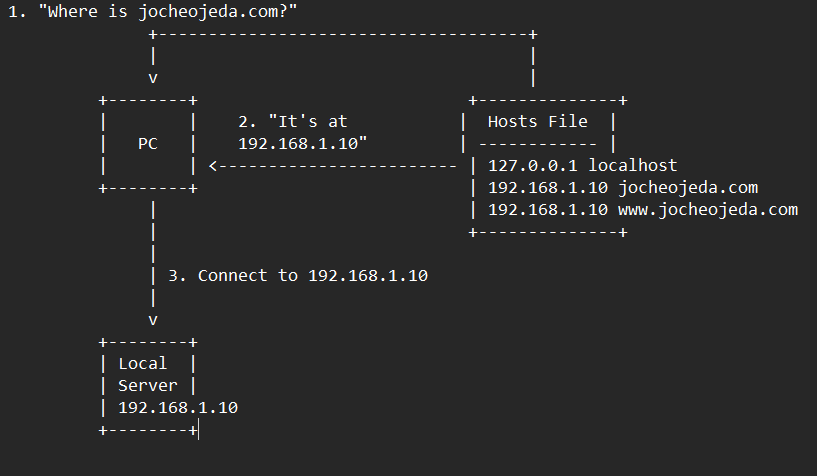
When using the hosts file:
- Your browser asks your operating system to resolve
jocheojeda.com
- Your OS checks the hosts file first, before any external DNS servers
- It finds an entry:
192.168.1.10 jocheojeda.com
- The OS immediately returns the IP
192.168.1.10 to your browser
- Your browser connects to
192.168.1.10 instead of the actual public IP
- The external DNS servers are never consulted
The Windows hosts file is located at C:\Windows\System32\drivers\etc\hosts. A typical entry might look like:
# For local development
192.168.1.10    jocheojeda.com
192.168.1.10    www.jocheojeda.com
192.168.1.10    api.jocheojeda.com
This is incredibly useful for:
- Testing websites locally before going live
- Testing different server configurations without changing public DNS
- Redirecting domains during development or troubleshooting
- Blocking certain websites by pointing them to 127.0.0.1
Why This Matters for Development
By modifying your hosts file, you can work on multiple websites locally, all running on the same machine but accessible via different domain names. This perfectly mimics how virtual hosting works on real servers, but without needing to change any public DNS records.
This technique saved me when my blog server was failing. I could test everything locally using my actual domain name in the browser, making sure everything was working correctly before changing any public DNS settings.
Conclusion
Understanding DNS and how to manipulate it locally via the hosts file is a powerful skill for any developer or system administrator. It allows you to test complex multi-domain setups without affecting your live environment, and can be a lifesaver when troubleshooting server issues.
In future posts, I’ll dive deeper into server virtualization and how to efficiently manage multiple web applications on a single server.
About Us
YouTube
https://www.youtube.com/c/JocheOjedaXAFXAMARINC
Our sites
Let’s discuss your XAF
https://www.udemy.com/course/microsoft-ai-extensions/
Our free A.I courses on Udemy

by Joche Ojeda | Mar 27, 2023 | Apache, Linux, Ubuntu, Uncategorized, WebServers
Cloud Storage
Cloud storage is useful for mobile and web apps because it provides an efficient and scalable way to store and retrieve data from anywhere in the world.
With cloud storage, mobile and web apps can easily scale their storage needs up or down depending on usage patterns. This means that developers don’t need to worry about running out of storage space or having to invest in expensive hardware to handle increased storage needs.
Files stored in the cloud can be accessed from anywhere in the world, as long as there is an internet connection. This makes it easy for mobile and web apps to store and retrieve data from different locations and devices.
Cloud services are typically offered as pay-as-you-go pricing model, which means that developers only pay for the storage and resources they actually use. This makes cloud storage an affordable option for mobile and web apps, especially those with limited budgets. also cloud providers typically have robust security measures in place to protect data from unauthorized access and ensure data privacy.
Amazon S3
Amazon S3 (Simple Storage Service) is a cloud-based storage service provided by Amazon Web Services (AWS). It is not an open-source technology, meaning that the source code of the service is not available for modification or redistribution by users. Instead, it is a proprietary technology owned and operated by AWS.
S3 Compatible services
An S3 compatible service is a cloud-based storage service that is designed to be compatible with the Amazon S3 (Simple Storage Service) API. This means that it provides a similar interface and functionality as Amazon S3, allowing users to easily migrate data and applications between the two services.
Some examples of S3 compatible services include:
- Wasabi: A cloud storage service that provides an S3-compatible interface with no egress fees or API request fees.
- DigitalOcean Spaces: A cloud storage service from DigitalOcean that provides an S3-compatible API with a simple pricing model.
- Google Cloud Storage: A cloud storage service from Google Cloud Platform that provides an S3-compatible API along with additional features like object versioning and lifecycle management.
- IBM Cloud Object Storage: A cloud storage service from IBM that provides an S3-compatible API along with features like built-in encryption and multi-region support.
- Contabo: is a cheap alternative with unlimited free transfer to AWS S3 and other vendors. Billing is simple and month-to-month at all-inclusive rate and you can easily migrate from S3
Simple Storage Service gives you a URL for each file by assigning a unique URL to each object stored in the S3 bucket. The URL includes the bucket name, the key (or path) to the object, and the S3 endpoint, which is used to access the object.
For example, if you have an S3 bucket named “my-bucket” and a file named “my-file.jpg” stored in the bucket, the URL to access the file would be:
https://my-bucket.s3.amazonaws.com/my-file.jpg
As you can see the URL includes the domain name of your cloud provider but even when there is nothing technically wrong with it, can bring some disadvantages.
Some common problems on how URLs are created in S3 storage
Here are some of the of disadvantages of not using a custom domain with Amazon S3 storage can cause several problems, including:
- URL appearance: When you access an S3 bucket using the default endpoint, the URL contains the bucket name and the Amazon S3 endpoint. The resulting URL can be long and difficult to remember, which can cause issues with branding and user experience.
- SEO: Using the default S3 endpoint can also negatively impact your search engine optimization (SEO) efforts, as search engines may view the URL as less trustworthy or relevant.
- SSL certificate: If you access an S3 bucket using the default endpoint, the SSL certificate presented to the user will be issued for the Amazon S3 endpoint, rather than your custom domain name. This can cause warnings to appear in the user’s browser, which can negatively impact trust and user experience.
- CORS: If you are using cross-origin resource sharing (CORS) to allow access to your S3 bucket from other domains, the default S3 endpoint may not allow those requests due to security restrictions.
- Maintenance: If you are using the default S3 endpoint, any changes to the S3 bucket or endpoint URLs may require updates to all references to the S3 bucket, which can be time-consuming and error-prone.
Overall, using a custom domain with an S3 storage can provide several benefits, including improved branding, better user experience, and stronger SEO.
There are several ways to provide a solution for the custom domain problem, most of the solutions you will find on the internet are related to cloud providers like Cloud Flare but in this article I want to propose a different approach of showing how this can be fixed using apache web server as a proxy, my goal is not to provide a step by step guide on how to setup a proxy but to provide the conceptual framework to understand how the proxy works
What is Apache
The Apache HTTP Server, commonly referred to as Apache web server, is a free and open-source cross-platform web server software developed and maintained by the Apache Software Foundation. It is one of the most widely used web servers in the world, serving as the backbone for many popular websites and web applications.
Apache web server is designed to be highly configurable and extensible, with a modular architecture that allows users to add or remove functionality as needed. It supports a wide range of features, including dynamic content generation, SSL/TLS encryption, proxying and caching, and authentication and authorization.
Apache web server is also highly portable, running on a wide range of operating systems including Windows, Linux, macOS, and Unix. It can be configured using a variety of tools and languages, including configuration files, command-line utilities, and programming languages such as Perl, PHP, and Python.
Overall, Apache web server is a versatile and powerful web server that provides a stable and reliable platform for serving web content and applications.
What is an Apache proxy
An Apache proxy, also known as an Apache reverse proxy, is a module of the Apache HTTP Server that allows the server to act as an intermediary between clients and other servers.
With an Apache proxy, incoming requests from clients are forwarded to one or more backend servers, which handle the request and return a response. The Apache proxy then forwards the response back to the client.
This can be useful for a variety of reasons, including load balancing, caching, and security. For example, an Apache proxy can be used to distribute incoming traffic across multiple backend servers to improve performance and availability. It can also be used to cache responses from backend servers to reduce the load on those servers and improve response times.
In addition, an Apache proxy can be used to add an extra layer of security to incoming traffic, by acting as a firewall and only allowing traffic from trusted sources.
Setting up an Apache proxy involves configuring the Apache HTTP Server to act as a reverse proxy and directing traffic to one or more backend servers. This can be done using the Apache mod_proxy module, which provides the necessary functionality to act as a reverse proxy.
Apache proxy flow
                  +-------------------+      +-------------+
+----------+      | Apache Web Server |      |Amazon S3     |
|          |      |   (Virtual Host)  |      |             |
|  Client  +----> |   example.com     +----> |  bucket-name|
|          |      |   (HTTPS)         |      |             |
+----------+      +-------------------+      +-------------+
Apache proxy configuration
#this is the configuration of the virtual hosting
SuexecUserGroup "#1010" "#1010"
ServerName files.jocheojeda.com
DocumentRoot /home/files/public_html
ErrorLog /var/log/virtualmin/files.jocheojeda.com_error_log
CustomLog /var/log/virtualmin/files.jocheojeda.com_access_log combined
ScriptAlias /cgi-bin/ /home/files/cgi-bin/
ScriptAlias /awstats/ /home/files/cgi-bin/
DirectoryIndex index.php index.php4 index.php5 index.htm index.html
<Directory /home/files/public_html>
    Options -Indexes +IncludesNOEXEC +SymLinksIfOwnerMatch +ExecCGI
    Require all granted
    AllowOverride All Options=ExecCGI,Includes,IncludesNOEXEC,Indexes,MultiViews,SymLinksIfOwnerMatch
    AddType application/x-httpd-php .php
    AddHandler fcgid-script .php
    AddHandler fcgid-script .php7.4
    FCGIWrapper /home/files/fcgi-bin/php7.4.fcgi .php
    FCGIWrapper /home/files/fcgi-bin/php7.4.fcgi .php7.4
</Directory>
<Directory /home/files/cgi-bin>
    Require all granted
    AllowOverride All Options=ExecCGI,Includes,IncludesNOEXEC,Indexes,MultiViews,SymLinksIfOwnerMatch
</Directory>
ProxyPass /.well-known !
RewriteEngine on
RemoveHandler .php
RemoveHandler .php7.4
FcgidMaxRequestLen 1073741824
<Files awstats.pl>
    AuthName "files.jocheojeda.com statistics"
    AuthType Basic
    AuthUserFile /home/files/.awstats-htpasswd
    require valid-user
</Files>
#these 2 likes are the one who forward the traffic from the custom domain files.jocheojeda.com to the contabo storage
ProxyPass / https://usc1.contabostorage.com/ade25b1c43c1457b87f0716a629d0ff8:files.jocheojeda/
ProxyPassReverse / https://usc1.contabostorage.com/ade25b1c43c1457b87f0716a629d0ff8:files.jocheojeda/
SSLProxyEngine on
Where the magic happens
You only need 2 lines in the configuration when you already have an apache virtual hosting already running to proxy the request from the client to the S3 storage service
ProxyPass / https://usc1.contabostorage.com/ade25b1c43c1457b87f0716a629d0ff8:files.jocheojeda/
ProxyPassReverse / https://usc1.contabostorage.com/ade25b1c43c1457b87f0716a629d0ff8:files.jocheojeda/ SSLProxyEngine on
Conclusions
As you can see is really easy to fix the problem of custom domains for an S3 storage, specially if you already have an apache webserver with virtual hosting running
by Joche Ojeda | Mar 21, 2023 | Linux, netcore, Oqtane, Ubuntu, Uncategorized
Virtual hosting is a technique used by Apache (and other web servers) to host multiple websites on a single server. With virtual hosting, a single physical server can host multiple virtual servers, each with its own domain name, IP address, and content.
Virtual hosting can be implemented in two ways:
- Name-based virtual hosting: In this approach, the server uses the domain name provided in the HTTP request to determine which virtual host should serve the request. For example, if a user requests a page from “example.com”, the server will use the virtual host configured for that domain and serve the appropriate content.
- IP-based virtual hosting: In this approach, each virtual host is assigned a separate IP address, and the server uses the IP address in the HTTP request to determine which virtual host should serve the request. For example, if a user requests a page from the IP address assigned to “example.com”, the server will use the virtual host configured for that IP address and serve the appropriate content.
Virtual hosting allows a server to serve multiple websites, each with its own domain name and content, using a single physical server. This makes hosting more efficient and cost-effective, especially for smaller websites that don’t require dedicated servers.
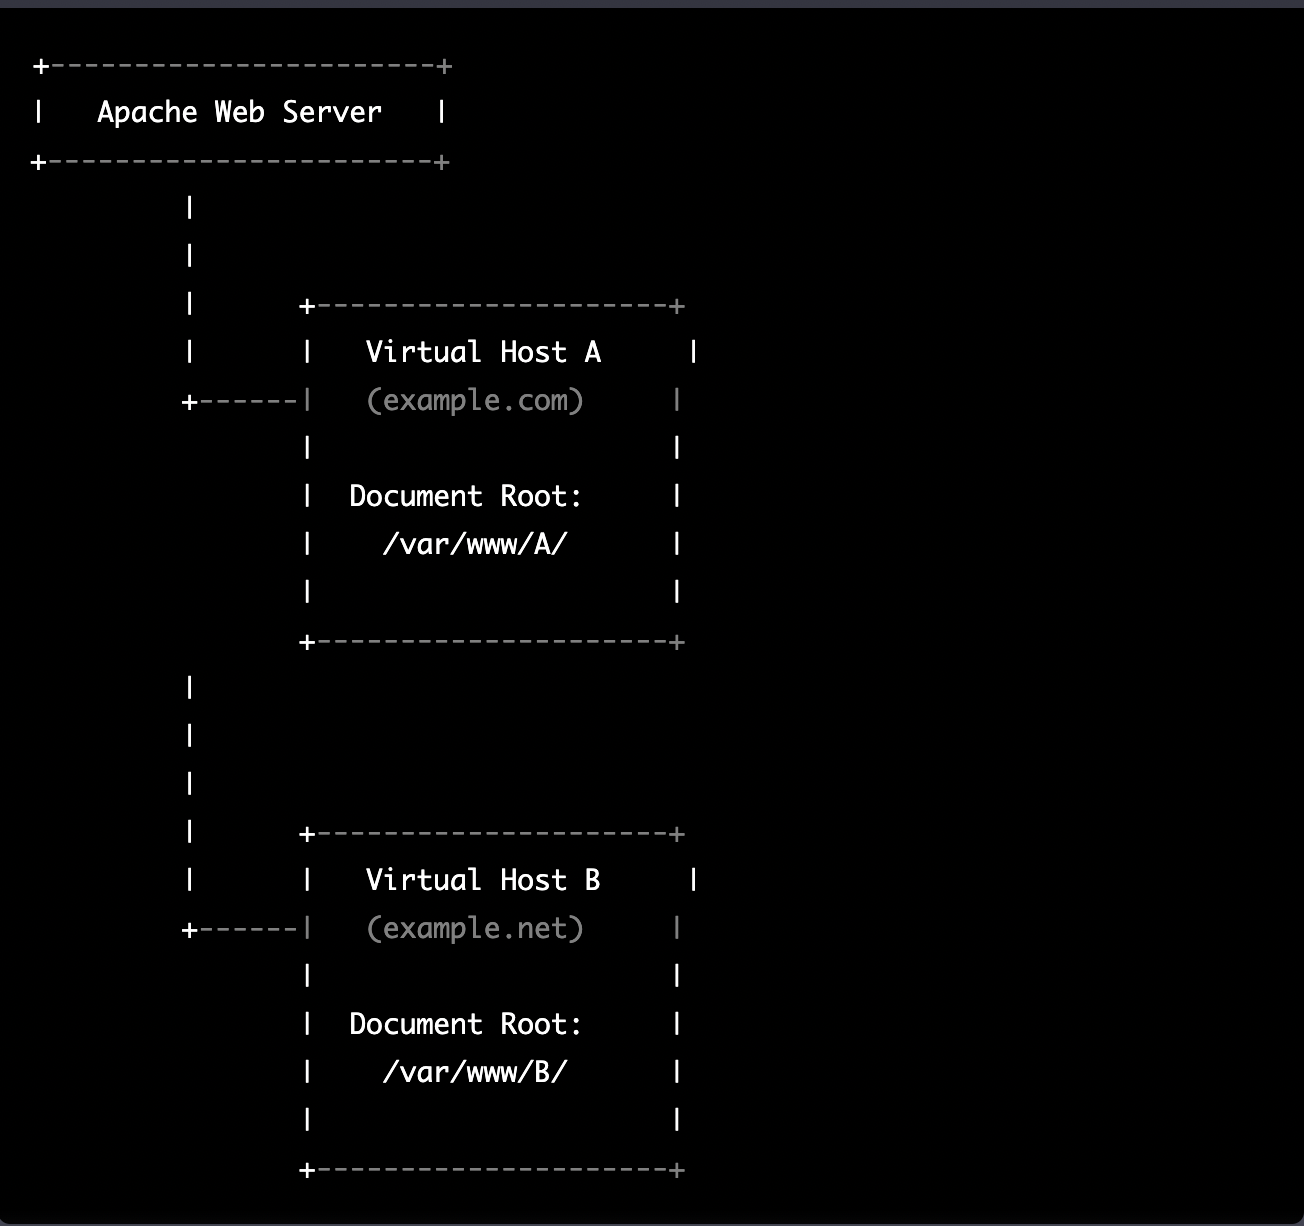
The following diagram represents the most common virtual hosting setup
+-----------------------+
|   Apache Web Server   |
+-----------------------+
         |
         |
         |      +---------------------+
         |      |   Virtual Host A     |
         +------|   (example.com)     |
                |                     |
                |  Document Root:     |
                |    /var/www/A/      |
                |                     |
                +---------------------+
         |
         |
         |
         |      +---------------------+
         |      |   Virtual Host B     |
         +------|   (example.net)     |
                |                     |
                |  Document Root:     |
                |    /var/www/B/      |
                |                     |
                +---------------------+
ASP.NET Core and Blazor applications have the capability to run their own in-process web server, Kestrel. Kestrel can be bound to a specific IP address or port number, enabling the applications to be hosted in virtual environments. To accomplish this, each application can be bound to a unique port number.
+-----------------------+
|   Apache Web Server   |
+-----------------------+
         |
         |
         |      +---------------------+
         |      |   Virtual Host A    |
         +------|   (example.com)     |
                |                     |
                |  Proxy to:          |
                |http://localhost:8016|
                |                     |
                +---------------------+
         |
         |
         |      +---------------------+
         |      |   Virtual Host B    |
         +------|   (example.net)     |
                |                     |
                |  Proxy to:          |
                |http://localhost:8017|
                |                     |
                +---------------------+
As shown in the diagram, physical folders for the document root are no longer utilized. Rather, a proxy is created to the Kestrel web server, which runs our ASP.NET Core applications
To bind our ASP.NET Core applications to a specific IP address or port number, there are multiple methods available. Detailed documentation on this subject can be found at the following link: https://learn.microsoft.com/en-us/aspnet/core/fundamentals/servers/kestrel/endpoints?view=aspnetcore-7.0#configureiconfiguration
There are various approaches that can be used based on the specific use case. For the sake of simplicity in this example, we will be utilizing the configuration method. This involves appending the configuration JSON for the Kestrel web server, as shown in the following example.
{
  "Kestrel": {
    "Endpoints": {
      "Http": {
        "Url": "http://localhost:8016"
      }
    }
  }
}
So here is how our configuration files should look like
Example.com (Host A)
{
  "Runtime": "Server",
  "RenderMode": "ServerPrerendered",
  "Database": {
    "DefaultDBType": "Oqtane.Database.PostgreSQL.PostgreSQLDatabase, Oqtane.Database.PostgreSQL"
  },
  "ConnectionStrings": {
    "DefaultConnection": "Server=127.0.0.1;Port=5432;Database=example.com;User ID=example.com;Password=1234567890;"
  },
  "Kestrel": {
  "Endpoints": {
    "Http": {
      "Url": "http://localhost:8016"
    }
   }
  },
  "Installation": {
    "DefaultAlias": "",
    "HostPassword": "",
    "HostEmail": "",
    "SiteTemplate": "",
    "DefaultTheme": "",
    "DefaultContainer": ""
  },
  "Localization": {
    "DefaultCulture": "en"
  },
  "AvailableDatabases": [
    {
      "Name": "LocalDB",
      "ControlType": "Oqtane.Installer.Controls.LocalDBConfig, Oqtane.Client",
      "DBType": "Oqtane.Database.SqlServer.SqlServerDatabase, Oqtane.Database.SqlServer"
    },
    {
      "Name": "SQL Server",
      "ControlType": "Oqtane.Installer.Controls.SqlServerConfig, Oqtane.Client",
      "DBType": "Oqtane.Database.SqlServer.SqlServerDatabase, Oqtane.Database.SqlServer"
    },
    {
      "Name": "SQLite",
      "ControlType": "Oqtane.Installer.Controls.SqliteConfig, Oqtane.Client",
      "DBType": "Oqtane.Database.Sqlite.SqliteDatabase, Oqtane.Database.Sqlite"
    },
    {
      "Name": "MySQL",
      "ControlType": "Oqtane.Installer.Controls.MySQLConfig, Oqtane.Client",
      "DBType": "Oqtane.Database.MySQL.MySQLDatabase, Oqtane.Database.MySQL"
    },
    {
      "Name": "PostgreSQL",
      "ControlType": "Oqtane.Installer.Controls.PostgreSQLConfig, Oqtane.Client",
      "DBType": "Oqtane.Database.PostgreSQL.PostgreSQLDatabase, Oqtane.Database.PostgreSQL"
    }
  ],
  "Logging": {
    "FileLogger": {
      "LogLevel": {
        "Default": "Error"
      }
    },
    "LogLevel": {
      "Default": "Information"
    }
  },
  "InstallationId": "f5789fa4-895c-45d7-bc26-03eb166e008a"
}
Example.net (Host B)
{
  "Runtime": "Server",
  "RenderMode": "ServerPrerendered",
  "Database": {
    "DefaultDBType": "Oqtane.Database.PostgreSQL.PostgreSQLDatabase, Oqtane.Database.PostgreSQL"
  },
  "ConnectionStrings": {
    "DefaultConnection": "Server=127.0.0.1;Port=5432;Database=example.net;User ID=example.net;Password=1234567890;"
  },
  {
    "Kestrel": {
    "Endpoints": {
      "Http": {
        "Url": "http://localhost:8017"
      }
     }
    }
  },
  "Installation": {
    "DefaultAlias": "",
    "HostPassword": "",
    "HostEmail": "",
    "SiteTemplate": "",
    "DefaultTheme": "",
    "DefaultContainer": ""
  },
  "Localization": {
    "DefaultCulture": "en"
  },
  "AvailableDatabases": [
    {
      "Name": "LocalDB",
      "ControlType": "Oqtane.Installer.Controls.LocalDBConfig, Oqtane.Client",
      "DBType": "Oqtane.Database.SqlServer.SqlServerDatabase, Oqtane.Database.SqlServer"
    },
    {
      "Name": "SQL Server",
      "ControlType": "Oqtane.Installer.Controls.SqlServerConfig, Oqtane.Client",
      "DBType": "Oqtane.Database.SqlServer.SqlServerDatabase, Oqtane.Database.SqlServer"
    },
    {
      "Name": "SQLite",
      "ControlType": "Oqtane.Installer.Controls.SqliteConfig, Oqtane.Client",
      "DBType": "Oqtane.Database.Sqlite.SqliteDatabase, Oqtane.Database.Sqlite"
    },
    {
      "Name": "MySQL",
      "ControlType": "Oqtane.Installer.Controls.MySQLConfig, Oqtane.Client",
      "DBType": "Oqtane.Database.MySQL.MySQLDatabase, Oqtane.Database.MySQL"
    },
    {
      "Name": "PostgreSQL",
      "ControlType": "Oqtane.Installer.Controls.PostgreSQLConfig, Oqtane.Client",
      "DBType": "Oqtane.Database.PostgreSQL.PostgreSQLDatabase, Oqtane.Database.PostgreSQL"
    }
  ],
  "Logging": {
    "FileLogger": {
      "LogLevel": {
        "Default": "Error"
      }
    },
    "LogLevel": {
      "Default": "Information"
    }
  },
  "InstallationId": "f5789fa4-895c-45d7-bc26-03eb166e008a"
}
As demonstrated, utilizing Oqtane in virtual hosting environments is a straightforward process. There is no need to recompile the source code, as configuring the application for virtual hosting can be easily accomplished through a single configuration section in the appsettings.json file.