
by Joche Ojeda | Mar 13, 2025 | netcore, Uno Platform
For the past two weeks, I’ve been experimenting with the Uno Platform in two ways: creating small prototypes to explore features I’m curious about and downloading example applications from the Uno Gallery. In this article, I’ll explain the first steps you need to take when creating an Uno Platform application, the decisions you’ll face, and what I’ve found useful so far in my journey.
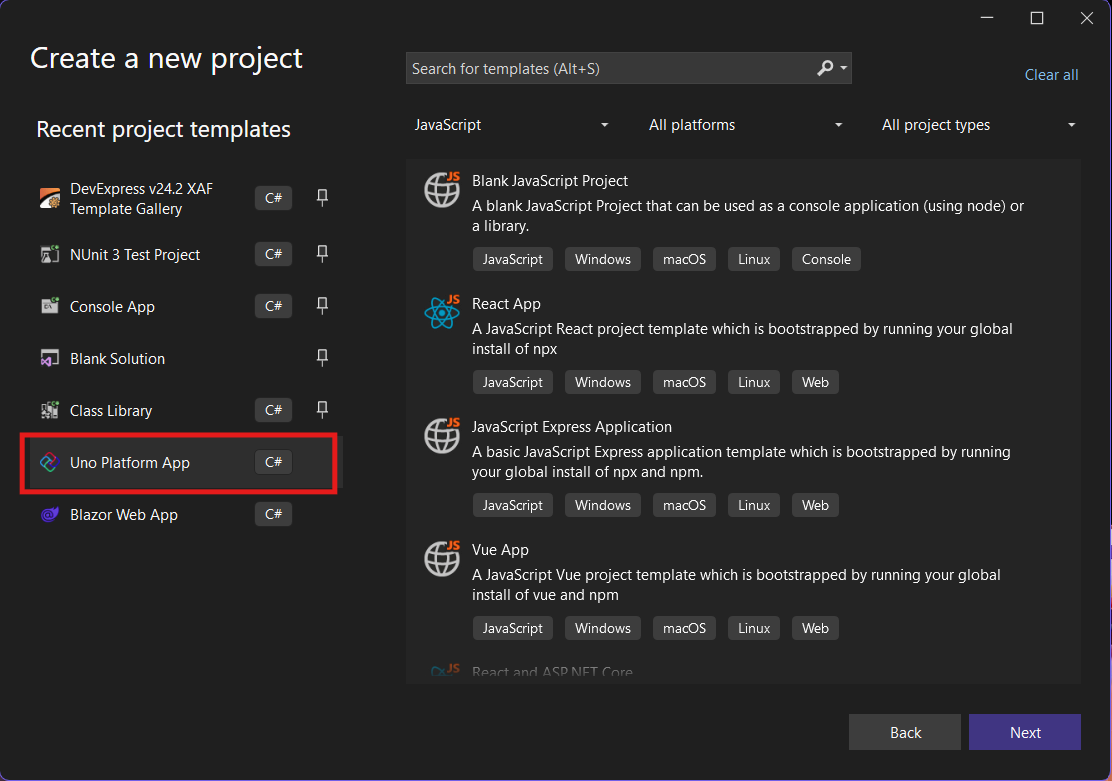
Step 1: Create a New Project
I’m using Visual Studio 2022, though the extensions and templates work well with previous versions too. I have both studio versions installed, and Uno Platform works well in both.
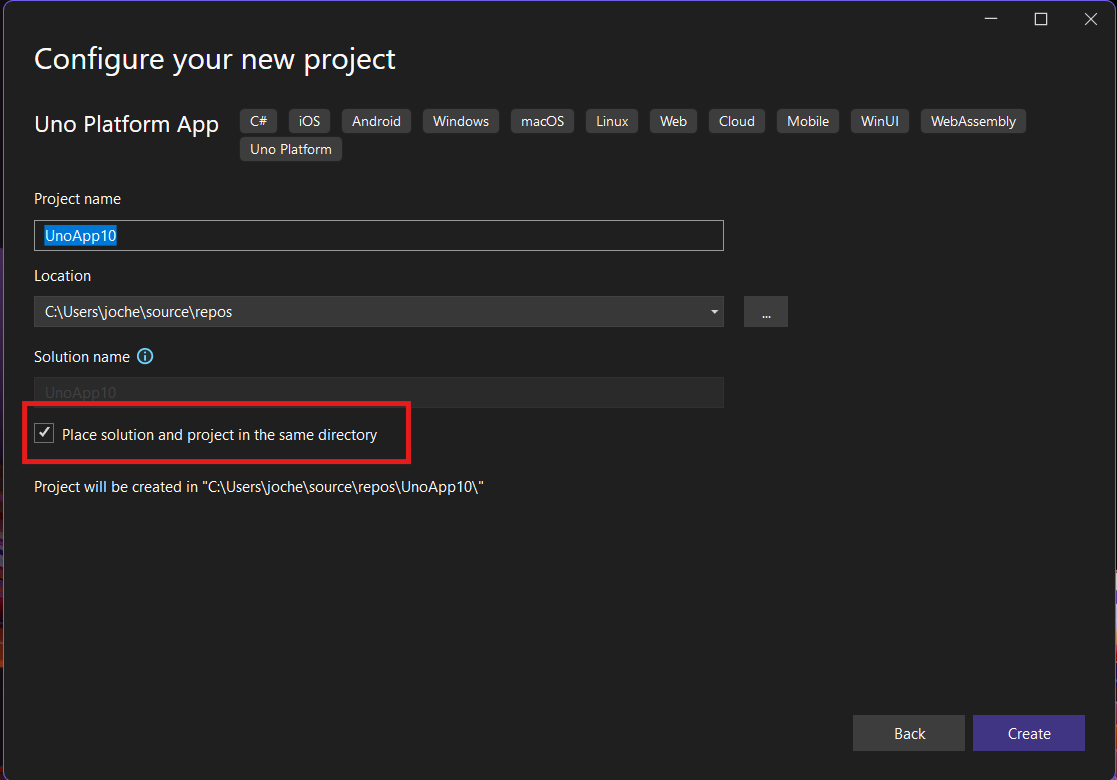
Step 2: Project Setup
After naming your project, it’s important to select “Place solution and project in the same directory” because of the solution layout requirements. You need the directory properties file to move forward. I’ll talk more about the solution structure in a future post, but for now, know that without checking this option, you won’t be able to proceed properly.
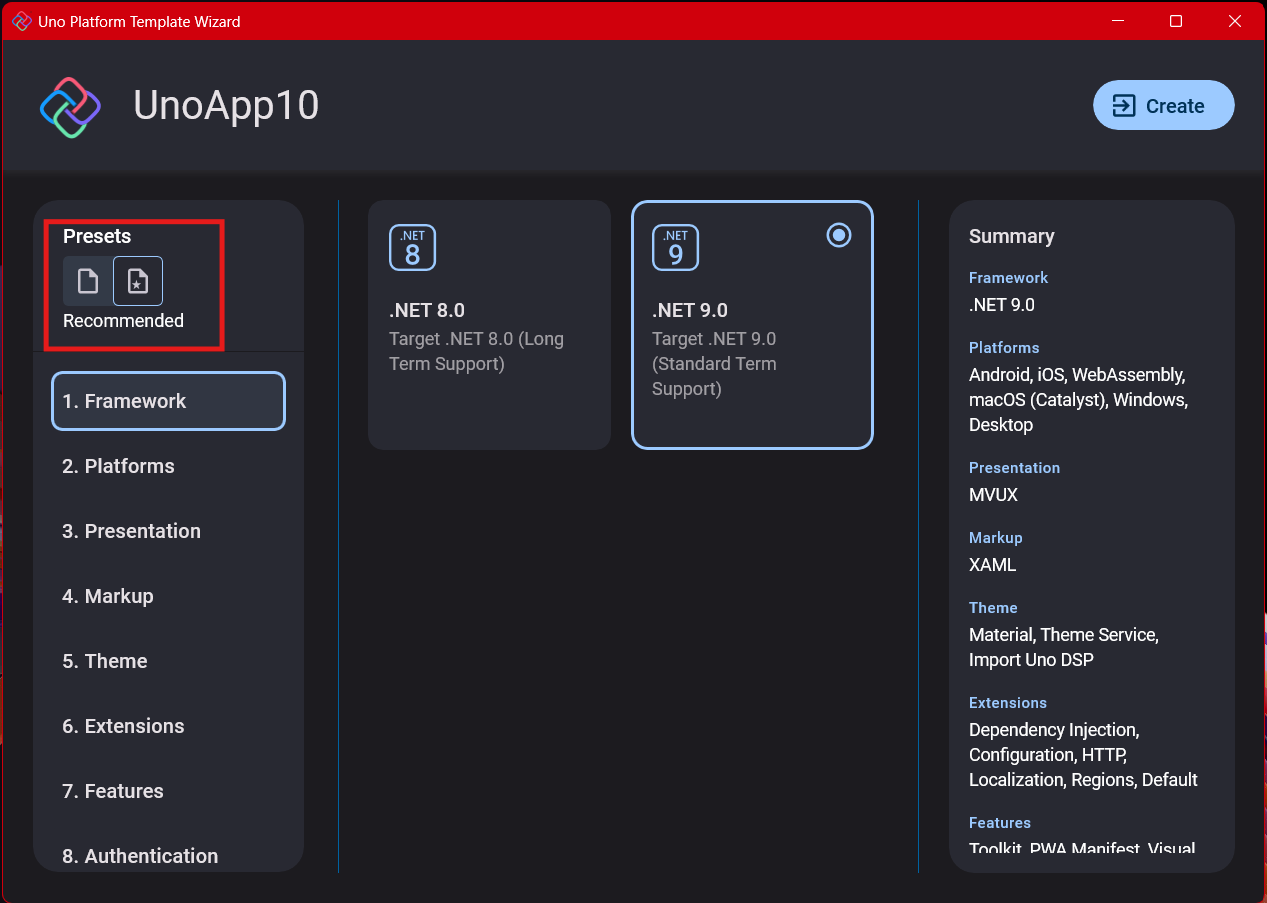
Step 3: The Configuration Wizard
The Uno Platform team has created a comprehensive wizard that guides you through various configuration options. It might seem overwhelming at first, but it’s better to have this guided approach where you can make one decision at a time.
Your first decision is which target framework to use. They recommend .NET 9, which I like, but in my test project, I’m working with .NET 8 because I’m primarily focused on WebAssembly output. Uno offers multi-threading in Web Assembly with .NET 8, which is why I chose it, but for new projects, .NET 9 is likely the better choice.
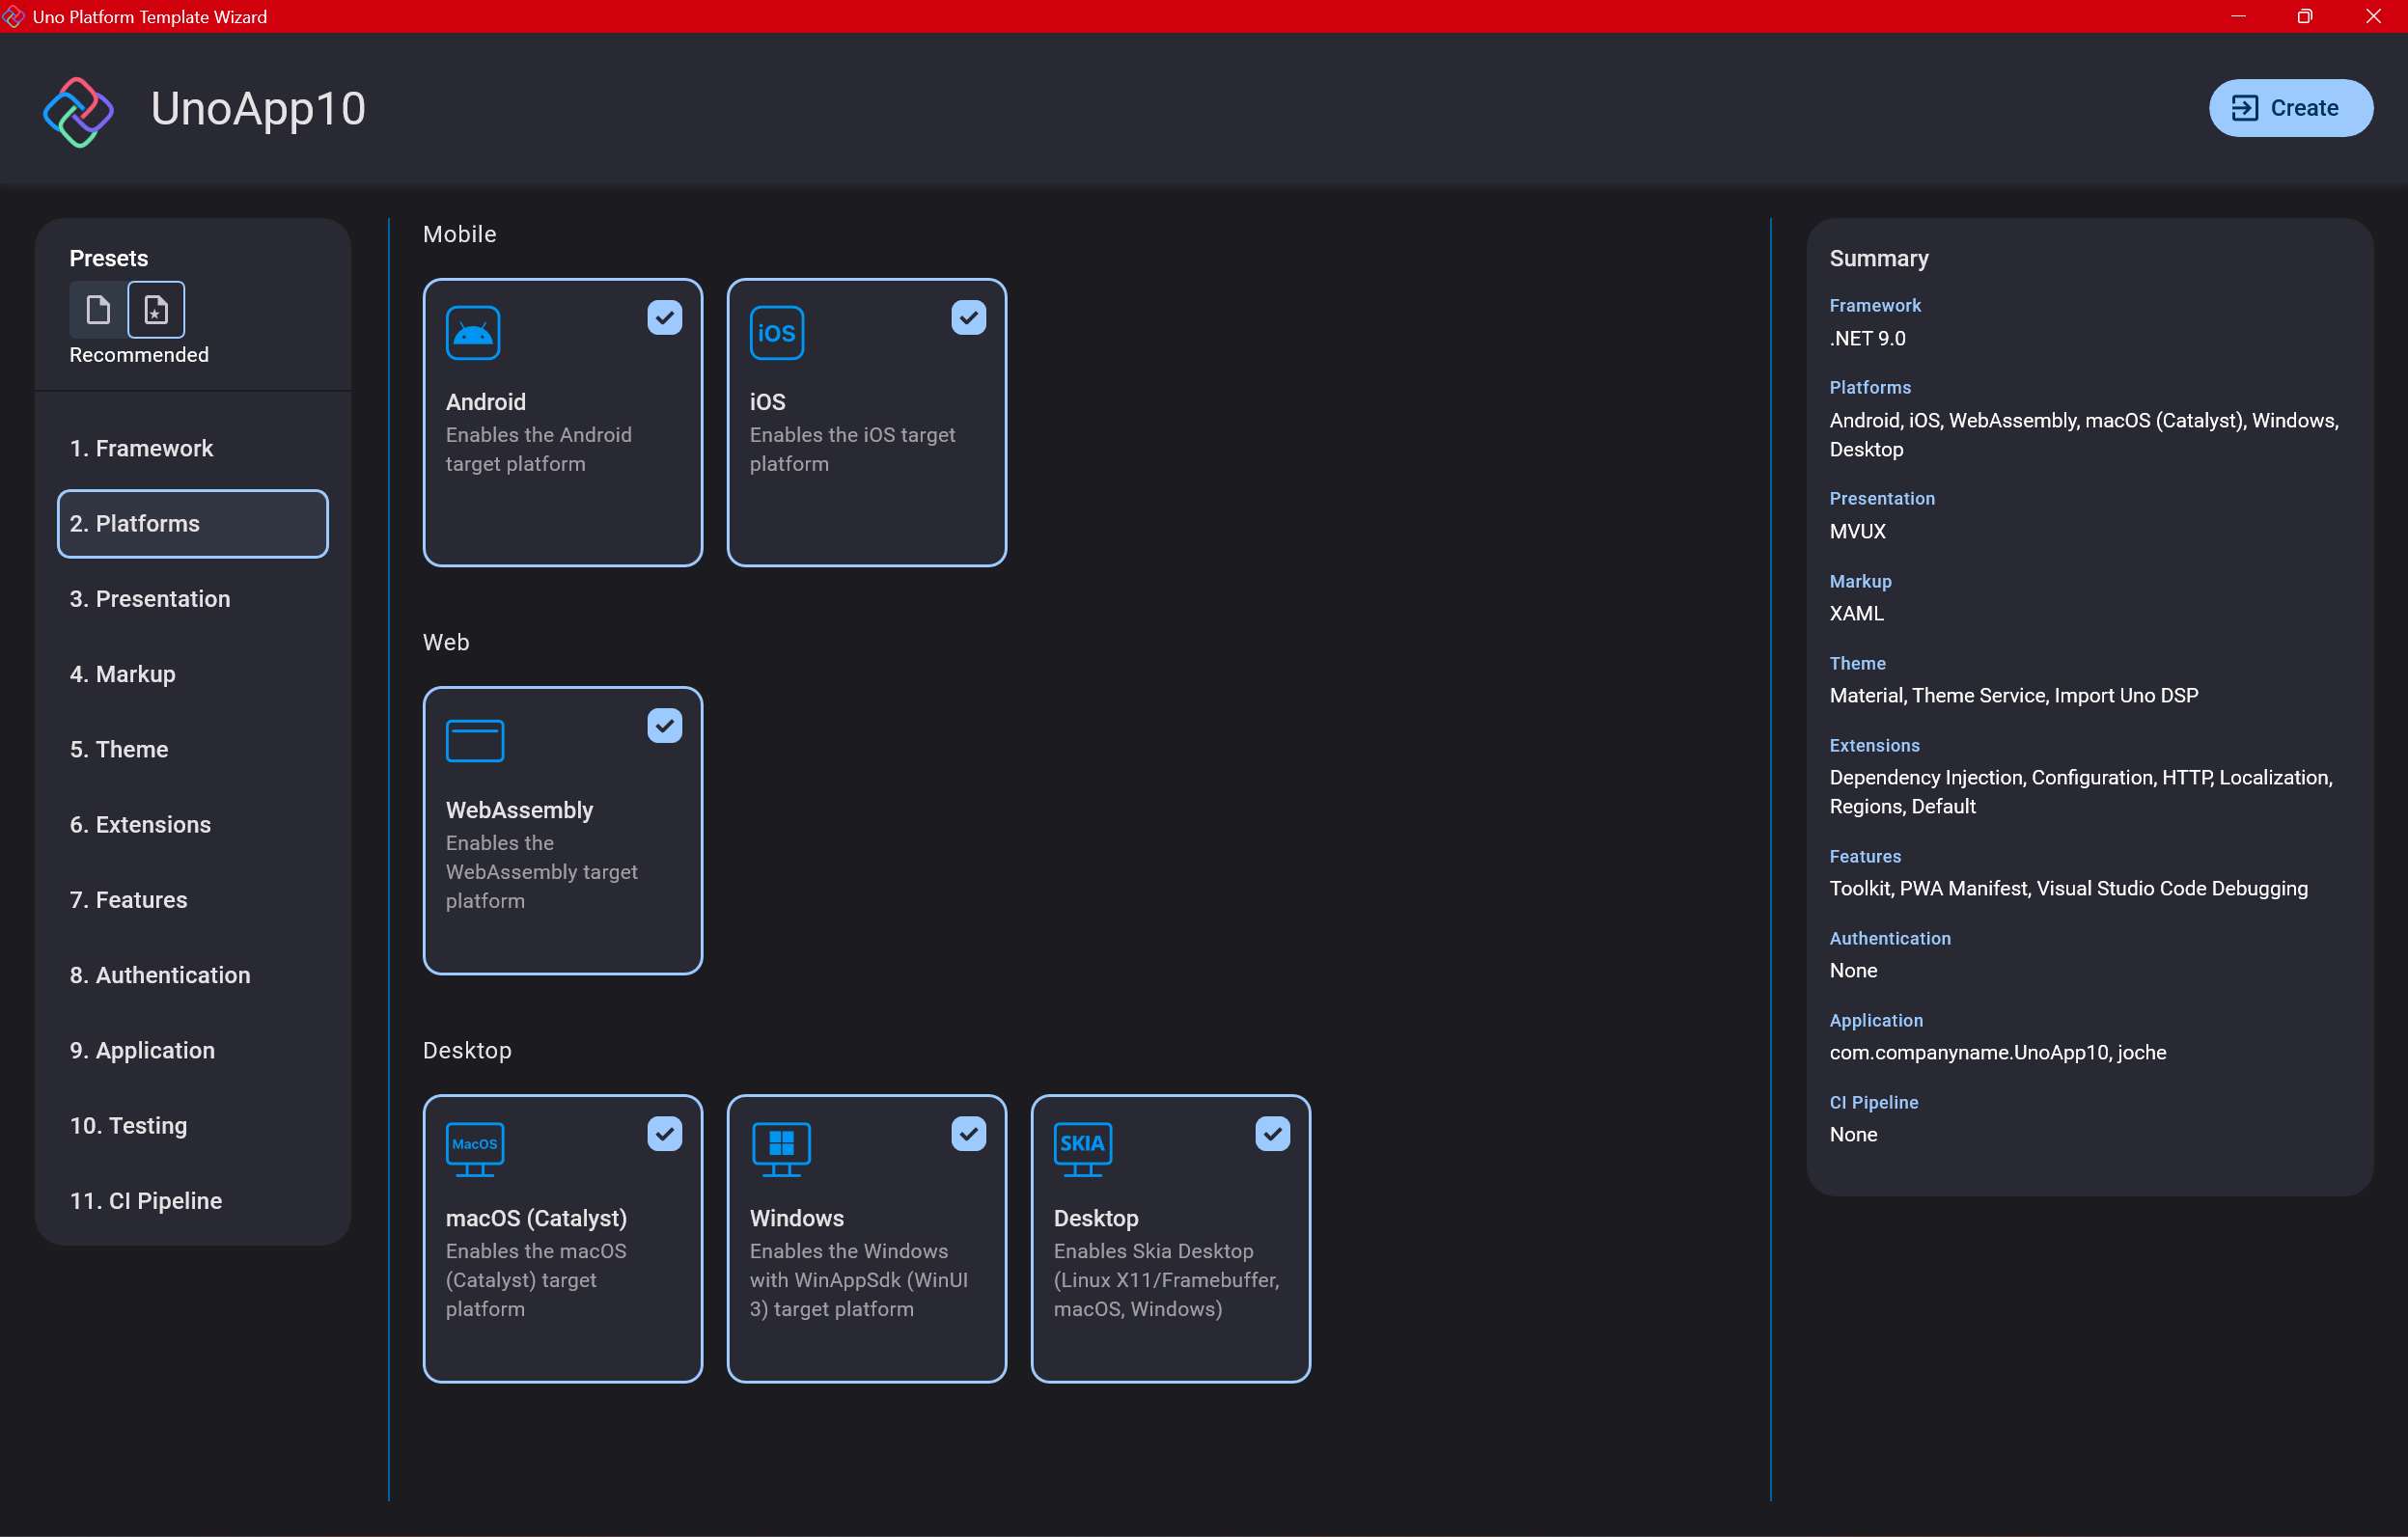
Step 4: Target Platforms
Next, you need to select which platforms you want to target. I always select all of them because the most beautiful aspect of the Uno Platform is true multi-targeting with a single codebase.
In the past (during the Xamarin era), you needed multiple projects with a complex directory structure. With Uno, it’s actually a single unified project, creating a clean solution layout. So while you can select just WebAssembly if that’s your only focus, I think you get the most out of Uno by multi-targeting.
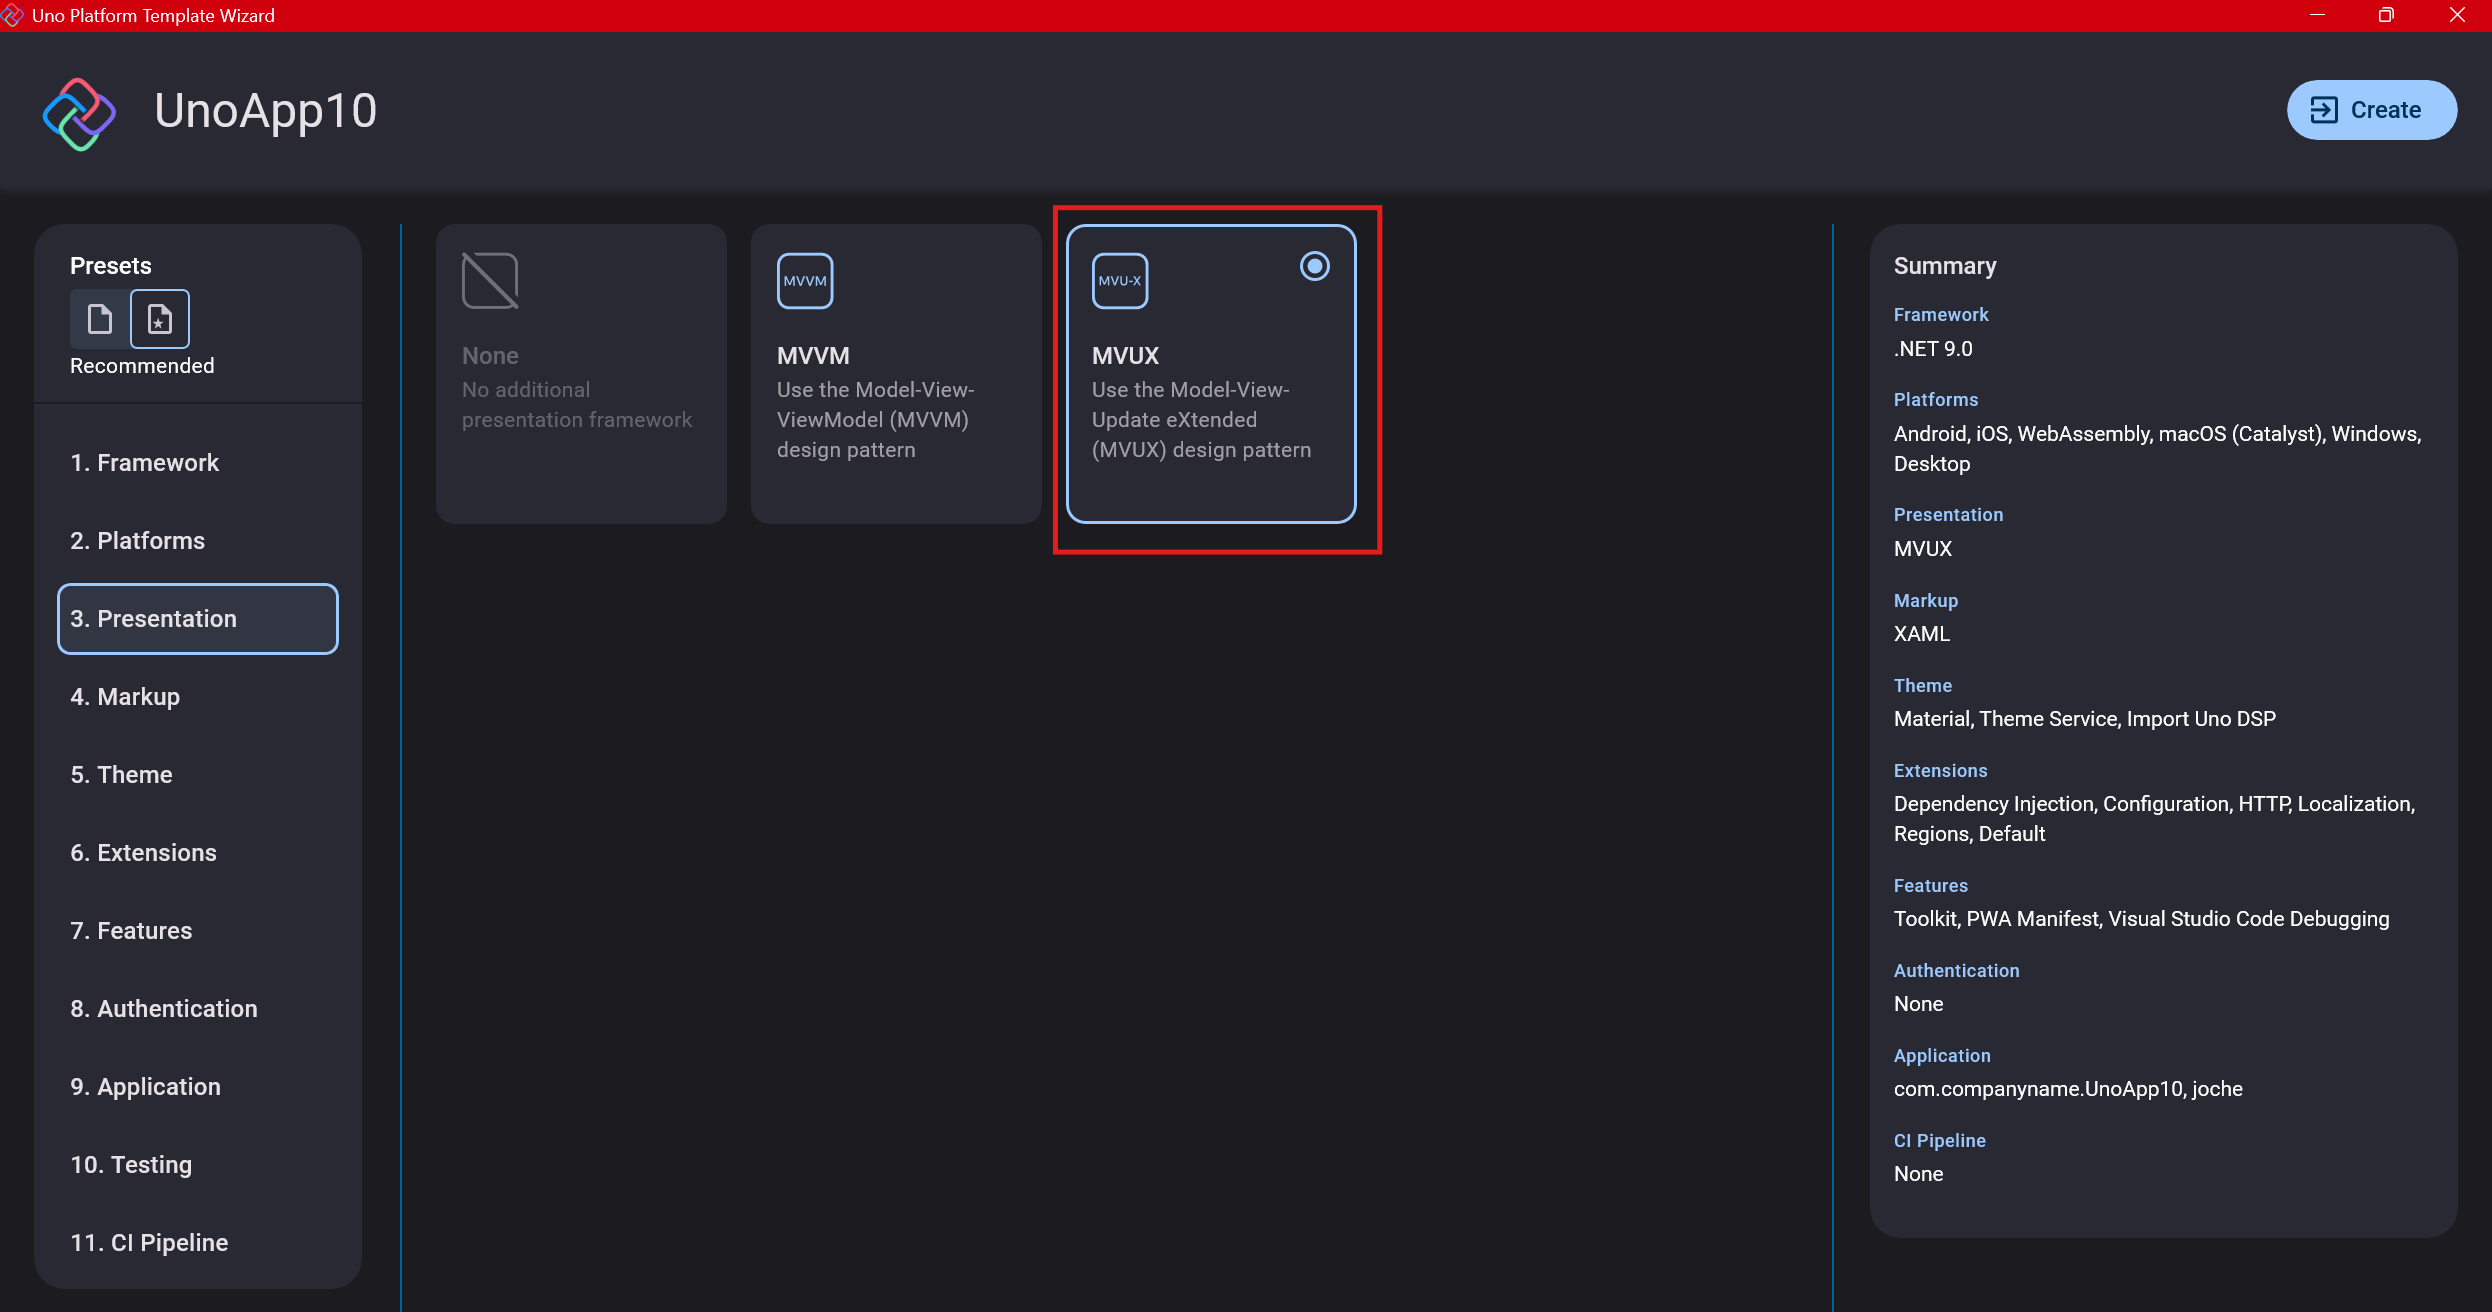
Step 5: Presentation Pattern
The next question is which presentation pattern you want to use. I would suggest MVUX, though I still have some doubts as I haven’t tried MVVM with Uno yet. MVVM is the more common pattern that most programmers understand, while MVUX is the new approach.
One challenge is that when you check the official Uno sample repository, the examples come in every presentation pattern flavor. Sometimes you’ll find a solution for your task in one pattern but not another, so you may need to translate between them. You’ll likely find more examples using MVVM.
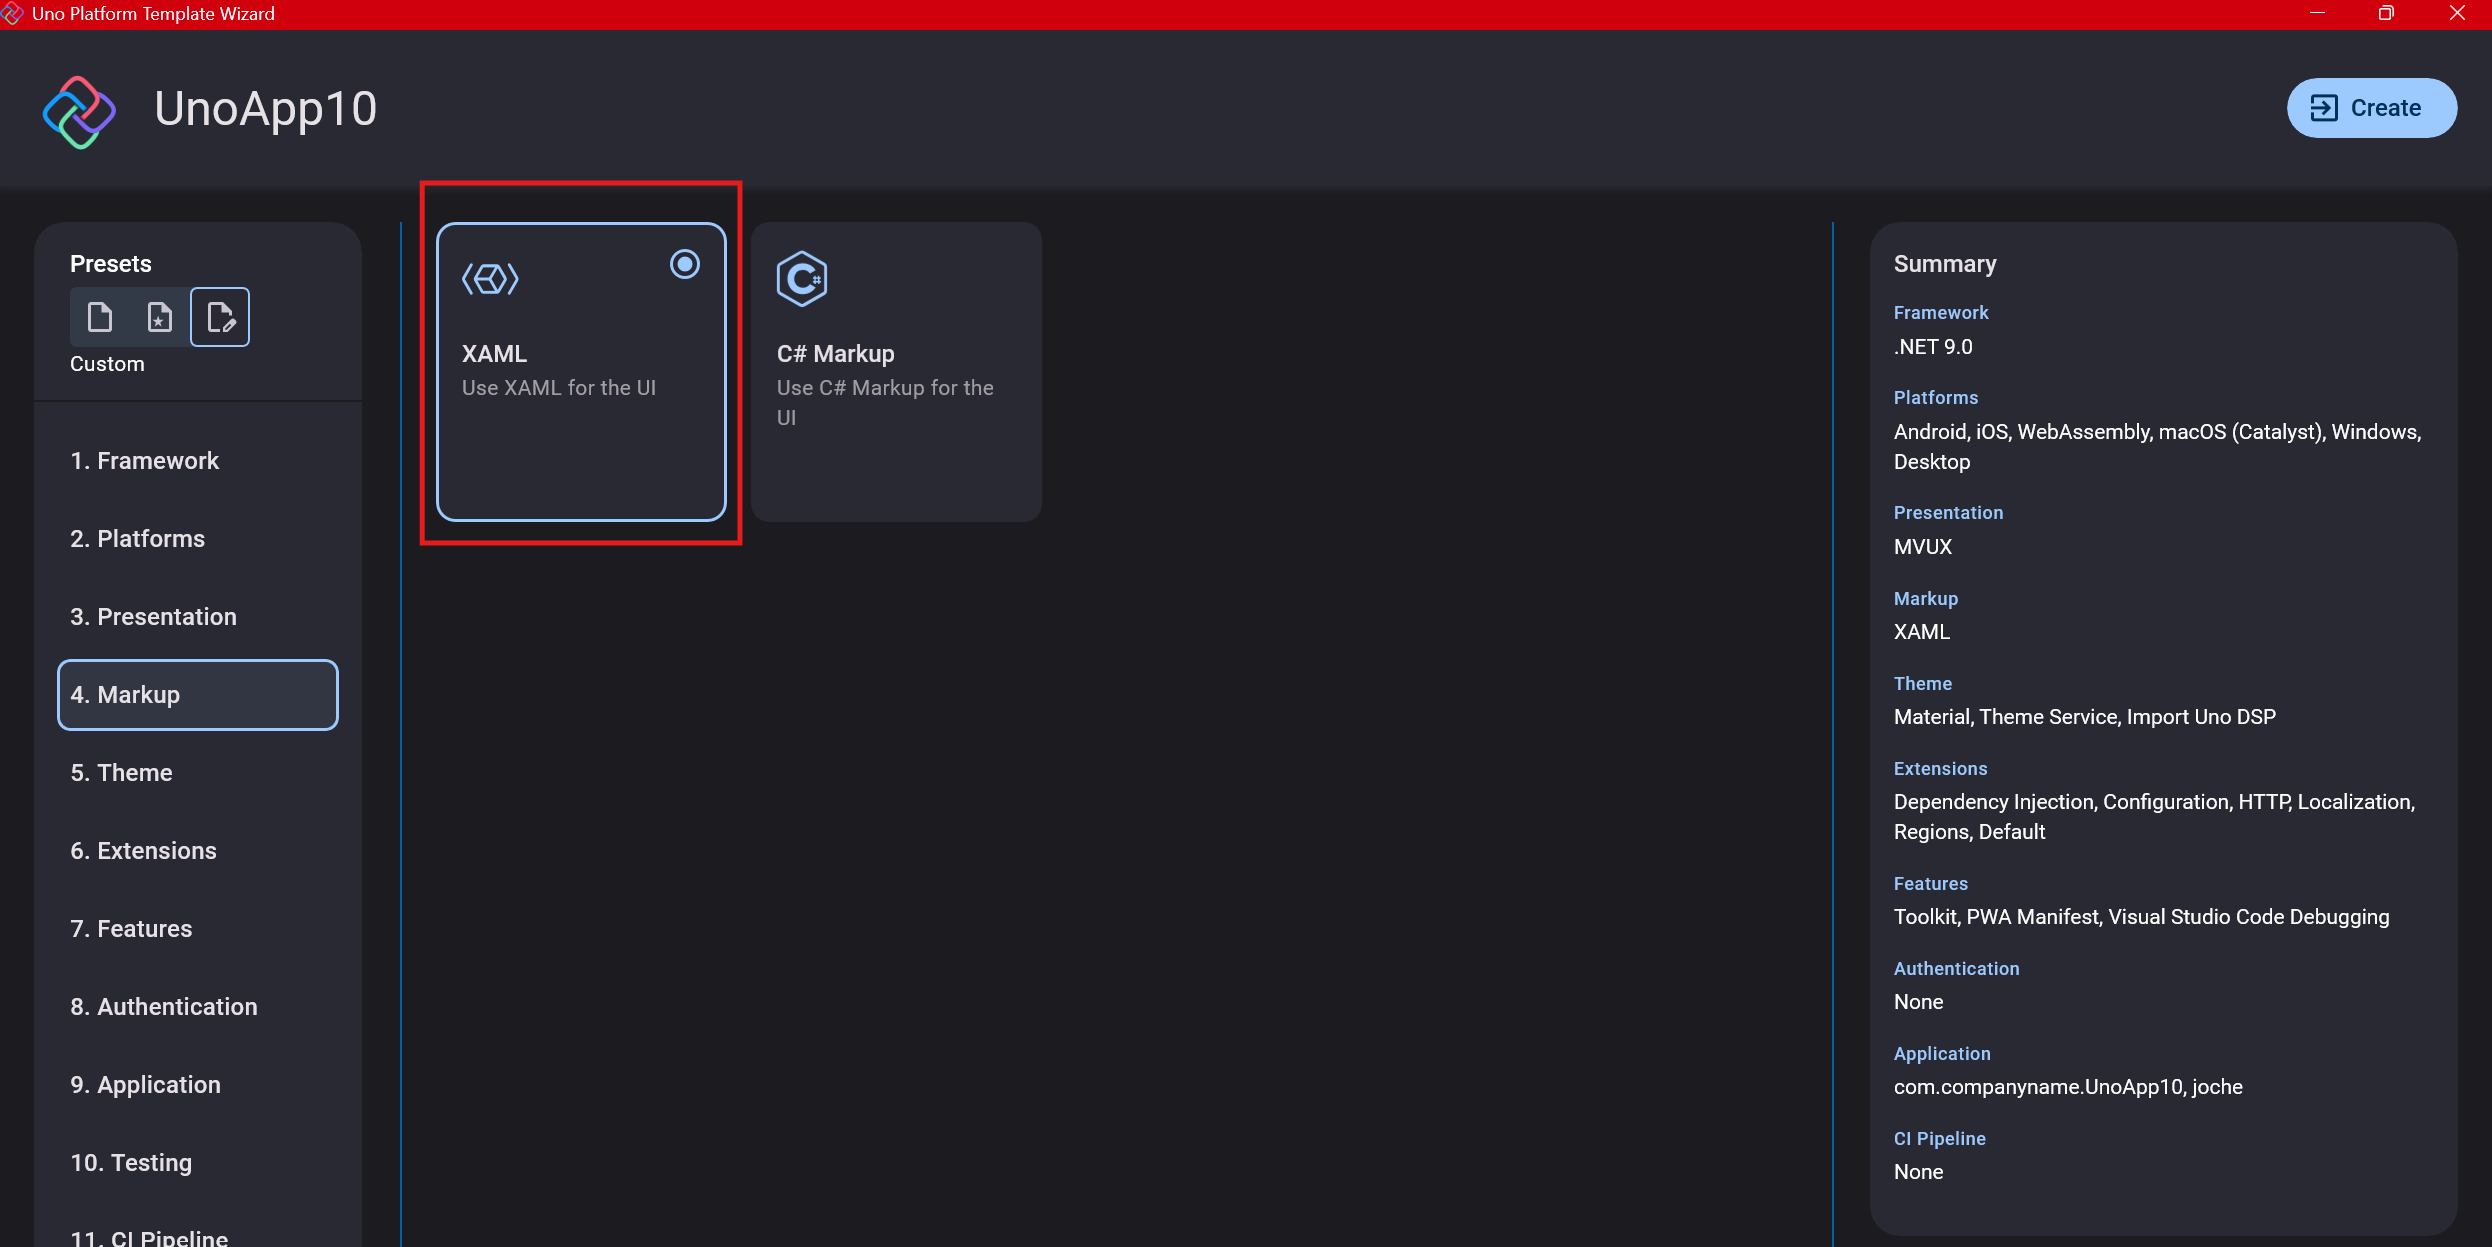
Step 6: Markup Language
For markup, I recommend selecting XAML. In my first project, I tried using C# markup, which worked well until I reached some roadblocks I couldn’t overcome. I didn’t want to get stuck trying to solve one specific layout issue, so I switched. For beginners, I suggest starting with XAML.
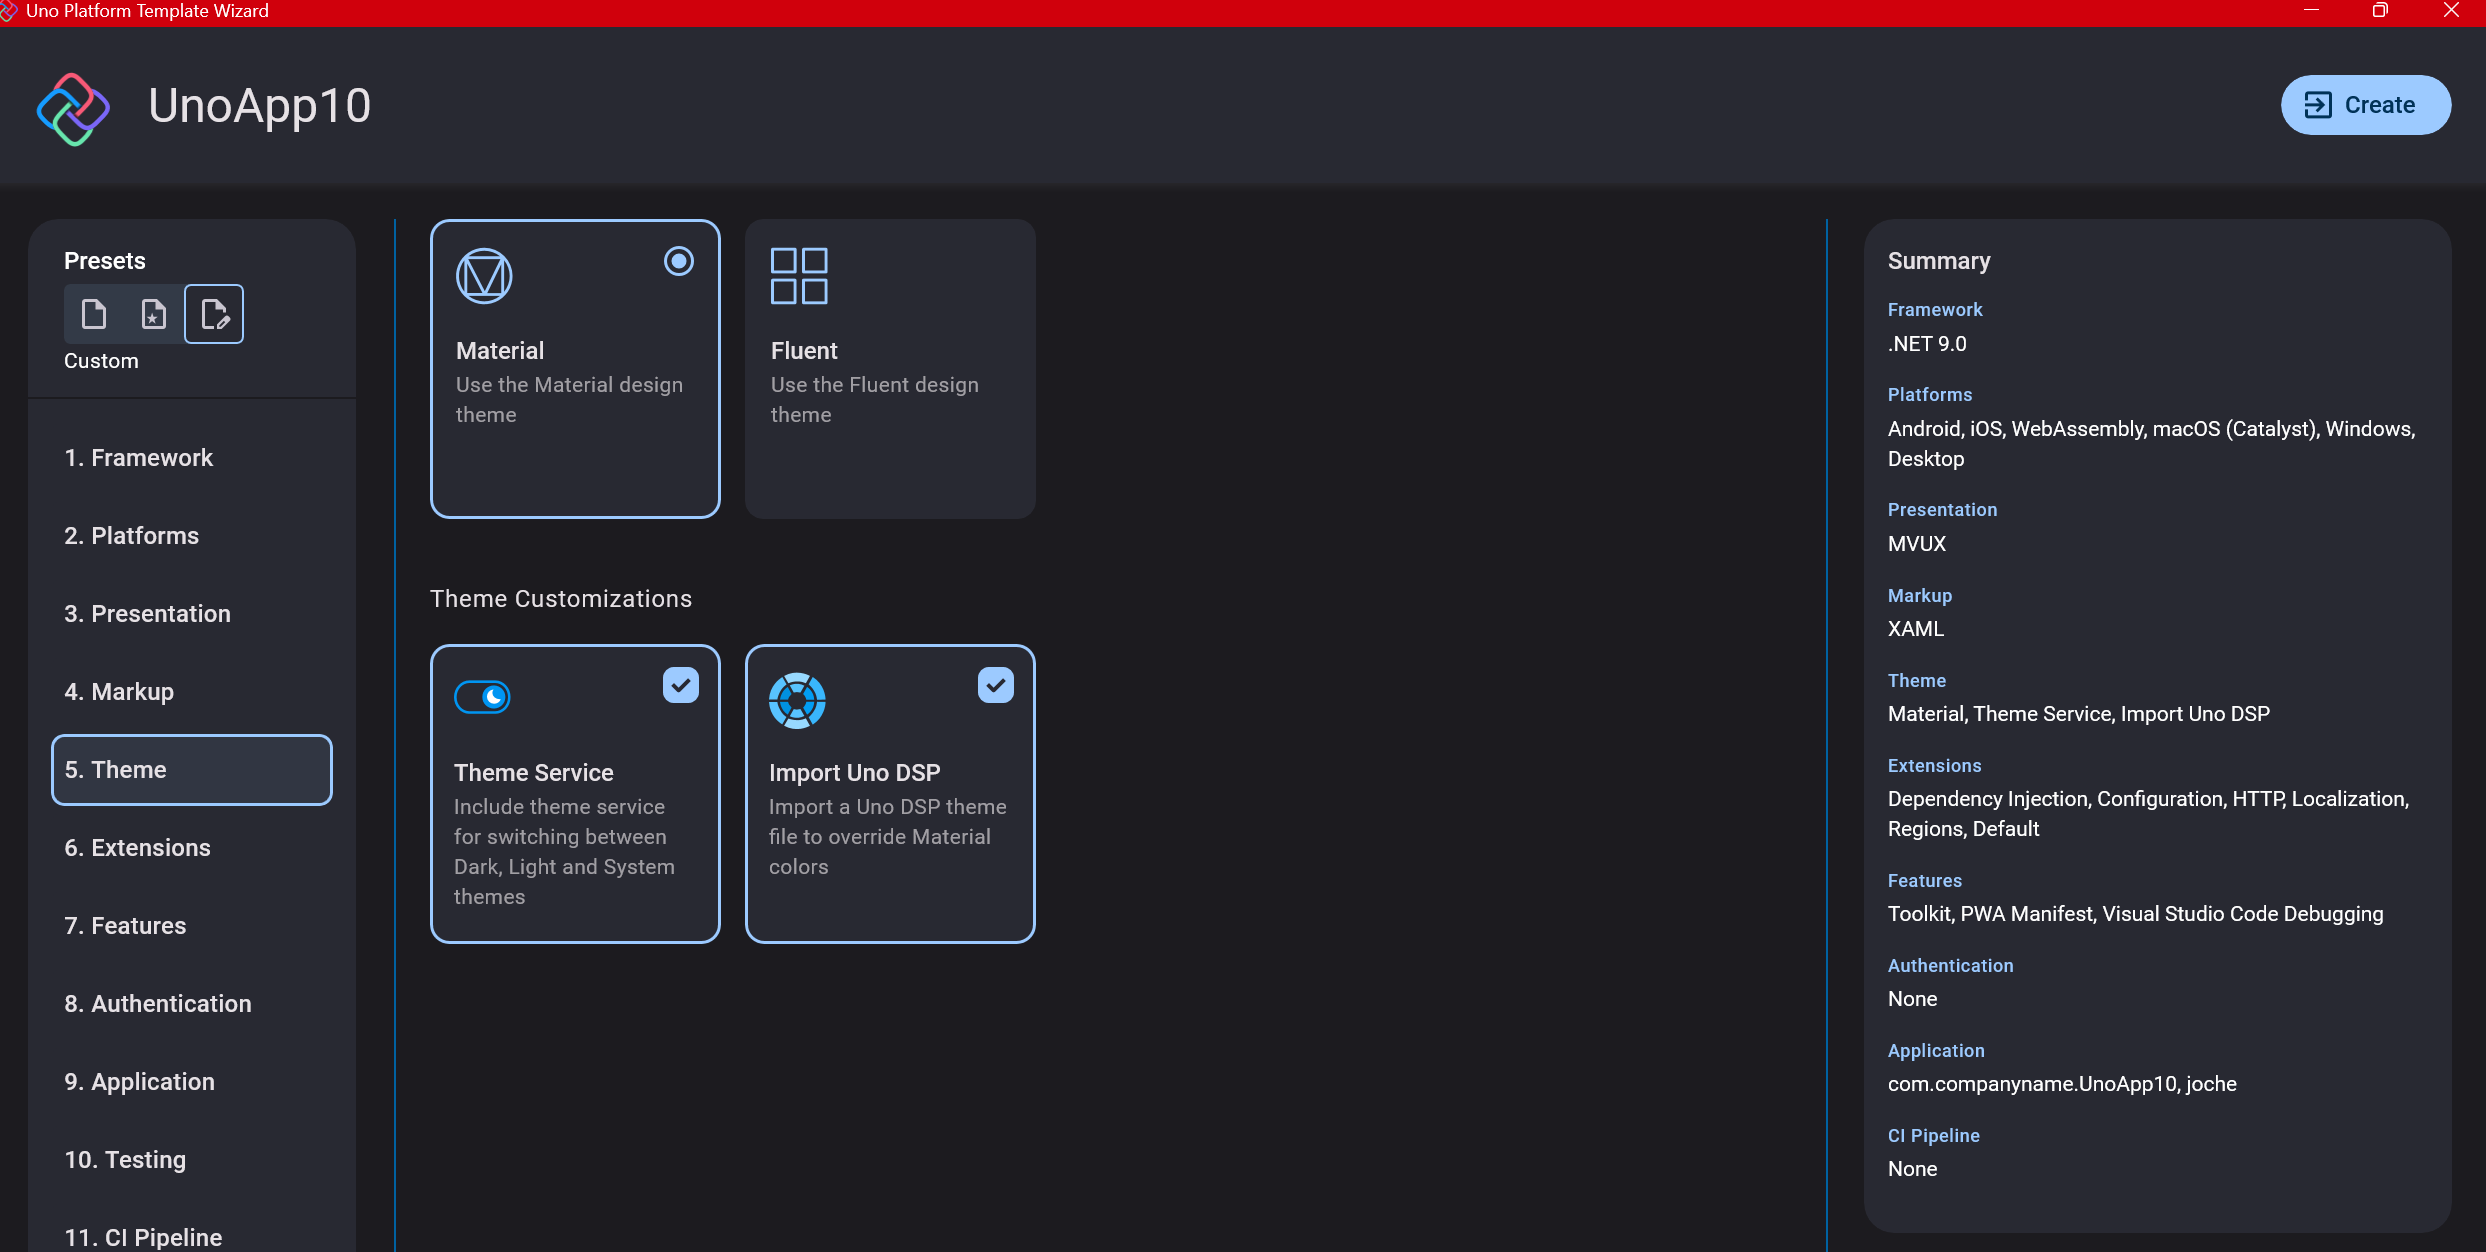
Step 7: Theming
For theming, you’ll need to select a UI theme. I don’t have a strong preference here and typically stick with the defaults: using Material Design, the theme service, and importing Uno DSP.
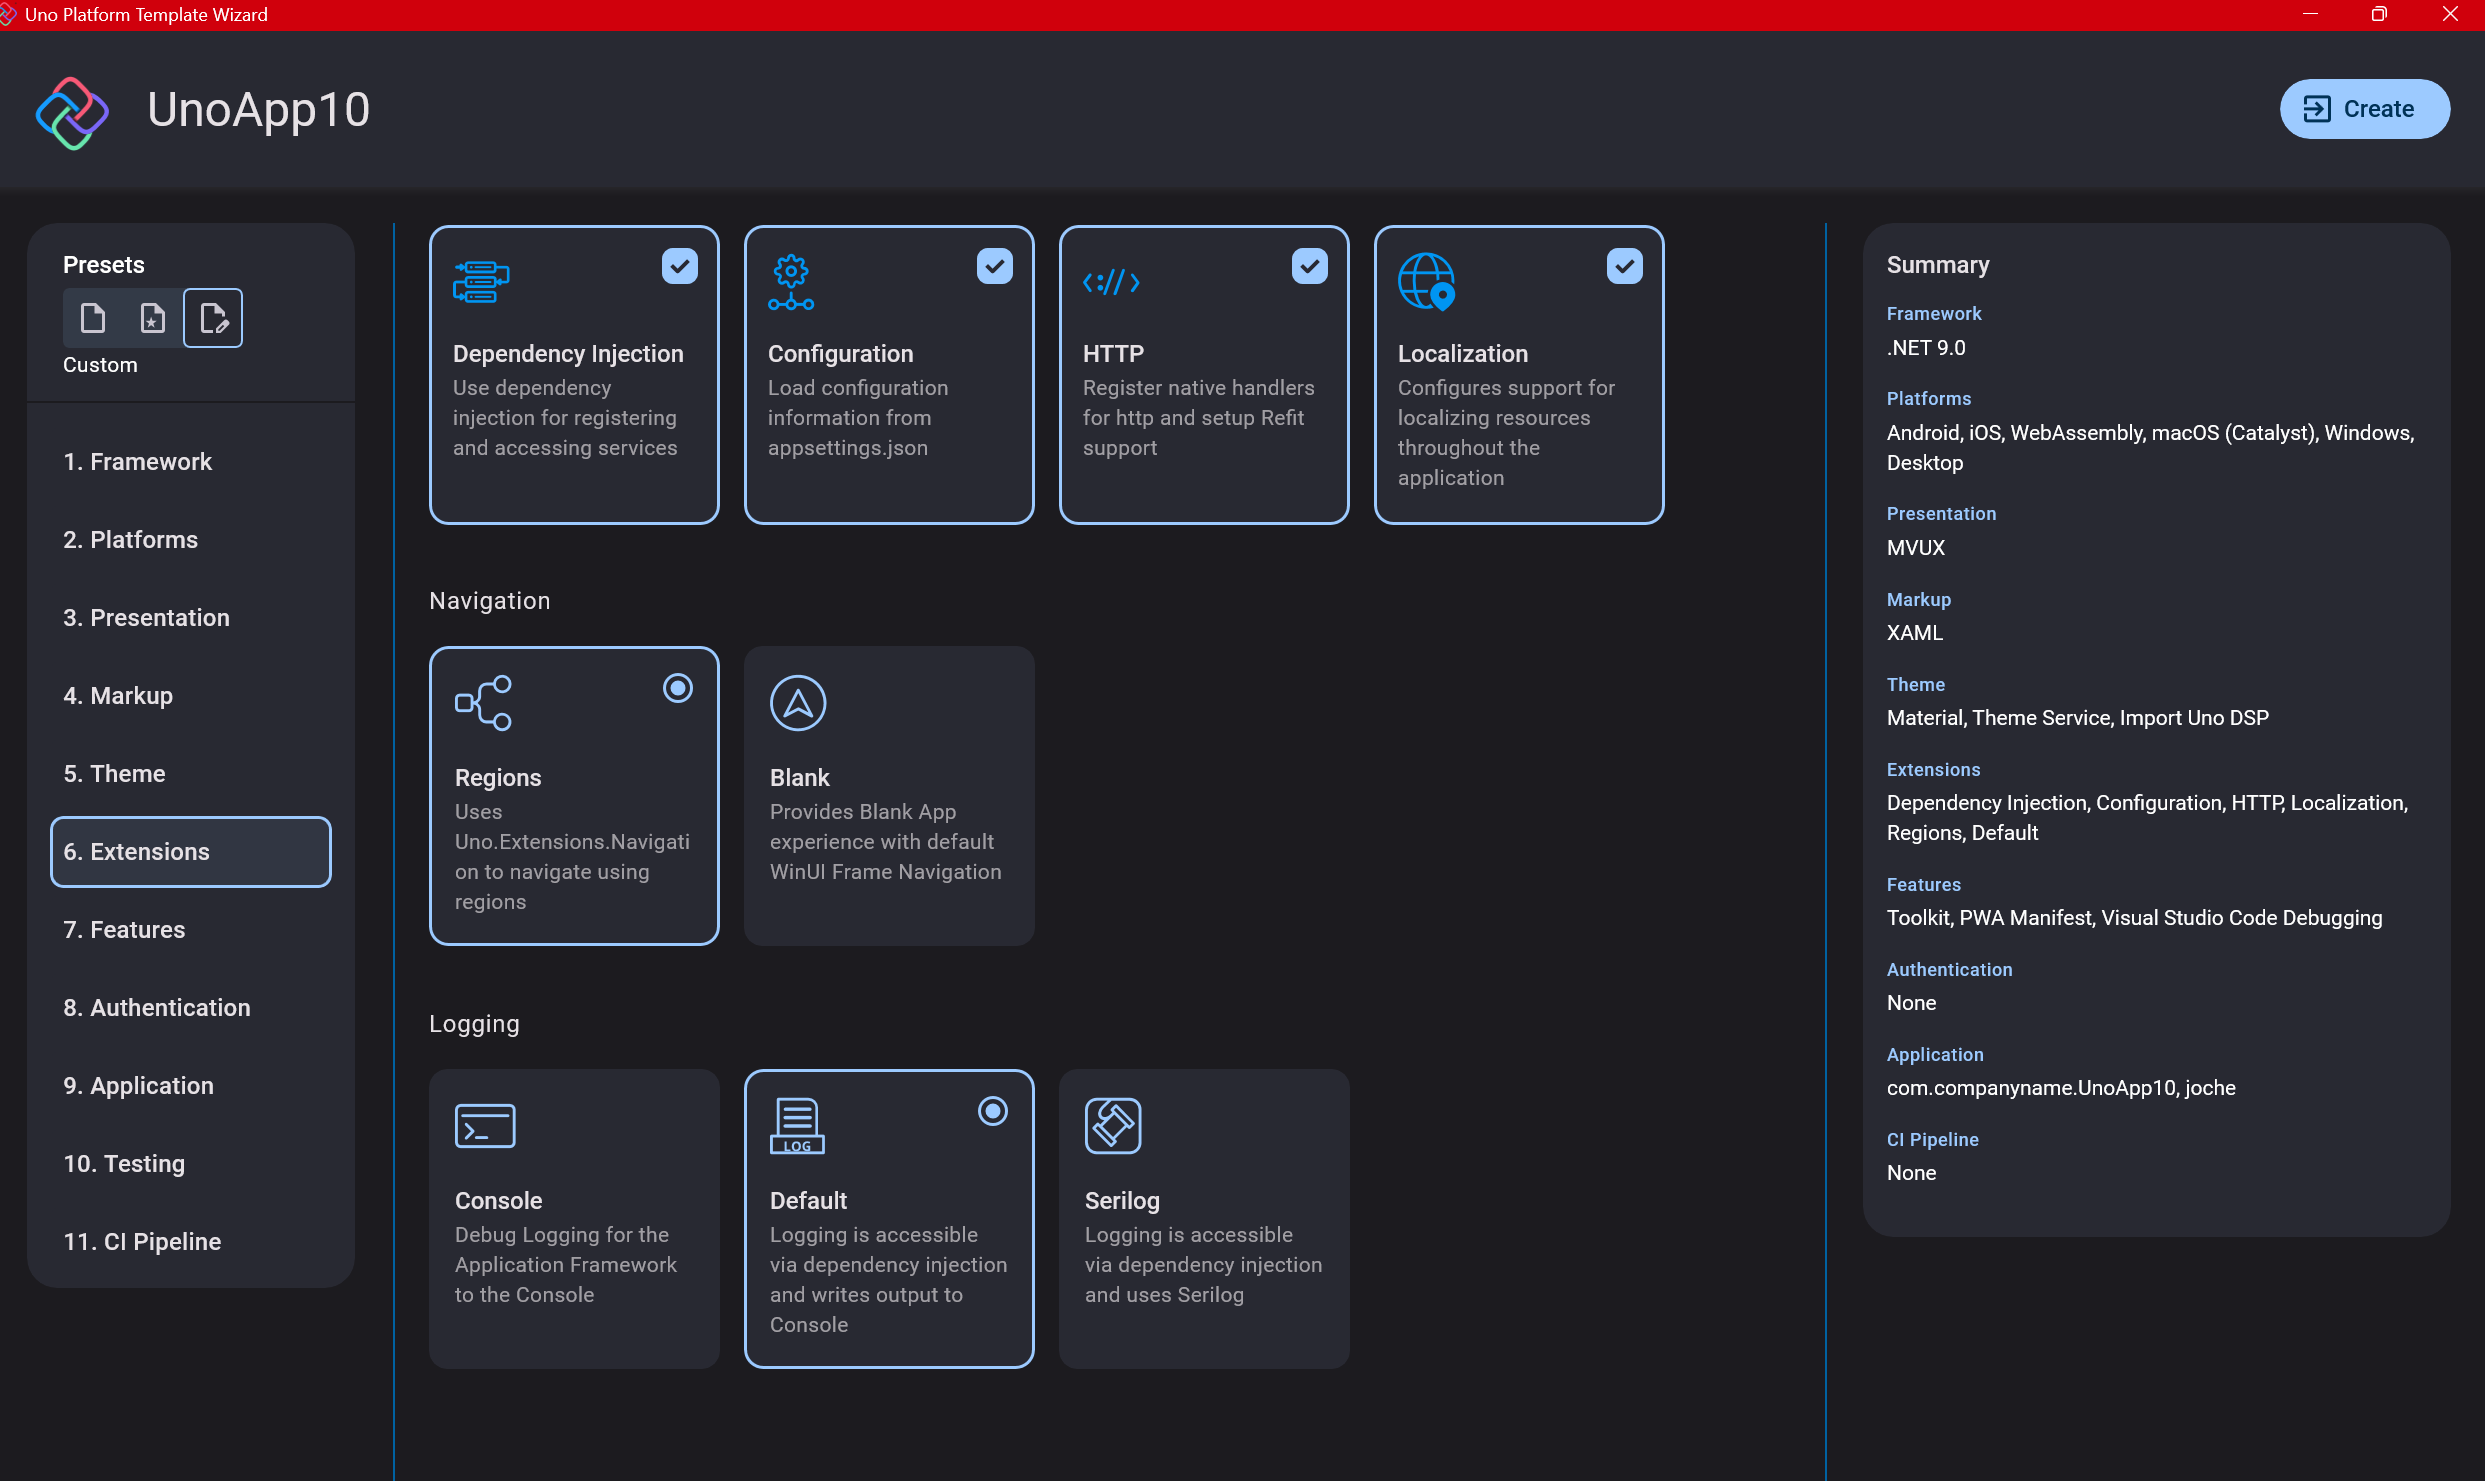
Step 8: Extensions
When selecting extensions to include, I recommend choosing almost all of them as they’re useful for modern application development. The only thing you might want to customize is the logging type (Console, Debug, or Serilog), depending on your previous experience. Generally, most applications will benefit from all the extensions offered.
Step 9: Features
Next, you’ll select which features to include in your application. For my tests, I include everything except the MAUI embedding and the media element. Most features can be useful, and I’ll show in a future post how to set them up when discussing the solution structure.

Step 10: Authentication
You can select “None” for authentication if you’re building test projects, but I chose “Custom” because I wanted to see how it works. In my case, I’m authenticating against DevExpress XAF REST API, but I’m also interested in connecting my test project to Azure B2C.
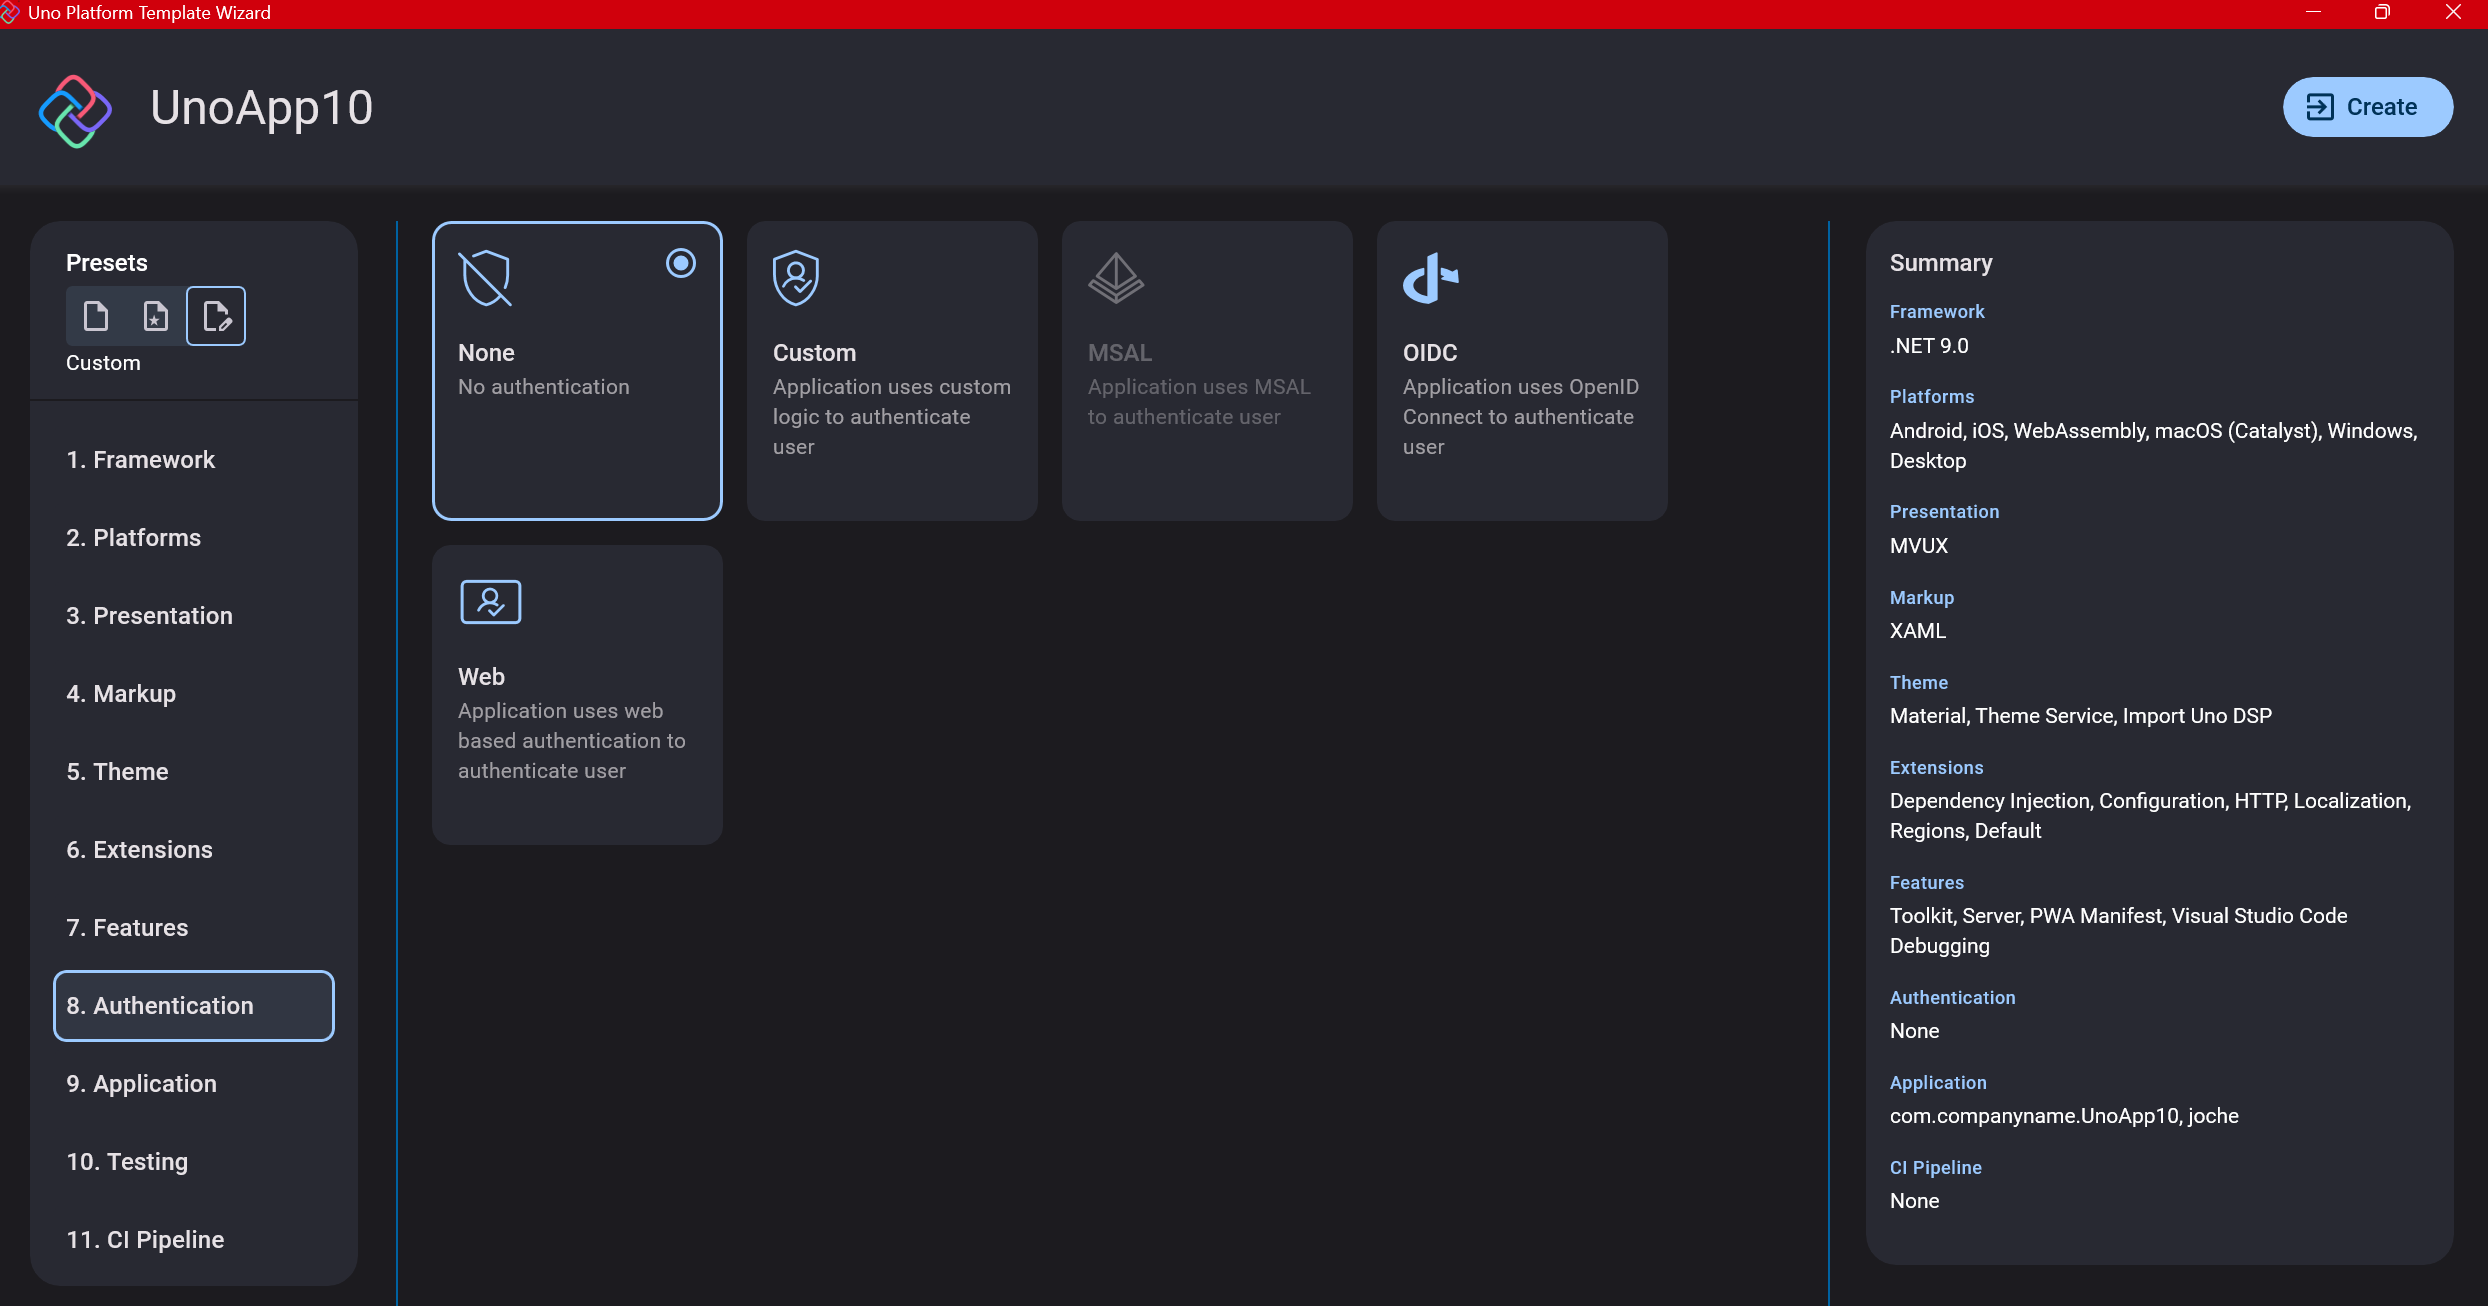
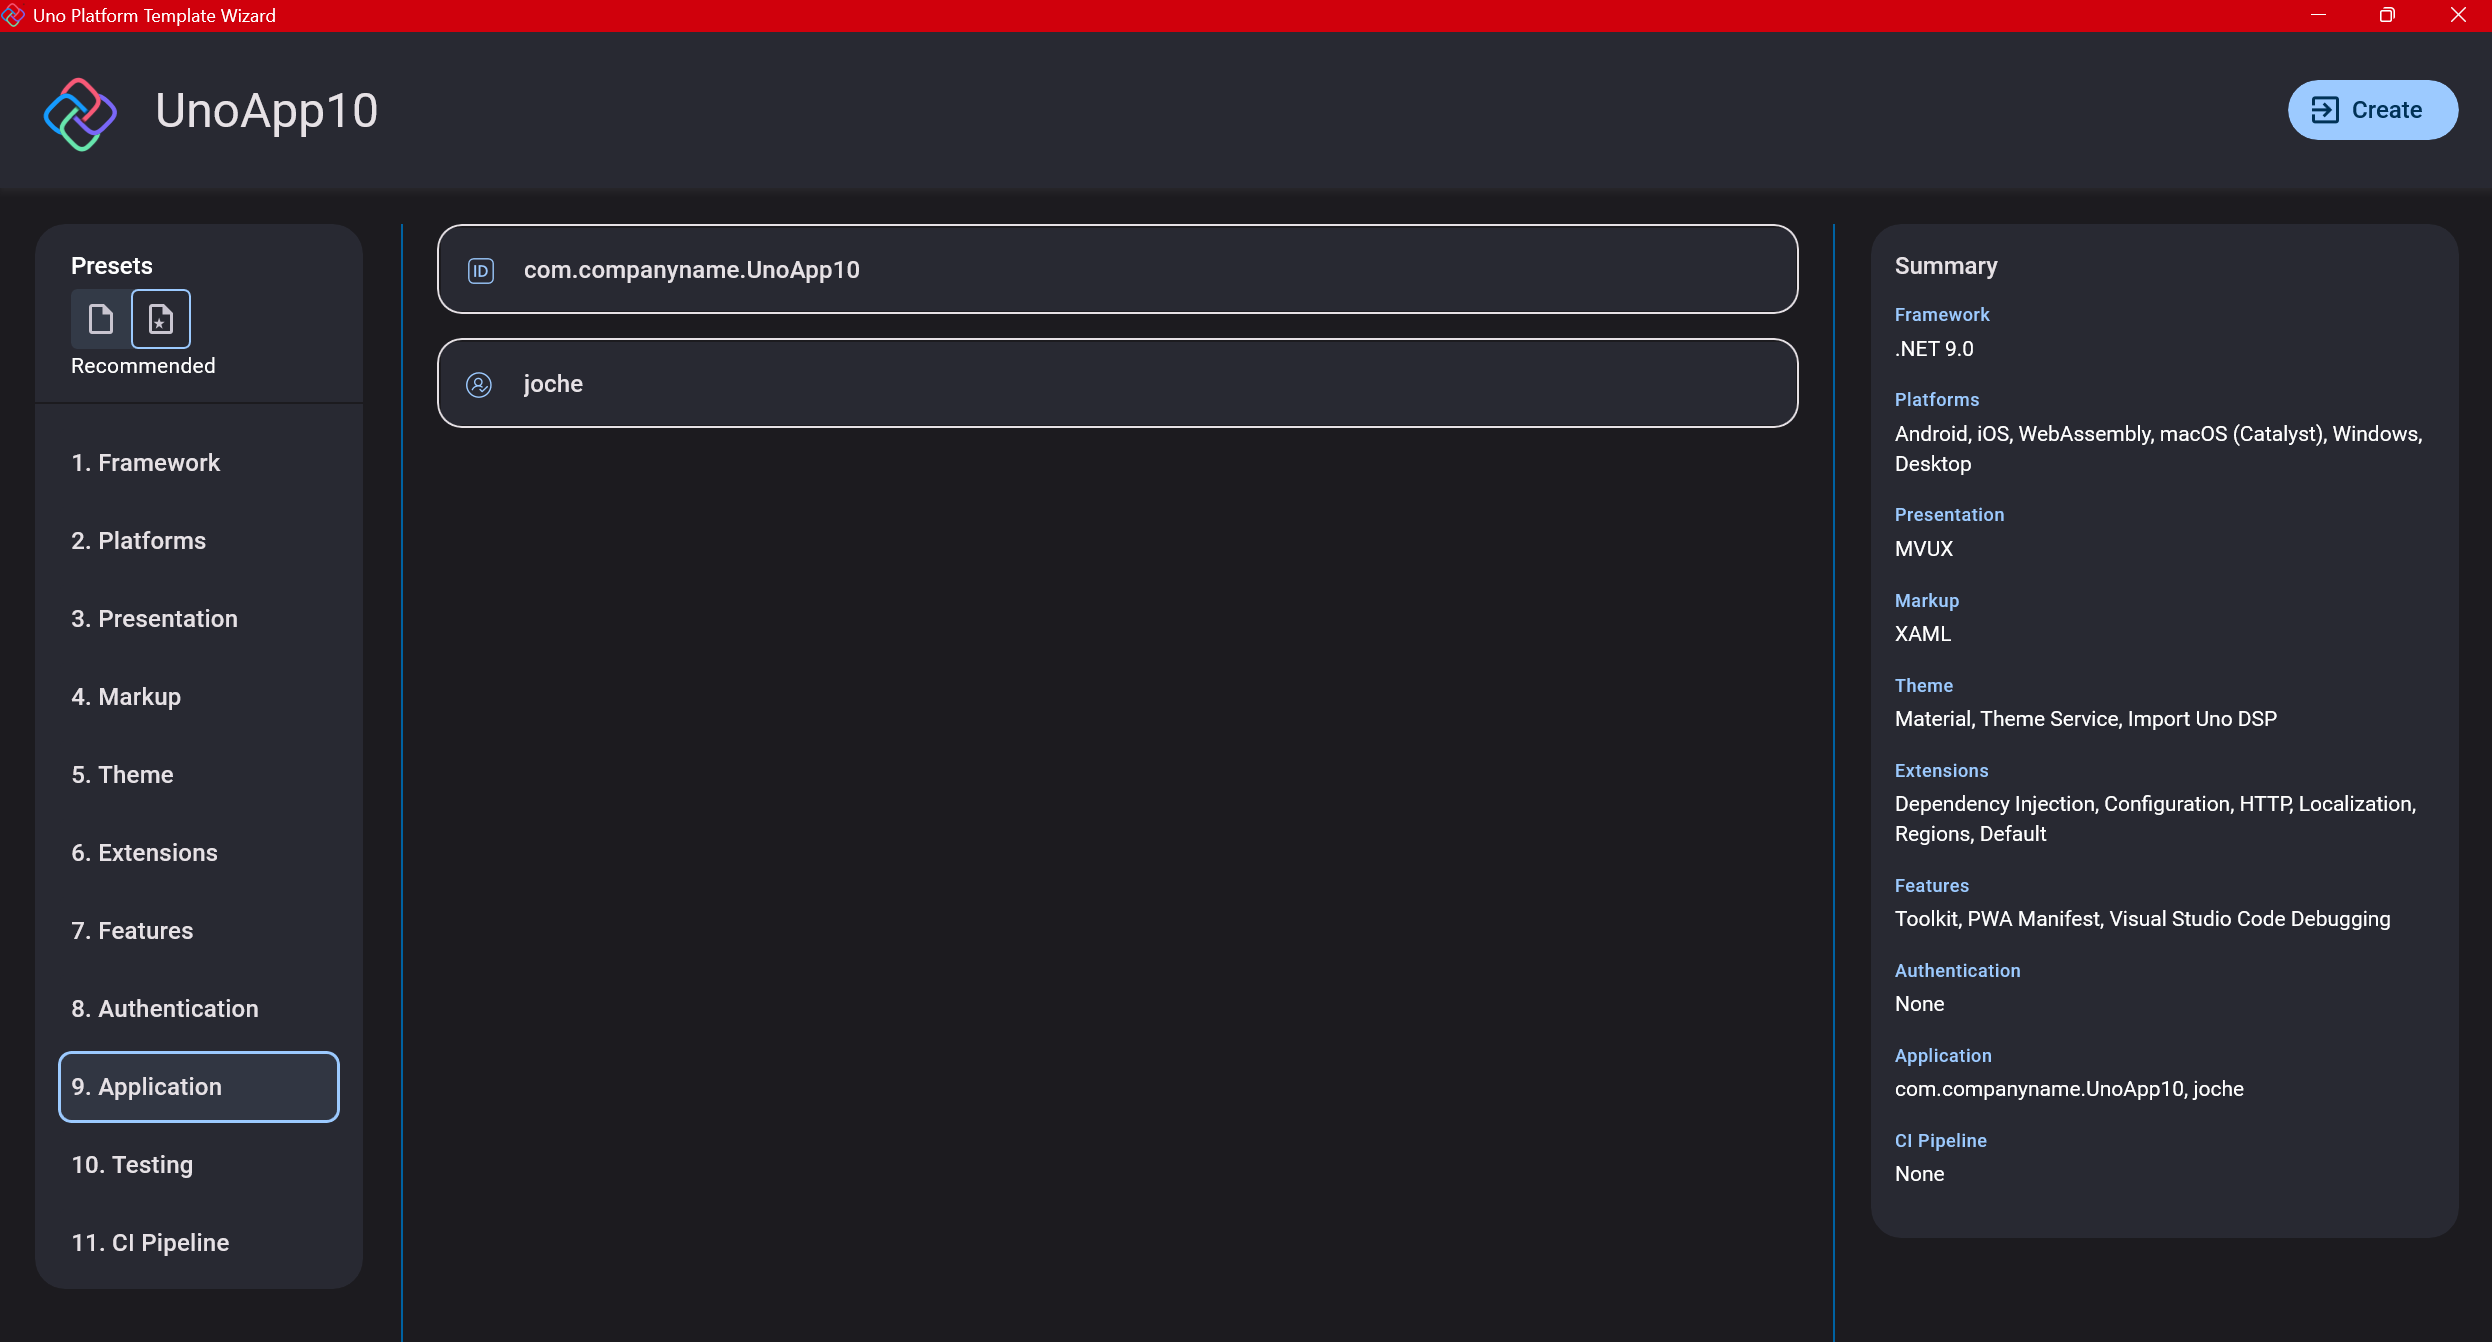
Step 11: Application ID
Next, you’ll need to provide an application ID. While I haven’t fully explored the purpose of this ID yet, I believe it’s needed when publishing applications to app stores like Google Play and the Apple App Store.
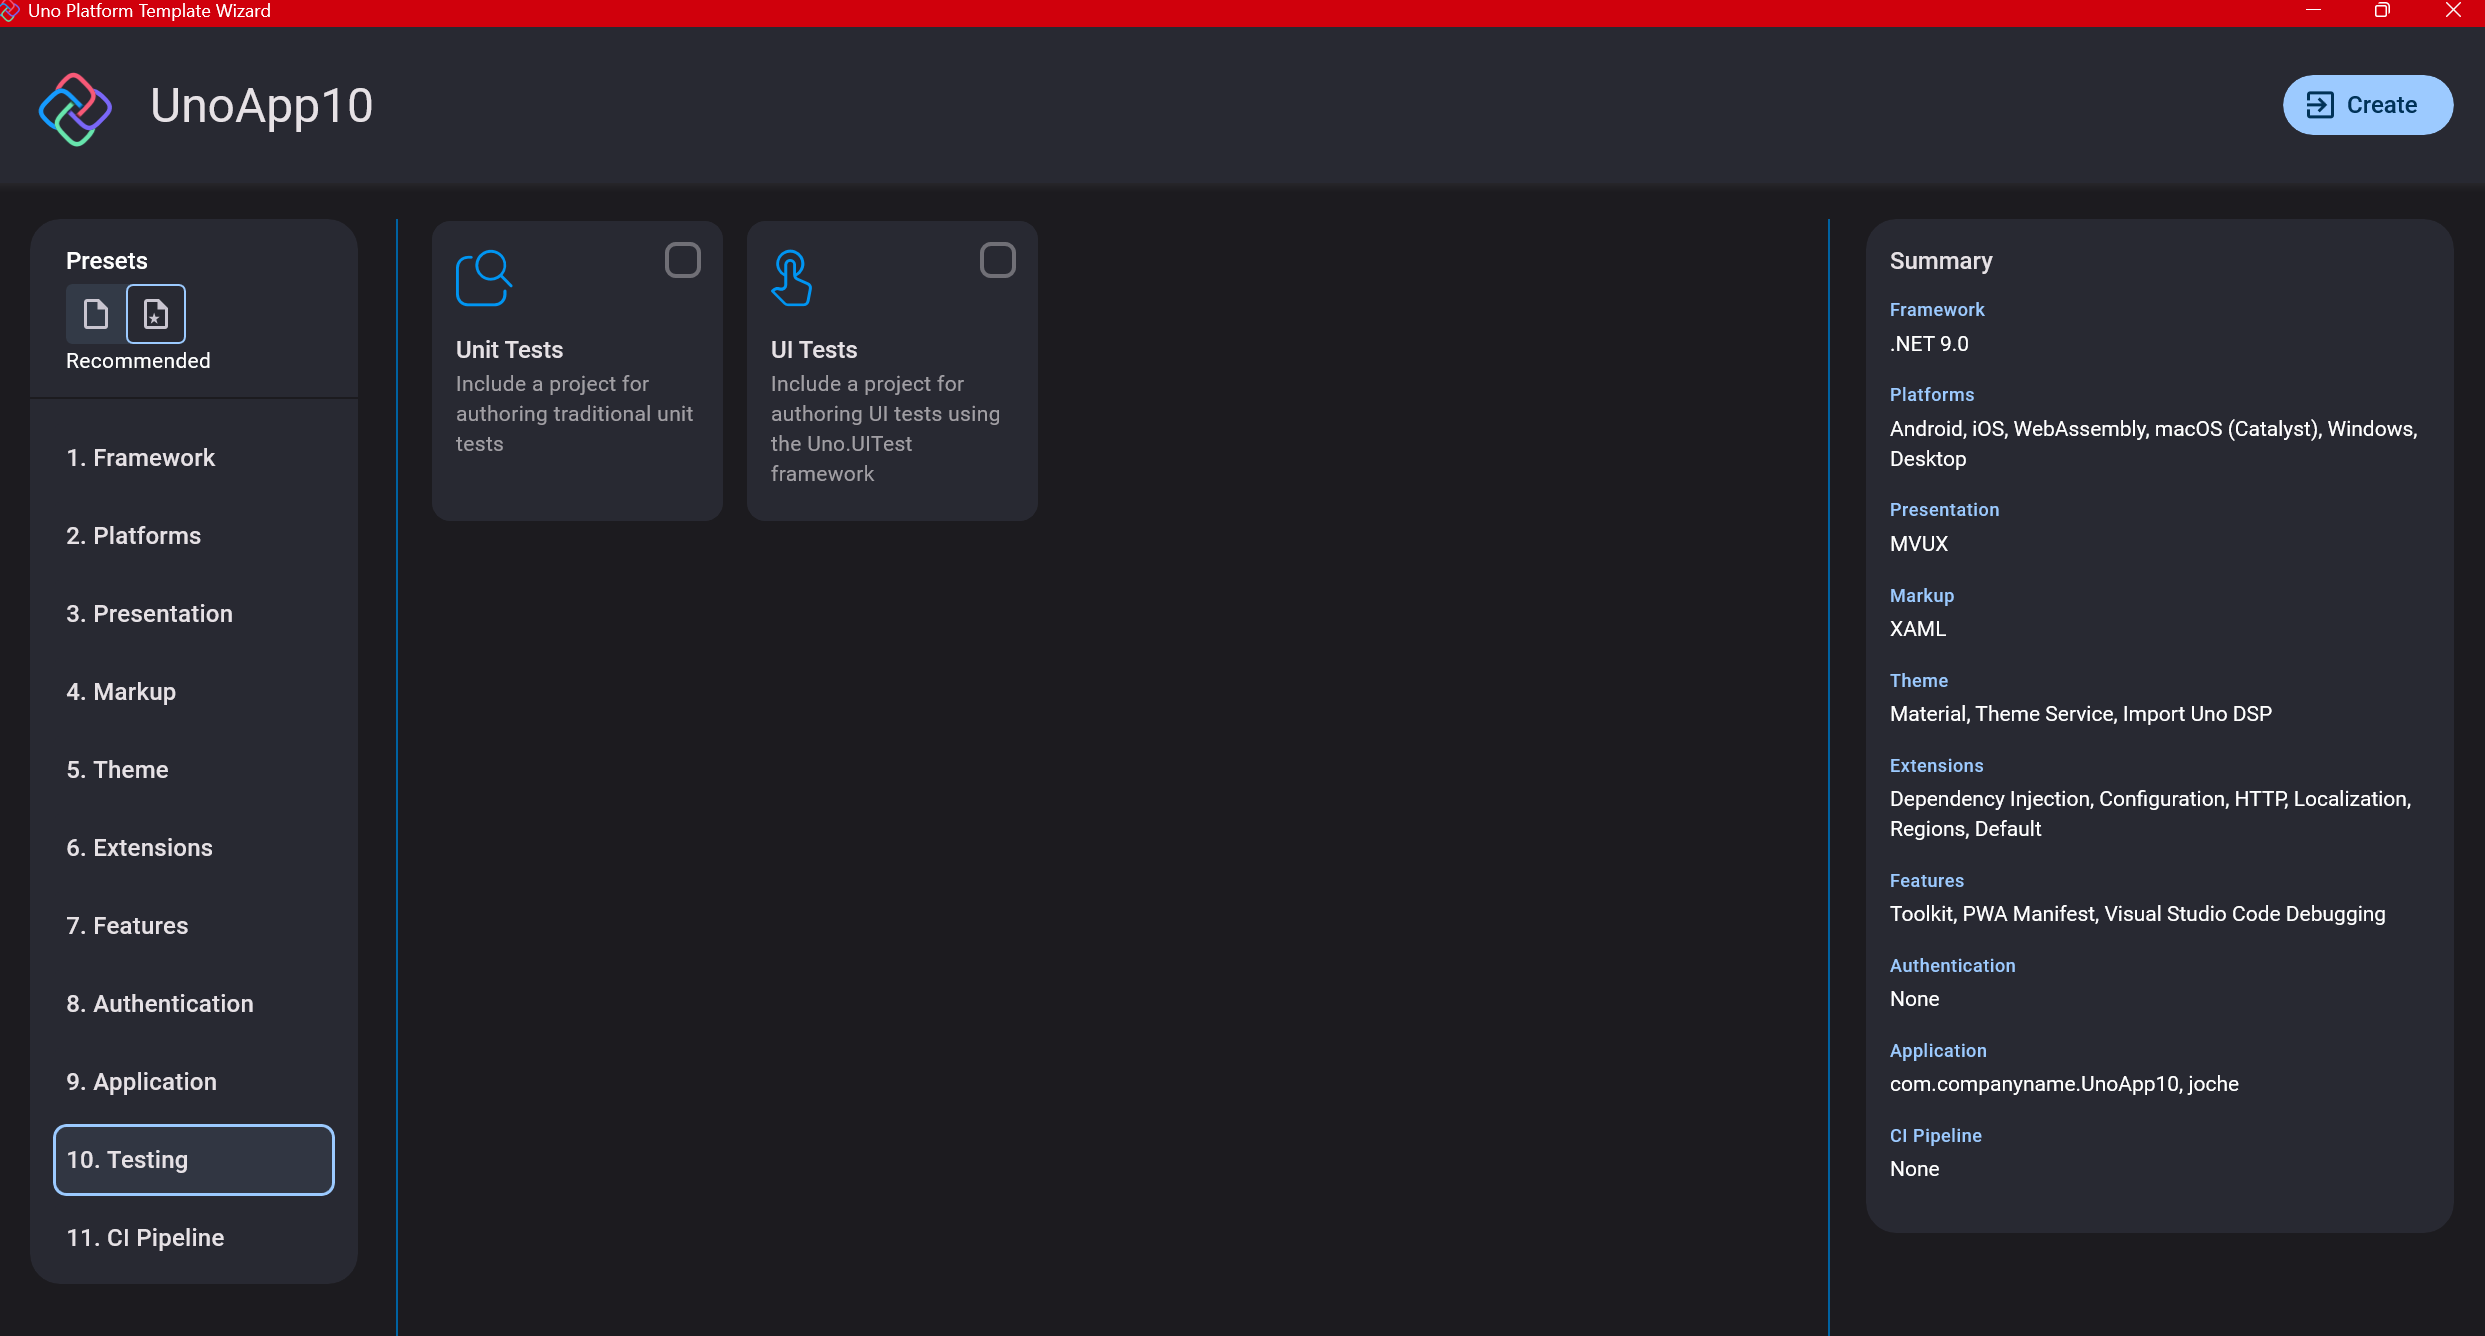
Step 12: Testing
I’m a big fan of testing, particularly integration tests. While unit tests are essential when developing components, for business applications, integration tests that verify the flow are often sufficient.
Uno also offers UI testing capabilities, which I haven’t tried yet but am looking forward to exploring. In platform UI development, there aren’t many choices for UI testing, so having something built-in is fantastic.
Testing might seem like a waste of time initially, but once you have tests in place, you’ll save time in the future. With each iteration or new release, you can run all your tests to ensure everything works correctly. The time invested in creating tests upfront pays off during maintenance and updates.
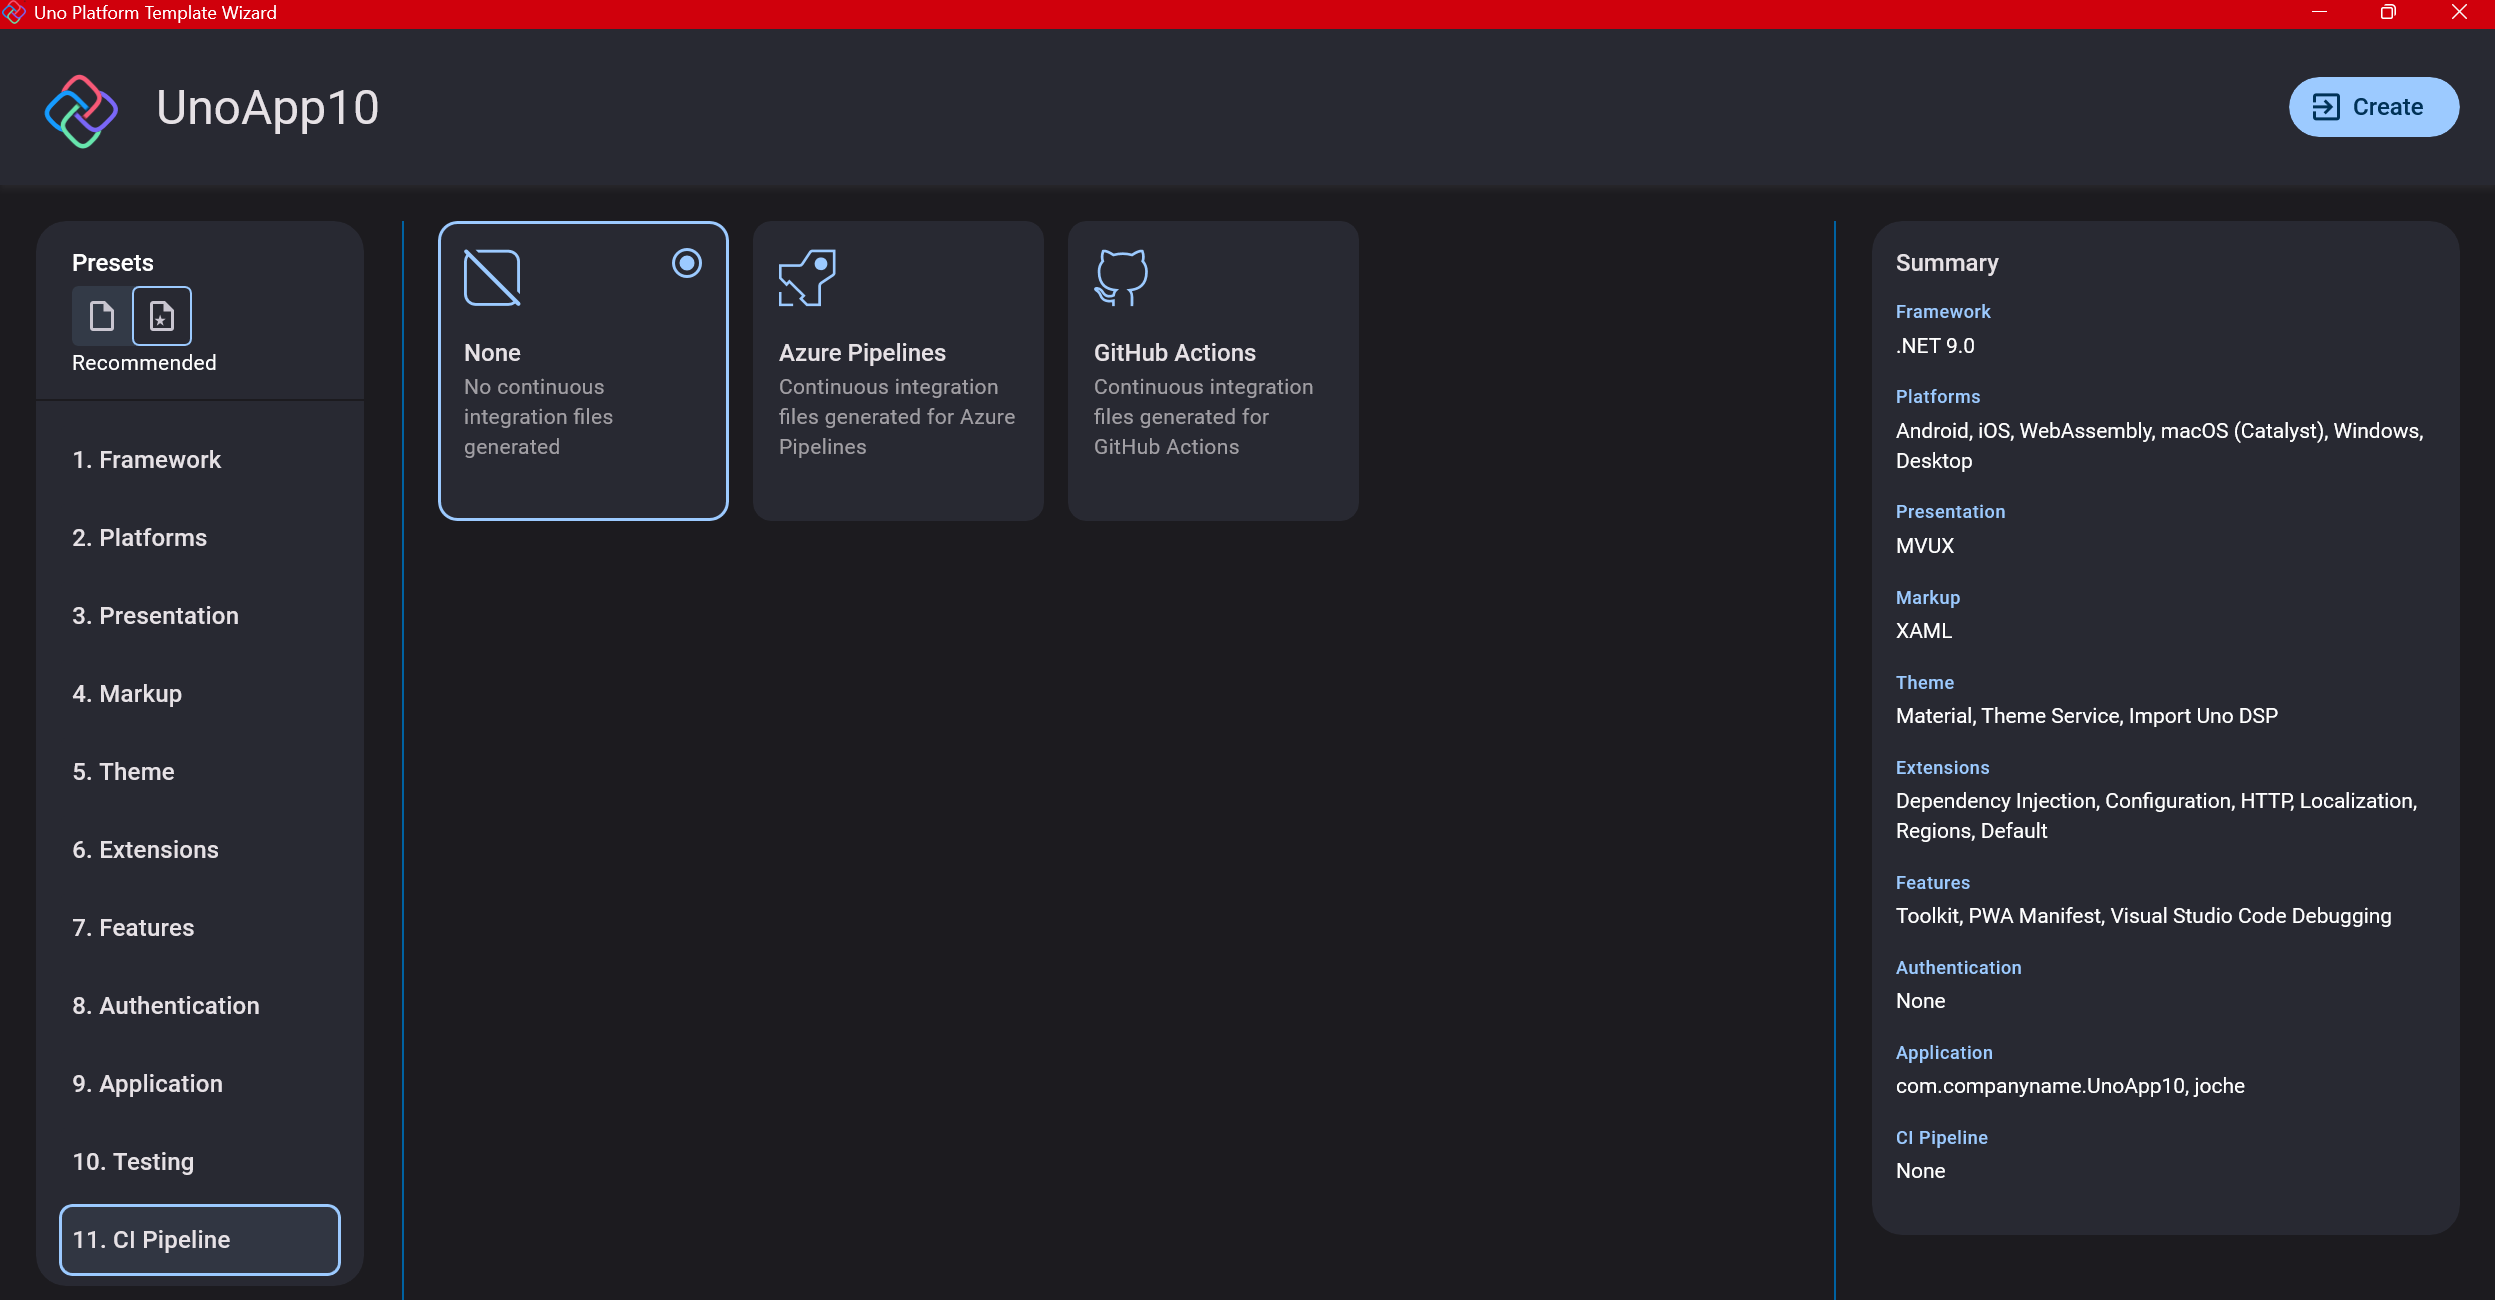
Step 13: CI Pipelines
The final step is about CI pipelines. If you’re building a test application, you don’t need to select anything. For production applications, you can choose Azure Pipelines or GitHub Actions based on your preferences. In my case, I’m not involved with CI pipeline configuration at my workplace, so I have limited experience in this area.
Conclusion
If you’ve made it this far, congratulations! You should now have a shiny new Uno Platform application in your IDE.
This post only covers the initial setup choices when creating a new Uno application. Your development path will differ based on the selections you’ve made, which can significantly impact how you write your code. Choose wisely and experiment with different combinations to see what works best for your needs.
During my learning journey with the Uno Platform, I’ve tried various settings—some worked well, others didn’t, but most will function if you understand what you’re doing. I’m still learning and taking a hands-on approach, relying on trial and error, occasional documentation checks, and GitHub Copilot assistance.
Thanks for reading and see you in the next post!
About Us
YouTube
https://www.youtube.com/c/JocheOjedaXAFXAMARINC
Our sites
Let’s discuss your XAF
https://www.udemy.com/course/microsoft-ai-extensions/
Our free A.I courses on Udemy

by Joche Ojeda | Mar 11, 2025 | http, MAUI, Xamarin
When developing cross-platform mobile applications with .NET MAUI (or previously Xamarin), you may encounter situations where your app works perfectly with public APIs but fails when connecting to internal network services. These issues often stem from HTTP client implementation differences, certificate validation, and TLS compatibility. This article explores how to identify, troubleshoot, and resolve these common networking challenges.
Understanding HTTP Client Options in MAUI/Xamarin
In the MAUI/.NET ecosystem, developers have access to two primary HTTP client implementations:
1. Managed HttpClient (Microsoft’s implementation)
- Cross-platform implementation built into .NET
- Consistent behavior across different operating systems
- May handle SSL/TLS differently than platform-native implementations
- Uses the .NET certificate validation system
2. Native HttpClient (Android’s implementation)
- Leverages the platform’s native networking stack
- Typically offers better performance on the specific platform
- Uses the device’s system certificate trust store
- Follows platform-specific security policies and restrictions
Switching Between Native and Managed HttpClient
In MAUI Applications
MAUI provides a flexible handler registration system that lets you explicitly choose which implementation to use:
// In your MauiProgram.cs
public static MauiApp CreateMauiApp()
{
    var builder = MauiApp.CreateBuilder();
    builder
        .UseMauiApp<App>()
        .ConfigureMauiHandlers(handlers =>
        {
            // Use the managed implementation (Microsoft's .NET HttpClient)
            handlers.AddHandler(typeof(HttpClient), typeof(ManagedHttpMessageHandler));

            // OR use the native implementation (platform-specific)
            // handlers.AddHandler(typeof(HttpClient), typeof(PlatformHttpMessageHandler));
        });

    return builder.Build();
}
In Xamarin.Forms Legacy Applications
For Xamarin.Forms applications, set this in your platform-specific initialization code:
// In MainActivity.cs (Android) or AppDelegate.cs (iOS)
HttpClientHandler.UseNativePlatformHandler = false; // Use managed handler
// OR
HttpClientHandler.UseNativePlatformHandler = true;  // Use native handler
Creating Specific Client Instances
You can also explicitly create HttpClient instances with specific handlers when needed:
// Use the managed handler
var managedHandler = new HttpClientHandler();
var managedClient = new HttpClient(managedHandler);

// Use the native handler (with DependencyService in Xamarin)
var nativeHandler = DependencyService.Get<INativeHttpClientHandler>();
var nativeClient = new HttpClient(nativeHandler);
Using HttpClientFactory (Recommended for MAUI)
For better control, testability, and lifecycle management, consider using HttpClientFactory:
// In your MauiProgram.cs
builder.Services.AddHttpClient("ManagedClient", client => {
    client.BaseAddress = new Uri("https://your.api.url/");
})
.ConfigurePrimaryHttpMessageHandler(() => new SocketsHttpHandler());

// Then inject and use it in your services
public class MyApiService
{
    private readonly HttpClient _client;

    public MyApiService(IHttpClientFactory clientFactory)
    {
        _client = clientFactory.CreateClient("ManagedClient");
    }
}
Common Issues and Troubleshooting
1. Self-Signed Certificates
Internal APIs often use self-signed certificates that aren’t trusted by default. Here’s how to handle them:
// Option 1: Create a custom handler that bypasses certificate validation
// (ONLY for development/testing environments)
var handler = new HttpClientHandler
{
    ServerCertificateCustomValidationCallback = (message, cert, chain, errors) => true
};
var client = new HttpClient(handler);
For production environments, instead of bypassing validation:
- Add your self-signed certificate to the Android trust store
- Configure your app to trust specific certificates
- Generate proper certificates from a trusted Certificate Authority
2. TLS Version Mismatches
Different Android versions support different TLS versions by default:
- Android 4.1-4.4: TLS 1.0 by default
- Android 5.0+: TLS 1.0, 1.1, 1.2
- Android 10+: TLS 1.3 support
If your server requires a specific TLS version:
// Force specific TLS versions
System.Net.ServicePointManager.SecurityProtocol = SecurityProtocolType.Tls12 | SecurityProtocolType.Tls13;
3. Network Configuration
Ensure your app has the proper permissions in the AndroidManifest.xml:
<uses-permission android:name="android.permission.INTERNET" />
<uses-permission android:name="android.permission.ACCESS_NETWORK_STATE" />
For Android 9+ (API level 28+), configure network security:
<!-- Create a network_security_config.xml file in Resources/xml -->
<?xml version="1.0" encoding="utf-8"?>
<network-security-config>
    <domain-config cleartextTrafficPermitted="true">
        <domain includeSubdomains="true">your.internal.domain</domain>
    </domain-config>
</network-security-config>
Then reference it in your AndroidManifest.xml:
<application android:networkSecurityConfig="@xml/network_security_config">
Practical Troubleshooting Steps
- Test with both HTTP client implementationsSwitch between native and managed implementations to isolate whether the issue is specific to one implementation
- Test the API endpoint outside your appUse tools like Postman or curl on the same network
- Enable logging for network calls
// Add this before making requests
HttpClient.DefaultRequestHeaders.TryAddWithoutValidation("User-Agent", "YourApp/1.0");
- Capture and inspect network trafficUse Charles Proxy or Fiddler to inspect the actual requests/responses
- Check certificate information
# On your development machine
openssl s_client -connect your.internal.server:443 -showcerts
- Verify which implementation you’re using
var client = new HttpClient();
var handlerType = client.GetType().GetField("_handler",
    System.Reflection.BindingFlags.Instance |
    System.Reflection.BindingFlags.NonPublic)?.GetValue(client);

Console.WriteLine($"Using handler: {handlerType?.GetType().FullName}");
- Debug specific errors
- For Java.IO.IOException: “Trust anchor for certification path not found” – this means your app doesn’t trust the certificate
- For HttpRequestException with “The SSL connection could not be established” – likely a TLS version mismatch
Conclusion
When your MAUI Android app connects successfully to public APIs but fails with internal network services, the issue often lies with HTTP client implementation differences, certificate validation, or TLS compatibility. By systematically switching between native and managed HTTP clients and applying the troubleshooting techniques outlined above, you can identify and resolve these networking challenges.
Remember that each implementation has its advantages – the native implementation typically offers better performance and follows platform-specific security policies, while the managed implementation provides more consistent cross-platform behavior. Choose the one that best fits your specific requirements and security considerations.
About Us
YouTube
https://www.youtube.com/c/JocheOjedaXAFXAMARINC
Our sites
Let’s discuss your XAF
https://www.udemy.com/course/microsoft-ai-extensions/
Our free A.I courses on Udemy

by Joche Ojeda | Mar 7, 2025 | Uncategorized, Uno Platform
This year I decided to learn something new, specifically something UI-related. Usually, I only do back-end type of code. Most of my code has no UI representation, and as you might know, that’s why I love XAF from Developer Express so much—because I don’t have to write a UI. I only have to define the business model and the actions, and then I’m good to go.
But this time, I wanted to challenge myself, so I said, “OK, let’s learn something that is UI-related.” I’ve been using .NET for about 18 years already, so I wanted to branch out while still leveraging my existing knowledge.
I was trying to decide which technology to go with, so I checked with the people in my office (XARI). We have the .NET team, which is like 99% of the people, and then we have one React person and a couple of other developers using different frameworks. They suggested Flutter, and I thought, “Well, maybe.”
I checked the setup and tried to do it on my new Surface computer, but it just didn’t work. Even though Flutter looks fine, moving from .NET (which I’ve been writing since day one in 2002) to Dart is a big challenge. I mean, writing code in any case is a challenge, but I realized that Flutter was so far away from my current infrastructure and setup that I would likely learn it and then forget it because I wouldn’t use it regularly.
Then I thought about checking React, but it was kind of the same idea. I could go deep into this for like one month, and then I would totally forget it because I wouldn’t update the tooling, and so on.
So I decided to take another look at Uno Platform. We’ve used Uno Platform in the office before, and I love this multi-platform development approach. The only problem I had at that time was that the tooling wasn’t quite there yet. Sometimes it would compile, sometimes you’d get a lot of errors, and the static analysis would throw a lot of errors too. It was kind of hard—you’d spend a lot of time setting up your environment, and compilation was kind of slow.
But when I decided to take a look again recently, I remembered that about a year ago they released new project templates and platform extensions that help with the setup of your environment. So I tried it, and it worked well! I have two clean setups right now: my new Surface computer that I reset maybe three weeks ago, and my old MSI computer with 64 gigabytes of RAM. These gave me good places to test.
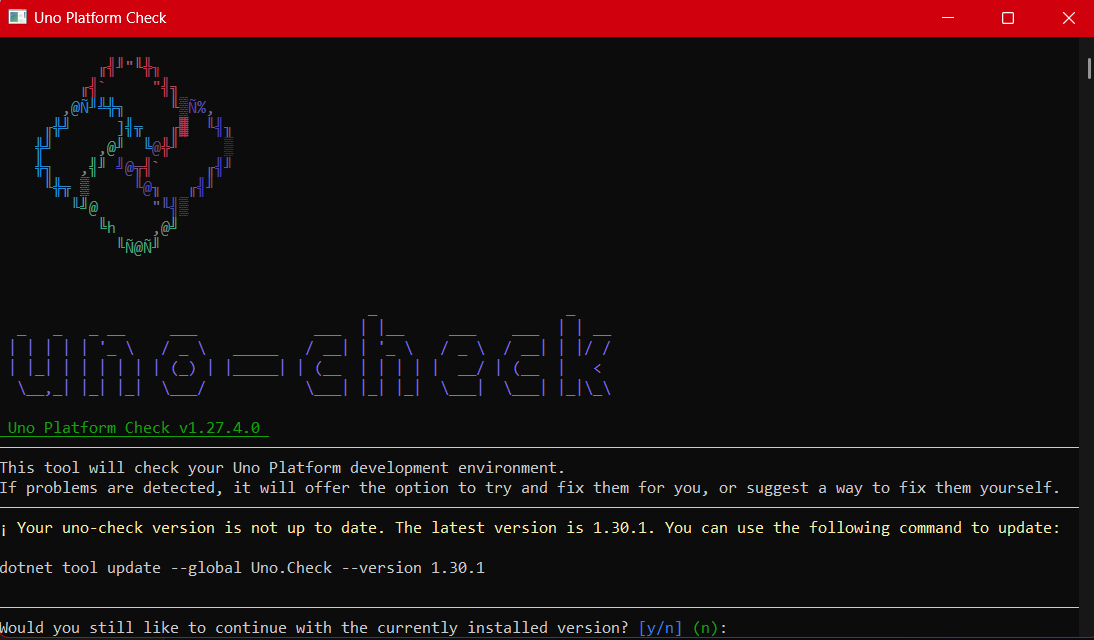
I decided to go to the Uno Platform page and follow the “Getting Started” guide. The first thing you need to do is use some commands to install a tool that checks your setup to see if you have all the necessary workloads. That was super simple. Then you have to add the extension to Visual Studio—I’m using Visual Studio in this case just to add the project templates. You can do this in Rider or Visual Studio Code as well, but the traditional Visual Studio is my tool of preference.
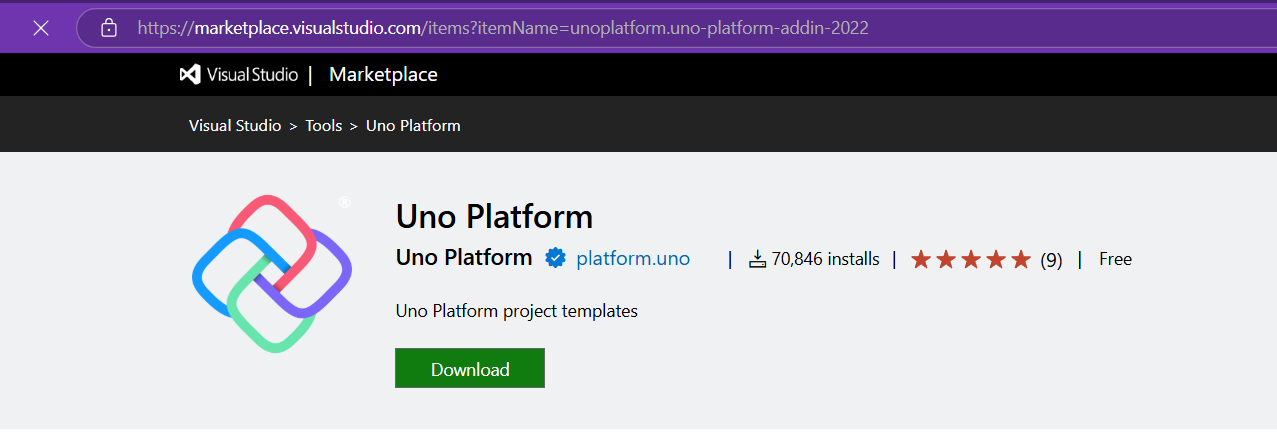
Uno Platform – Visual Studio Marketplace
Setup your environment with uno check
After completing all the setup, you get a menu with a lot of choices, but they give you a set of recommended options that follow best practices. That’s really nice because you don’t have to think too much about it. After that, I created a few projects. The first time I compiled them, it took a little bit, but then it was just like magic—they compiled extremely fast!
You have all these choices to run your app on: WebAssembly, Windows UI, Android, and iOS, and it works perfectly. I fell in love again, especially because the tooling is actually really solid right now. You don’t have to struggle to make it work.
Since then, I’ve been checking the examples and trying to write some code, and so far, so good. I guess my new choice for a UI framework will be Uno because it builds on my current knowledge of .NET and C#. I can take advantage of the tools I already have, and I don’t have to switch languages. I just need to learn a new paradigm.
I will write a series of articles about all my adventures with Uno Platform. I’ll share links about getting started, and after this, I’ll create some sample applications addressing the challenges that app developers face: how to implement navigation, how to register services, how to work with the Model-View-ViewModel pattern, and so on.
I would like to document every challenge I encounter, and I hope that you can join me in these Uno adventures!
About Us
YouTube
https://www.youtube.com/c/JocheOjedaXAFXAMARINC
Our sites
Let’s discuss your XAF
https://calendly.com/bitframeworks/bitframeworks-free-xaf-support-hour/
Our free A.I courses on Udemy

by Joche Ojeda | Jan 20, 2025 | ADO, ADO.NET, Database, dotnet
When I first encountered the challenge of migrating hundreds of Visual Basic 6 reports to .NET, I never imagined it would lead me down a path of discovering specialized data analytics tools. Today, I want to share my experience with ADOMD.NET and how it could have transformed our reporting challenges, even though we couldn’t implement it due to our database constraints.
The Challenge: The Sales Gap Report
The story begins with a seemingly simple report called “Sales Gap.” Its purpose was critical: identify periods when regular customers stopped purchasing specific items. For instance, if a customer typically bought 10 units monthly from January to May, then suddenly stopped in June and July, sales representatives needed to understand why.
This report required complex queries across multiple transactional tables:
- Invoicing
- Sales
- Returns
- Debits
- Credits
Initially, the report took about a minute to run. As our data grew, so did the execution time—eventually reaching an unbearable 15 minutes. We were stuck with a requirement to use real-time transactional data, making traditional optimization techniques like data warehousing off-limits.
Enter ADOMD.NET: A Specialized Solution
ADOMD.NET (ActiveX Data Objects Multidimensional .NET) emerged as a potential solution. Here’s why it caught my attention:
Key Features:
-
Multidimensional Analysis
Unlike traditional SQL queries, ADOMD.NET uses MDX (Multidimensional Expressions), specifically designed for analytical queries. Here’s a basic example:
string mdxQuery = @"
    SELECT
        {[Measures].[Sales Amount]} ON COLUMNS,
        {[Date].[Calendar Year].MEMBERS} ON ROWS
    FROM [Sales Cube]
    WHERE [Product].[Category].[Electronics]";
-
Performance Optimization
ADOMD.NET is built for analytical workloads, offering better performance for complex calculations and aggregations. It achieves this through:
- Specialized data structures for multidimensional analysis
- Efficient handling of hierarchical data
- Built-in support for complex calculations
-
Advanced Analytics Capabilities
The tool supports sophisticated analysis patterns like:
string mdxQuery = @"
    WITH MEMBER [Measures].[GrowthVsPreviousYear] AS
        ([Measures].[Sales Amount] -
        ([Measures].[Sales Amount], [Date].[Calendar Year].PREVMEMBER)
        )/([Measures].[Sales Amount], [Date].[Calendar Year].PREVMEMBER)
    SELECT
        {[Measures].[Sales Amount], [Measures].[GrowthVsPreviousYear]}
    ON COLUMNS...";
Lessons Learned
While we couldn’t implement ADOMD.NET due to our use of Pervasive Database instead of SQL Server, the investigation taught me valuable lessons about report optimization:
- The importance of choosing the right tools for analytical workloads
- The limitations of running complex analytics on transactional databases
- The value of specialized query languages for different types of data analysis
Modern Applications
Today, ADOMD.NET continues to be relevant for organizations using:
- SQL Server Analysis Services (SSAS)
- Azure Analysis Services
- Power BI Premium datasets
If I were facing the same challenge today with SQL Server, ADOMD.NET would be my go-to solution for:
- Complex sales analysis
- Customer behavior tracking
- Performance-intensive analytical reports
Conclusion
While our specific situation with Pervasive Database prevented us from using ADOMD.NET, it remains a powerful tool for organizations using Microsoft’s analytics stack. The experience taught me that sometimes the solution isn’t about optimizing existing queries, but about choosing the right specialized tools for analytical workloads.
Remember: Just because you can run analytics on your transactional database doesn’t mean you should. Tools like ADOMD.NET exist for a reason, and understanding when to use them can save countless hours of optimization work and provide better results for your users.

by Joche Ojeda | Jan 17, 2025 | DevExpress, dotnet
My mom used to say that fashion is cyclical – whatever you do will eventually come back around. I’ve come to realize the same principle applies to technology. Many technologies have come and gone, only to resurface again in new forms.
Take Command Line Interface (CLI) commands, for example. For years, the industry pushed to move away from CLI towards graphical interfaces, promising a more user-friendly experience. Yet here we are in 2025, witnessing a remarkable return to CLI-based tools, especially in software development.
As a programmer, efficiency is key – particularly when dealing with repetitive tasks. This became evident when my business partner Javier and I decided to create our own application templates for Visual Studio. The process was challenging, mainly because Visual Studio’s template infrastructure isn’t well maintained. Documentation was sparse, and the whole process felt cryptic.
Our first major project was creating a template for Xamarin.Forms (now .NET MAUI), aiming to build a multi-target application template that could work across Android, iOS, and Windows. We relied heavily on James Montemagno’s excellent resources and videos to navigate this complex territory.
The task became significantly easier with the introduction of the new SDK-style projects. Compared to the older MSBuild project types, which were notoriously complex to template, the new format makes creating custom project templates much more straightforward.
In today’s development landscape, most application templates are distributed as NuGet packages, making them easier to share and implement. Interestingly, these packages are primarily designed for CLI use rather than Visual Studio’s graphical interface – a perfect example of technology coming full circle.
Following this trend, DevExpress has developed a new set of application templates that work cross-platform using the CLI. These templates leverage SkiaSharp for UI rendering, enabling true multi-IDE and multi-OS compatibility. While they’re not yet compatible with Apple Silicon, that support is likely coming in future updates.
The templates utilize CLI under the hood to generate new project structures. When you install these templates in Visual Studio Code or Visual Studio, they become available through both the CLI and the graphical interface, offering developers the best of both worlds.
Here is the official DevExpress blog post for the new application templates
https://www.devexpress.com/subscriptions/whats-new/#project-template-gallery-net8
Templates for Visual Studio
DevExpress Template Kit for Visual Studio – Visual Studio Marketplace
Templates for VS Code
DevExpress Template Kit for VS Code – Visual Studio Marketplace
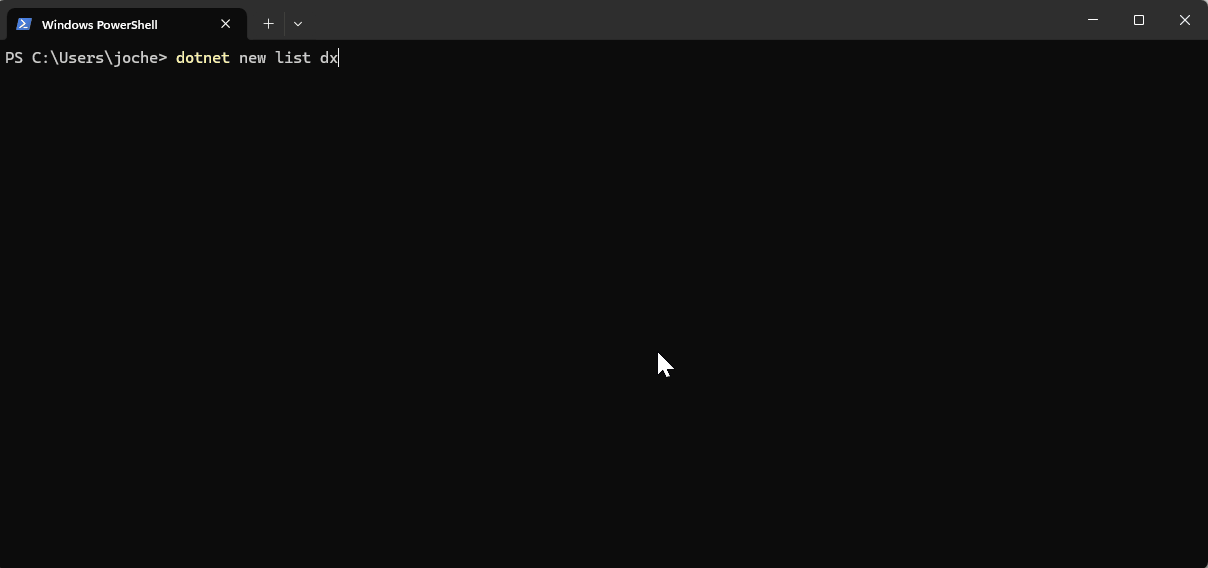
If you want to see the list of the new installed DevExpress templates, you can use the following command on the terminal
dotnet new list dx
I’d love to hear your thoughts on this technological cycle. Which approach do you prefer for creating new projects – CLI or graphical interface? Let me know in the comments below!