
by Joche Ojeda | Feb 11, 2026 | A.I
My last two articles have been about one idea: closing the loop with AI.
Not “AI-assisted coding.” Not “AI that helps you write functions.”
I’m talking about something else entirely.
I’m talking about building systems where the agent writes the code, tests the code, evaluates the result,
fixes the code, and repeats — without me sitting in the middle acting like a tired QA engineer.
Because honestly, that middle position is the worst place to be.
You get exhausted. You lose objectivity. And eventually you look at the project and think:
everything here is garbage.
So the goal is simple:
Remove the human from the middle of the loop.
Place the human at the end of the loop.
The human should only confirm: “Is this what I asked for?”
Not manually test every button.
The Real Question: How Do You Close the Loop?
There isn’t a single answer. It depends on the technology stack and the type of application you’re building.
So far, I’ve been experimenting with three environments:
- Console applications
- Web applications
- Windows Forms applications (still a work in progress)
Each one requires a slightly different strategy.
But the core principle is always the same:
The agent must be able to observe what it did.
If the agent cannot see logs, outputs, state, or results — the loop stays open.
Console Applications: The Easiest Loop to Close
Console apps are the simplest place to start.
My setup is minimal and extremely effective:
- Serilog writing structured logs
- Logs written to the file system
- Output written to the console
Why both?
Because the agent (GitHub Copilot in VS Code) can run the app, read console output, inspect log files,
decide what to fix, and repeat.
No UI. No browser. No complex state.
Just input → execution → output → evaluation.
If you want to experiment with autonomous loops, start here. Console apps are the cleanest lab environment you’ll ever get.
Web Applications: Where Things Get Interesting
Web apps are more complex, but also more powerful.
My current toolset:
- Serilog for structured logging
- Logs written to filesystem
- SQLite for loop-friendly database inspection
- Playwright for automated UI testing
Even if production uses PostgreSQL or SQL Server, I use SQLite during loop testing.
Not for production. For iteration.
The SQLite CLI makes inspection trivial.
The agent can call the API, trigger workflows, query SQLite directly, verify results, and continue fixing.
That’s a full feedback loop. No human required.
Playwright: Giving the Agent Eyes
For UI testing, Playwright is the key.
You can run it headless (fully autonomous) or with UI visible (my preferred mode).
Yes, I could remove myself completely. But I don’t.
Right now I sit outside the loop as an observer.
Not a tester. Not a debugger. Just watching.
If something goes completely off the rails, I interrupt.
Otherwise, I let the loop run.
This is an important transition:
From participant → to observer.
The Windows Forms Problem
Now comes the tricky part: Windows Forms.
Console apps are easy. Web apps have Playwright.
But desktop UI automation is messy.
Possible directions I’m exploring:
- UI Automation APIs
- WinAppDriver
- Logging + state inspection hybrid approach
- Screenshot-based verification
- Accessibility tree inspection
The goal remains the same: the agent must be able to verify what happened without me.
Once that happens, the loop closes.
What I’ve Learned So Far
1) Logs Are Everything
If the agent cannot read what happened, it cannot improve. Structured logs > pretty logs. Always.
2) SQLite Is the Perfect Loop Database
Not for production. For iteration. The ability to query state instantly from CLI makes autonomous debugging possible.
3) Agents Need Observability, Not Prompts
Most people focus on prompt engineering. I focus on observability engineering.
Give the agent visibility into logs, state, outputs, errors, and the database. Then iteration becomes natural.
4) Humans Should Validate Outcomes — Not Steps
The human should only answer: “Is this what I asked for?” That’s what the agent is for.
My Current Loop Architecture (Simplified)
Specification → Agent writes code → Agent runs app → Agent tests → Agent reads logs/db →
Agent fixes → Repeat → Human validates outcome
If the loop works, progress becomes exponential.
If the loop is broken, everything slows down.
My Question to You
This is still evolving. I’m refining the process daily, and I’m convinced this is how development will work from now on:
agents running closed feedback loops with humans validating outcomes at the end.
So I’m curious:
- What tooling are you using?
- How are you creating feedback loops?
- Are you still inside the loop — or already outside watching it run?
Because once you close the loop…
you don’t want to go back.
by Joche Ojeda | Oct 8, 2025 | Oqtane, Tenants
OK — it’s time for today’s Oqtane blog post!
Yesterday, I wrote about changing the runtime mode in Oqtane and how that allows you to switch between
Blazor Server and Blazor WebAssembly functionality.
Today, I decided to explore how multi-tenancy works — specifically, how Oqtane manages multiple sites within the same
installation.
Originally, I wanted to cover the entire administrative panel and all of its modules in one post, but that would’ve been too big.
So, I’m breaking it down into smaller topics. This post focuses only on site functionality and how
multi-tenancy works from the administrative side — basically, how to set up tenants in Oqtane.
Setting Up a Multi-Tenant Oqtane Installation
To make these experiments easy to replicate, I decided to use SQLite as my database.
I created a new .NET Oqtane application using the official templates and added it to a
GitHub repository.
Here’s what I did:
- Set up the host configuration directly in
appsettings.json.
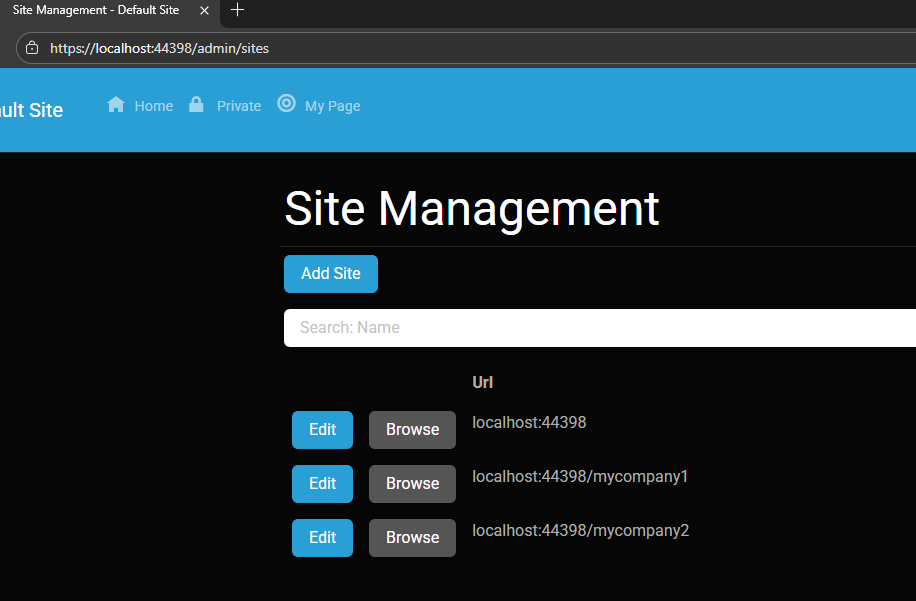
- Ran the app, went to the admin panel, and created two additional sites.
You can see the screenshots below showing the settings for each site.
At first, it was a bit confusing — I thought I could simply use different ports for each site (like 8081,
8082, etc.), but that’s not how Oqtane works. Everything runs in the same process, so all tenants
share the same port.
Instead of changing ports, you configure different URL paths or folders. For example:
http://localhost:8080/ → the main hosthttp://localhost:8080/mycompany1 → first tenanthttp://localhost:8080/mycompany2 → second tenant
Site Managment
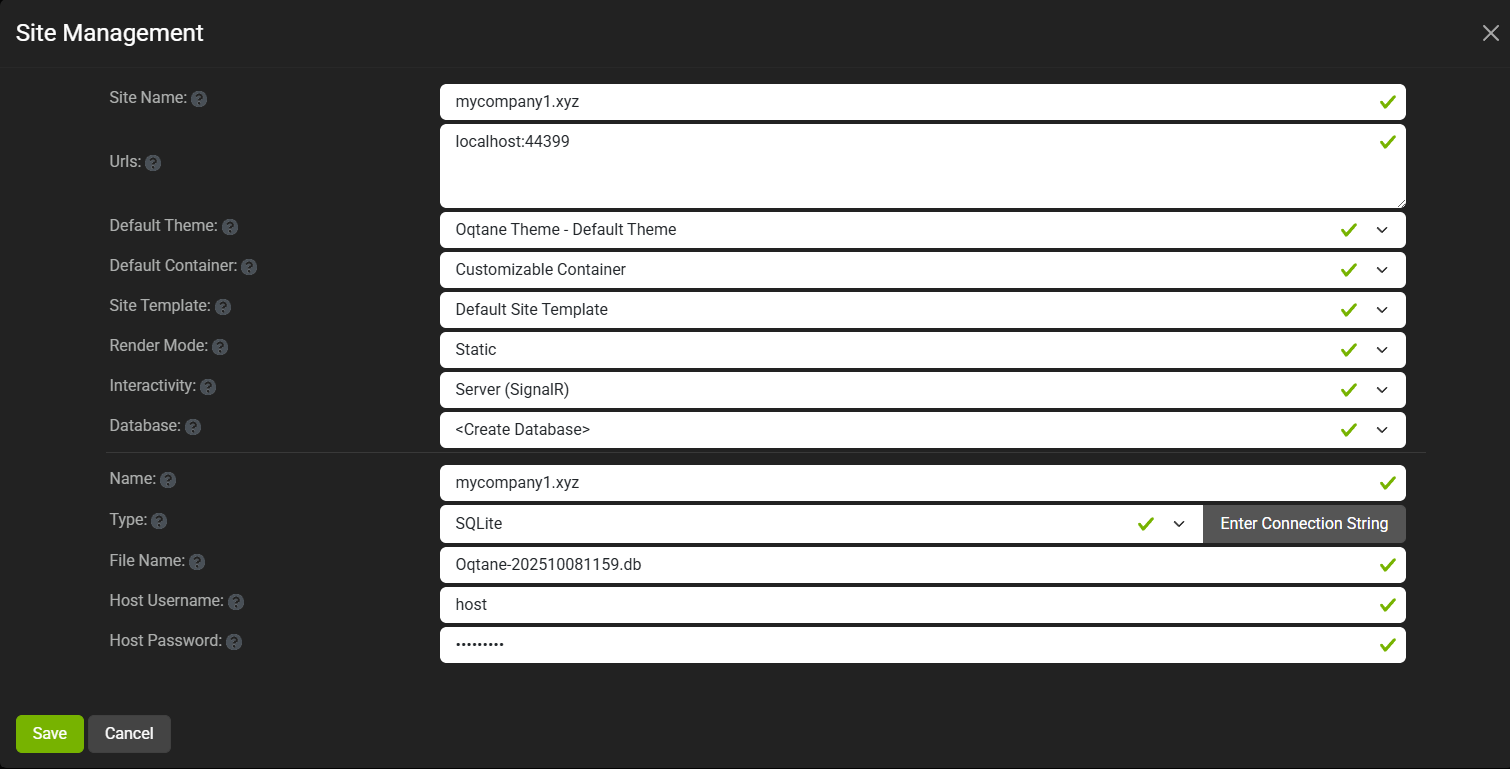
Site MyCompany1
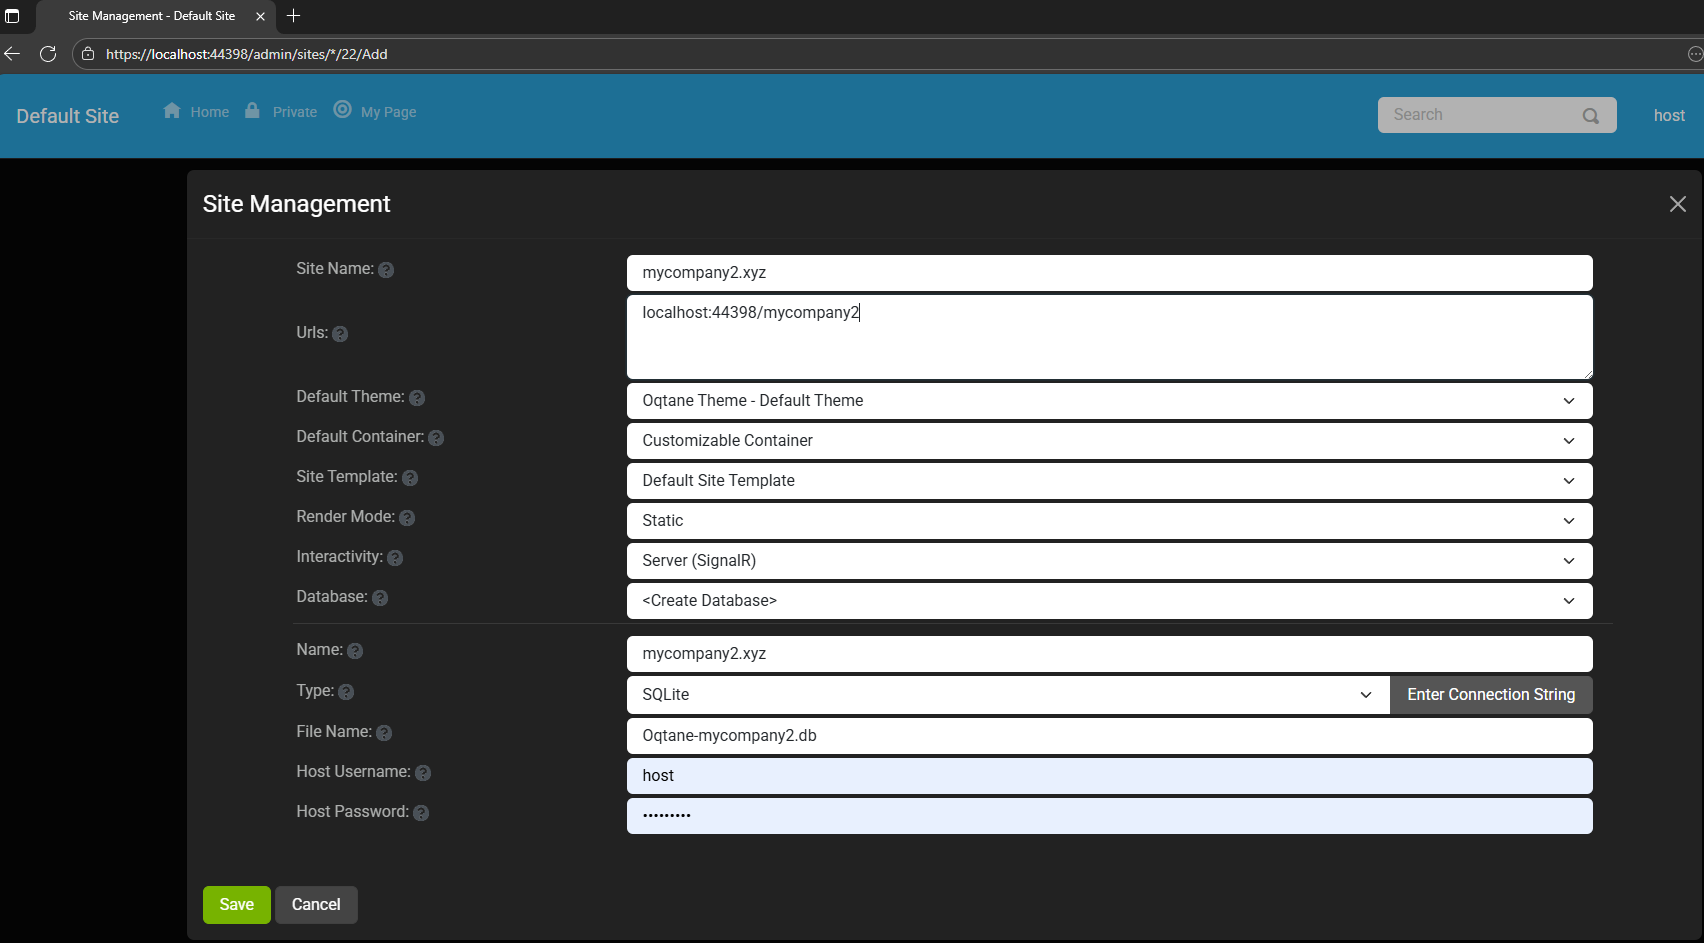
Site MyCompany2
Each tenant can:
- Use a separate database or share the same one as the host
- Have its own theme
- Maintain independent site settings
In the short GIF animation I attached to the repository, you can see how each site has its
own unique visual theme — it’s really neat to watch.
When you add a new site, its connection string is also stored automatically in the application settings. So, if you download
the repository and run it locally, you’ll be able to access all the sites and see how the URLs and configurations work.
Here is the repository egarim/OqtaneMultiTenant: an example of how to use multi tenant in oqtane
Why I’m Doing These Posts
These blog entries are like my personal research notes — documenting what I discover while working with Oqtane.
I’m keeping each experiment small and reproducible so I can:
- Share them with others easily
- Download them later and reproduce the same setup, including data and configuration
What’s Next
In the next post, I’ll cover virtual hosting — how to use domain names that forward to specific
URLs or tenants. I’ve already done some research on that, but I don’t want to overload this post with too many topics.
For now, I’ll just attach the screenshots showing the different site configurations and URLs, along with a link to the GitHub
repository so you can try it yourself.
If you have any questions, feel free to reach out! I’ll keep documenting everything as I go.
One of the great things about Oqtane is that it’s open source — you can always dive into the code, or if you’re
stuck, open a GitHub issue. Shaun Walker and the community are incredibly helpful, so don’t hesitate to ask.
Thanks again to the Oqtane team for building such an amazing framework.

by Joche Ojeda | Feb 24, 2025 | Linux, Postgres, SyncFrameworkV2, Ubuntu, WSL
After a problematic Windows update on my Surface computer that prevented me from compiling .NET applications, I spent days trying various fixes without success. Eventually, I had to format my computer and start fresh. This meant setting up everything again – Visual Studio, testing databases, and all the other development tools.To make future setups easier, I created a collection of WSL 2 scripts that automate the installation of tools I frequently use, like PostgreSQL and MySQL for testing purposes. While these scripts contain some practices that wouldn’t be recommended for production (like hardcoded passwords), they’re specifically designed for testing environments. The passwords used are already present in the sync framework source code, so there’s no additional security risk.I decided to share these scripts not as a perfect solution, but as a starting point for others who might need to set up similar testing environments. You can use them as inspiration for your own scripts or modify the default passwords to match your needs.
Note that these are specifically for testing purposes – particularly for working with the sync framework – and the hardcoded credentials should never be used in a production environment.
https://github.com/egarim/MyWslScripts
LDAP Scripts
MyWslScripts/ldap-setup.sh at master · egarim/MyWslScripts
MyWslScripts/add-ldap-user.sh at master · egarim/MyWslScripts
MySQL
MyWslScripts/install_mysql.sh at master · egarim/MyWslScripts
Postgres
MyWslScripts/install_postgres.sh at master · egarim/MyWslScripts
Redis
MyWslScripts/redis-install.sh at master · egarim/MyWslScripts
Let me know if you’d like me to share the actual scripts in a follow-up post!

by Joche Ojeda | May 14, 2024 | C#, Data Synchronization, dotnet
Hello there! Today, we’re going to delve into the fascinating world of design patterns. Don’t worry if you’re not a tech whiz – we’ll keep things simple and relatable. We’ll use the SyncFramework as an example, but our main focus will be on the design patterns themselves. So, let’s get started!
What are Design Patterns?
Design patterns are like blueprints – they provide solutions to common problems that occur in software design. They’re not ready-made code that you can directly insert into your program. Instead, they’re guidelines you can follow to solve a particular problem in a specific context.
SOLID Design Principles
One of the most popular sets of design principles is SOLID. It’s an acronym that stands for five principles that help make software designs more understandable, flexible, and maintainable. Let’s break it down:
- Single Responsibility Principle: A class should have only one reason to change. In other words, it should have only one job.
- Open-Closed Principle: Software entities should be open for extension but closed for modification. This means we should be able to add new features or functionality without changing the existing code.
- Liskov Substitution Principle: Subtypes must be substitutable for their base types. This principle is about creating new derived classes that can replace the functionality of the base class without breaking the application.
- Interface Segregation Principle: Clients should not be forced to depend on interfaces they do not use. This principle is about reducing the side effects and frequency of required changes by splitting the software into multiple, independent parts.
- Dependency Inversion Principle: High-level modules should not depend on low-level modules. Both should depend on abstractions. This principle allows for decoupling.
Applying SOLID Principles in SyncFramework
The SyncFramework is a great example of how these principles can be applied. Here’s how:
- Single Responsibility Principle: Each component of the SyncFramework has a specific role. For instance, one component is responsible for tracking changes, while another handles conflict resolution.
- Open-Closed Principle: The SyncFramework is designed to be extensible. You can add new data sources or change the way data is synchronized without modifying the core framework.
- Liskov Substitution Principle: The SyncFramework uses base classes and interfaces that allow for substitutable components. This means you can replace or modify components without affecting the overall functionality.
- Interface Segregation Principle: The SyncFramework provides a range of interfaces, allowing you to choose the ones you need and ignore the ones you don’t.
- Dependency Inversion Principle: The SyncFramework depends on abstractions, not on concrete classes. This makes it more flexible and adaptable to changes.
And that’s a wrap for today! But don’t worry, this is just the beginning. In the upcoming series of articles, we’ll dive deeper into each of these principles. We’ll explore how they’re applied in the source code of the SyncFramework, providing real-world examples to help you understand these concepts better. So, stay tuned for more exciting insights into the world of design patterns! See you in the next article!
Related articles
If you want to learn more about data synchronization you can checkout the following blog posts:
- Data synchronization in a few words – https://www.jocheojeda.com/2021/10/10/data-synchronization-in-a-few-words/
- Parts of a Synchronization Framework – https://www.jocheojeda.com/2021/10/10/parts-of-a-synchronization-framework/
- Let’s write a Synchronization Framework in C# – https://www.jocheojeda.com/2021/10/11/lets-write-a-synchronization-framework-in-c/
- Synchronization Framework Base Classes – https://www.jocheojeda.com/2021/10/12/synchronization-framework-base-classes/
- Planning the first implementation – https://www.jocheojeda.com/2021/10/12/planning-the-first-implementation/
- Testing the first implementation – https://youtu.be/l2-yPlExSrg
- Adding network support – https://www.jocheojeda.com/2021/10/17/syncframework-adding-network-support/