
by Joche Ojeda | Sep 26, 2024 | A.I, DevExpress, Semantic Kernel
If you’re a Blazor developer looking to integrate AI-powered chat functionality into your applications, the new DevExpress DxAIChat component offers a turnkey solution. It’s designed to make building chat interfaces as easy as possible, with out-of-the-box support for simple chats, virtual assistants, and even Retrieval-Augmented Generation (RAG) scenarios.
The best part? You don’t have to start from scratch—DevExpress provides a range of pre-built examples, making it easy to get started and customize to your needs. Whether you’re aiming for a basic chatbot or a more complex AI assistant, this component has you covered.
To use the examples you can use any open A.I compatible service like Ollama, Open A.I and Azure OpenAI, in current devexpress example they use Azure like this
using DevExpress.AIIntegration;
...
string azureOpenAIEndpoint = Environment.GetEnvironmentVariable("AZURE_OPENAI_ENDPOINT");
string azureOpenAIKey = Environment.GetEnvironmentVariable("AZURE_OPENAI_API_KEY");
string deploymentName = "YourModelDeploymentName"
...
builder.Services.AddDevExpressBlazor();
builder.Services.AddDevExpressAI((config) => {
    config.RegisterChatClientOpenAIService
        new AzureOpenAIClient(
            new Uri(azureOpenAIEndpoint),
            new AzureKeyCredential(azureOpenAIKey)
        ), deploymentName);
    //or call the following method to use self-hosted Ollama models
    //config.RegisterChatClientOllamaAIService("http://localhost:11434/api/chat", "llama3.1");
});
I tested with OpenA.I API instead of azure, so my code looks like this
string azureOpenAIEndpoint = Environment.GetEnvironmentVariable("AZURE_OPENAI_ENDPOINT");
string azureOpenAIKey = Environment.GetEnvironmentVariable("AZURE_OPENAI_API_KEY");

string OpenAiKey= Environment.GetEnvironmentVariable("OpenAiTestKey");

builder.Services.AddDevExpressBlazor();
builder.Services.AddDevExpressAI((config) => {
    //var client = new AzureOpenAIClient(
    //    new Uri(azureOpenAIEndpoint),
    //    new AzureKeyCredential(azureOpenAIKey));
    //Open Ai models ID are a bit different than azure, Azure=gtp4o OpenAI=gpt-4o
    var client = new OpenAIClient(new System.ClientModel.ApiKeyCredential(OpenAiKey));
    config.RegisterChatClientOpenAIService(client, "gpt-4o");
    config.RegisterOpenAIAssistants(client, "gpt-4o");
});
Notice the IDs of the models in Azure and Open A.I are different
- Azure=gtp4o
- OpenAI=gpt-4o
This are the URLs for the different example
- Chat : https://localhost:53340/
- Assistant/RAG: https://localhost:53340/assistant
- Streaming: https://localhost:53340/streaming
I’m super happy that DevExpress components are doing all the heavy lifting and boilerplate code for us, I have developed the same scenarios using semantic kernel even when there is not so much code to write you still have the challenge of develop a responsive U.I
For more information and to see the examples in action, check out the full article.

by Joche Ojeda | Jul 28, 2024 | PropertyEditors, XAF
Introduction
The eXpressApp Framework (XAF) from DevExpress is a versatile application framework that supports multiple UI platforms, including Windows Forms and Blazor. Maintaining separate property editors for each platform can be cumbersome. This article explores how to create unified property editors for both Windows Forms and Blazor by leveraging WebView for Windows Forms and the Monaco Editor, the editor used in Visual Studio Code.
Blazor Implementation
Windows forms Implementation

Prerequisites
Before we begin, ensure you have the following installed:
- Visual Studio 2022 or later
- .NET 8.0 SDK or later
- DevExpress XAF 22.2 or later
Step 1: Create a XAF Application for Windows Forms and Blazor
- Create a New Solution:
- Open Visual Studio and create a new solution.
- Add two projects to this solution:
- A Windows Forms project.
- A Blazor project.
- Set Up XAF:
- Follow the DevExpress documentation to set up XAF in both projects. Official documentation here
Step 2: Create a Razor Class Library
- Create a Razor Class Library:
- Add a new Razor Class Library project to the solution.
- Name it XafVsCodeEditor.
- Design the Monaco Editor Component:
We are done with the shared library that we will reference in both Blazor and Windows projects.
Step 3: Integrate the Razor Class Library into Windows Forms
- Add NuGet References:
- In the Windows Forms project, add the following NuGet packages:
- Microsoft.AspNetCore.Components.WebView.WindowsForms
- XafVsCodeEditor (the Razor Class Library created earlier).
- You can see all the references in the csproj file.
- Change the Project Type: In order to add the ability to host Blazor components, we need to change the project SDK from Microsoft.NET.Sdk to Microsoft.NET.Sdk.Razor.
- Add Required Files:
- wwwroot: folder to host CSS, JavaScript, and the index.html.
- _Imports.razor: this file adds global imports. Source here.
- index.html: one of the most important files because it hosts a special blazor.webview.js to interact with the WebView. See here.
Official Microsoft tutorial is available here.
Step 4: Implementing the XAF Property Editors
I’m not going to show the full steps to create the property editors. Instead, I will focus on the most important parts of the editor. Let’s start with Windows.
In Windows Forms, the most important method is when you create the instance of the control, in this case, the WebView. As you can see, this is where you instantiate the services that will be passed as a parameter to the component, in our case, the data model. You can find the full implementation of the property editor for Windows here and the official DevExpress documentation here.
protected override object CreateControlCore()
{
    control = new BlazorWebView();
    control.Dock = DockStyle.Fill;
    var services = new ServiceCollection();
    services.AddWindowsFormsBlazorWebView();
    control.HostPage = "wwwroot\\index.html";
    var tags = MonacoEditorTagHelper.AddScriptTags;
    control.Services = services.BuildServiceProvider();
    parameters = new Dictionary<string, object>();
    if (PropertyValue == null)
    {
        PropertyValue = new MonacoEditorData() { Language = "markdown" };
    }
    parameters.Add("Value", PropertyValue);
    control.RootComponents.Add<MonacoEditorComponent>("#app", parameters);
    control.Size = new System.Drawing.Size(300, 300);
    return control;
}
Now, for the property editor for Blazor, you can find the full source code here and the official DevExpress documentation here.
protected override IComponentModel CreateComponentModel()
{
    var model = new MonacoEditorDataModel();
    model.ValueChanged = EventCallback.Factory.Create<IMonacoEditorData>(this, value => {
        model.Value = value;
        OnControlValueChanged();
        WriteValue();
    });
    return model;
}
One of the most important things to notice here is that in version 24 of XAF, Blazor property editors have been simplified so they require fewer layers of code. The magical databinding happens because in the data model there should be a property of the same value and type as one of the parameters in the Blazor component.
Step 5: Running the Application
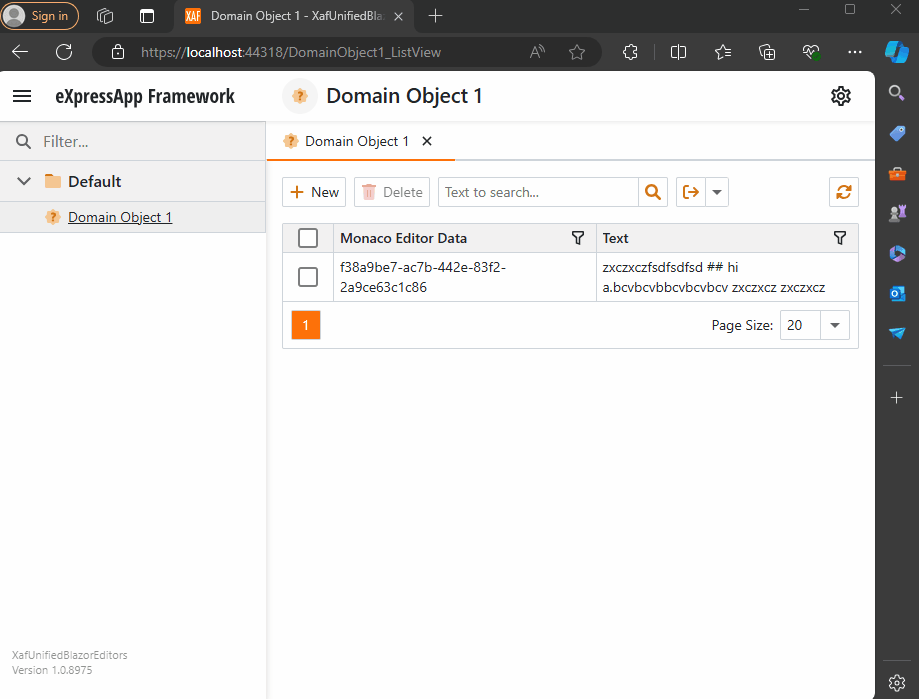
Before we run our solution, we need to add a domain object that implements a property of type IMonacoData, which is the interface we associated with our property editor. Here is a sample domain object that has a property of type MonacoEditorData:
[DefaultClassOptions]
public class DomainObject1 : BaseObject, IXafEntityObject
{
    public DomainObject1(Session session) : base(session) { }
    public override void AfterConstruction()
    {
        base.AfterConstruction();
    }

    MonacoEditorData monacoEditorData;
    string text;

    public MonacoEditorData MonacoEditorData
    {
        get => monacoEditorData;
        set => SetPropertyValue(nameof(MonacoEditorData), ref monacoEditorData, value);
    }

    [Size(SizeAttribute.DefaultStringMappingFieldSize)]
    public string Text
    {
        get => text;
        set => SetPropertyValue(nameof(Text), ref text, value);
    }

    public void OnCreated()
    {
        this.MonacoEditorData = new MonacoEditorData("markdown", "");
        MonacoEditorData.PropertyChanged += SourceEditor_PropertyChanged;
    }

    void IXafEntityObject.OnSaving()
    {
        this.Text = this.MonacoEditorData.Code;
    }

    void IXafEntityObject.OnLoaded()
    {
        this.MonacoEditorData = new MonacoEditorData("markdown", this.Text);
        MonacoEditorData.PropertyChanged += SourceEditor_PropertyChanged;
    }

    private void SourceEditor_PropertyChanged(object sender, PropertyChangedEventArgs e)
    {
        this.Text = this.MonacoEditorData.Code;
    }
}
As you can see, DomainObject1 implements the interface IXafEntityObject. We are using the interface events to load and save the content of the editor to the text property.
Now, build and run the solution. You should now have a Windows Forms application that hosts a Blazor property editor using WebView and the Monaco Editor, as well as a Blazor application using the same property editor.
You can find a working example here.
Conclusion
By leveraging WebView and the Monaco Editor, you can create unified property editors for both Windows Forms and Blazor in XAF applications. This approach simplifies maintenance and provides a consistent user experience across different platforms. With the flexibility of Blazor and the robustness of Windows Forms, you can build powerful and versatile property editors that cater to a wide range of user needs.
by Joche Ojeda | Jul 17, 2023 | Blazor, C#, Data Synchronization, EfCore, WebAssembly
Last week, I decided to create a playground for the SyncFramework to demonstrate how synchronization works. The sync framework itself is not designed in a client-server architecture, but as a set of APIs that you can use to synchronize data.
Synchronization scenarios usually involve a client-server architecture, but when I created the SyncFramework, I decided that network communication was something outside the scope and not directly related to data synchronization. So, instead of embedding the client-server concept in the SyncFramework, I decided to create a set of extensions to handle these scenarios. If you want to take a look at the network extensions, you can see them here.
Now, let’s return to the playground. The main requirement for me, besides showing how the synchronization process works, was not having to maintain an infrastructure for it. You know, a Sync Server and a few databases that I would have to constantly delete. So, I decided to use Blazor WebAssembly and SQLite databases running in the browser. If you want to know more about how SQLite databases can run in the browser, take a look at this article.
Now, there’s still a problem. How do I run a server on the browser? I know it’s somehow possible, but I did not have the time to do the research. So, I decided to create my own HttpClientHandler.
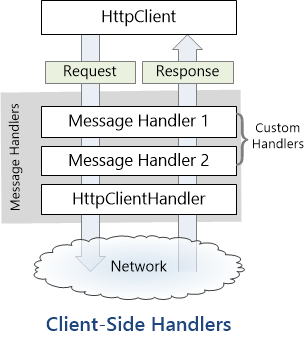
How the HttpClientHandler works
HttpClientHandler offers a number of attributes and methods for controlling HTTP requests and responses. It serves as the fundamental mechanism for HttpClient’s ability to send and receive HTTP requests and responses.
The HttpClientHandler manages aspects like the maximum number of redirects, redirection policies, handling cookies, and automated decompression of HTTP traffic. It can be set up and supplied to HttpClient to regulate the HTTP requests made by HttpClient.
HttpClientHandler might be helpful in testing situations when it’s necessary to imitate or mock HTTP requests and responses. The SendAsync method of HttpMessageHandler, from which HttpClientHandler also descended, can be overridden in a new class to deliver any response you require for your test.
here is a basic example
public class TestHandler : HttpMessageHandler
{
    protected override async Task<HttpResponseMessage> SendAsync(HttpRequestMessage request, CancellationToken cancellationToken)
    {
        // You can check the request details and return different responses based on that.
        // For simplicity, we're always returning the same response here.
        var responseMessage = new HttpResponseMessage(HttpStatusCode.OK)
        {
            Content = new StringContent("Test response.")
        };
        return await Task.FromResult(responseMessage);
    }
}
And here’s how you’d use this handler in a test:
[Test]
public async Task TestHttpClient()
{
    var handler = new TestHandler();
    var client = new HttpClient(handler);

    var response = await client.GetAsync("http://example.com");
    var responseContent = await response.Content.ReadAsStringAsync();

    Assert.AreEqual("Test response.", responseContent);
}
The TestHandler in this illustration consistently sends back an HTTP 200 response with the body “Test response.” In a real test, you might use SendAsync with more sophisticated logic to return several responses depending on the specifics of the request. By doing so, you may properly test your code’s handling of different answers without actually sending HTTP queries.
Going back to our main story
Now that we know we can catch the HTTP request and handle it locally, we can write an HttpClientHandler that takes the request from the client nodes and processes them locally. Now, we have all the pieces to make the playground work without a real server. You can take a look at the implementation of the custom handler for the playground here
Until next time, happy coding )))))

by Joche Ojeda | Jul 10, 2023 | Blazor, Sqlite, WebAssembly
Blazor is a framework for building interactive client-side web UI with .NET, developed by Microsoft. It allows developers to build full-stack web applications using C# instead of JavaScript.
Blazor comes in two different hosting models:
1. Blazor Server: In this model, the application runs on the server from within an ASP.NET Core app. UI updates, event handling, and JavaScript calls are handled over a SignalR connection.
2. Blazor Web Assembly: In this model, the application runs directly in the browser on a Web Assembly-based .NET runtime. Blazor Web Assembly includes a proper .NET runtime implemented in Web Assembly, a standard that defines a binary format for executable programs in web pages.
In both models, you can write your code in C#, compile it, and have it run in the browser. However, the way the code is executed differs significantly.
Blazor Web Assembly has a few key features:
– Runs in the browser: The app’s .NET assemblies and its runtime are downloaded into the browser and run locally. There’s no need for ongoing active server connection like in Blazor Server.
– Runs on Web Assembly: Web Assembly (wasm) is a binary instruction format for a stack-based virtual machine. It’s designed as a portable target for the compilation of high-level languages like C, C++, and Rust, allowing deployment on the web for client and server applications.
– Can be offline capable: Blazor Web Assembly apps can download the necessary resources to the client machine and run offline.
– Full .NET debugging support: Developers can debug their application using the tools they are accustomed to, like Visual Studio and Visual Studio Code.
– Sharing code between server and client: Since Blazor uses .NET for both server-side and client-side, code can easily be shared or moved, which is especially useful for data validation and model classes.
SQLite
As an alternative, Indexed DB, a low-level API for client-side storage of significant amounts of structured data, can be used as a backing store. However, using SQLite in a web browser through Web Assembly and Indexed DB is a rather advanced topic that may require additional libraries to manage the details.
Another way to use SQLite with Web Assembly is on the server side, particularly when using technologies like WASI (Web Assembly System Interface), which aims to extend the capabilities of Web Assembly beyond the browser. With WASI, Web Assembly modules could directly access system resources like the file system, and thus could interact with an SQLite database in a more traditional way.
Web Assembly and Native References
Applications built with Blazor Web Assembly (since net6) can incorporate native dependencies that are designed to function on Web Assembly. The .NET Web Assembly construction tools, which are also utilized for ahead-of-time (AOT) compilation of a Blazor application to Web Assembly and for relinking the runtime to eliminate unnecessary features, allow you to integrate these native dependencies into the .NET Web Assembly runtime statically.
This mean that if you are targeting net 6 in your Blazor Web Assembly application you can include the SQLite native Web Assembly reference and use all the power of a full SQL engine in your SPA application. If you want to learn more about native references here is the link for the official documentation
https://learn.microsoft.com/en-us/aspnet/core/blazor/webassembly-native-dependencies?view=aspnetcore-6.0
Including SQLite native reference in you Blazor Web Assembly project
The first thing that we need to do to use SQLite native reference in a web assembly application is to compile it from the source, you can do that in Linux or WSL
sudo apt-get install cmake default-jre git-core unzip

git clone https://github.com/emscripten-core/emsdk.git
cd emsdk
./emsdk install latest
./emsdk activate latest
source ./emsdk_env.sh
Command to compile SQLite as a web assembly reference
emcc sqlite3.h -shared -o e_sqlite3.o
Now that we have the native reference we need to refence it in the web assembly project
First we need to suppress the warnings we will get by adding native refences, so we need to include this lines in the project
<PropertyGroup>
    <!-- The following two are to suppress spurious build warnings from consuming Sqlite.  -->
    <!--These will become unnecessary when the Sqlite packages contain a dedicated WASM binary. -->
    <AllowUnsafeBlocks>true</AllowUnsafeBlocks>
    <EmccExtraLDFlags>-s WARN_ON_UNDEFINED_SYMBOLS=0</EmccExtraLDFlags>
</PropertyGroup>
Now we are ready to include the reference
<ItemGroup>
    <PackageReference Include="Microsoft.Data.Sqlite" Version="6.0.3" />
    <NativeFileReference Include="e_sqlite3.o" />
</ItemGroup>
And voila, now we can use a SQLite database in web assembly
If you want to learn more about native references here are a few links that you might find interesting
Remember in this example we just talked about SQLite native reference but there is a world of native reference to explore, until next time, happy coding ))

by Joche Ojeda | Nov 24, 2022 | Uncategorized
Sometime we want to reuse our Blazor components in another apps, the best way to do this is to create a razor library, this process of create a razor library is not different from create a normal class library to share code. There is only one exception, razor components might need to reference JavaScript or CSS files. This problem can be easily solve in 2 steps as shown below.
1) Create a class that inherits from TagHelperComponent,,this class should include the tags that you want to include in the html header section of your app
using Microsoft.AspNetCore.Html;
using Microsoft.AspNetCore.Razor.TagHelpers;
using System;
using System.Collections.Generic;
using System.Linq;
using System.Text;
using System.Threading.Tasks;


namespace MyBlazorApp
{
  [HtmlTargetElement("head")]
  public class MyTagHelper: TagHelperComponent
  {
    private string Tags=
@"
        <!-- ZXingBlazor -->
        <script src=""_content/ZXingBlazor/lib/barcodereader/zxing.js""></script>
        <script src = ""_content/ZXingBlazor/lib/barcodereader/barcode.js"" ></ script >
        < !--ZXingBlazor-- >
        < !--Signature Pad  -->
        <script src = ""_content/Mobsites.Blazor.SignaturePad/bundle.js"" ></ script >
        < link href=""_content/Mobsites.Blazor.SignaturePad/bundle.css"" rel=""stylesheet"" />
        < link href=""_content/Ultra.PropertyEditors.Module.Blazor/js/signaturepropertyeditor.js""/>
        <!-- Signature Pad  -->
        <!-- HTML Editor  -->
        <link href = ""//cdn.quilljs.com/1.3.6/quill.snow.css"" rel=""stylesheet"">
        <link href = ""//cdn.quilljs.com/1.3.6/quill.bubble.css"" rel=""stylesheet"">
        <script src = ""https://cdn.quilljs.com/1.3.6/quill.js"" ></ script >
        <script src=""_content/Blazored.TextEditor/quill-blot-formatter.min.js""></script>
        <script src = ""_content/Blazored.TextEditor/Blazored-BlazorQuill.js"" ></ script >
        < !--HTML Editor  -->
";
    public override Task ProcessAsync(TagHelperContext context, TagHelperOutput output)
    {
      if (string.Equals(context.TagName, "head", StringComparison.OrdinalIgnoreCase))
      {
        output.PostContent.AppendHtml(Tags).AppendLine();
      }
      return Task.CompletedTask;
    }
  }
}
*Note: to reference JavaScript or CSS from any razor library you can use the following syntax,please notice the doble quotes.
<script src=""_content/MyAssemblyName/PathToMyJavaScript/MyJavaScriptFile.js""></script>
2) Create an extension method in the “Microsoft.Extensions.DependencyInjection” namespace so you can easily add your tag helper to the service collection
using Microsoft.AspNetCore.Razor.TagHelpers;
using Microsoft.Extensions.DependencyInjection;
using System;
using System.Collections.Generic;
using System.Linq;
using System.Text;
using System.Threading.Tasks;

namespace Microsoft.Extensions.DependencyInjection
{
  public static class StartupExtensions
  {
    public static IServiceCollection AddMyHtmlTags(this IServiceCollection services)
    {
      services.AddTransient<ITagHelperComponent, MyTagHelper>();
      return services;
    }
  }
}
Here is an example on how to use your new extension in your startup class
 public void ConfigureServices(IServiceCollection services
 {
   services.AddMyHtmlTags();
 }