
by Joche Ojeda | Oct 5, 2025 | Oqtane, ORM
In this article, I’ll show you what to do after you’ve obtained and opened an Oqtane solution. Specifically, we’ll go through two different ways to set up your database for the first time.
- Using the setup wizard — this option appears automatically the first time you run the application.
- Configuring it manually — by directly editing the
appsettings.json file to skip the wizard.
Both methods achieve the same result. The only difference is that, if you configure the database manually, you won’t see the setup wizard during startup.
Step 1: Running the Application for the First Time
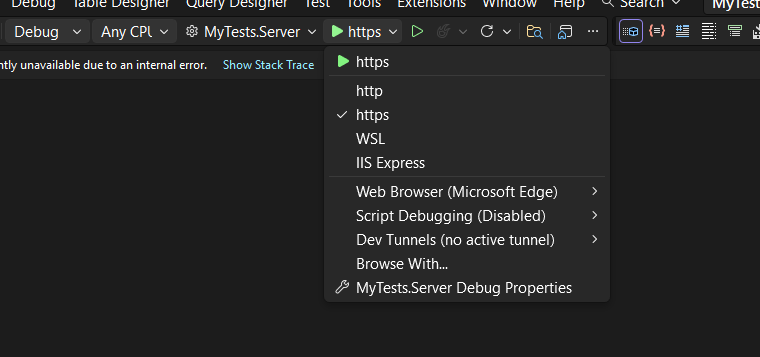
Once your solution is open in Visual Studio, set the Server project as the startup project. Then run it just as you would with any ASP.NET Core application.
You’ll notice several run options — I recommend using the HTTPS version instead of IIS Express (I stopped using IIS Express because it doesn’t work well on ARM-based computers).
When you run the application for the first time and your settings file is still empty, you’ll see the Database Setup Wizard. As shown in the image, the wizard allows you to select a database provider and configure it through a form.
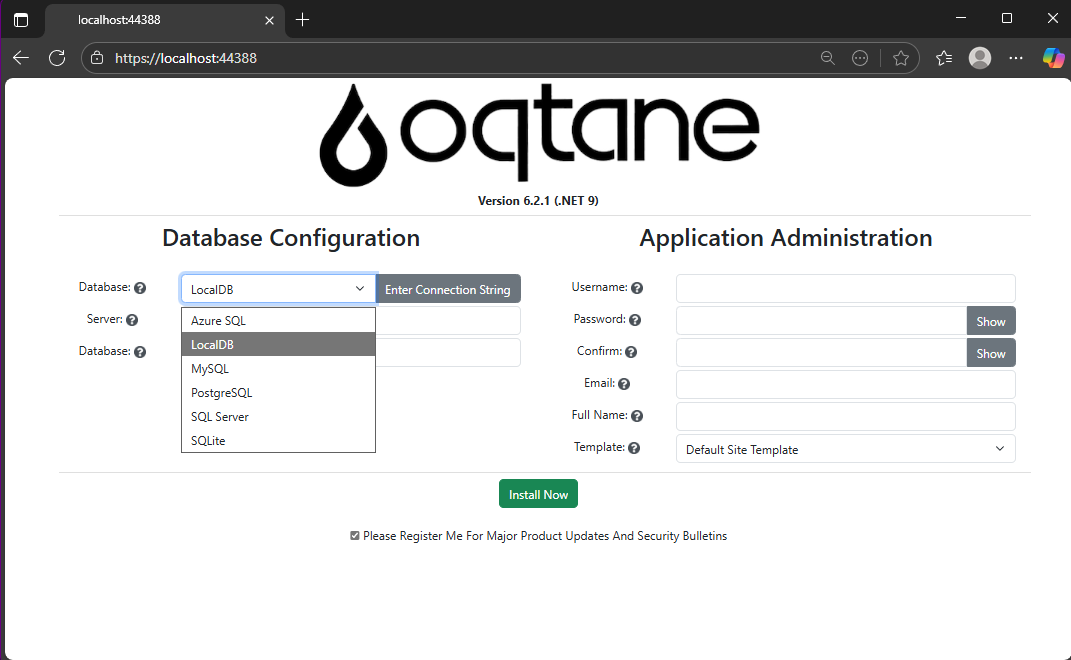
There’s also an option to paste your connection string directly. Make sure it’s a valid Entity Framework Core connection string.
After that, fill in the admin user’s details — username, email, and password — and you’re done. Once this process completes, you’ll have a working Oqtane installation.
Step 2: Setting Up the Database Manually
If you prefer to skip the wizard, you can configure the database manually. To do this, open the appsettings.json file and add the following parameters:
{
"DefaultDBType": "Oqtane.Database.Sqlite.SqliteDatabase, Oqtane.Server",
"ConnectionStrings": {
  "DefaultConnection": "Data Source=Oqtane-202510052045.db;"
},
"Installation": {
  "DefaultAlias": "https://localhost:44388",
  "HostPassword": "MyPasswor25!",
  "HostEmail": "joche@myemail.com",
  "SiteTemplate": "",
  "DefaultTheme": "",
  "DefaultContainer": ""
}
}
Here you need to specify:
- The database provider type (e.g., SQLite, SQL Server, PostgreSQL, etc.)
- The connection string
- The admin email and password for the first user — known as the host user (essentially the root or super admin).
This is the method I usually use now since I’ve set up Oqtane so many times recently that I’ve grown tired of the wizard. However, if you’re new to Oqtane, the wizard is a great way to get started.
Wrapping Up
That’s it for this setup guide! By now, you should have a running Oqtane installation configured either through the setup wizard or manually via the configuration file. Both methods give you a solid foundation to start exploring what Oqtane can do.
In the next article, we’ll dive into the Oqtane backend, exploring how the framework handles modules, data, and the underlying architecture that makes it flexible and powerful. Stay tuned — things are about to get interesting!

by Joche Ojeda | Aug 5, 2025 | Auth, Linux, Ubuntu, WSL
In modern application development, managing user authentication and authorization across multiple systems has become a significant challenge. Keycloak emerges as a compelling solution to address these identity management complexities, offering particular value for .NET developers seeking flexible authentication options.
What is Keycloak?
Keycloak is an open-source Identity and Access Management (IAM) solution developed by Red Hat. It functions as a centralized authentication and authorization server that manages user identities and controls access across multiple applications and services within an organization.
Rather than each application handling its own user authentication independently, Keycloak provides a unified identity provider that enables Single Sign-On (SSO) capabilities. Users authenticate once with Keycloak and gain seamless access to all authorized applications without repeated login prompts.
Core Functionality
Keycloak serves as a comprehensive identity management platform that handles several critical functions. It manages user authentication through various methods including traditional username/password combinations, multi-factor authentication, and social login integration with providers like Google, Facebook, and GitHub.
Beyond authentication, Keycloak provides robust authorization capabilities, controlling what authenticated users can access within applications through role-based access control and fine-grained permissions. The platform supports industry-standard protocols including OpenID Connect, OAuth 2.0, and SAML 2.0, ensuring compatibility with a wide range of applications and services.
User federation capabilities allow Keycloak to integrate with existing user directories such as LDAP and Active Directory, enabling organizations to leverage their current user stores rather than requiring complete migration to new systems.
The Problem Keycloak Addresses
Modern users often experience “authentication fatigue” – the exhaustion that comes from repeatedly logging into multiple systems throughout their workday. A typical enterprise user might need to authenticate with email systems, project management tools, CRM platforms, cloud storage, HR portals, and various internal applications, each potentially requiring different credentials and authentication flows.
This fragmentation leads to several problems: users struggle with password management across multiple systems, productivity decreases due to time spent on authentication processes, security risks increase as users resort to password reuse or weak passwords, and IT support costs rise due to frequent password reset requests.
Keycloak eliminates these friction points by providing seamless SSO while simultaneously improving security through centralized identity management and consistent security policies.
Keycloak and .NET Integration
For .NET developers, Keycloak offers excellent compatibility through its support of standard authentication protocols. The platform’s adherence to OpenID Connect and OAuth 2.0 standards means it integrates naturally with .NET applications using Microsoft’s built-in authentication middleware.
.NET Core and .NET 5+ applications can integrate with Keycloak using the Microsoft.AspNetCore.Authentication.OpenIdConnect package, while older .NET Framework applications can utilize OWIN middleware. Blazor applications, both Server and WebAssembly variants, support the same integration patterns, and Web APIs can be secured using JWT tokens issued by Keycloak.
The integration process typically involves configuring authentication middleware in the .NET application to communicate with Keycloak’s endpoints, establishing client credentials, and defining appropriate scopes and redirect URIs. This standards-based approach ensures that .NET developers can leverage their existing knowledge of authentication patterns while benefiting from Keycloak’s advanced identity management features.
Benefits for .NET Development
Keycloak offers several advantages for .NET developers and organizations. As an open-source solution, it provides cost-effectiveness compared to proprietary alternatives while offering extensive customization capabilities that proprietary solutions often restrict.
The platform reduces development time by handling complex authentication scenarios out-of-the-box, allowing developers to focus on business logic rather than identity management infrastructure. Security benefits include centralized policy management, regular security updates, and implementation of industry best practices.
Keycloak’s vendor-neutral approach provides flexibility for organizations using multiple cloud providers or seeking to avoid vendor lock-in. The solution scales effectively through clustered deployments and supports high-availability configurations suitable for enterprise environments.
Comparison with Microsoft Solutions
When compared to Microsoft’s identity offerings like Entra ID (formerly Azure AD), Keycloak presents different trade-offs. Microsoft’s solutions provide seamless integration within the Microsoft ecosystem and offer managed services with minimal maintenance requirements, but come with subscription costs and potential vendor lock-in considerations.
Keycloak, conversely, offers complete control over deployment and data, extensive customization options, and freedom from licensing fees. However, it requires organizations to manage their own infrastructure and maintain the necessary technical expertise.
When Keycloak Makes Sense
Keycloak represents an ideal choice for .NET developers and organizations that prioritize flexibility, cost control, and customization capabilities. It’s particularly suitable for scenarios involving multiple cloud providers, integration with diverse systems, or requirements for extensive branding and workflow customization.
Organizations with the technical expertise to manage infrastructure and those seeking vendor independence will find Keycloak’s open-source model advantageous. The solution also appeals to teams building applications that need to work across different technology stacks and cloud environments.
Conclusion
Keycloak stands as a robust, flexible identity management solution that integrates seamlessly with .NET applications through standard authentication protocols. Its open-source nature, comprehensive feature set, and standards-based approach make it a compelling alternative to proprietary identity management solutions.
For .NET developers seeking powerful identity management capabilities without vendor lock-in, Keycloak provides the tools necessary to implement secure, scalable authentication solutions while maintaining the flexibility to adapt to changing requirements and diverse technology environments.

by Joche Ojeda | Mar 12, 2025 | dotnet, http, netcore, netframework, network, WebServers
Last week, I was diving into Uno Platform to understand its UI paradigms. What particularly caught my attention is Uno’s ability to render a webapp using WebAssembly (WASM). Having worked with WASM apps before, I’m all too familiar with the challenges of connecting to data sources and handling persistence within these applications.
My Previous WASM Struggles
About a year ago, I faced a significant challenge: connecting a desktop WebAssembly app to an old WCF webservice. Despite having the CORS settings correctly configured (or so I thought), I simply couldn’t establish a connection from the WASM app to the server. I spent days troubleshooting both the WCF service and another ASMX service, but both attempts failed. Eventually, I had to resort to webserver proxies to achieve my goal.
This experience left me somewhat traumatized by the mere mention of “connecting WASM with an API.” However, the time came to face this challenge again during my weekend experiments.
A Pleasant Surprise with Uno Platform
This weekend, I wanted to connect a XAF REST API to an Uno Platform client. To my surprise, it turned out to be incredibly straightforward. I successfully performed this procedure twice: once with a XAF REST API and once with the API included in the Uno app template. The ease of this integration was a refreshing change from my previous struggles.
Understanding CORS and Why It Matters for WASM Apps
To understand why my previous attempts failed and my recent ones succeeded, it’s important to grasp what CORS is and why it’s crucial for WebAssembly applications.
What is CORS?
CORS (Cross-Origin Resource Sharing) is a security feature implemented by web browsers that restricts web pages from making requests to a domain different from the one that served the original web page. It’s an HTTP-header based mechanism that allows a server to indicate which origins (domains, schemes, or ports) other than its own are permitted to load resources.
The Same-Origin Policy
Browsers enforce a security restriction called the “same-origin policy” which prevents a website from one origin from requesting resources from another origin. An origin consists of:
- Protocol (HTTP, HTTPS)
- Domain name
- Port number
For example, if your website is hosted at https://myapp.com, it cannot make AJAX requests to https://myapi.com without the server explicitly allowing it through CORS.
Why CORS is Required for Blazor WebAssembly
Blazor WebAssembly (which uses similar principles to Uno Platform’s WASM implementation) is fundamentally different from Blazor Server in how it operates:
- Separate Deployment: Blazor WebAssembly apps are fully downloaded to the client’s browser and run entirely in the browser using WebAssembly. They’re typically hosted on a different server or domain than your API.
- Client-Side Execution: Since all code runs in the browser, when your Blazor WebAssembly app makes HTTP requests to your API, they’re treated as cross-origin requests if the API is hosted on a different domain, port, or protocol.
- Browser Security: Modern browsers block these cross-origin requests by default unless the server (your API) explicitly permits them via CORS headers.
Implementing CORS in Startup.cs
The solution to these CORS issues lies in properly configuring your server. In your Startup.cs file, you can configure CORS as follows:
public void ConfigureServices(IServiceCollection services) {
    services.AddCors(options => {
        options.AddPolicy("AllowBlazorApp",
            builder => {
                builder.WithOrigins("https://localhost:5000") // Replace with your Blazor app's URL
                       .AllowAnyHeader()
                       .AllowAnyMethod();
            });
    });

    // Other service configurations...
}

public void Configure(IApplicationBuilder app, IWebHostEnvironment env) {
    // Other middleware configurations...

    app.UseCors("AllowBlazorApp");

    // Other middleware configurations...
}
Conclusion
My journey with connecting WebAssembly applications to APIs has had its ups and downs. What once seemed like an insurmountable challenge has now become much more manageable, especially with platforms like Uno that simplify the process. Understanding CORS and implementing it correctly is crucial for successful WASM-to-API communication.
If you’re working with WebAssembly applications and facing similar challenges, I hope my experience helps you avoid some of the pitfalls I encountered along the way.
About Us
YouTube
https://www.youtube.com/c/JocheOjedaXAFXAMARINC
Our sites
Let’s discuss your XAF
https://www.udemy.com/course/microsoft-ai-extensions/
Our free A.I courses on Udemy

by Joche Ojeda | Dec 2, 2024 | Blazor
Over time, I transitioned to using the first versions of my beloved framework, XAF. As you might know, XAF generates a polished and functional UI out of the box. Using XAF made me more of a backend developer since most of the development work wasn’t visual—especially in the early versions, where the model designer was rudimentary (it’s much better now).
Eventually, I moved on to developing .NET libraries and NuGet packages, diving deep into SOLID design principles. Fun fact: I actually learned about SOLID from DevExpress TV. Yes, there was a time before YouTube when DevExpress posted videos on technical tasks!
Nowadays, I feel confident creating and publishing my own libraries as NuGet packages. However, my “old monster” was still lurking in the shadows: UI components. I finally decided it was time to conquer it, but first, I needed to choose a platform. Here were my options:
- Windows Forms: A robust and mature platform but limited to desktop applications.
- WPF: A great option with some excellent UI frameworks that I love, but it still feels a bit “Windows Forms-ish” to me.
- Xamarin/Maui: I’m a big fan of Xamarin Forms and Xamarin/Maui XAML, but they’re primarily focused on device-specific applications.
- Blazor: This was the clear winner because it allows me to create desktop applications using Electron, embed components into Windows Forms, or even integrate with MAUI.
Recently, I’ve been helping my brother with a project in Blazor. (He’s not a programmer, but I am.) This gave me an opportunity to experiment with design patterns to get the most out of my components, which started as plain HTML5 pages.
Without further ado, here are the key insights I’ve gained so far.
Building high-quality Blazor components requires attention to both the C# implementation and Razor markup patterns. This guide combines architectural best practices with practical implementation patterns to create robust, reusable components.
1. Component Architecture and Organization
Parameter Organization
Start by organizing parameters into logical groups for better maintainability:
public class CustomForm : ComponentBase
{
    // Layout Parameters
    [Parameter] public string Width { get; set; }
    [Parameter] public string Margin { get; set; }
    [Parameter] public string Padding { get; set; }

    // Validation Parameters
    [Parameter] public bool EnableValidation { get; set; }
    [Parameter] public string ValidationMessage { get; set; }

    // Event Callbacks
    [Parameter] public EventCallback<bool> OnValidationComplete { get; set; }
    [Parameter] public EventCallback<string> OnSubmit { get; set; }
}
Corresponding Razor Template
<div class="form-container" style="width: @Width; margin: @Margin; padding: @Padding">
    <form @onsubmit="HandleSubmit">
        @if (EnableValidation)
        {
            <div class="validation-message">
                @ValidationMessage
            </div>
        }
        @ChildContent
    </form>
</div>
2. Smart Default Values and Template Composition
Component Implementation
public class DataTable<T> : ComponentBase
{
    [Parameter] public int PageSize { get; set; } = 10;
    [Parameter] public bool ShowPagination { get; set; } = true;
    [Parameter] public string EmptyMessage { get; set; } = "No data available";
    [Parameter] public IEnumerable<T> Items { get; set; } = Array.Empty<T>();
    [Parameter] public RenderFragment HeaderTemplate { get; set; }
    [Parameter] public RenderFragment<T> RowTemplate { get; set; }
    [Parameter] public RenderFragment FooterTemplate { get; set; }
}
Razor Implementation
<div class="table-container">
    @if (HeaderTemplate != null)
    {
        <header class="table-header">
            @HeaderTemplate
        </header>
    }

    <div class="table-content">
        @if (!Items.Any())
        {
            <div class="empty-state">@EmptyMessage</div>
        }
        else
        {
            @foreach (var item in Items)
            {
                @RowTemplate(item)
            }
        }
    </div>

    @if (ShowPagination)
    {
        <div class="pagination">
            <!-- Pagination implementation -->
        </div>
    }
</div>
3. Accessibility and Unique IDs
Component Implementation
public class FormField : ComponentBase
{
    private string fieldId = $"field-{Guid.NewGuid():N}";
    private string labelId = $"label-{Guid.NewGuid():N}";
    private string errorId = $"error-{Guid.NewGuid():N}";

    [Parameter] public string Label { get; set; }
    [Parameter] public string Error { get; set; }
    [Parameter] public bool Required { get; set; }
}
Razor Implementation
<div class="form-field">
    <label id="@labelId" for="@fieldId">
        @Label
        @if (Required)
        {
            <span class="required" aria-label="required">*</span>
        }
    </label>

    <input id="@fieldId"
           aria-labelledby="@labelId"
           aria-describedby="@errorId"
           aria-required="@Required" />

    @if (!string.IsNullOrEmpty(Error))
    {
        <div id="@errorId" class="error-message" role="alert">
            @Error
        </div>
    }
</div>
4. Virtualization and Performance
Component Implementation
public class VirtualizedList<T> : ComponentBase
{
    [Parameter] public IEnumerable<T> Items { get; set; }
    [Parameter] public RenderFragment<T> ItemTemplate { get; set; }
    [Parameter] public int ItemHeight { get; set; } = 50;
    [Parameter] public Func<ItemsProviderRequest, ValueTask<ItemsProviderResult<T>>> ItemsProvider { get; set; }
}
Razor Implementation
<div class="virtualized-container" style="height: 500px; overflow-y: auto;">
    <Virtualize Items="@Items"
                ItemSize="@ItemHeight"
                ItemsProvider="@ItemsProvider"
                Context="item">
        <ItemContent>
            <div class="list-item" style="height: @(ItemHeight)px">
                @ItemTemplate(item)
            </div>
        </ItemContent>
        <Placeholder>
            <div class="loading-placeholder" style="height: @(ItemHeight)px">
                <div class="loading-animation"></div>
            </div>
        </Placeholder>
    </Virtualize>
</div>
Best Practices Summary
1. Parameter Organization
- Group related parameters with clear comments
- Provide meaningful default values
- Use parameter validation where appropriate
2. Template Composition
- Use RenderFragment for customizable sections
- Provide default templates when needed
- Enable granular control over component appearance
3. Accessibility
- Generate unique IDs for form elements
- Include proper ARIA attributes
- Support keyboard navigation
4. Performance
- Implement virtualization for large datasets
- Use loading states and placeholders
- Optimize rendering with appropriate conditions
Conclusion
Building effective Blazor components requires attention to both the C# implementation and Razor markup. By following these patterns and practices, you can create components that are:
- Highly reusable
- Performant
- Accessible
- Easy to maintain
- Flexible for different use cases
Remember to adapt these practices to your specific needs while maintaining clean component design principles.
by Joche Ojeda | Dec 1, 2024 | Blazor
My journey with Microsoft Semantic Kernel marked the beginning of a new adventure: stepping out of my comfort zone as a backend developer to create applications with user interfaces, rather than just building apps for unit and integration testing.
I naturally chose Blazor as my UI framework, and I’ll be sharing my frontend development experiences here. Sometimes it can be frustratingly difficult to accomplish seemingly simple tasks (like centering a div!), but AI assistants like GitHub Copilot have been incredibly helpful in reducing those pain points.
One of my recent challenges involved programmatically including JavaScript and CSS in Blazor applications. I prefer an automated approach rather than manually adding tags to HTML. Back in the .NET 5 era, I wrote an article about using tag helpers for this purpose, which you can find here
However, I recently discovered that my original approach no longer works. I’ve been developing several prototypes using the new DevExpress Chat component, and many of these prototypes include custom components that require JavaScript and CSS. Despite my attempts, I couldn’t get these components to work with the tag helpers, and the reason wasn’t immediately obvious. During the Thanksgiving break, I decided to investigate this issue, and I’d like to share what I found.
With the release of .NET 8, Blazor introduced a new web app template that unifies Blazor Server and WebAssembly into a single project structure. This change affects how we inject content into the document’s head section, particularly when working with Tag Helpers or components.
Understanding the Changes
In previous versions of Blazor, we typically worked with _Host.cshtml for server-side rendering, where traditional ASP.NET Core Tag Helpers could target the <head> element directly. The new .NET 8 Blazor Web App template uses App.razor as the root component and introduces the <HeadOutlet> component for managing head content.
Approach 1: Adapting Tag Helpers
If you’re migrating existing Tag Helpers or creating new ones for head content injection, you’ll need to modify them to target HeadOutlet instead of the head element:
using Microsoft.AspNetCore.Razor.TagHelpers;

namespace YourNamespace
{
    [HtmlTargetElement("HeadOutlet")]
    public class CustomScriptTagHelper : TagHelper
    {
        public override void Process(TagHelperContext context, TagHelperOutput output)
        {
            output.PostContent.AppendHtml(
                "<script src=\"_content/YourLibrary/js/script.js\"></script>"
            );
        }
    }
}
Remember to register your Tag Helper in _Imports.razor:
@addTagHelper *, YourLibrary
Approach 2: Using Blazor Components (Recommended)
While adapting Tag Helpers works, Blazor offers a more idiomatic approach using components and the HeadContent component. This approach aligns better with Blazor’s component-based architecture:
@namespace YourNamespace
@implements IComponentRenderMode

<HeadContent>
    <script src="_content/YourLibrary/js/script.js"></script>
</HeadContent>
To use this component in your App.razor:
<head>
    <!-- Other head elements -->
    <HeadOutlet @rendermode="RenderModeForPage" />
    <YourScriptComponent @rendermode="RenderModeForPage" />
</head>
Benefits of the Component Approach
- Better Integration: Components work seamlessly with Blazor’s rendering model
- Render Mode Support: Easy to control rendering based on the current render mode (Interactive Server, WebAssembly, or Auto)
- Dynamic Content: Can leverage Blazor’s full component lifecycle and state management
- Type Safety: Provides compile-time checking and better tooling support
Best Practices
- Prefer the component-based approach for new development
- Use Tag Helpers only when migrating existing code or when you need specific ASP.NET Core pipeline integration
- Always specify the
@rendermode attribute to ensure proper rendering in different scenarios
- Place custom head content components after HeadOutlet to ensure proper ordering
Conclusion
While both approaches work in .NET 8 Blazor Web Apps, the component-based approach using HeadContent provides a more natural fit with Blazor’s architecture and offers better maintainability and flexibility. When building new applications, consider using components unless you have a specific need for Tag Helper functionality.