
OK, so it’s time for a new article about Oqtane!
In my previous post (or “mental note,” as I like to call them), I covered how to set up
multi-tenancy in Oqtane. Today, I got a really nice surprise —
Shaun Walker just posted an excellent video explaining how multi-tenancy works,
along with its advantages and possible drawbacks.
From my point of view, the advantages clearly outweigh the disadvantages,
although it depends on your specific scenario.
Extending the Previous Example
I wanted to improve my previous example a bit. So, I created a new GitHub repository using the same base code,
but this time I added hostnames for each tenant.
A hostname is basically the domain that points to one of your tenants in Oqtane.
In a typical setup, you use DNS records for this.
The simplest case is an A record that points to a specific IP address.
When a request arrives, the server reads the hostname from the request and routes it to the correct tenant.
This part isn’t specific to Oqtane — it’s how web servers work in general.
The concept exists in IIS, Apache, and NGINX,
and it’s part of basic networking theory. If you want to learn more,
there are countless articles about how DNS works.
A Small Story from the Past
This actually takes me back — one of the first things I learned as a teenager was how to configure DNS
and run my own Apache web server.
I even started offering web hosting from my home using an old 486 computer (yes, really).
Eventually, my internet provider noticed what I was doing, blocked my connection, and called my parents.
Let’s just say… that Christmas was canceled for me. 😅
Anyway, that’s a story for another time.
Setting Up Local Domains for Tenants
For today’s example, I’m using the same structure as before:
- One host site
- Two tenant sites: MyCompany1 and MyCompany2
I want to show you how to assign domain names to each of them.
If you’re running everything locally (for example, through Visual Studio or VS Code),
you can’t use real domain names — but you can simulate them using the Windows hosts file.
If you’ve ever wondered how your computer resolves localhost to 127.0.0.1,
the answer lies in that file. It’s located inside the Windows system folder,
and it maps domain names to IP addresses.
Here’s the cool part: you can add your own domains there, pointing them to any IP you like.
It’s a great trick for local testing.
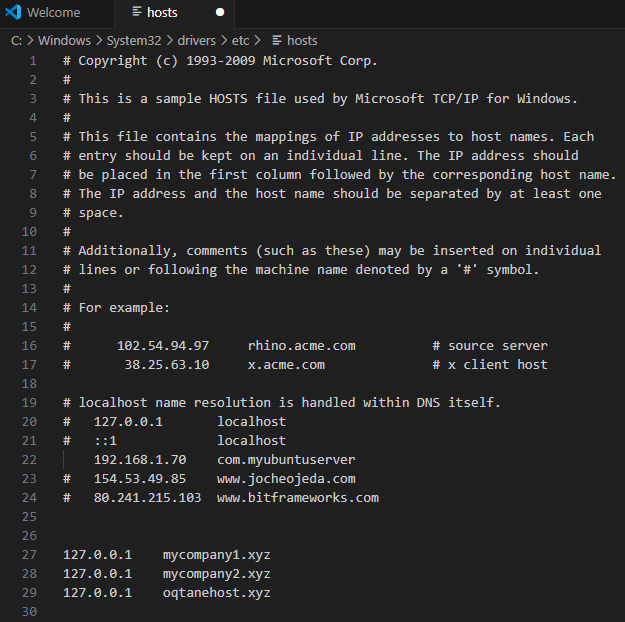
Below, you’ll see a screenshot of my hosts file.
I’ve mapped my fake domains to my local IP address,
so when I open them in the browser, the requests go straight to my
Kestrel server, which then routes them to the correct tenant.
How to Edit the Windows Hosts File
Editing the hosts file in Windows is simple, but you need administrative permissions.
Here’s how you can do it safely:
- Press Start, type
Notepad, then right-click it and select
Run as administrator. - Once Notepad opens, go to File → Open and browse to:
C:\Windows\System32\drivers\etc\hosts
- In the open dialog, change the filter from “Text Documents (*.txt)” to “All Files (*.*)”
so you can see the hosts file. - Add your entries at the bottom of the file. For example:
127.0.0.1   mycompany1.xyz
127.0.0.1   mycompany2.xyz
Each line maps an IP address to a domain name.
- Save the file and close Notepad.
- Open your browser and visit
http://mycompany1.xyz:44398
(or the port your Oqtane app is running on).
You should see the tenant corresponding to that domain.
⚠️ Important: If you edit the file without admin rights,
you won’t be able to save it. Also, be careful — if you modify or delete system entries by accident,
your network resolution might stop working.
Here is how my host file actually looks at the moment
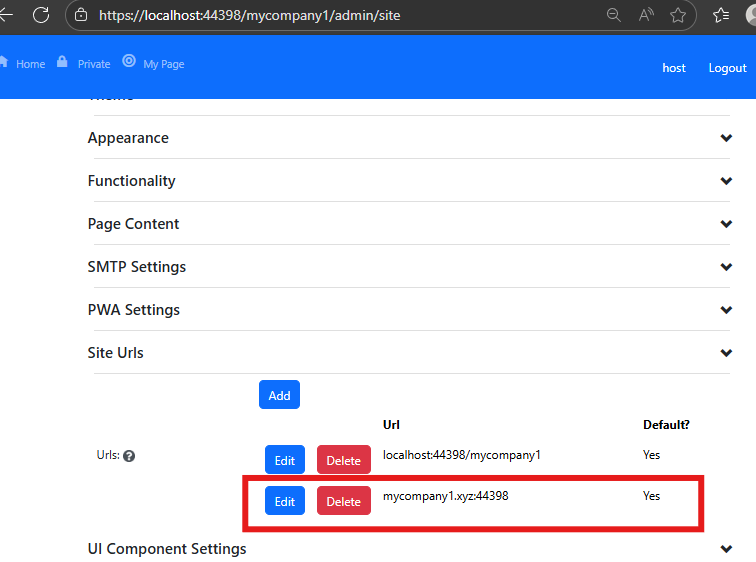
Set siteURL for :Company 1
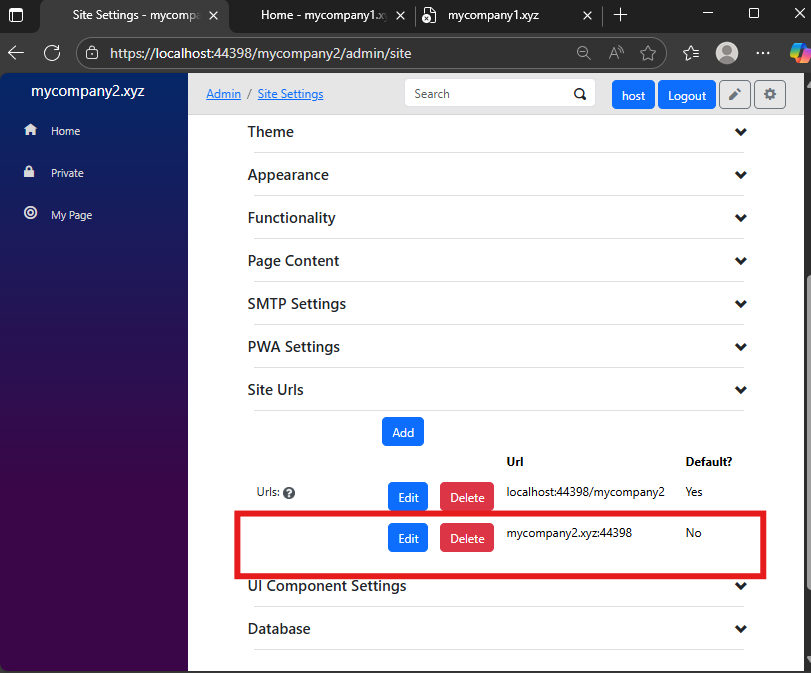
Set siteURL for :Company 2
Testing with Real Domains
Of course, this same logic applies to real domains too — as long as your Oqtane instance is publicly accessible.
In one of the next parts (maybe part 3 or 4), I’ll show how to configure it using a web server like
Apache. I know that NGINX is more popular these days,
but I’ve used Apache since my teenage years, so I’m more comfortable with it.
Still, I’ll probably demonstrate both.
Most developers today use cloud providers like AWS or Azure,
but honestly, I still prefer spinning up a simple Ubuntu server and doing everything manually.
The best tool is the one you know best — and for me, that’s Apache on Ubuntu.
Demo
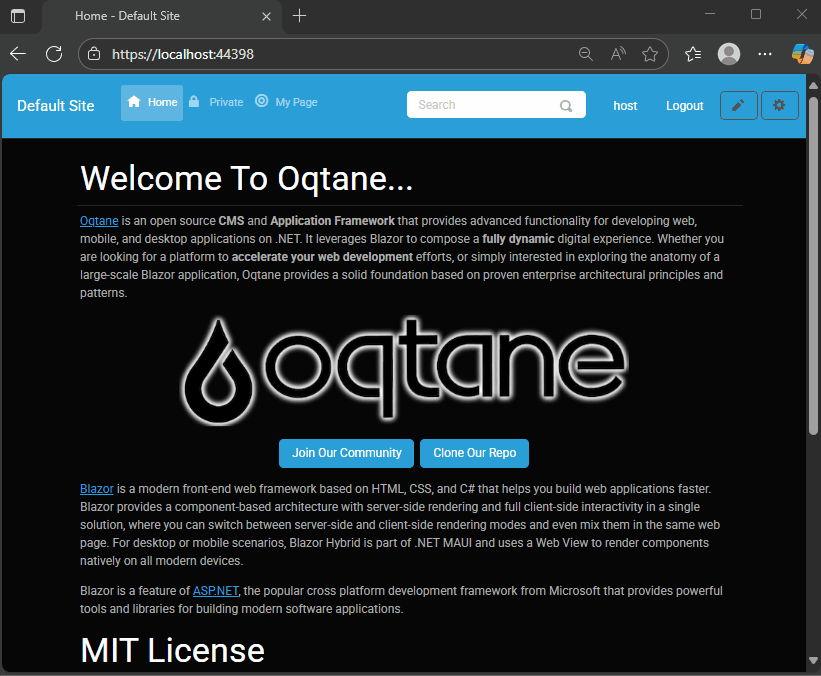
As you can see there is a little bit of a different behavior if is a default site or not If it’s a default site it will redirect to that URL if not it’s going to redirect to the default site URL
Resources
- 🧩 GitHub Repository — This project is based on the previous example
but adds hostname configuration and uses SQLite for simplicity.
- 🎥 Shaun Walker’s Video on Multi-Tenancy —
Highly recommended if you want a solid overview of how it all works: