by Joche Ojeda | Oct 7, 2025 | Oqtane
Oqtane Notes: Understanding Site Settings vs. App Settings
OK — it’s time for another blog post (or maybe just a mental note) about Oqtane.
I’ve been doing what feels like a million installations of it lately. Honestly, if the Oqtane team gets a notification every time I spin up a new instance, they’re probably tired of seeing my name by now. I’ve been spending nearly every free minute exploring the framework — I love diving into new technologies, digging into the source code, and figuring out how things really work.
One of the most beautiful parts about Oqtane is that it’s open source. You can simply go into the repository and inspect the source code yourself. Some parts might not be obvious at first glance, but the project’s creator, Shaun Walker, is incredibly responsive and helpful to the community. I think I’ve only posted a couple of issues over the years, but every single time I’ve woken up the next morning with a thoughtful response waiting — even though I’m usually several time zones ahead in Europe. He really knows Oqtane inside and out.
Hosting Models and Render Modes
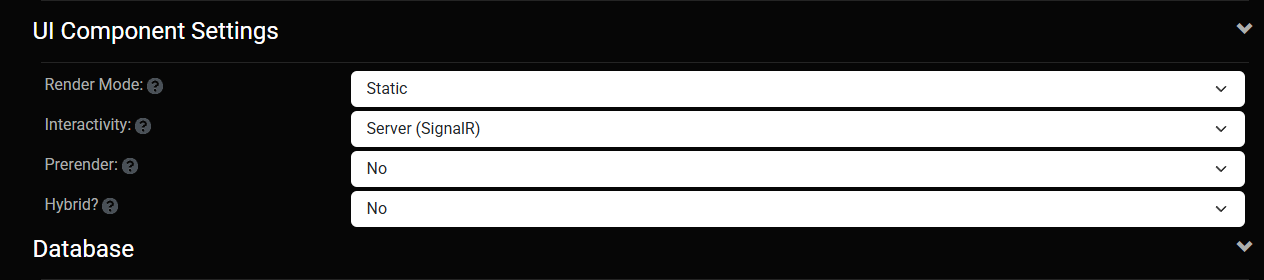
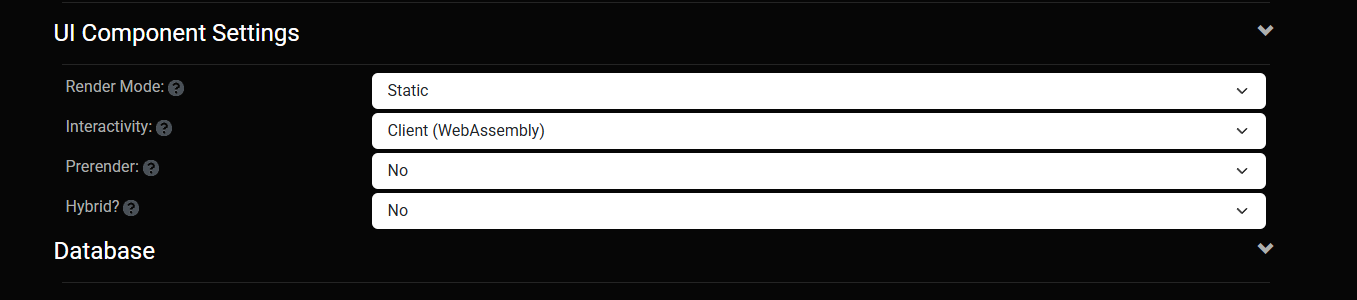
As you probably know, one of Oqtane’s biggest strengths is its flexibility with Blazor hosting models. It can run as Server or WebAssembly, and you can switch between them with a simple configuration change.
On top of that, Oqtane supports different render modes for components: Interactive or Static. In simple terms, you can choose to render content on the server (similar to how PHP works) or make it fully interactive like a standard Blazor app where the state refreshes dynamically.
You can toggle these behaviors with just a few clicks in the admin backend — which is awesome once you understand how the settings are actually applied.
My Confusion (and the Lesson Learned)
This post was originally meant to be a follow-up to the previous one about database configuration, but I ran into an interesting issue while testing API controllers. I wanted to confirm that when I ran the application in WebAssembly mode, it would hit the API controllers correctly.
It didn’t — at least not at first.
I spent quite a while trying to figure out why. Oqtane has both app-level settings (in appsettings.json) and site-level settings (in the admin panel), and it wasn’t immediately clear which ones took priority. I initially thought I could just change the render and runtime options in appsettings.json, restart the app, and see the effect. But it didn’t work that way.
After some trial and error — and a helpful reply from Shaun — I realized my mistake. When you first spin up a new site, Oqtane uses the values defined in appsettings.json. But once that site exists, it maintains its own configuration separately. From that point forward, any runtime or render mode changes must be made in the site settings from the admin panel, not in the original configuration file.
Server Runtime

WebAssembly Runtime
The Takeaway
If you edit appsettings.json after your first site is already created, it won’t affect the existing site — those values only apply when a new site is initialized.
So, to summarize:
- Before the first run → Configure defaults in
appsettings.json.
- After the site is running → Change settings from the admin backend.
That was the source of my confusion. Hopefully, this note saves someone else a few hours of head-scratching.
Thanks again to Shaun and the entire Oqtane team for keeping this project alive and so well supported.
These posts are just my personal notes, but I hope they help someone who’s following the same learning path.

by Joche Ojeda | Mar 11, 2025 | network
DNS and Virtual Hosting: A Personal Journey
In this article, I’m going to talk about a topic I’ve been working on lately because I’m creating a course on how to host ASP.NET Core applications on Linux. This is a trick that I learned a really long time ago.
I was talking with one of my students, Lance, who asked me when I learned all this hosting and server stuff. It’s actually a nice story.
My Early Server Adventures
When I was around 16 years old, I got a book on networking and figured out how to find free public IPs on my Internet provider’s network. A few years later, when I was 19, I got a book on Windows 2000 Server and managed to get a copy of that Windows version.
I had a great combination of resources:
- Public IPs that I was “borrowing” from my Internet provider
- A copy of Windows Server
- An extra machine (at that time, we only had one computer at home, unlike now where I have about 5 computers)
I formatted the extra computer using Windows Server 2000 and set up DNS using a program called Simple DNS. I also set up the IIS web server. Finally, for the first time in my life, I could host a domain from a computer at home.
In El Salvador, .sv domains were free at that time—you just needed to fill out a form and you could get them for free for many years. Now they’re quite expensive, around $50, compared to normal domains.
The Magic of Virtual Hosting
What I learned was that you can host multiple websites or web applications sharing the same IP without having to change ports by using a hostname or domain name instead.
Here’s how DNS works: When you have an internet connection, it has several parts—the IP address, the public mask, the gateway, and the DNS servers. The DNS servers essentially house a simple file where they have translations: this domain (like HotCoder.com) translates to this IP address. They make IP addresses human-readable.
Once requests go to the server side, the server checks which domain name is being requested and then picks from all the websites being hosted on that server and responds accordingly.
Creating DNS records was tricky the first time. I spent a lot of time reading about it. The internet wasn’t like it is now—we didn’t have AI to help us. I had to figure it out with books, and growing up in El Salvador, we didn’t always have the newest or most accurate books available.
The Hosts File: A Local DNS
In the most basic setup, you need a record which says “this domain goes to this IP,” and then maybe a CNAME record that does something similar. That’s what DNS servers do—they maintain these translation tables.
Each computer also has its own translation table, which is a text file. In Windows, it’s called the “hosts” file. If you’ve used computers for development, you probably know that there’s an IP address reserved for localhost: 127.0.0.1. When you type “localhost” in the browser, it translates to that IP address.
This translation doesn’t require an external network request. Instead, your computer checks the hosts file, where you can set up the same domain-to-IP translations locally. This is how you can test domains without actually buying them. You can say “google.com will be forwarded to this IP address” which can be on your own computer.
A Real-World Application
I used this principle just this morning. I have an old MSI computer from 2018—still a solid machine with an i7 processor and 64GB of RAM. I reformatted it last week and set up the Hyper-V server. Inside Hyper-V, I set up an Ubuntu machine to emulate hosting, and installed a virtual hosting manager called Webmin.
I know I could do everything via command line, but why write a lot of text when you can use a user interface?
Recently, we’ve been having problems with our servers. My business partner Javier (who’s like a brother to me) mentioned that we have many test servers without clear documentation of what’s inside each one. We decided to format some of them to make them clean test servers again.
One of our servers that was failing happens to host my blog—the very one you’re reading right now! Yesterday, Javier messaged me early in the morning (7 AM for me in Europe, around 9 PM for him in America) to tell me my blog was down. There seemed to be a problem with the server that I couldn’t immediately identify.
We decided to move to a bigger server. I created a backup of the virtual server (something I’ll discuss in a different post) and moved it to the Hyper-V virtual machine on my MSI computer. I didn’t want to redirect my real IP address and DNS servers to my home computer—that would be messy and prevent access to my blog temporarily.
Instead, I modified the hosts file on my computer to point to the private internal IP of that virtual server. This allowed me to test everything locally before making any public DNS changes.
Understanding DNS: A Practical Example
Let me explain how DNS actually works with a simple example using the domain jocheojeda.com and an IP address of 203.0.113.42.
How DNS Resolution Works with ISP DNS Servers
When you type jocheojeda.com in your browser, here’s what happens:
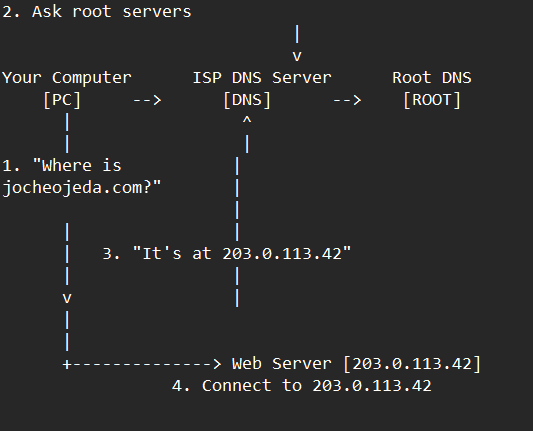
- Your browser asks your operating system to resolve
jocheojeda.com
- Your OS checks its local DNS cache, doesn’t find it, and then asks your ISP’s DNS server
- If the ISP’s DNS server doesn’t know, it asks the root DNS servers, which direct it to the appropriate Top-Level Domain (TLD) servers for
.com
- The TLD servers direct the ISP DNS to the authoritative DNS servers for
jocheojeda.com
- The authoritative DNS server responds with the A record:
jocheojeda.com -> 203.0.113.42
- Your ISP DNS server caches this information and passes it back to your computer
- Your browser can now connect directly to the web server at
203.0.113.42
DNS Records Explained
A Record (Address Record)
An A record maps a domain name directly to an IPv4 address:
jocheojeda.com. IN A 203.0.113.42
This tells DNS servers that when someone asks for jocheojeda.com, they should be directed to the server at 203.0.113.42.
CNAME Record (Canonical Name)
A CNAME record maps one domain name to another domain name:
www.jocheojeda.com.    IN    CNAME    jocheojeda.com.
blog.jocheojeda.com.   IN    CNAME    jocheojeda.com.
This means that www.jocheojeda.com and blog.jocheojeda.com are aliases for jocheojeda.com. When someone visits either of these subdomains, DNS will first resolve them to jocheojeda.com, and then resolve that to 203.0.113.42.
Using the Windows Hosts File
Now, let’s see what happens when you use the hosts file instead:
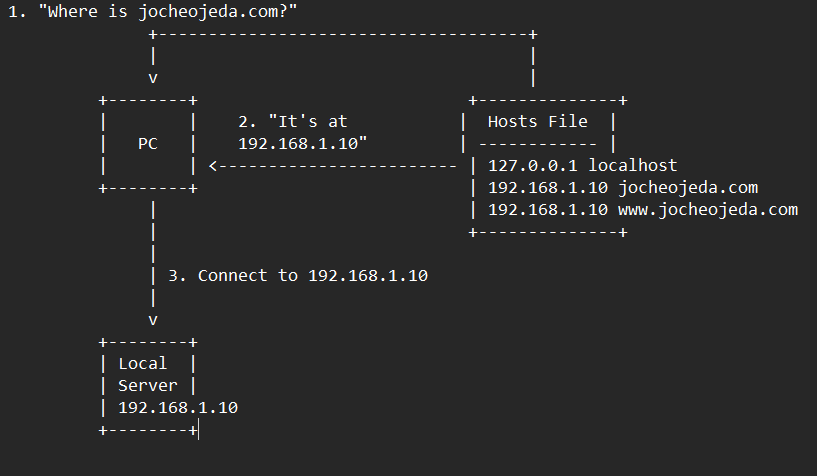
When using the hosts file:
- Your browser asks your operating system to resolve
jocheojeda.com
- Your OS checks the hosts file first, before any external DNS servers
- It finds an entry:
192.168.1.10 jocheojeda.com
- The OS immediately returns the IP
192.168.1.10 to your browser
- Your browser connects to
192.168.1.10 instead of the actual public IP
- The external DNS servers are never consulted
The Windows hosts file is located at C:\Windows\System32\drivers\etc\hosts. A typical entry might look like:
# For local development
192.168.1.10    jocheojeda.com
192.168.1.10    www.jocheojeda.com
192.168.1.10    api.jocheojeda.com
This is incredibly useful for:
- Testing websites locally before going live
- Testing different server configurations without changing public DNS
- Redirecting domains during development or troubleshooting
- Blocking certain websites by pointing them to 127.0.0.1
Why This Matters for Development
By modifying your hosts file, you can work on multiple websites locally, all running on the same machine but accessible via different domain names. This perfectly mimics how virtual hosting works on real servers, but without needing to change any public DNS records.
This technique saved me when my blog server was failing. I could test everything locally using my actual domain name in the browser, making sure everything was working correctly before changing any public DNS settings.
Conclusion
Understanding DNS and how to manipulate it locally via the hosts file is a powerful skill for any developer or system administrator. It allows you to test complex multi-domain setups without affecting your live environment, and can be a lifesaver when troubleshooting server issues.
In future posts, I’ll dive deeper into server virtualization and how to efficiently manage multiple web applications on a single server.
About Us
YouTube
https://www.youtube.com/c/JocheOjedaXAFXAMARINC
Our sites
Let’s discuss your XAF
https://www.udemy.com/course/microsoft-ai-extensions/
Our free A.I courses on Udemy

by Joche Ojeda | Apr 20, 2024 | C#
Finding Out the Invoking Methods in .NET
In .NET, it’s possible to find out the methods that are invoking a specific method. This can be particularly useful when you don’t have the source code available. One way to achieve this is by throwing an exception and examining the call stack. Here’s how you can do it:
Throwing an Exception
First, within the method of interest, you need to throw an exception. Here’s an example:
public void MethodOfInterest()
{
    throw new Exception("MethodOfInterest was called");
}
Catching the Exception
Next, you need to catch the exception in a higher level method that calls the method of interest:
public void InvokingMethod()
{
    try
    {
        MethodOfInterest();
    }
    catch (Exception ex)
    {
        Console.WriteLine(ex.StackTrace);
    }
}
In the catch block, we print the stack trace of the exception to the console. The stack trace is a string that represents a stack of method calls that leads to the location where the exception was thrown.
Examining the Call Stack
The call stack is a list of all the methods that were in the process of execution at the time the exception was thrown. By examining the call stack, you can see which methods were invoking the method of interest.
Here’s an example of what a call stack might look like:
at Namespace.MethodOfInterest() in C:\Path\To\File.cs:line 10
at Namespace.InvokingMethod() in C:\Path\To\File.cs:line 20
In this example, InvokingMethod was the method that invoked MethodOfInterest.
Conclusion
By throwing an exception and examining the call stack, you can find out which methods are invoking a specific method in .NET. This can be a useful debugging tool, especially when you don’t have the source code available.

by Joche Ojeda | Apr 18, 2024 | network, Uncategorized
In today’s digital age, ensuring the security of our online activities and expanding the capabilities of our home networks are more important than ever. Two powerful tools that can help you achieve these goals are OpenVPN and DD-WRT. Here’s a straightforward guide to understanding what these technologies are and how they can be beneficial.
What is OpenVPN?
OpenVPN is a software application that allows you to create a secure connection over the internet between your computer and a server. Think of it as a protective tunnel for your internet traffic, shielding your data from prying eyes. This is particularly useful if you often use public Wi-Fi networks, which can be less secure and more vulnerable to hacking. By using OpenVPN, you can ensure that your sensitive information, such as passwords and personal details, are encrypted and safe from cyber threats.
Key Benefits of OpenVPN:
- Security: Encrypts your internet connection to provide enhanced security.
- Privacy: Masks your IP address, which helps keep your online activities private.
- Accessibility: Allows you to access websites and services that may be restricted in your area.
What is DD-WRT?
DD-WRT is a type of firmware that can replace the default firmware on your wireless router. Firmware is essentially the operating system that runs on your router, managing everything from network traffic to security features. Many factory-installed firmwares provide only basic functionalities. DD-WRT, on the other hand, is an open-source alternative that boosts your router’s capabilities significantly.
Key Benefits of DD-WRT:
- Enhanced Performance: Improves Wi-Fi signal strength and extends the range of your network.
- Advanced Features: Offers features like bandwidth monitoring, access controls, and the ability to set up a virtual private network (VPN).
- Customization: Allows more control over your network’s behavior and settings.
Why Combine OpenVPN with DD-WRT?
Using OpenVPN in conjunction with DD-WRT can transform your router into a powerful gateway that secures your entire home’s internet traffic. By installing OpenVPN on a DD-WRT router, you can ensure that all data passing through your router is encrypted, which adds an extra layer of security to every device connected to your network.
How Can You Get Started?
Setting up OpenVPN and DD-WRT might sound daunting, but there are plenty of resources and guides available to help you. Many communities and forums are dedicated to DD-WRT and OpenVPN, where you can find detailed instructions and get advice from experienced users. Additionally, considering a professional setup might be a good idea if you’re not comfortable undertaking the installation yourself.
Troubleshooting Common OpenVPN Issues on DD-WRT Routers
DD-WRT routers are popular for their robust features and flexibility compared to standard firmware shipped with wireless routers. However, setting up advanced features like an OpenVPN client can sometimes lead to errors if not configured correctly. Two common issues encountered during OpenVPN setups on DD-WRT routers are: unrecognized options in the configuration and errors related to Data Channel Offload (DCO). Here, we’ll walk through solutions to these problems, ensuring a smoother VPN experience.
Issue 1: Unrecognized Option “block-outside-dns“
Problem Description:
The error “Options error: Unrecognized option or missing or extra parameter(s) in [PUSH-OPTIONS]:3: block-outside-dns (2.6.10)” typically indicates that the OpenVPN client on DD-WRT does not recognize or support the `block-outside-dns` directive. This directive is commonly used on Windows clients to prevent DNS leaks but is not applicable or necessary for DD-WRT setups.
Solution Steps:
- Access Your VPN Server Configuration: Log into your OpenVPN server where your VPN configuration files are stored. This might be a PiVPN setup on a Raspberry Pi or any other Linux-based server running OpenVPN.
- Modify the Server Configuration:
- Restart the OpenVPN Service: Apply the changes by restarting the OpenVPN service with
sudo systemctl restart openvpn@server.
- Verify on DD-WRT: Reconnect the DD-WRT router to your VPN to ensure the error does not reappear.
Issue 2: Error Installing Key Material in DCO
Problem Description:
The error “Impossible to install key material in DCO: No such file or directory” refers to problems involving the Data Channel Offload feature, which is intended to enhance VPN performance by offloading certain processing tasks from the CPU.
Solution Steps:
- Check VPN Configuration Files: Ensure all necessary certificates and keys (CA certificate, client certificate, and client key) are correctly placed and accurately referenced in your DD-WRT’s VPN configuration.
- Disable DCO (If Unnecessary):
- DCO might not be supported adequately by all hardware or DD-WRT builds. To disable DCO, access the VPN configuration file on your router via the administration interface.
- Look for any DCO-related directives and disable them (comment out or remove). You can disable DCO by using the following line to the additional configuration section of your OpenVPN configuration
disable-dco
- Firmware Update: Confirm that your DD-WRT firmware is up to date, as updates may include fixes and enhancements for VPN functionalities.
- Check File Paths and Permissions: Use SSH to connect to your router and verify that all referenced files in your VPN configuration exist at the specified paths and have appropriate permissions.
- Consult Community Forums: If the issue persists, the DD-WRT community forums are a valuable resource for troubleshooting specific to your router model and firmware version.
Final Thoughts
Troubleshooting VPN issues on DD-WRT can be complex, but resolving these common errors can greatly enhance your network’s functionality and security. Ensuring that your VPN configuration is appropriate for your specific router and keeping your system up-to-date are critical steps in maintaining a secure and efficient network.
In conclusion, both OpenVPN and DD-WRT are excellent tools to enhance the security and functionality of your home network. Whether you’re looking to protect your personal information or simply want to boost your internet connection across your household, these technologies offer practical solutions that are worth considering. Embrace these tools to take control of your digital home environment and enjoy a safer, more efficient online experience.