
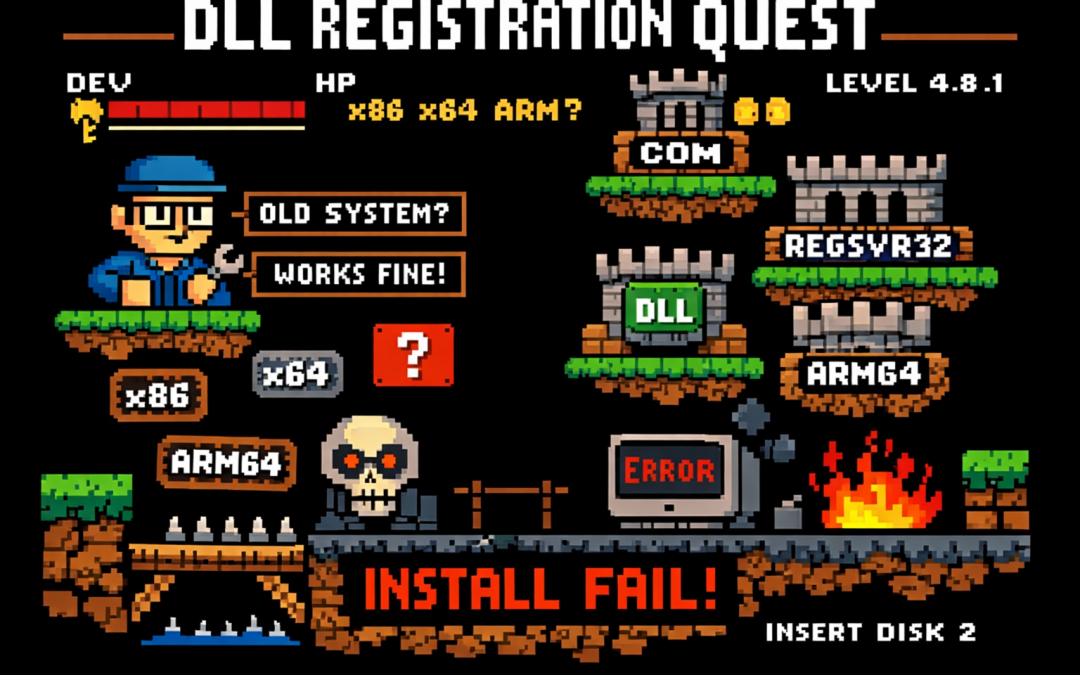
by Joche Ojeda | Jan 15, 2026 | DLLs, netframework
Most .NET developers eventually face it.
A project that targets .NET Framework 4.7.2, uses video and audio components, depends on vendor SDKs, and mixes managed code, native DLLs, and legacy decisions.
In other words: a brownfield project.
This is the kind of system that still runs real businesses, even if it doesn’t fit neatly into modern slides about containers and self-contained deployments.
And it’s also where many developers discover — usually the hard way — that deployment is not just copying the Release folder and hoping for the best.
The Myth: “Just Copy the EXE”
I’ve seen this mindset for years:
“It works on my machine. Just copy the EXE and the DLLs to the client.”
Sometimes it works. Often it doesn’t.
And when it fails, it fails in the most frustrating ways:
- Silent crashes
- Missing assembly errors
- COM exceptions that appear only on client machines
- Video or audio features that break minutes after startup
The real issue isn’t the DLL.
The real issue is that most developers don’t understand how .NET Framework actually resolves assemblies.
How I Learned This the Hard Way (XPO + Pervasive, 2006)
The first time I truly understood this was around 2006, while writing a custom XPO provider for Pervasive 7.
At the time, the setup was fairly typical:
- A .NET Framework application
- Using DevExpress XPO
- Talking to Pervasive SQL
- The Pervasive .NET provider lived under Program Files
- It was not registered in the GAC
On my development machine, everything worked.
On another machine? File not found. Or worse: a crash when XPO tried to initialize the provider.
The “fix” everyone used back then was almost ritual:
“Copy the Pervasive provider DLL into the same folder as the EXE.”
And suddenly… it worked.
That was my first real encounter with assembly probing — even though I didn’t know the name yet.
How Assembly Resolution Really Works in .NET Framework
.NET Framework does not scan your disk.
It does not care that a DLL exists under Program Files.
It follows a very strict resolution order.
1. Already Loaded Assemblies
If the assembly is already loaded in the current AppDomain, the CLR reuses it.
Simple.
2. Application Base Directory
Next, the CLR looks in the directory where the EXE lives.
This single rule explains years of “just copy the DLL next to the EXE” folklore.
In the Pervasive case, copying the provider locally worked because it entered the application base probing path.
3. Private Probing Paths
This is where things get interesting.
In app.config, you can extend the probing logic:
<runtime>
  <assemblyBinding xmlns="urn:schemas-microsoft-com:asm.v1">
    <probing privatePath="lib;providers;drivers" />
  </assemblyBinding>
</runtime>
This tells the runtime:
“If you don’t find the assembly in the EXE folder, also look in these subfolders.”
Important details many developers miss:
- Paths are relative to the EXE
- No recursive search
- Every folder must be explicitly listed
4. Global Assembly Cache (GAC)
Only after probing the application paths does the CLR look in the GAC, and only if:
- The assembly is strong-named
- The reference includes that strong name
Two common misconceptions:
- A DLL being “installed on the system” does not matter
- Non–strong-named assemblies are never loaded from the GAC
5. AssemblyResolve: The Last-Chance Hook
If the CLR cannot find an assembly using any of the rules above, it fires:
AppDomain.CurrentDomain.AssemblyResolve
This happens at runtime, exactly when the assembly is needed.
That’s why:
- The app may start fine
- The crash happens later
- Video or database features fail “randomly”
Why Video and Audio Projects Amplify the Pain
Projects that deal with video codecs, audio pipelines, hardware acceleration, and vendor SDKs are especially vulnerable because:
- Assemblies load late
- Managed code pulls native DLLs
- Bitness matters (x86 vs x64)
- Licensing logic often lives outside managed code
The failure doesn’t happen at startup. It happens when the feature is first used.
The Final Step: Building a Real Installer
Eventually, I stopped pretending that copying files was enough.
I built a proper installer.
Even though today I often use the Visual Studio Installer Projects extension, for this legacy application I went with a WiX-based installer. Not because it was fashionable — but because it forced me to be explicit.
An installer asks uncomfortable questions:
- Which assemblies belong in the GAC?
- Which must live next to the EXE?
- Which native DLLs must be deployed together?
- Which dependencies only worked because Visual Studio copied them silently?
I had to inspect every file I was adding and make a conscious decision:
- Shared, strong-named → GAC
- App-local or version-sensitive → EXE folder
- Native dependencies → exact placement matters
The installer didn’t magically fix the application.
It revealed the truth about it.
The Real Lesson of Brownfield Work
Legacy projects don’t fail because they’re old.
They fail because nobody understands them anymore.
Once you understand assembly probing, GAC rules, runtime loading, and deployment boundaries, brownfield systems stop being mysterious.
They become predictable.
What’s Next: COM (Yes, That COM)
This application doesn’t stop at managed assemblies.
It also depends heavily on COM components.
The next article will focus entirely on that world: what COM components really are, why they survived for decades, and how to work with them safely as a .NET developer.
If assembly probing was the first reality check, COM is the one that separates “it runs on my machine” from “this can be deployed.”
by Joche Ojeda | Jan 8, 2026 | netframework
If you’ve ever worked on a traditional .NET Framework application — the kind that predates .NET Core and .NET 5+ — this story may feel painfully familiar.
I’m talking about classic .NET Framework 4.x applications (4.0, 4.5, 4.5.1, 4.5.2, 4.6, 4.6.1, 4.6.2, 4.7, 4.7.1, 4.7.2, 4.8, and the final release 4.8.1). These systems often live long, productive lives… and accumulate interesting technical debt along the way.
This particular system is written in C# and relies heavily on COM components to render video, audio, and PDF content. Under the hood, many of these components are based on technologies like DirectShow filters, ActiveX controls, or other native COM DLLs.
And that’s where the story begins.
The Setup: COM, DirectShow, and Registration
Unlike managed .NET assemblies, COM components don’t just live quietly next to your executable. They need to be registered in the system registry so Windows knows:
- What CLSID they expose
- Which DLL implements that CLSID
- Whether it’s 32-bit or 64-bit
- How it should be activated
For DirectShow-based components (very common for video/audio playback in legacy apps), registration is usually done manually during development using regsvr32.
Example:
regsvr32 MyVideoFilter.dll
To unregister:
regsvr32 /u MyVideoFilter.dll
Important detail that bites a lot of people:
- 32-bit DLLs must be registered using:
C:\Windows\SysWOW64\regsvr32.exe My32BitFilter.dll
- 64-bit DLLs must be registered using:
C:\Windows\System32\regsvr32.exe My64BitFilter.dll
Yes — the folder names are historically confusing.
Development Works… Until It Doesn’t
So here’s the usual development flow:
- You register all required COM DLLs on your development machine
- Visual Studio runs the app
- Video plays, audio works, PDFs render
- Everyone is happy
Then comes the next step.
“Let’s build an installer.”
The Installer Paradox
This is where the real battle story begins.
Your application installer (MSI, InstallShield, WiX, Inno Setup — pick your poison) now needs to:
- Copy the COM DLLs
- Register them during installation
- Unregister them during uninstall
This seems reasonable… until you test it.
The Loop From Hell
Here’s what happens in practice:
- You install your app for testing
- The installer registers its own copies of the COM DLLs
- Your development environment was using different copies (maybe newer, maybe local builds)
- Suddenly:
- Your source build stops working
- Visual Studio debugging breaks
- Another app on your machine mysteriously fails
Then you:
- Uninstall the app
- The installer unregisters the DLLs
- Now nothing works anymore
So you re-register the DLLs manually for development…
…and the cycle repeats.
The Battle Story: It Only Worked… Until It Didn’t
For a long time, this system appeared to work just fine.
Video played. Audio rendered. PDFs opened. No obvious errors.
What we didn’t realize at first was a dangerous hidden assumption:
The system only worked on machines where a previous version had already been installed.
Those older installations had left COM DLLs registered in the system — quietly, globally, and invisibly.
So when we deployed a new version without removing the old one:
- Everything looked fine
- No one suspected missing registrations
- The system passed casual testing
The illusion broke the moment we tried a clean installation.
On a fresh machine — no previous version, no leftover registry entries — the application suddenly failed:
- Components didn’t initialize
- Media rendering silently broke
- COM activation errors appeared only in Event Viewer
The installer claimed it was registering the DLLs.
In reality, it wasn’t doing it correctly — or at least not in the way the application actually needed.
That’s when we realized we were standing on years of accidental state.
Why This Happens
The core problem is simple but brutal:
COM registration is global and mutable.
There is:
- One registry
- One CLSID mapping
- One “active” DLL per COM component
Your development environment, your installed application, and your installer are all fighting over the same global state.
.NET Framework itself isn’t the villain here — it’s just sitting on top of an old Windows integration model that predates modern isolation concepts.
A New Player Enters: ARM64
Just when we thought the problem space was limited to x86 vs x64, another variable entered the scene.
One of the development machines was ARM64.
Modern Windows on ARM adds a new layer of complexity:
- ARM64 native processes
- x64 emulation
- x86 emulation on top of ARM64
From the outside, everything looks like it’s running on x64.
Under the hood, it’s not that simple.
Why This Makes COM Registration Worse
COM registration is architecture-specific:
- x86 DLLs register under one view of the registry
- x64 DLLs register under another
- ARM64 introduces yet another execution context
On Windows ARM:
System32 contains ARM64 binariesSysWOW64 contains x86 binaries- x64 binaries often run through emulation layers
So now the questions multiply:
- Which
regsvr32 did the installer call?
- Was it ARM64, x64, or x86?
- Did the app run natively, or under emulation?
- Did the COM DLL match the process architecture?
The result is a system where:
- Some things work on Intel machines
- Some things work on ARM machines
- Some things only work if another version was installed first
At this point, debugging stops being logical and starts being archaeological.
Why This Is So Common in .NET Framework 4.x Apps
Many enterprise and media-heavy applications built on:
- .NET Framework 4.0–4.8.1
- WinForms or WPF
- DirectShow or ActiveX components
were designed in an era where:
- Global COM registration was normal
- Side-by-side isolation was rare
- “Just register the DLL” was accepted practice
These systems work, but they’re fragile — especially on developer machines.
Where the Article Is Going Next
In the rest of this article series, we’ll look at:
- Why install-time registration is often a mistake
- How to isolate development vs runtime environments
- Techniques like:
- Dedicated dev VMs
- Registration-free COM (where possible)
- App-local COM deployment
- Clear ownership rules for installers
- How to survive (and maintain) legacy .NET Framework systems without losing your sanity
If you’ve ever broken your own development environment just by testing your installer — you’re not alone.
This is the cost of living at the intersection of managed code and unmanaged history.

by Joche Ojeda | Oct 5, 2025 | Oqtane, ORM
In this article, I’ll show you what to do after you’ve obtained and opened an Oqtane solution. Specifically, we’ll go through two different ways to set up your database for the first time.
- Using the setup wizard — this option appears automatically the first time you run the application.
- Configuring it manually — by directly editing the
appsettings.json file to skip the wizard.
Both methods achieve the same result. The only difference is that, if you configure the database manually, you won’t see the setup wizard during startup.
Step 1: Running the Application for the First Time
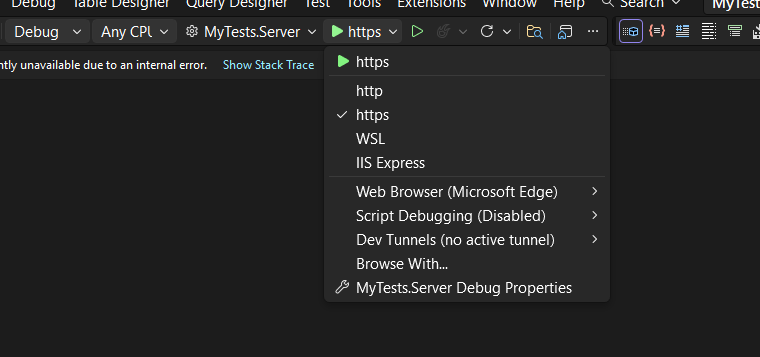
Once your solution is open in Visual Studio, set the Server project as the startup project. Then run it just as you would with any ASP.NET Core application.
You’ll notice several run options — I recommend using the HTTPS version instead of IIS Express (I stopped using IIS Express because it doesn’t work well on ARM-based computers).
When you run the application for the first time and your settings file is still empty, you’ll see the Database Setup Wizard. As shown in the image, the wizard allows you to select a database provider and configure it through a form.
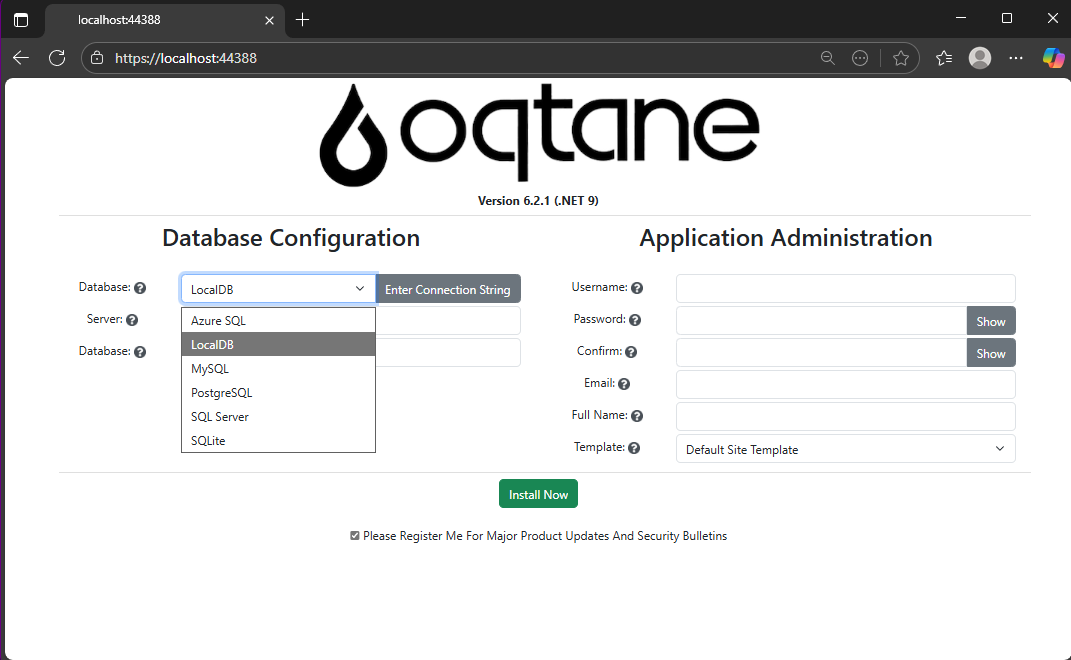
There’s also an option to paste your connection string directly. Make sure it’s a valid Entity Framework Core connection string.
After that, fill in the admin user’s details — username, email, and password — and you’re done. Once this process completes, you’ll have a working Oqtane installation.
Step 2: Setting Up the Database Manually
If you prefer to skip the wizard, you can configure the database manually. To do this, open the appsettings.json file and add the following parameters:
{
"DefaultDBType": "Oqtane.Database.Sqlite.SqliteDatabase, Oqtane.Server",
"ConnectionStrings": {
  "DefaultConnection": "Data Source=Oqtane-202510052045.db;"
},
"Installation": {
  "DefaultAlias": "https://localhost:44388",
  "HostPassword": "MyPasswor25!",
  "HostEmail": "joche@myemail.com",
  "SiteTemplate": "",
  "DefaultTheme": "",
  "DefaultContainer": ""
}
}
Here you need to specify:
- The database provider type (e.g., SQLite, SQL Server, PostgreSQL, etc.)
- The connection string
- The admin email and password for the first user — known as the host user (essentially the root or super admin).
This is the method I usually use now since I’ve set up Oqtane so many times recently that I’ve grown tired of the wizard. However, if you’re new to Oqtane, the wizard is a great way to get started.
Wrapping Up
That’s it for this setup guide! By now, you should have a running Oqtane installation configured either through the setup wizard or manually via the configuration file. Both methods give you a solid foundation to start exploring what Oqtane can do.
In the next article, we’ll dive into the Oqtane backend, exploring how the framework handles modules, data, and the underlying architecture that makes it flexible and powerful. Stay tuned — things are about to get interesting!

by Joche Ojeda | Oct 5, 2025 | Blazor, Oqtane
I’m returning to work with Oqtane, and to be honest, we’re exploring new frameworks at the office that will help us expand our market reach. We specialize in a specific type of development and don’t want to move too far away from .NET in general. We’ve used Oqtane in the past—I’ve even installed it on Linux—but I want to conduct fresh research: try it again, get a feel for it, and potentially move some production-sized projects to it.
There’s a lot to understand about Oqtane, especially because it’s a truly layered development framework where you need to work across different layers. This will be the first article in a series that serves both as a guide and as personal mental notes of things I don’t want to forget the next time I develop prototypes or production sites with Oqtane.
The first topic we’ll review is how to install Oqtane and start it up. Here are the steps I usually follow.
Choosing Your Development Approach
The first question you should ask yourself is: How do you want to develop? There are a few ways to do it, and I’ve watched every video about Oqtane over the last two weeks. Here are your three main options:
Option 1: Clone or Download from GitHub (Main Branch)
The old way was to simply go to GitHub and clone or download the source from the main branch, which is actually the development branch. This approach allows you to see all the ins and outs of the framework—how each module is created and registered, how they use repositories, and so on.
However, this may be overwhelming at the beginning. To be honest, since Oqtane has several layers, I got confused many times and wrote code in the wrong layer more than once.
Option 2: Download a Specific Version from Releases
You can also download just the version you want from the releases section on GitHub. This gives you a stable, versioned codebase to work with.
Option 3: Use .NET Templates (Recommended for Beginners)
Now they have .NET new templates available. If you’re a beginner, I strongly suggest installing the .NET templates and using dotnet new because the structure is much more simplified.
However, if you want to understand the ins and outs of the application framework and how it works, I strongly recommend taking a look at the source code.
Installation Resources
Source Code Repository
You can get the source code at this GitHub repository:
https://github.com/oqtane/oqtane.framework
In the README of that repository, you’ll find instructions for installing the templates.
Using the Templates
Here’s an example of how to install and use the templates:
dotnet new install Oqtane.Application.Template
dotnet new oqtane-app -o MyCompany.MyProject
cd MyCompany.MyProject
dotnet build
cd Server
dotnet run
Release Versions
In the releases section, you can find the source code for each specific version:
https://github.com/oqtane/oqtane.framework/releases
Solution Structure
The solution structure differs depending on which installation method you choose:
Solution structure when created with the templates:
MyTests/
├── Client/                    # Blazor WebAssembly Client Project
├── Server/                    # ASP.NET Core Server Project
├── Shared/                    # Shared Models and Contracts
├── MyTests.sln               # Solution File
└── README.md                 # Solution Documentation
Solution structure when using the downloaded source:
OqtaneFramework/
├── .github/                      # GitHub configuration and issue templates
├── Oqtane.Application/           # .NET Template for creating new Oqtane apps
├── Oqtane.Client/                # Core Blazor WebAssembly client framework
├── Oqtane.Server/                # Core ASP.NET server framework
├── Oqtane.Shared/                # Shared contracts, models, and interfaces
├── Oqtane.Maui/                  # MAUI mobile application support
├── Oqtane.Package/               # NuGet packaging and distribution tools
├── Oqtane.Updater/               # Framework update/upgrade utilities
├── screenshots/                  # Marketing and documentation images
├── Oqtane.sln                    # Main solution file
├── Oqtane.Maui.sln              # MAUI solution file
├── Oqtane.Updater.sln           # Updater solution file
└── Configuration Files           # Build, deployment, and Git configs
In the source you will also find the source of around 27+ admin modules, which is a great way to learn how to create your own modules.
- Dashboard
- Files (file management)
- Jobs (background job scheduler)
- Languages (localization)
- Login/Register/Reset (authentication)
- Logs (system logging viewer)
- ModuleDefinitions (module registry)
- Modules (module instance management)
- Pages (page/route management)
- Profiles (user profiles)
- RecycleBin (soft delete management)
- Roles (role-based access)
- Search/SearchResults
- Settings (system configuration)
- Site/Sites (multi-tenancy)
- SQL (database query tool)
- SystemInfo (diagnostics)
- Themes (theme management)
- Upgrade (version upgrades)
- UrlMappings (URL rewriting)
- Users (user management)
- Visitors (analytics)
Wrapping Up
That’s it for this first article! We’ve covered the basics of getting Oqtane installed and understanding the different approaches you can take depending on your experience level and project needs.
In the next article, we’ll dive into starting up the application and picking a database provider. This is where things get interesting, as Oqtane supports multiple database options, and understanding how to configure them properly is crucial for getting your project off the ground.
Stay tuned, and happy coding!
This is part 1 of a series documenting my journey with Oqtane. Check back soon for the next installment.

by Joche Ojeda | Jan 21, 2025 | Uncategorized
During my recent AI research break, I found myself taking a walk down memory lane, reflecting on my early career in data analysis and ETL operations. This journey brought me back to an interesting aspect of software development that has evolved significantly over the years: the management of shared libraries.
The VB6 Era: COM Components and DLL Hell
My journey began with Visual Basic 6, where shared libraries were managed through COM components. The concept seemed straightforward: store shared DLLs in the Windows System directory (typically C:\Windows\System32) and register them using regsvr32.exe. The Windows Registry kept track of these components under HKEY_CLASSES_ROOT.
However, this system had a significant flaw that we now famously know as “DLL Hell.” Let me share a practical example: Imagine you have two systems, A and B, both using Crystal Reports 7. If you uninstall either system, the other would break because the shared DLL would be removed. Version control was primarily managed by location, making it a precarious system at best.
Enter .NET Framework: The GAC Revolution
When Microsoft introduced the .NET Framework, it brought a sophisticated solution to these problems: the Global Assembly Cache (GAC). Located at C:\Windows\Microsoft.NET\assembly\ (for .NET 4.0 and later), the GAC represented a significant improvement in shared library management.
The most revolutionary aspect was the introduction of assembly identity. Instead of relying solely on filenames and locations, each assembly now had a unique identity consisting of:
- Simple name (e.g., “MyCompany.MyLibrary”)
- Version number (e.g., “1.0.0.0”)
- Culture information
- Public key token
A typical assembly full name would look like this:
MyCompany.MyLibrary, Version=1.0.0.0, Culture=neutral, PublicKeyToken=b77a5c561934e089
This robust identification system meant that multiple versions of the same assembly could coexist peacefully, solving many of the versioning nightmares that plagued the VB6 era.
The Modern Approach: Private Dependencies
Fast forward to 2025, and we’re living in what I call the “brave new world” of .NET for multi-operative systems. The landscape has changed dramatically. Storage is no longer the premium resource it once was, and the trend has shifted away from shared libraries toward application-local deployment.
Modern applications often ship with their own private version of the .NET runtime and dependencies. This approach eliminates the risks associated with shared components and gives applications complete control over their runtime environment.
Reflection on Technology Evolution
While researching Blazor’s future and seeing discussions about Microsoft’s technology choices, I’m reminded that technology evolution is a constant journey. Organizations move slowly in production environments, and that’s often for good reason. The shift from COM components to GAC to private dependencies wasn’t just a technical evolution – it was a response to real-world problems and changing resources.
This journey from VB6 to modern .NET reveals an interesting pattern: sometimes the best solution isn’t sharing resources but giving each application its own isolated environment. It’s fascinating how the decreasing cost of storage and increasing need for reliability has transformed our approach to dependency management.
As I return to my AI research, this trip down memory lane serves as a reminder that while technology constantly evolves, understanding its history helps us appreciate the solutions we have today and better prepare for the challenges of tomorrow.