by Joche Ojeda | May 5, 2025 | Uncategorized
Integration testing is a critical phase in software development where individual modules are combined and tested as a group. In our accounting system, we’ve created a robust integration test that demonstrates how the Document module and Chart of Accounts module interact to form a functional accounting system. In this post, I’ll explain the components and workflow of our integration test.
The Architecture of Our Integration Test
Our integration test simulates a small retail business’s accounting operations. Let’s break down the key components:
Test Fixture Setup
The AccountingIntegrationTests class contains all our test methods and is decorated with the [TestFixture] attribute to identify it as a NUnit test fixture. The Setup method initializes our services and data structures:
[SetUp]
public async Task Setup()
{
    // Initialize services
    _auditService = new AuditService();
    _documentService = new DocumentService(_auditService);
    _transactionService = new TransactionService();
    _accountValidator = new AccountValidator();
    _accountBalanceCalculator = new AccountBalanceCalculator();

    // Initialize storage
    _accounts = new Dictionary<string, AccountDto>();
    _documents = new Dictionary<string, IDocument>();
    _transactions = new Dictionary<string, ITransaction>();

    // Create Chart of Accounts
    await SetupChartOfAccounts();
}
This method:
- Creates instances of our services
- Sets up in-memory storage for our entities
- Calls
SetupChartOfAccounts() to create our initial chart of accounts
Chart of Accounts Setup
The SetupChartOfAccounts method creates a basic chart of accounts for our retail business:
private async Task SetupChartOfAccounts()
{
    // Clear accounts dictionary in case this method is called multiple times
    _accounts.Clear();

    // Assets (1xxxx)
    await CreateAccount("Cash", "10100", AccountType.Asset, "Cash on hand and in banks");
    await CreateAccount("Accounts Receivable", "11000", AccountType.Asset, "Amounts owed by customers");
    // ... more accounts

    // Verify all accounts are valid
    foreach (var account in _accounts.Values)
    {
        bool isValid = _accountValidator.ValidateAccount(account);
        Assert.That(isValid, Is.True, $"Account {account.AccountName} validation failed");
    }

    // Verify expected number of accounts
    Assert.That(_accounts.Count, Is.EqualTo(17), "Expected 17 accounts in chart of accounts");
}
This method:
- Creates accounts for each category (Assets, Liabilities, Equity, Revenue, and Expenses)
- Validates each account using our
AccountValidator
- Ensures we have the expected number of accounts
Individual Transaction Tests
We have separate test methods for specific transaction types:
Purchase of Inventory
CanRecordPurchaseOfInventory demonstrates recording a supplier invoice:
[Test]
public async Task CanRecordPurchaseOfInventory()
{
    // Arrange - Create document
    var document = new DocumentDto { /* properties */ };

    // Act - Create document, transaction, and entries
    var createdDocument = await _documentService.CreateDocumentAsync(document, TEST_USER);
    // ... create transaction and entries

    // Validate transaction
    var isValid = await _transactionService.ValidateTransactionAsync(
        createdTransaction.Id, ledgerEntries);

    // Assert
    Assert.That(isValid, Is.True, "Transaction should be balanced");
}
This test:
- Creates a document for our inventory purchase
- Creates a transaction linked to that document
- Creates ledger entries (debiting Inventory, crediting Accounts Payable)
- Validates that the transaction is balanced (debits = credits)
Sale to Customer
CanRecordSaleToCustomer demonstrates recording a customer sale:
[Test]
public async Task CanRecordSaleToCustomer()
{
    // Similar pattern to inventory purchase, but with sale-specific entries
    // ...

    // Create ledger entries - a more complex transaction with multiple entries
    var ledgerEntries = new List<ILedgerEntry>
    {
        // Cash received
        // Sales revenue
        // Cost of goods sold
        // Reduce inventory
    };

    // Validate transaction
    // ...
}
This test is more complex, recording both the revenue side (debit Cash, credit Sales Revenue) and the cost side (debit Cost of Goods Sold, credit Inventory) of a sale.
Full Accounting Cycle Test
The CanExecuteFullAccountingCycle method ties everything together:
[Test]
public async Task CanExecuteFullAccountingCycle()
{
    // Run these in a defined order, with clean account setup first
    _accounts.Clear();
    _documents.Clear();
    _transactions.Clear();

    await SetupChartOfAccounts();

    // 1. Record inventory purchase
    await RecordPurchaseOfInventory();

    // 2. Record sale to customer
    await RecordSaleToCustomer();

    // 3. Record utility expense
    await RecordBusinessExpense();

    // 4. Create a payment to supplier
    await RecordPaymentToSupplier();

    // 5. Verify account balances
    await VerifyAccountBalances();
}
This test:
- Starts with a clean state
- Records a sequence of business operations
- Verifies the final account balances
Mock Account Balance Calculator
The MockAccountBalanceCalculator is a crucial part of our test that simulates how a real database would work:
public class MockAccountBalanceCalculator : AccountBalanceCalculator
{
    private readonly Dictionary<string, AccountDto> _accounts;
    private readonly Dictionary<Guid, List<LedgerEntryDto>> _ledgerEntriesByTransaction = new();
    private readonly Dictionary<Guid, decimal> _accountBalances = new();

    public MockAccountBalanceCalculator(
        Dictionary<string, AccountDto> accounts,
        Dictionary<string, ITransaction> transactions)
    {
        _accounts = accounts;

        // Create mock ledger entries for each transaction
        InitializeLedgerEntries(transactions);

        // Calculate account balances based on ledger entries
        CalculateAllBalances();
    }

    // Methods to initialize and calculate
    // ...
}
This class:
- Takes our accounts and transactions as inputs
- Creates a collection of ledger entries for each transaction
- Calculates account balances based on these entries
- Provides methods to query account balances and ledger entries
The InitializeLedgerEntries method creates a collection of ledger entries for each transaction:
private void InitializeLedgerEntries(Dictionary<string, ITransaction> transactions)
{
    // For inventory purchase
    if (transactions.TryGetValue("InventoryPurchase", out var inventoryPurchase))
    {
        var entries = new List<LedgerEntryDto>
        {
            // Create entries for this transaction
            // ...
        };
        _ledgerEntriesByTransaction[inventoryPurchase.Id] = entries;
    }

    // For other transactions
    // ...
}
The CalculateAllBalances method processes these entries to calculate account balances:
private void CalculateAllBalances()
{
    // Initialize all account balances to zero
    foreach (var account in _accounts.Values)
    {
        _accountBalances[account.Id] = 0m;
    }

    // Process each transaction's ledger entries
    foreach (var entries in _ledgerEntriesByTransaction.Values)
    {
        foreach (var entry in entries)
        {
            if (entry.EntryType == EntryType.Debit)
            {
                _accountBalances[entry.AccountId] += entry.Amount;
            }
            else // Credit
            {
                _accountBalances[entry.AccountId] -= entry.Amount;
            }
        }
    }
}
This approach closely mirrors how a real accounting system would work with a database:
- Ledger entries are stored in collections (similar to database tables)
- Account balances are calculated by processing all relevant entries
- The calculator provides methods to query this data (similar to a repository)
Balance Verification
The VerifyAccountBalances method uses our mock calculator to verify account balances:
private async Task VerifyAccountBalances()
{
// Create mock balance calculator
var mockBalanceCalculator = new MockAccountBalanceCalculator(_accounts, _transactions);
// Verify individual account balances
decimal cashBalance = mockBalanceCalculator.CalculateAccountBalance(
_accounts["Cash"].Id,
_testDate.AddDays(15)
);
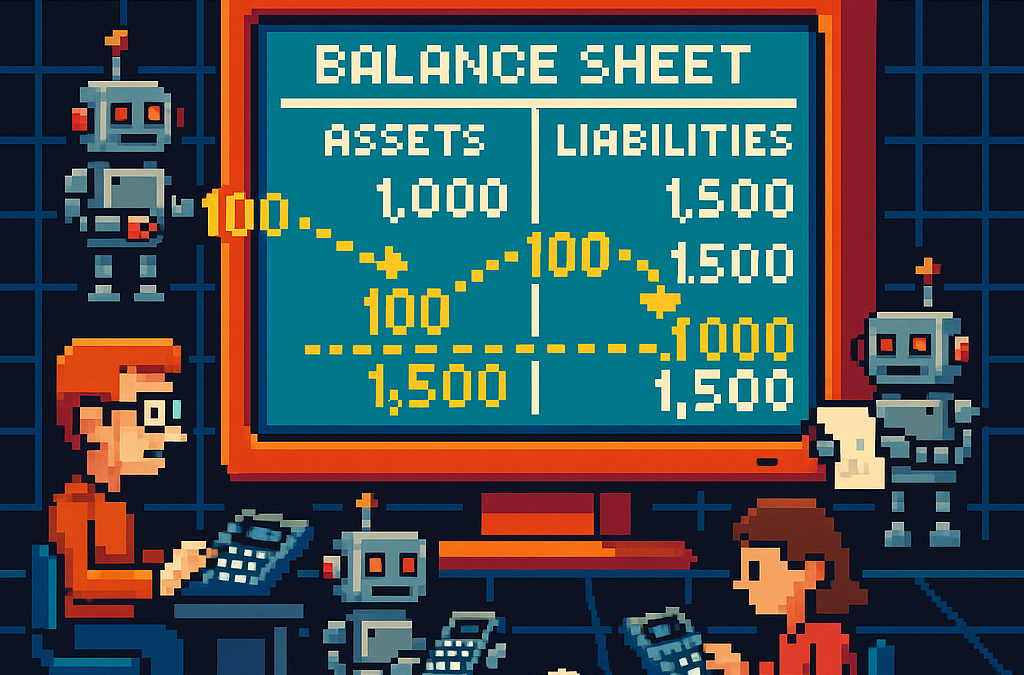
Assert.That(cashBalance, Is.EqualTo(-2750m), "Cash balance is incorrect");
// ... verify other account balances
// Also verify the accounting equation
// ...
}
The Benefits of Our Collection-Based Approach
Our redesigned MockAccountBalanceCalculator offers several advantages:
- Data-Driven: All calculations are based on collections of data, not hardcoded values.
- Flexible: New transactions can be added easily without changing calculation logic.
- Maintainable: If transaction amounts change, we only need to update them in one place.
- Realistic: This approach closely mirrors how a real database-backed accounting system would work.
- Extensible: We can add support for more complex queries like filtering by date range.
The Goals of Our Integration Test
Our integration test serves several important purposes:
- Verify Module Integration: Ensures that the Document module and Chart of Accounts module work correctly together.
- Validate Business Workflows: Confirms that standard accounting workflows (purchasing, sales, expenses, payments) function as expected.
- Ensure Data Integrity: Verifies that all transactions maintain balance (debits = credits) and that account balances are accurate.
- Test Double-Entry Accounting: Confirms that our system properly implements double-entry accounting principles where every transaction affects at least two accounts.
- Validate Accounting Equation: Ensures that the fundamental accounting equation (Assets = Liabilities + Equity + (Revenues – Expenses)) remains balanced.
Conclusion
This integration test demonstrates the core functionality of our accounting system using a data-driven approach that closely mimics a real database. By simulating a retail business’s transactions and storing them in collections, we’ve created a realistic test environment for our double-entry accounting system.
The collection-based approach in our MockAccountBalanceCalculator allows us to test complex accounting logic without an actual database, while still ensuring that our calculations are accurate and our accounting principles are sound.
While this test uses in-memory collections rather than a database, it provides a strong foundation for testing the business logic of our accounting system in a way that would translate easily to a real-world implementation.
Repo
egarim/SivarErp: Open Source ERP
About Us
YouTube
https://www.youtube.com/c/JocheOjedaXAFXAMARINC
Our sites
Let’s discuss your XAF
This call/zoom will give you the opportunity to define the roadblocks in your current XAF solution. We can talk about performance, deployment or custom implementations. Together we will review you pain points and leave you with recommendations to get your app back in track
https://calendly.com/bitframeworks/bitframeworks-free-xaf-support-hour
Our free A.I courses on Udemy

by Joche Ojeda | May 5, 2025 | Uncategorized
The chart of accounts module is a critical component of any financial accounting system, serving as the organizational structure that categorizes financial transactions. As a software developer working on accounting applications, understanding how to properly implement a chart of accounts module is essential for creating robust and effective financial management solutions.
What is a Chart of Accounts?
Before diving into the implementation details, let’s clarify what a chart of accounts is. In accounting, the chart of accounts is a structured list of all accounts used by an organization to record financial transactions. These accounts are categorized by type (assets, liabilities, equity, revenue, and expenses) and typically follow a numbering system to facilitate organization and reporting.
Core Components of a Chart of Accounts Module
Based on best practices in financial software development, a well-designed chart of accounts module should include:
1. Account Entity
The fundamental entity in the module is the account itself. A properly designed account entity should include:
- A unique identifier (typically a GUID in modern systems)
- Account name
- Account type (asset, liability, equity, revenue, expense)
- Official account code (often used for regulatory reporting)
- Reference to financial statement lines
- Audit information (who created/modified the account and when)
- Archiving capability (for soft deletion)
2. Account Type Enumeration
Account types are typically implemented as an enumeration:
public enum AccountType
{
    Asset = 1,
    Liability = 2,
    Equity = 3,
    Revenue = 4,
    Expense = 5
}
This enumeration serves as more than just a label—it determines critical business logic, such as whether an account normally has a debit or credit balance.
3. Account Validation
A robust chart of accounts module includes validation logic for accounts:
- Ensuring account codes follow the required format (typically numeric)
- Verifying that account codes align with their account types (e.g., asset accounts starting with “1”)
- Validating consistency between account types and financial statement lines
- Checking that account names are not empty and are unique
4. Balance Calculation
One of the most important functions of the chart of accounts module is calculating account balances:
- Point-in-time balance calculations (as of a specific date)
- Period turnover calculations (debit and credit movement within a date range)
- Determining if an account has any transactions
Implementation Best Practices
When implementing a chart of accounts module, consider these best practices:
1. Use Interface-Based Design
Implement interfaces like IAccount to define the contract for account entities:
public interface IAccount : IEntity, IAuditable, IArchivable
{
    Guid? BalanceAndIncomeLineId { get; set; }
    string AccountName { get; set; }
    AccountType AccountType { get; set; }
    string OfficialCode { get; set; }
}
2. Apply SOLID Principles
- Single Responsibility: Separate account validation, balance calculation, and persistence
- Open-Closed: Design for extension without modification (e.g., for custom account types)
- Liskov Substitution: Ensure derived implementations can substitute base interfaces
- Interface Segregation: Create focused interfaces for different concerns
- Dependency Inversion: Depend on abstractions rather than concrete implementations
3. Implement Comprehensive Validation
Account validation should be thorough to prevent data inconsistencies:
public bool ValidateAccountCode(string accountCode, AccountType accountType)
{
    if (string.IsNullOrWhiteSpace(accountCode))
        return false;

    // Account code should be numeric
    if (!accountCode.All(char.IsDigit))
        return false;

    // Check that account code prefix matches account type
    char expectedPrefix = GetExpectedPrefix(accountType);
    return accountCode.Length > 0 && accountCode[0] == expectedPrefix;
}
4. Integrate with Financial Reporting
The chart of accounts should map accounts to financial statement lines for reporting:
- Balance sheet lines
- Income statement lines
- Cash flow statement lines
- Equity statement lines
Testing the Chart of Accounts Module
Comprehensive testing is crucial for a chart of accounts module:
- Unit Tests: Test individual components like account validation and balance calculation
- Integration Tests: Verify that components work together properly
- Business Rule Tests: Ensure business rules like “assets have debit balances” are enforced
- Persistence Tests: Confirm correct database interaction
Common Challenges and Solutions
When working with a chart of accounts module, you might encounter:
1. Account Code Standardization
Challenge: Different jurisdictions may have different account coding requirements.
Solution: Implement a flexible validation system that can be configured for different accounting standards.
2. Balance Calculation Performance
Challenge: Balance calculations for accounts with many transactions can be slow.
Solution: Implement caching strategies and consider storing period-end balances for faster reporting.
3. Account Hierarchies
Challenge: Supporting account hierarchies for reporting.
Solution: Implement a nested set model or closure table for efficient hierarchy querying.
Conclusion
A well-designed chart of accounts module is the foundation of a reliable accounting system. By following these implementation guidelines and understanding the core concepts, you can create a flexible, maintainable, and powerful chart of accounts that will serve as the backbone of your financial accounting application.
Remember that the chart of accounts is not just a technical construct—it should reflect the business needs and reporting requirements of the organization using the system. Taking time to properly design this module will pay dividends throughout the life of your application.
Repo
egarim/SivarErp: Open Source ERP
About Us
YouTube
https://www.youtube.com/c/JocheOjedaXAFXAMARINC
Our sites
Let’s discuss your XAF
This call/zoom will give you the opportunity to define the roadblocks in your current XAF solution. We can talk about performance, deployment or custom implementations. Together we will review you pain points and leave you with recommendations to get your app back in track
https://calendly.com/bitframeworks/bitframeworks-free-xaf-support-hour
Our free A.I courses on Udemy

by Joche Ojeda | Apr 28, 2025 | dotnet, Uno Platform
It’s been almost a month since I left home to attend the Microsoft MVP Summit in Seattle. I’m still on the road, currently in Athens, Greece, with numerous notes for upcoming articles. While traveling makes writing challenging, I want to maintain the order of my Uno Platform series to ensure everything makes sense for readers.
In this article, we’ll dive into the structure of an Uno Platform solution. There’s some “black magic” happening behind the scenes, so understanding how everything works will make development significantly easier.
What is Uno Platform?
Before we dive into the anatomy, let’s briefly explain what Uno Platform is. Uno Platform is an open-source framework that enables developers to build cross-platform applications from a single codebase. Using C# and XAML, you can create applications that run on Windows, iOS, Android, macOS, Linux, and WebAssembly.
Root Solution Structure
An Uno Platform solution follows a specific structure that facilitates cross-platform development. Let’s break down the key components:
Main (and only) Project
The core of an Uno Platform solution is the main shared project (in our example, “UnoAnatomy”). This project contains cross-platform code shared across all target platforms and includes:
- Assets: Contains shared resources like images and icons used across all platforms. These assets may be adapted for different screen densities and platforms as needed.
- Serialization: Here is where the JsonSerializerContext lives, Since .NET 6 serialization context allows controlling how objects are serialized through the JsonSerializerContext class. It provides ahead-of-time metadata generation for better performance and reduces reflection usage, particularly beneficial for AOT compilation scenarios like Blazor WebAssembly and native apps.
- Models: Contains business model classes representing core domain entities in your application.
- Presentation: Holds UI components including pages, controls, and views. This typically includes files like
Shell.xaml.cs and MainPage.xaml.cs that implement the application’s UI elements and layout.
- Platforms:
- • Android: Contains the Android-specific entry point (MainActivity.Android.cs) and any other Android-specific configurations or code.
- • iOS: Contains the iOS-specific entry point (Main.iOS.cs).
- • MacCatalyst: Contains the MacCatalyst-specific entry point (Main.maccatalyst.cs).
- • BrowserWasm: Contains the Browser WASM specific configurations or code.
- • Desktop: Contains the Desktop specific configurations or code.
- Services: Contains service classes implementing business logic, data access, etc. This folder often includes subfolders like:
- Strings: the purpose of this folder is to store the localized string resources for the application so it can be translated to multiple languages.
- Styles: this folder contains the styles or color configuration for the app.
Build Configuration Files
Several build configuration files in the root of the solution control the build process:
- Directory.Build.props: Contains global MSBuild properties applied to all projects.
- Directory.Build.targets: Contains global MSBuild targets for all projects.
- Directory.Packages.props: Centralizes package versions for dependency management.
- global.json: Specifies the Uno.SDK version and other .NET SDK configurations.
The Power of Uno.Sdk
One of the most important aspects of modern Uno Platform development is the Uno.Sdk, which significantly simplifies the development process.
What is Uno.Sdk?
Uno.Sdk is a specialized MSBuild SDK that streamlines Uno Platform development by providing:
- A cross-platform development experience that simplifies targeting multiple platforms from a single project
- Automatic management of platform-specific dependencies and configurations
- A simplified build process that handles the complexity of building for different target platforms
- Feature-based configuration that enables adding functionality through the UnoFeatures property
In your project file, you’ll see <Project Sdk="Uno.Sdk"> at the top, indicating that this project uses the Uno SDK rather than the standard .NET SDK.
Key Components of the Project File
TargetFrameworks
<TargetFrameworks>net9.0-android;net9.0-ios;net9.0-maccatalyst;net9.0-windows10.0.26100;net9.0-browserwasm;net9.0-desktop</TargetFrameworks>
This line specifies that your application targets:
- Android
- iOS
- macOS (via Mac Catalyst)
- Windows (Windows 10/11 with SDK version 10.0.26100)
- WebAssembly (for browser-based applications)
- Desktop (for cross-platform desktop applications)
All of these targets use .NET 9 as the base framework.
Single Project Configuration
<OutputType>Exe</OutputType>
<UnoSingleProject>true</UnoSingleProject>
OutputType: Specifies this project builds an executable applicationUnoSingleProject: Enables Uno’s single-project approach, allowing you to maintain one codebase for all platforms
Application Metadata
<ApplicationTitle>UnoAnatomy</ApplicationTitle>
<ApplicationId>com.companyname.UnoAnatomy</ApplicationId>
<ApplicationDisplayVersion>1.0</ApplicationDisplayVersion>
<ApplicationVersion>1</ApplicationVersion>
<ApplicationPublisher>joche</ApplicationPublisher>
<Description>UnoAnatomy powered by Uno Platform.</Description>
These properties define your app’s identity and metadata used in app stores and installation packages.
UnoFeatures
The most powerful aspect of Uno.Sdk is the UnoFeatures property:
<UnoFeatures>
  Material;
  Dsp;
  Hosting;
  Toolkit;
  Logging;
  Mvvm;
  Configuration;
  Http;
  Serialization;
  Localization;
  Navigation;
  ThemeService;
</UnoFeatures>
This automatically adds relevant NuGet packages for each listed feature:
- Material: Material Design UI components
- Dsp: Digital Signal Processing capabilities
- Hosting: Dependency injection and host builder pattern
- Toolkit: Community Toolkit components
- Logging: Logging infrastructure
- Mvvm: Model-View-ViewModel pattern implementation
- Configuration: Application configuration framework
- Http: HTTP client capabilities
- Serialization: Data serialization/deserialization
- Localization: Multi-language support
- Navigation: Navigation services
- ThemeService: Dynamic theme support
The UnoFeatures property eliminates the need to manually add numerous NuGet packages and ensures compatibility between components.
Benefits of the Uno Platform Structure
This structured approach to cross-platform development offers several advantages:
- Code Sharing: Most code is shared across platforms, reducing duplication and maintenance overhead.
- Platform-Specific Adaptation: When needed, the structure allows for platform-specific implementations.
- Simplified Dependencies: The Uno.Sdk handles complex dependency management behind the scenes.
- Consistent Experience: Ensures a consistent development experience across all target platforms.
- Future-Proofing: The architecture makes it easier to add support for new platforms in the future.
Conclusion
Understanding the anatomy of an Uno Platform solution is crucial for effective cross-platform development. The combination of shared code, platform-specific heads, and the powerful Uno.Sdk creates a development experience that makes it much easier to build and maintain applications across multiple platforms from a single codebase.
By leveraging this structure and the features provided by the Uno Platform, you can focus on building your application’s functionality rather than dealing with the complexities of cross-platform development.
In my next article in this series, we’ll dive deeper into the practical aspects of developing with Uno Platform, exploring how to leverage these structural components to build robust cross-platform applications.
Related articles
Getting Started with Uno Platform: First Steps and Configuration Choices | Joche Ojeda
My Adventures Picking a UI Framework: Why I Chose Uno Platform | Joche Ojeda
Exploring the Uno Platform: Handling Unsafe Code in Multi-Target Applications | Joche Ojeda
About Us
YouTube
https://www.youtube.com/c/JocheOjedaXAFXAMARINC
Our sites
Let’s discuss your XAF
This call/zoom will give you the opportunity to define the roadblocks in your current XAF solution. We can talk about performance, deployment or custom implementations. Together we will review you pain points and leave you with recommendations to get your app back in track
https://calendly.com/bitframeworks/bitframeworks-free-xaf-support-hour
Our free A.I courses on Udemy

by Joche Ojeda | Apr 2, 2025 | Testing
In the last days, I have been dealing with a chat prototype that uses SignalR. I’ve been trying to follow the test-driven development (TDD) approach as I like this design pattern. I always try to find a way to test my code and define use cases so that when I’m refactoring or writing code, as long as the tests pass, I know everything is fine.
When doing ORM-related problems, testing is relatively easy because you can set up a memory provider, have a clean database, perform your operations, and then revert to normal. But when testing APIs, there are several approaches.
Some approaches are more like unit tests where you get a controller and directly pass values by mocking them. However, I prefer tests that are more like integration tests – for example, I want to test a scenario where I send a message to a chat and verify that the message send event was real. I want to show the complete set of moving parts and make sure they work together.
In this article, I want to explore how to do this type of test with REST APIs by creating a test host server. This test host creates two important things: a handler and an HTTP client. If you use the HTTP client, each HTTP operation (POST, GET, etc.) will be sent to the controllers that are set up for the test host. For the test host, you do the same configuration as you would for any other host – you can use a startup class or add the services you need and configure them.
I wanted to do the same for SignalR chat applications. In this case, you don’t need the HTTP client; you need the handler. This means that each request you make using that handler will be directed to the hub hosted on the HTTP test host.
Here’s the code that shows how to create the test host:
// ARRANGE
// Build a test server
var hostBuilder = new HostBuilder()
    .ConfigureWebHost(webHost =>
    {
        webHost.UseTestServer();
        webHost.UseStartup<Startup>();
    });

var host = await hostBuilder.StartAsync();

//Create a test server
var server = host.GetTestServer();
And now the code for handling SignalR connections:
         // Create SignalR connection
         var connection = new HubConnectionBuilder()
             .WithUrl("http://localhost/chathub", options =>
             {
                 // Set up the connection to use the test server
                 options.HttpMessageHandlerFactory = _ => server.CreateHandler();
             })
             .Build();

         string receivedUser = null;
         string receivedMessage = null;

         // Set up a handler for received messages
         connection.On<string, string>("ReceiveMessage", (user, message) =>
         {
             receivedUser = user;
             receivedMessage = message;
         });
//if we take a closer look, we can see the creation of the test handler "server.CreateHandler"
var connection = new HubConnectionBuilder() .WithUrl("http://localhost/chathub", options =>
{
// Set up the connection to use the test server
options.HttpMessageHandlerFactory = _ => server.CreateHandler();
}) .Build();
Now let’s open a SignalR connection and see if we can connect to our test server:
          string receivedUser = null;
          string receivedMessage = null;

          // Set up a handler for received messages
          connection.On<string, string>("ReceiveMessage", (user, message) =>
          {
              receivedUser = user;
              receivedMessage = message;
          });

          // ACT
          // Start the connection
          await connection.StartAsync();

          // Send a test message through the hub
          await connection.InvokeAsync("SendMessage", "TestUser", "Hello SignalR");

          // Wait a moment for the message to be processed
          await Task.Delay(100);

          // ASSERT
          // Verify the message was received correctly
          Assert.That("TestUser"==receivedUser);
          Assert.That("Hello SignalR"== receivedMessage);

          // Clean up
          await connection.DisposeAsync();
You can find the complete source of this example here: https://github.com/egarim/TestingSignalR/blob/master/UnitTest1.cs

by Joche Ojeda | Mar 13, 2025 | netcore, Uno Platform
For the past two weeks, I’ve been experimenting with the Uno Platform in two ways: creating small prototypes to explore features I’m curious about and downloading example applications from the Uno Gallery. In this article, I’ll explain the first steps you need to take when creating an Uno Platform application, the decisions you’ll face, and what I’ve found useful so far in my journey.
Step 1: Create a New Project
I’m using Visual Studio 2022, though the extensions and templates work well with previous versions too. I have both studio versions installed, and Uno Platform works well in both.
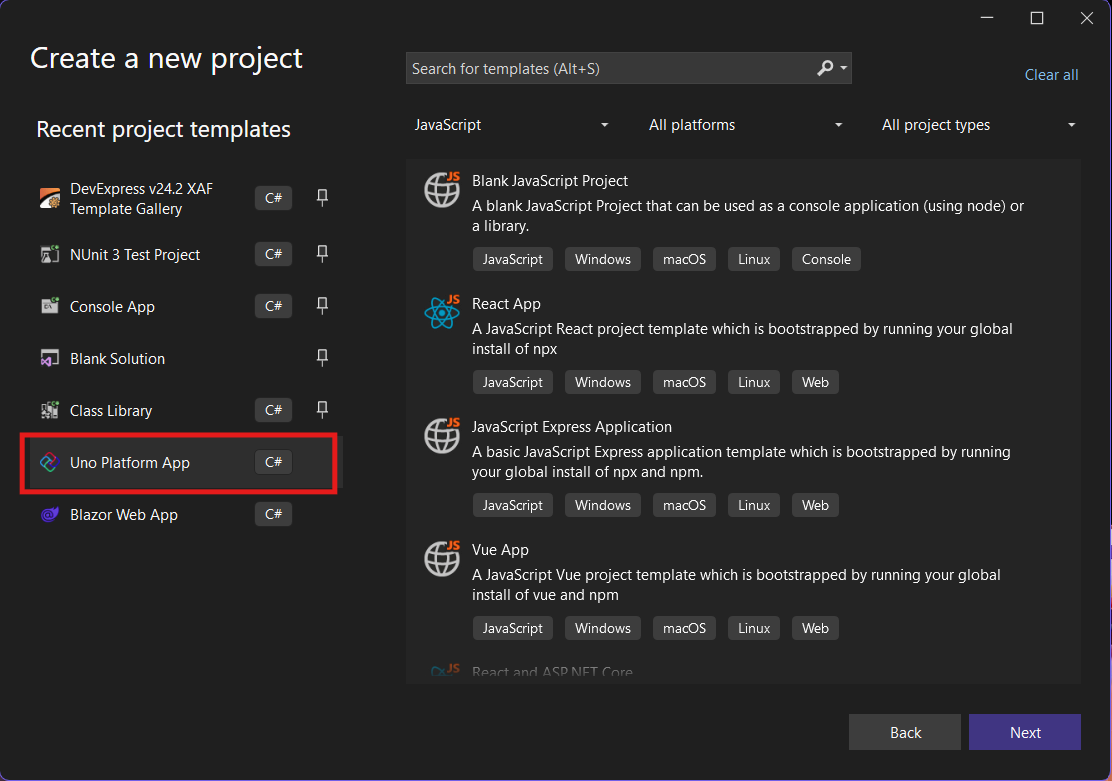
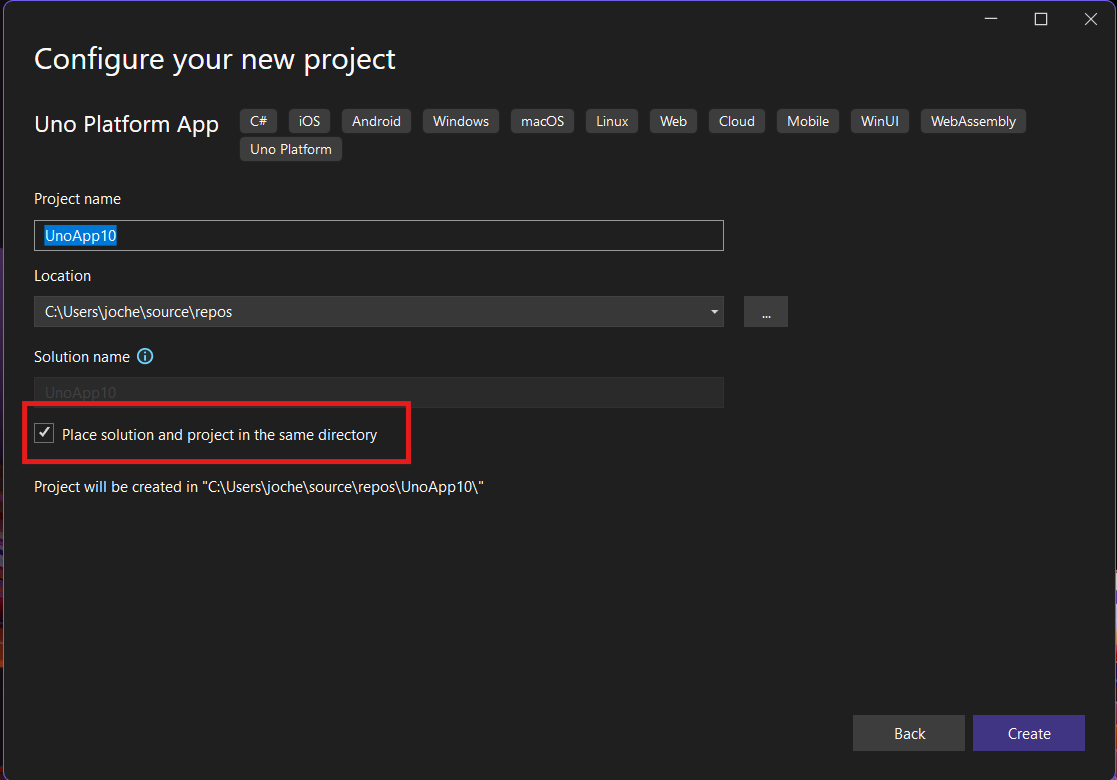
Step 2: Project Setup
After naming your project, it’s important to select “Place solution and project in the same directory” because of the solution layout requirements. You need the directory properties file to move forward. I’ll talk more about the solution structure in a future post, but for now, know that without checking this option, you won’t be able to proceed properly.
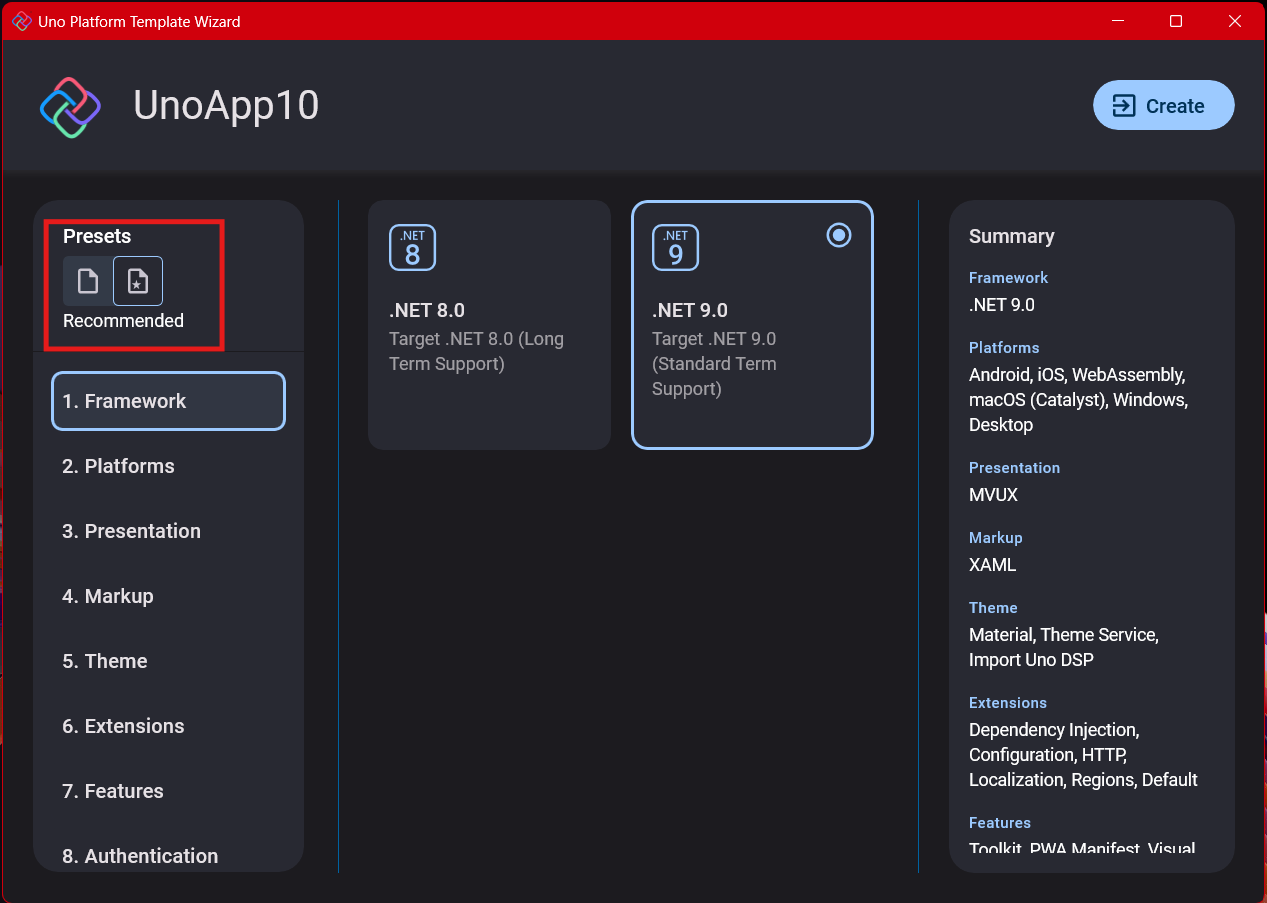
Step 3: The Configuration Wizard
The Uno Platform team has created a comprehensive wizard that guides you through various configuration options. It might seem overwhelming at first, but it’s better to have this guided approach where you can make one decision at a time.
Your first decision is which target framework to use. They recommend .NET 9, which I like, but in my test project, I’m working with .NET 8 because I’m primarily focused on WebAssembly output. Uno offers multi-threading in Web Assembly with .NET 8, which is why I chose it, but for new projects, .NET 9 is likely the better choice.
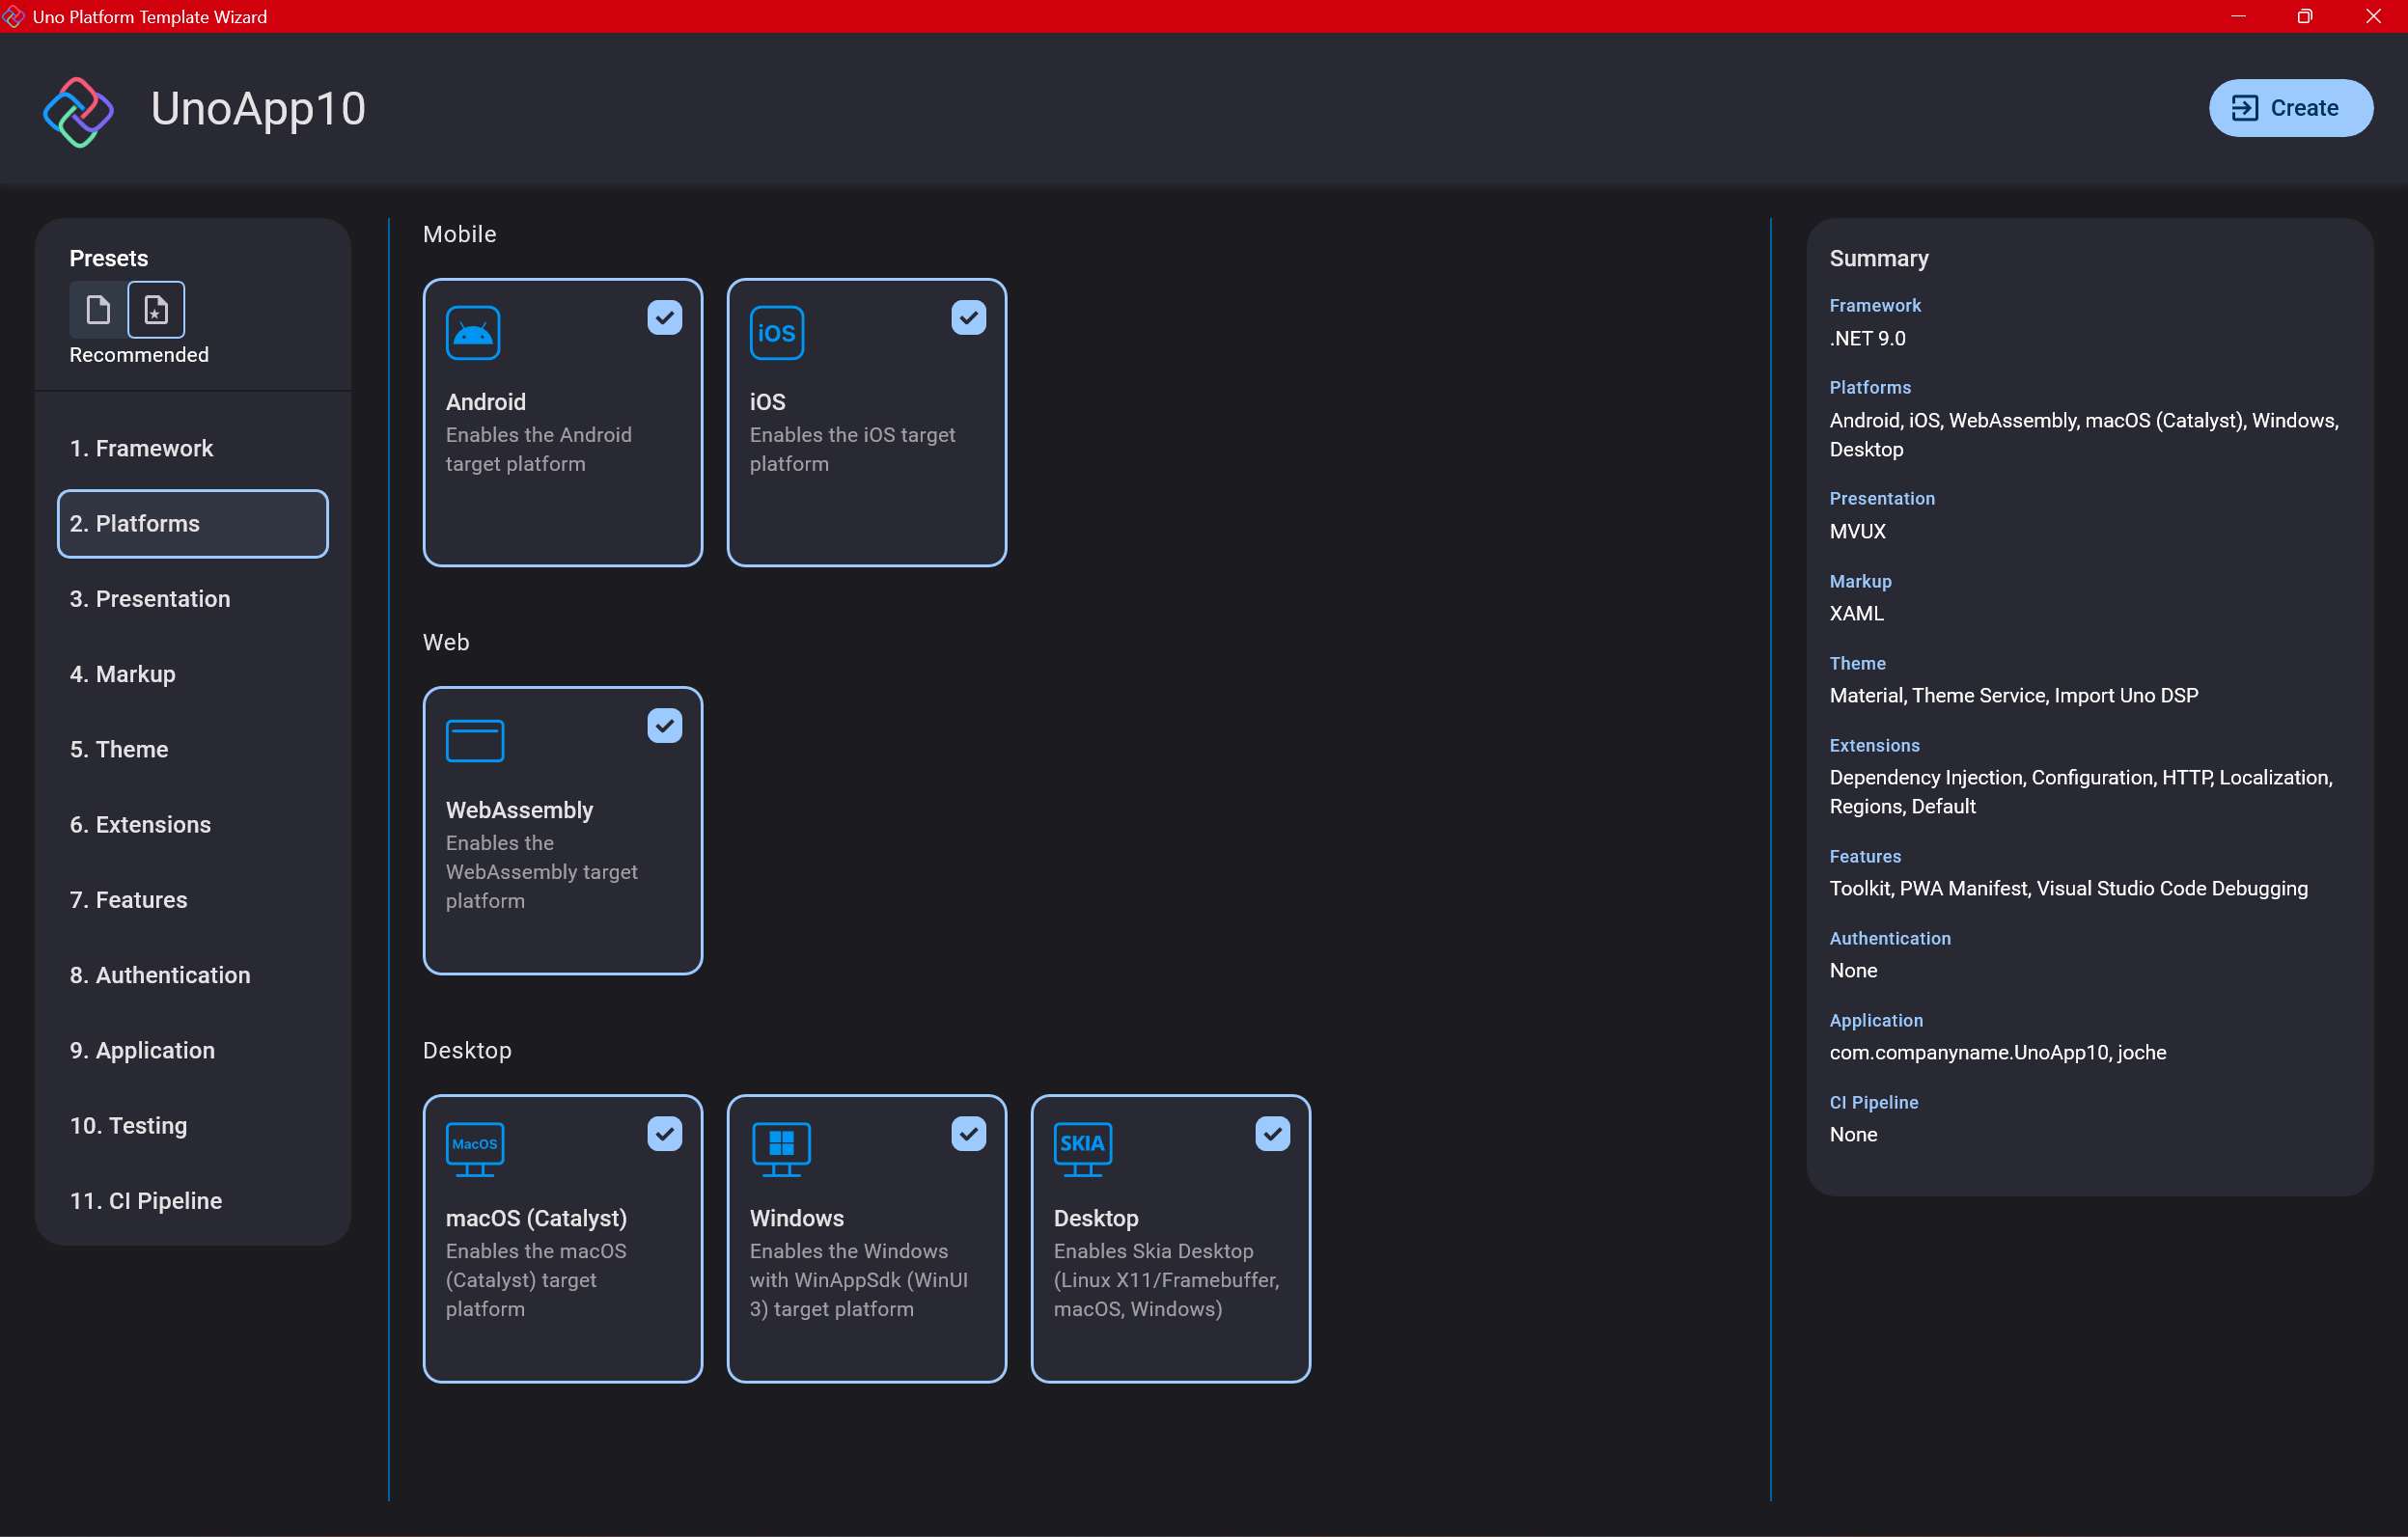
Step 4: Target Platforms
Next, you need to select which platforms you want to target. I always select all of them because the most beautiful aspect of the Uno Platform is true multi-targeting with a single codebase.
In the past (during the Xamarin era), you needed multiple projects with a complex directory structure. With Uno, it’s actually a single unified project, creating a clean solution layout. So while you can select just WebAssembly if that’s your only focus, I think you get the most out of Uno by multi-targeting.
Step 5: Presentation Pattern
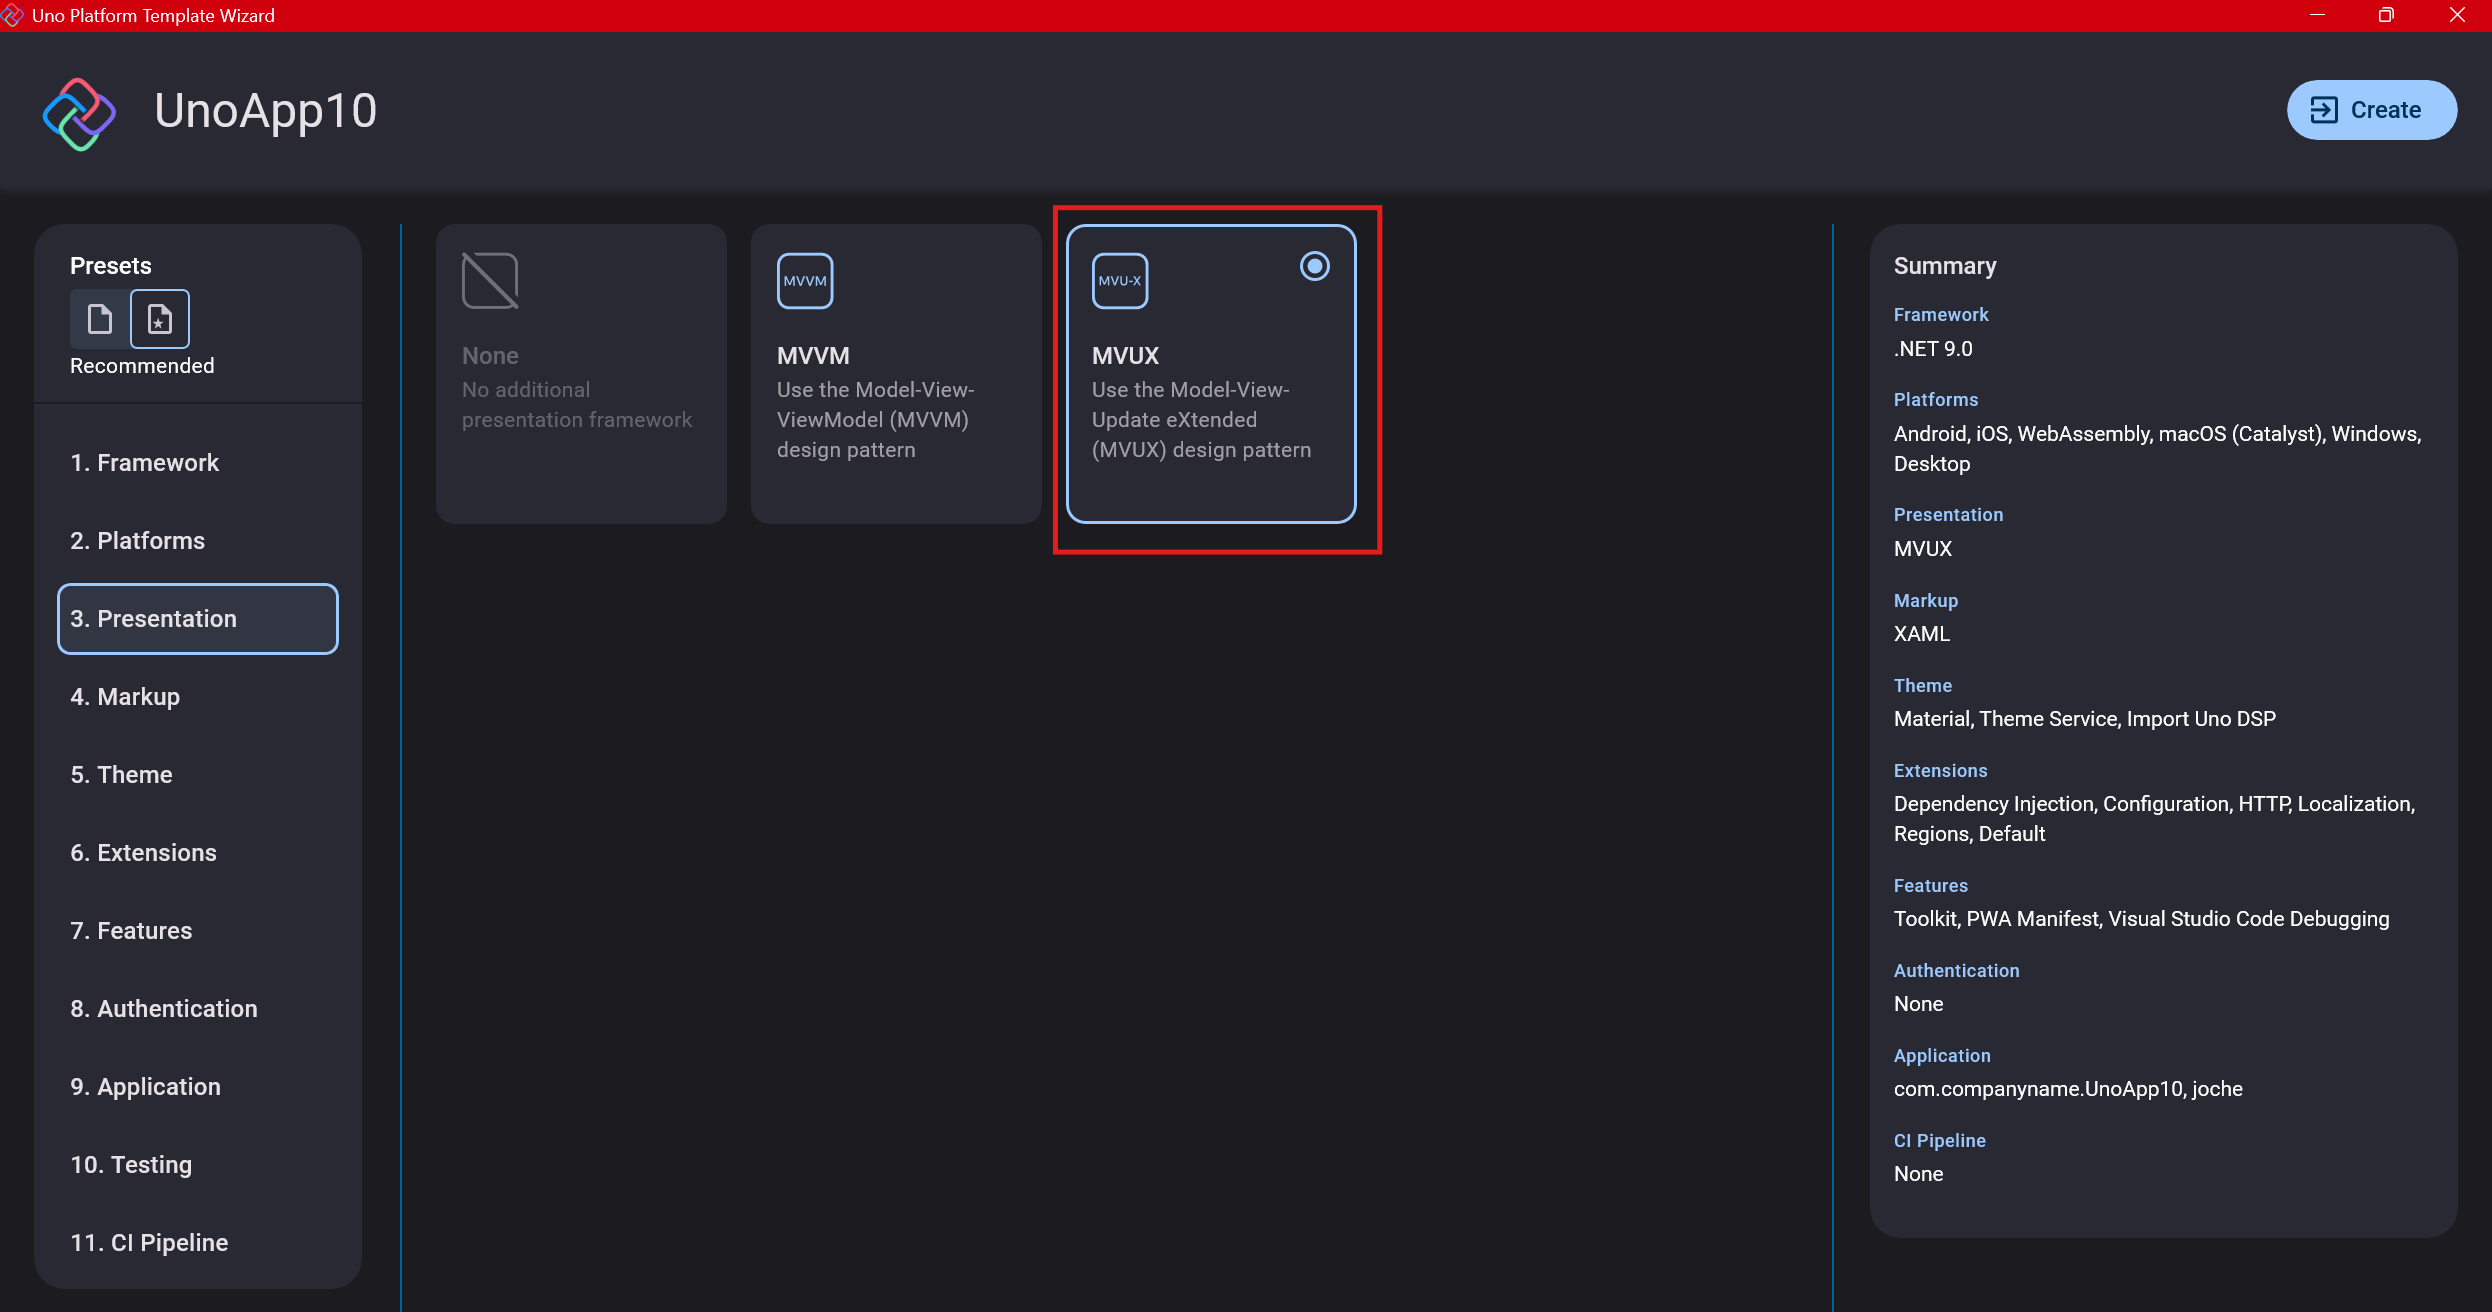
The next question is which presentation pattern you want to use. I would suggest MVUX, though I still have some doubts as I haven’t tried MVVM with Uno yet. MVVM is the more common pattern that most programmers understand, while MVUX is the new approach.
One challenge is that when you check the official Uno sample repository, the examples come in every presentation pattern flavor. Sometimes you’ll find a solution for your task in one pattern but not another, so you may need to translate between them. You’ll likely find more examples using MVVM.
Step 6: Markup Language
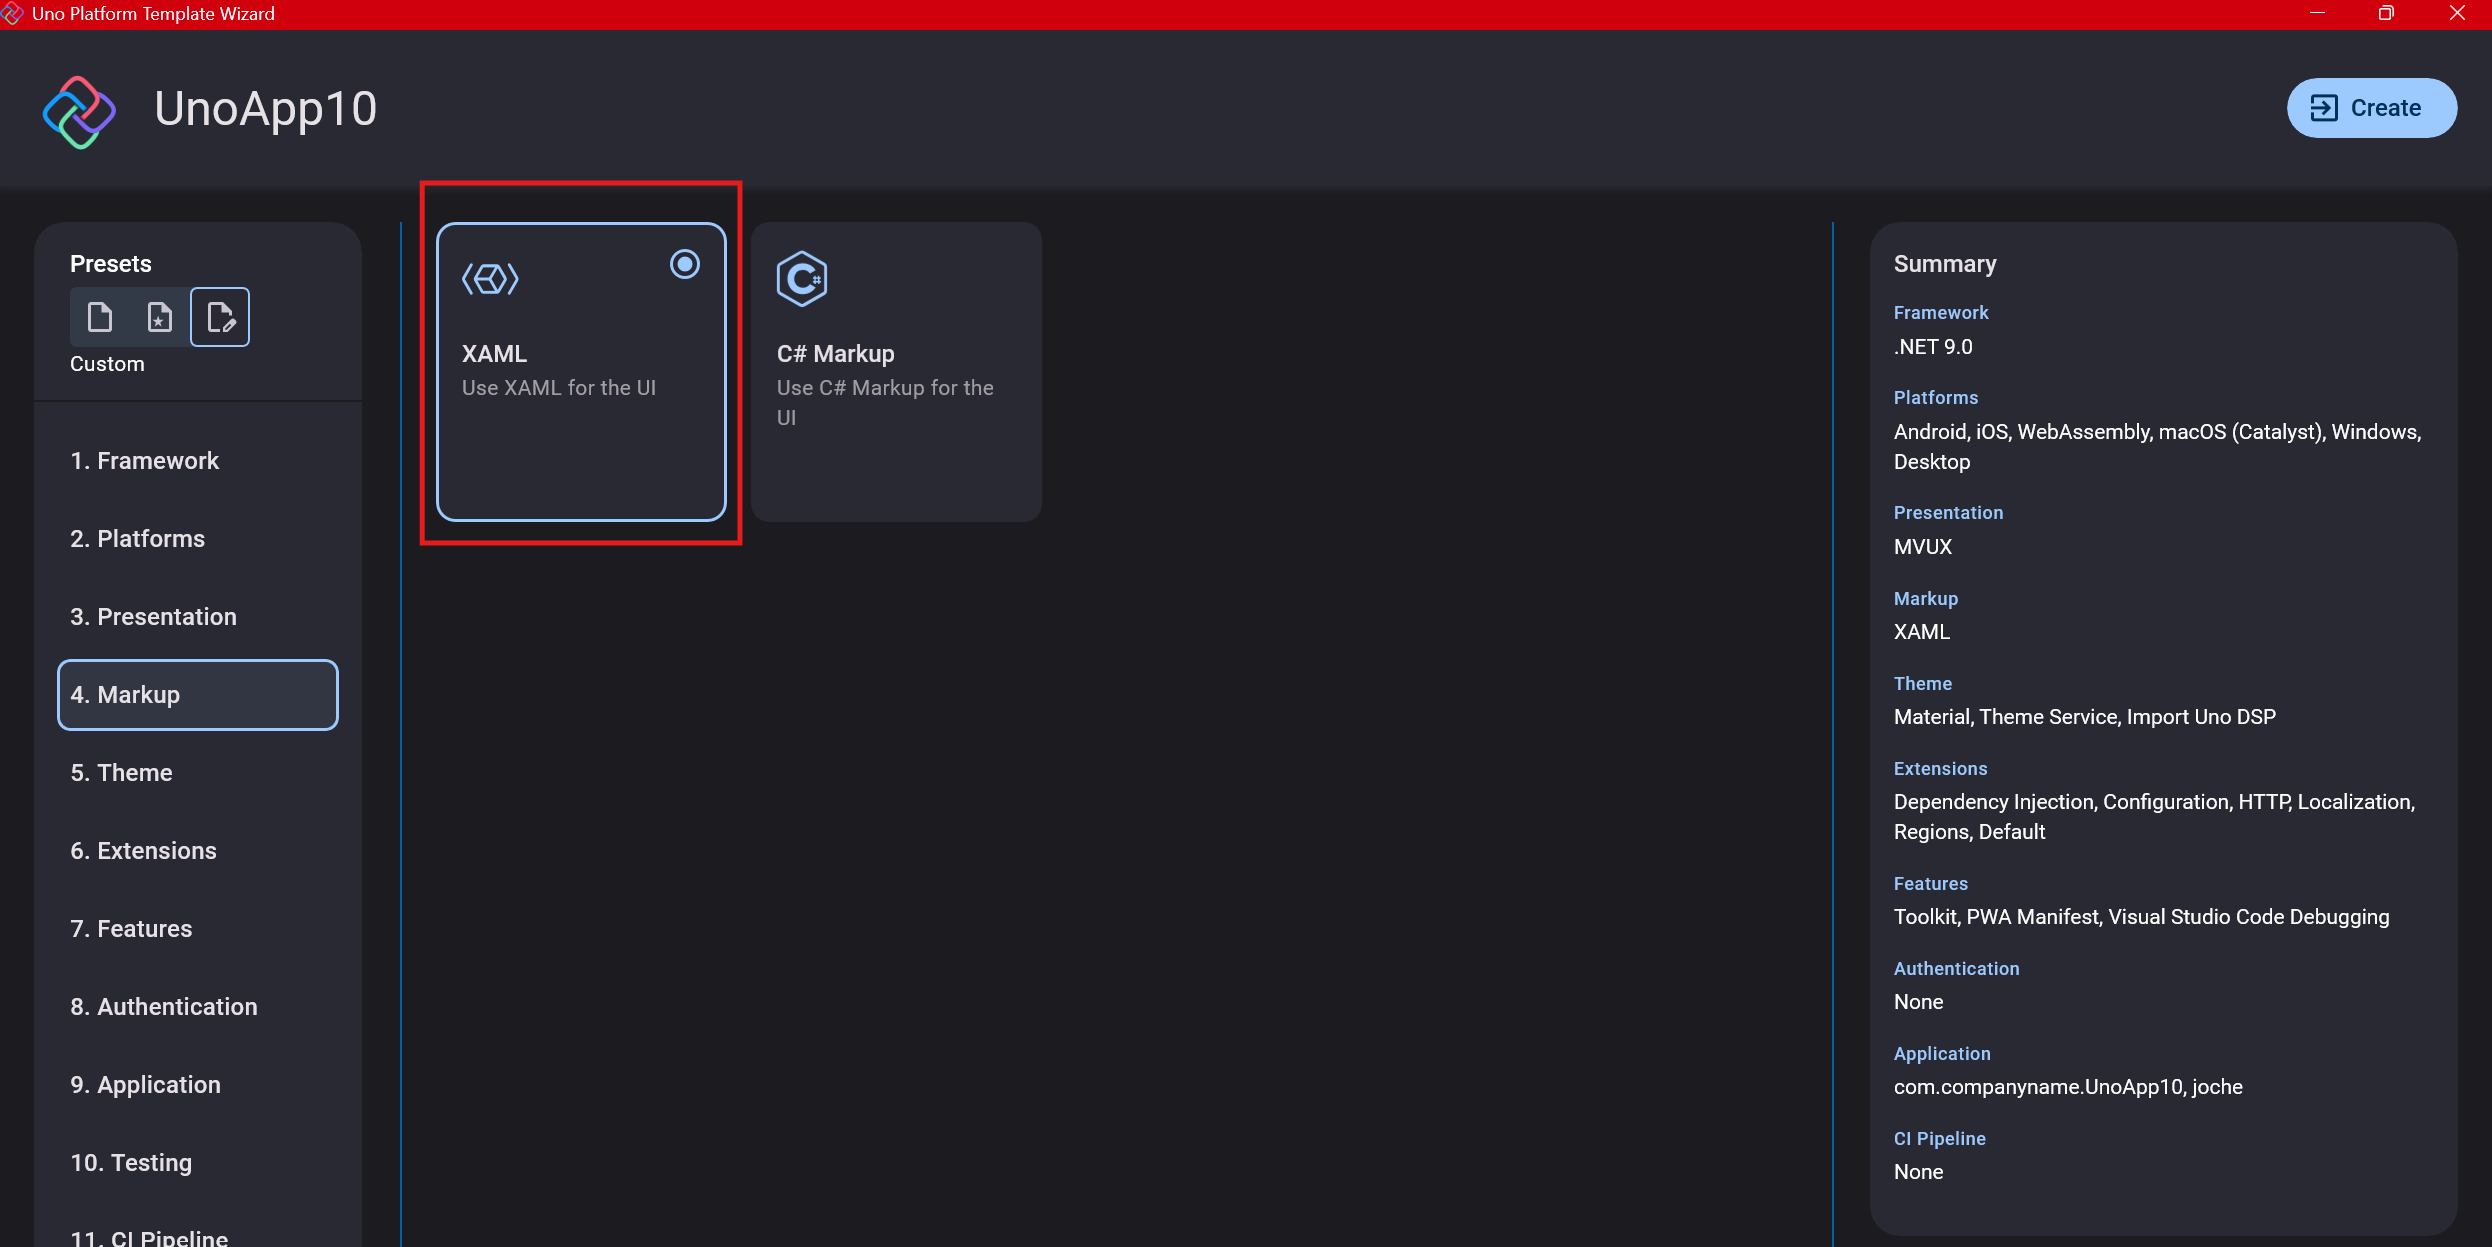
For markup, I recommend selecting XAML. In my first project, I tried using C# markup, which worked well until I reached some roadblocks I couldn’t overcome. I didn’t want to get stuck trying to solve one specific layout issue, so I switched. For beginners, I suggest starting with XAML.
Step 7: Theming
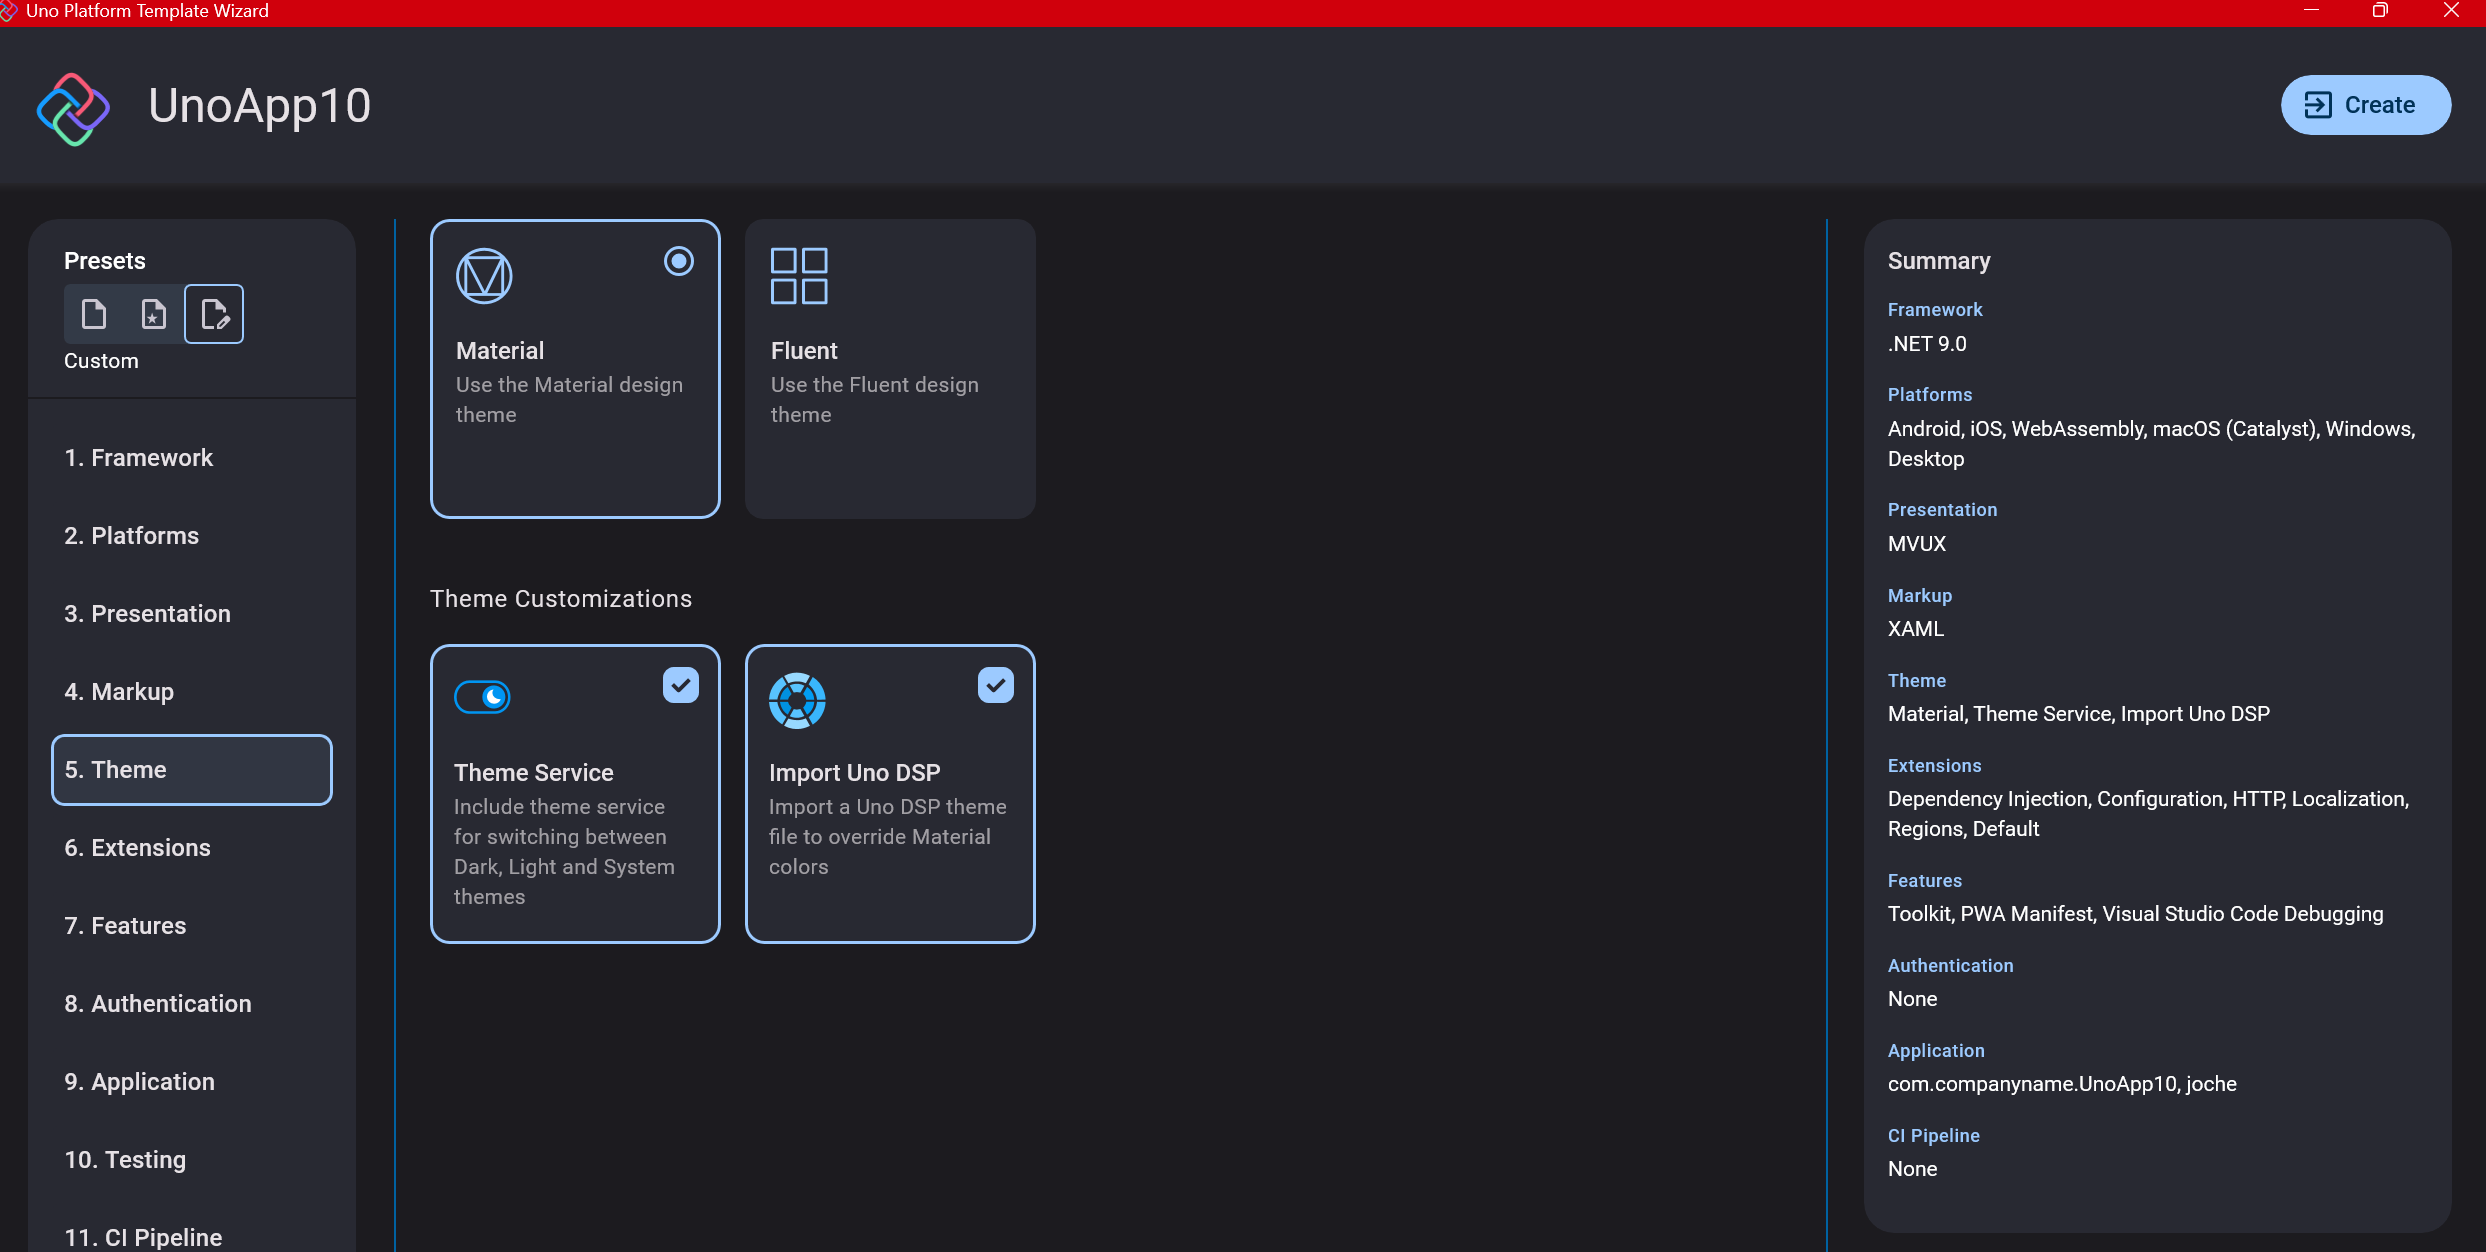
For theming, you’ll need to select a UI theme. I don’t have a strong preference here and typically stick with the defaults: using Material Design, the theme service, and importing Uno DSP.
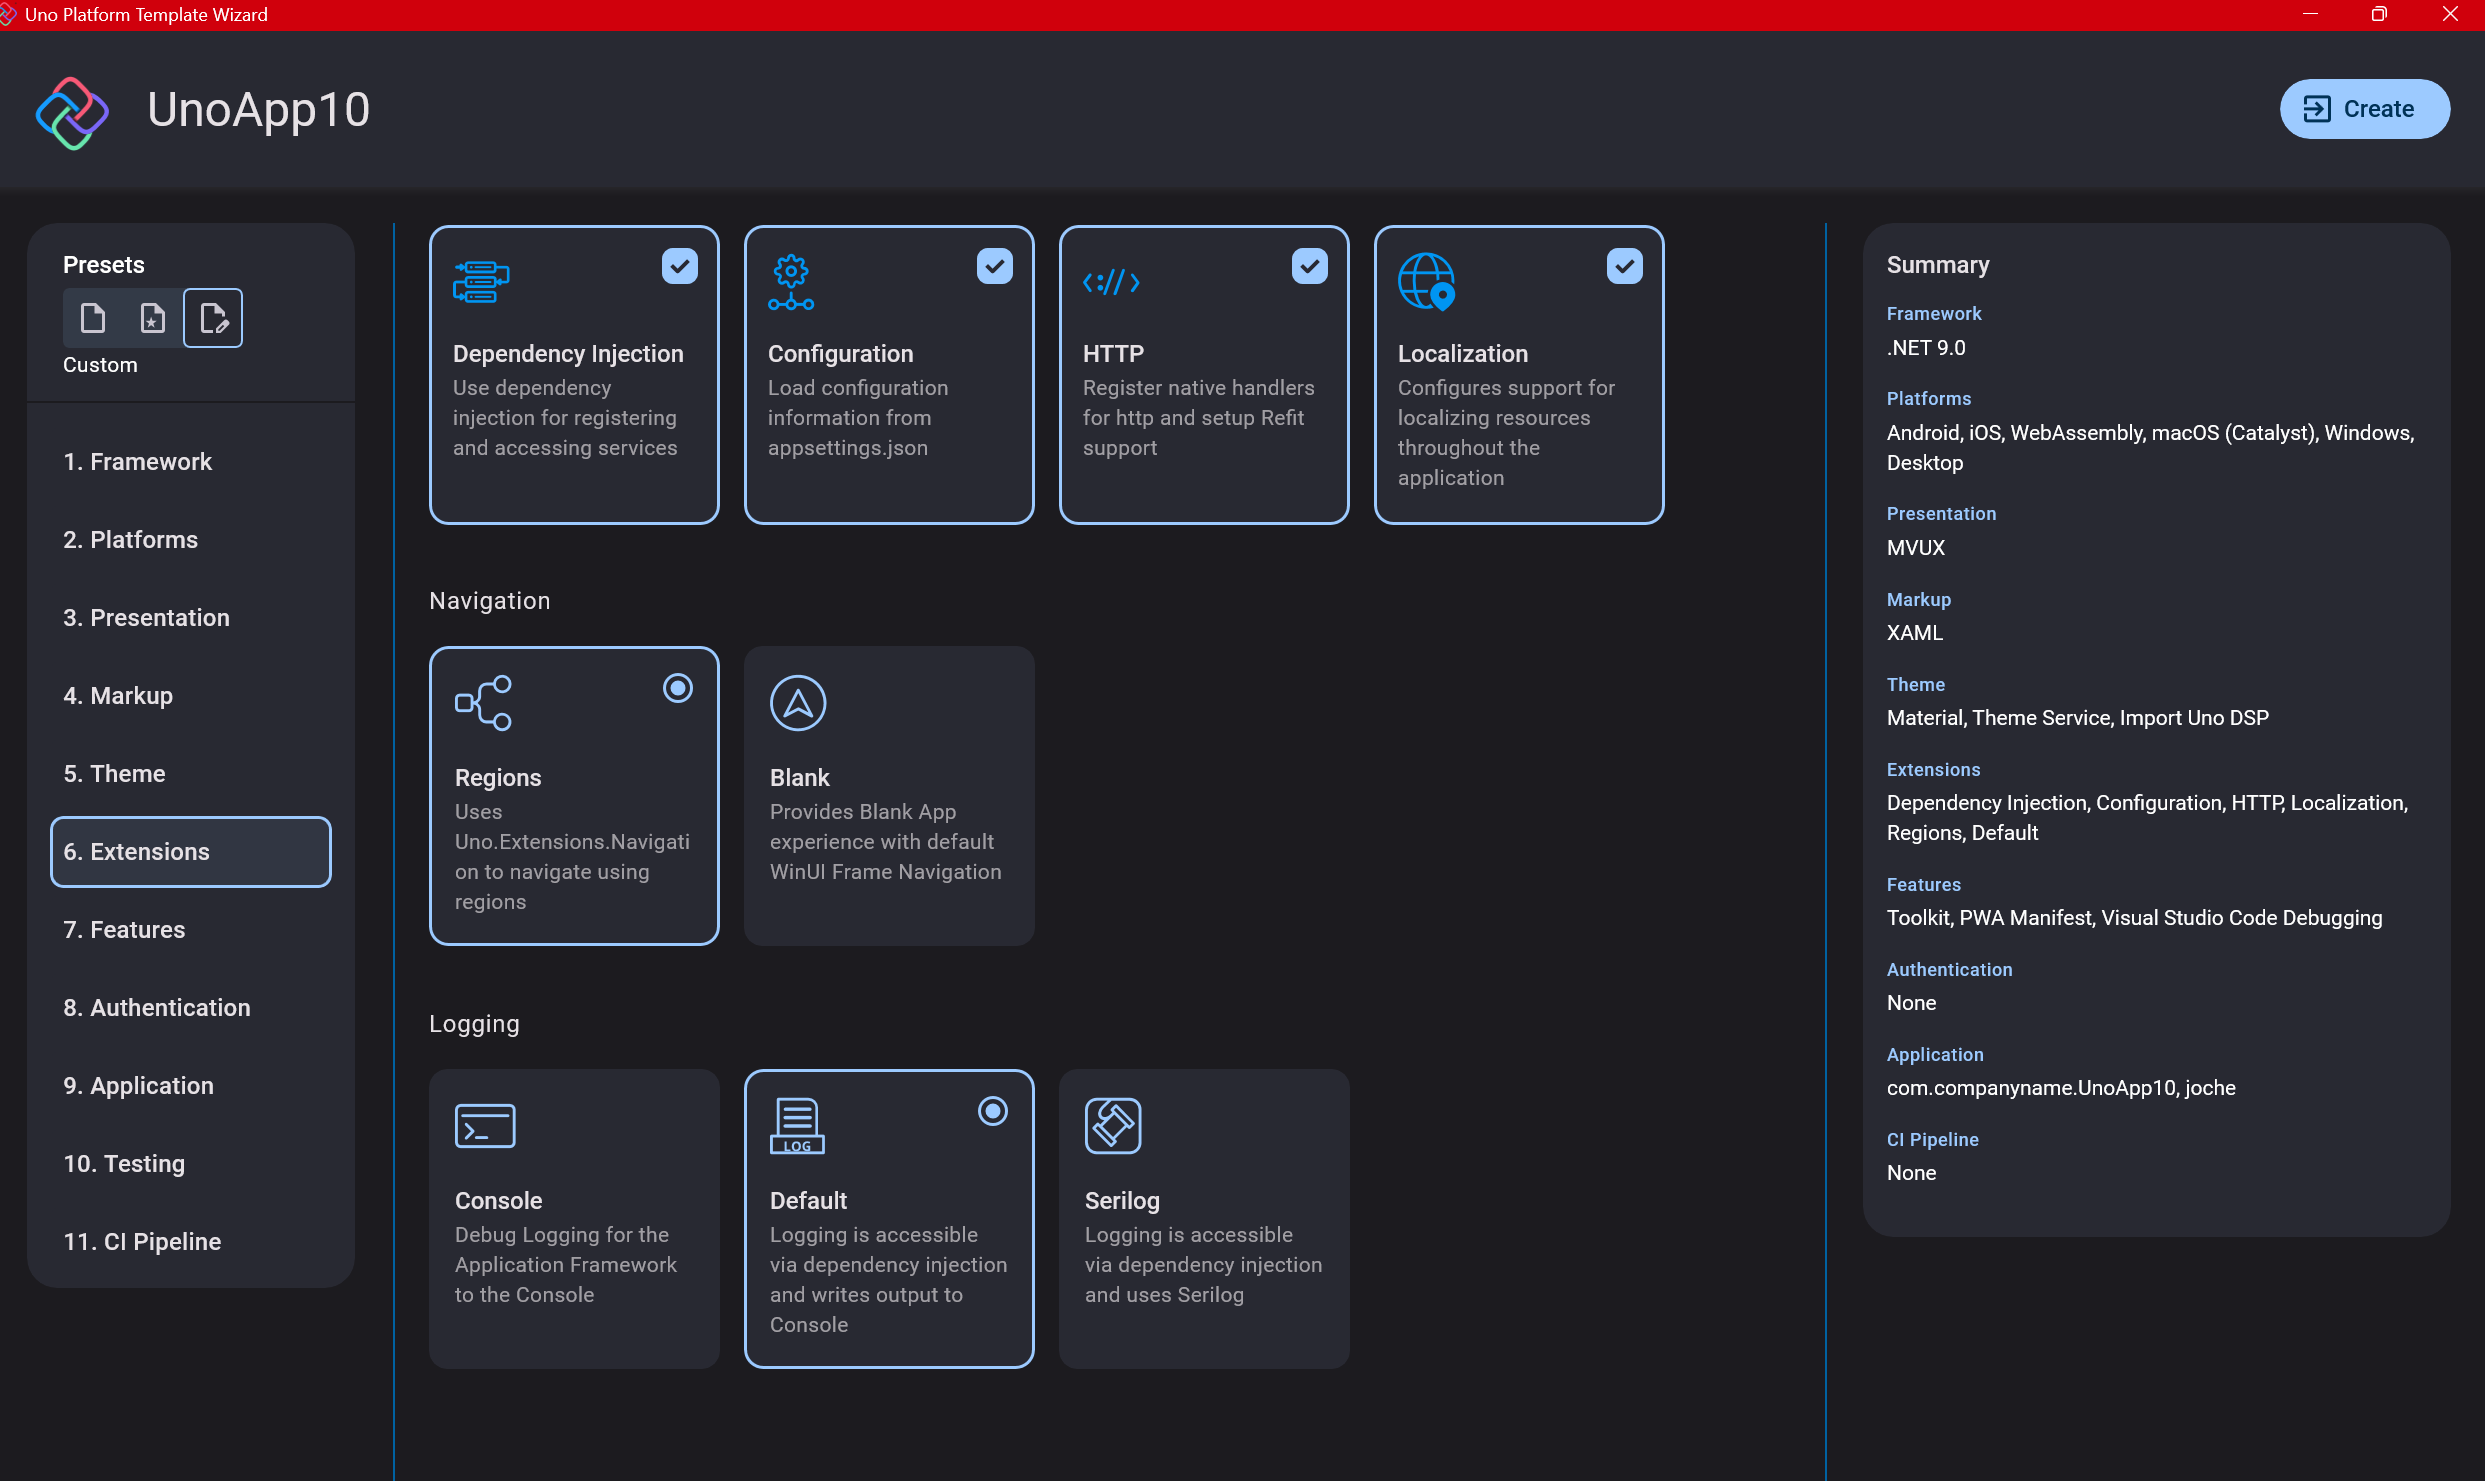
Step 8: Extensions
When selecting extensions to include, I recommend choosing almost all of them as they’re useful for modern application development. The only thing you might want to customize is the logging type (Console, Debug, or Serilog), depending on your previous experience. Generally, most applications will benefit from all the extensions offered.
Step 9: Features
Next, you’ll select which features to include in your application. For my tests, I include everything except the MAUI embedding and the media element. Most features can be useful, and I’ll show in a future post how to set them up when discussing the solution structure.

Step 10: Authentication
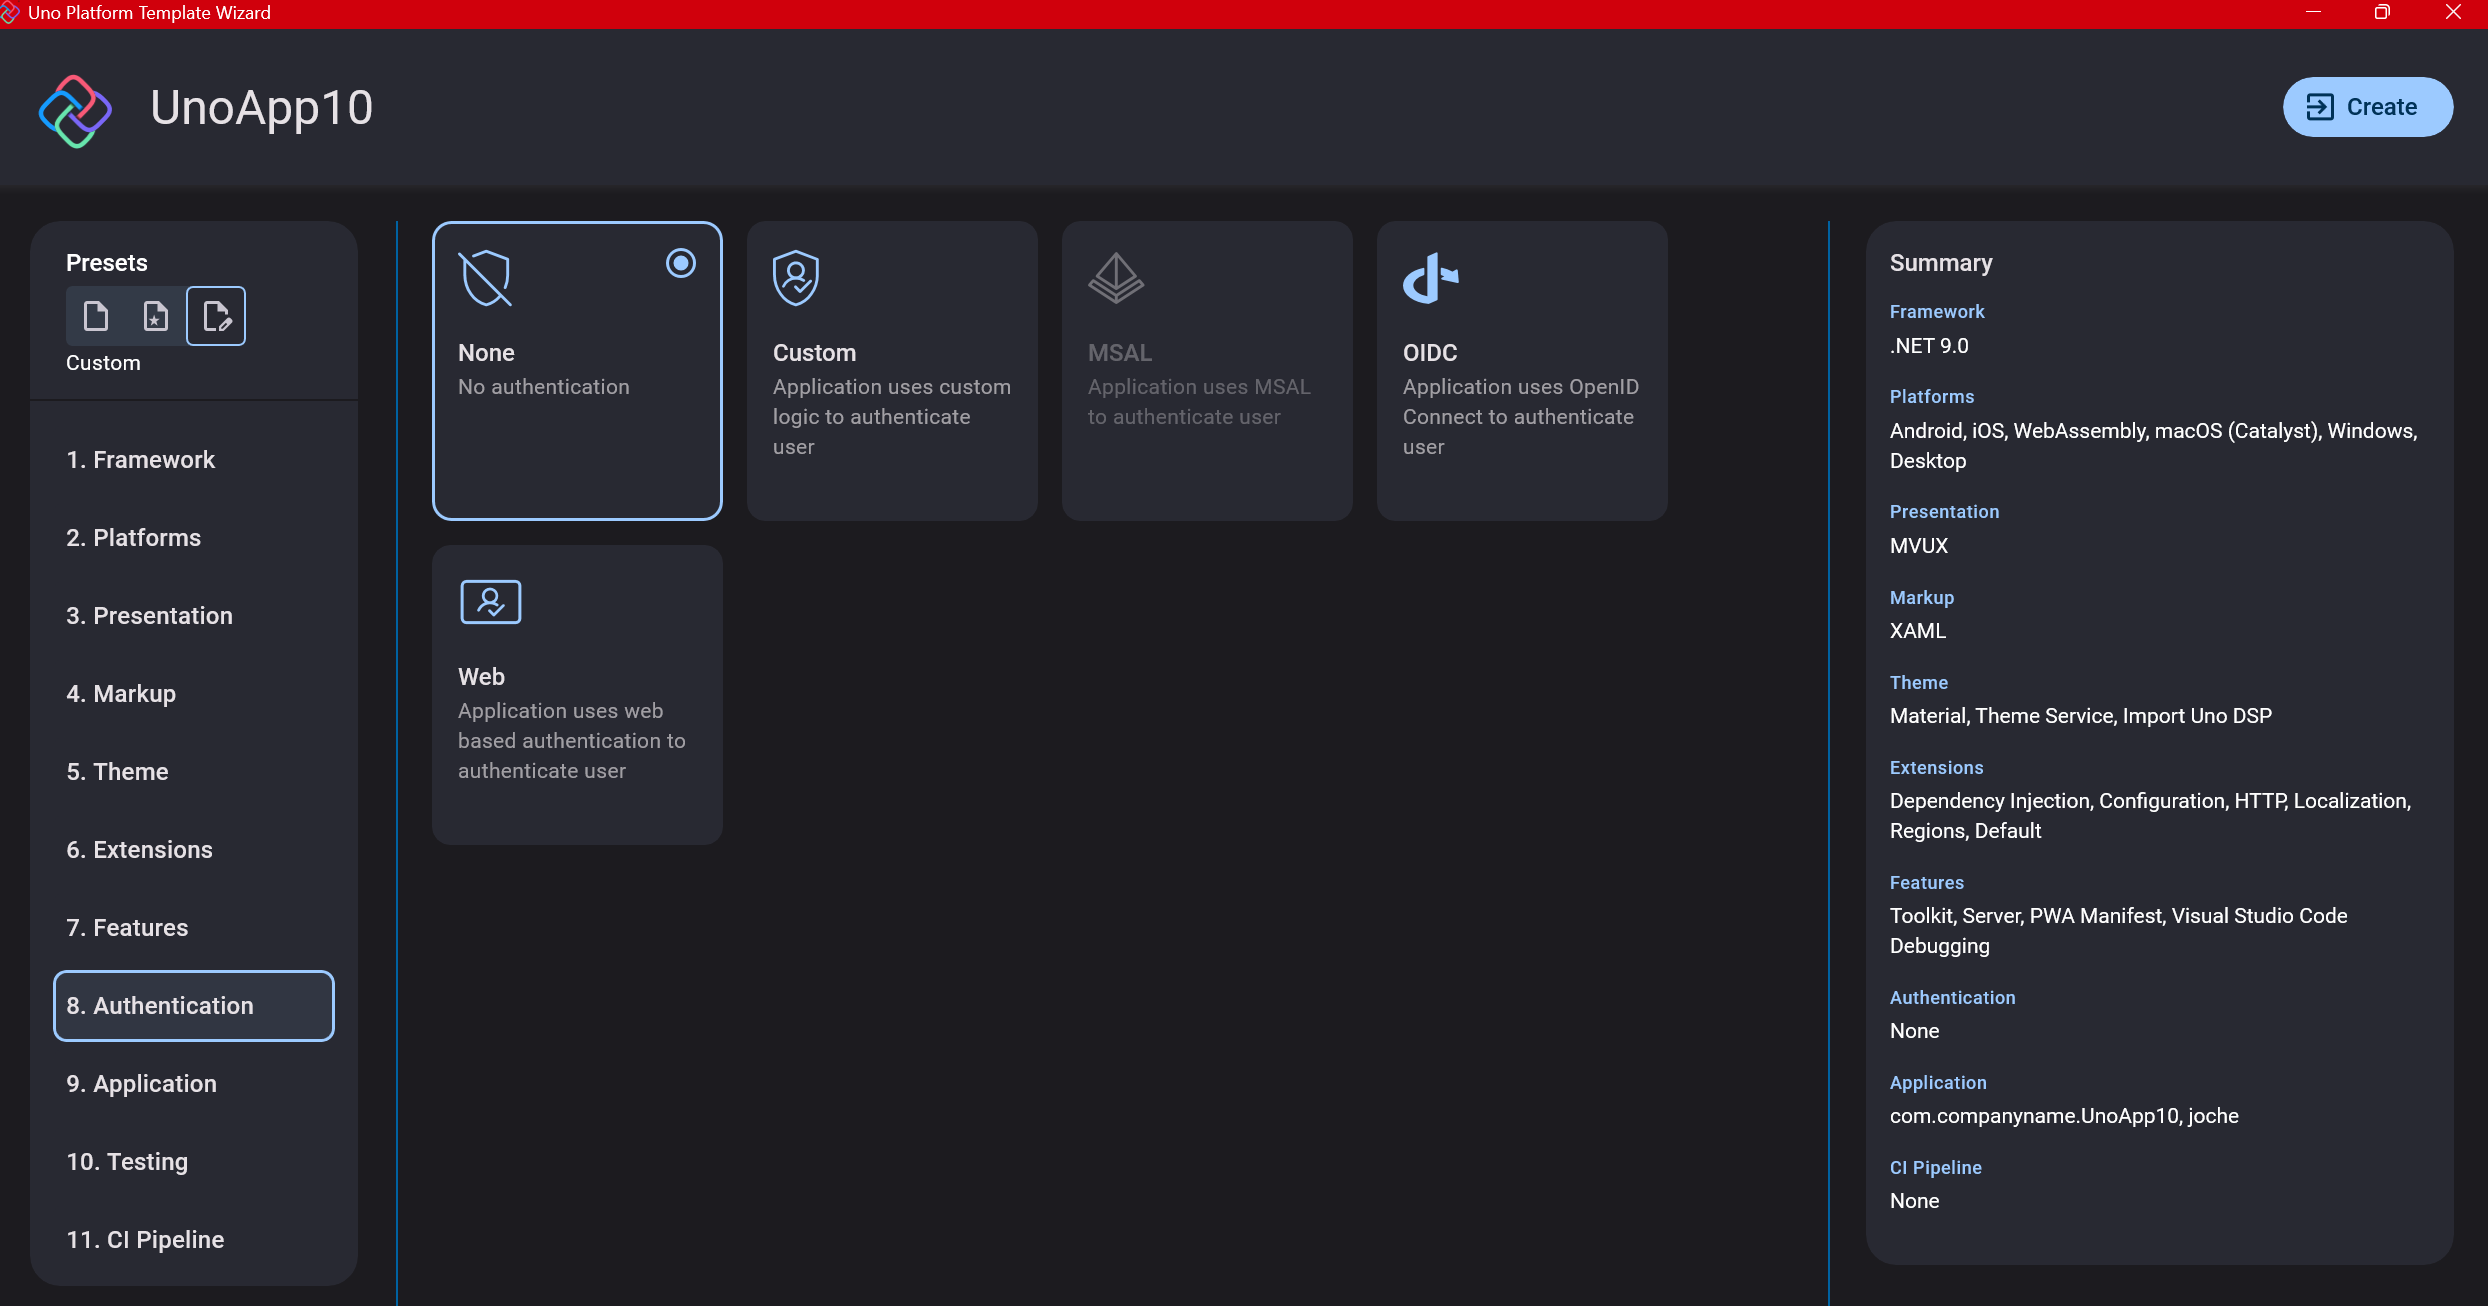
You can select “None” for authentication if you’re building test projects, but I chose “Custom” because I wanted to see how it works. In my case, I’m authenticating against DevExpress XAF REST API, but I’m also interested in connecting my test project to Azure B2C.
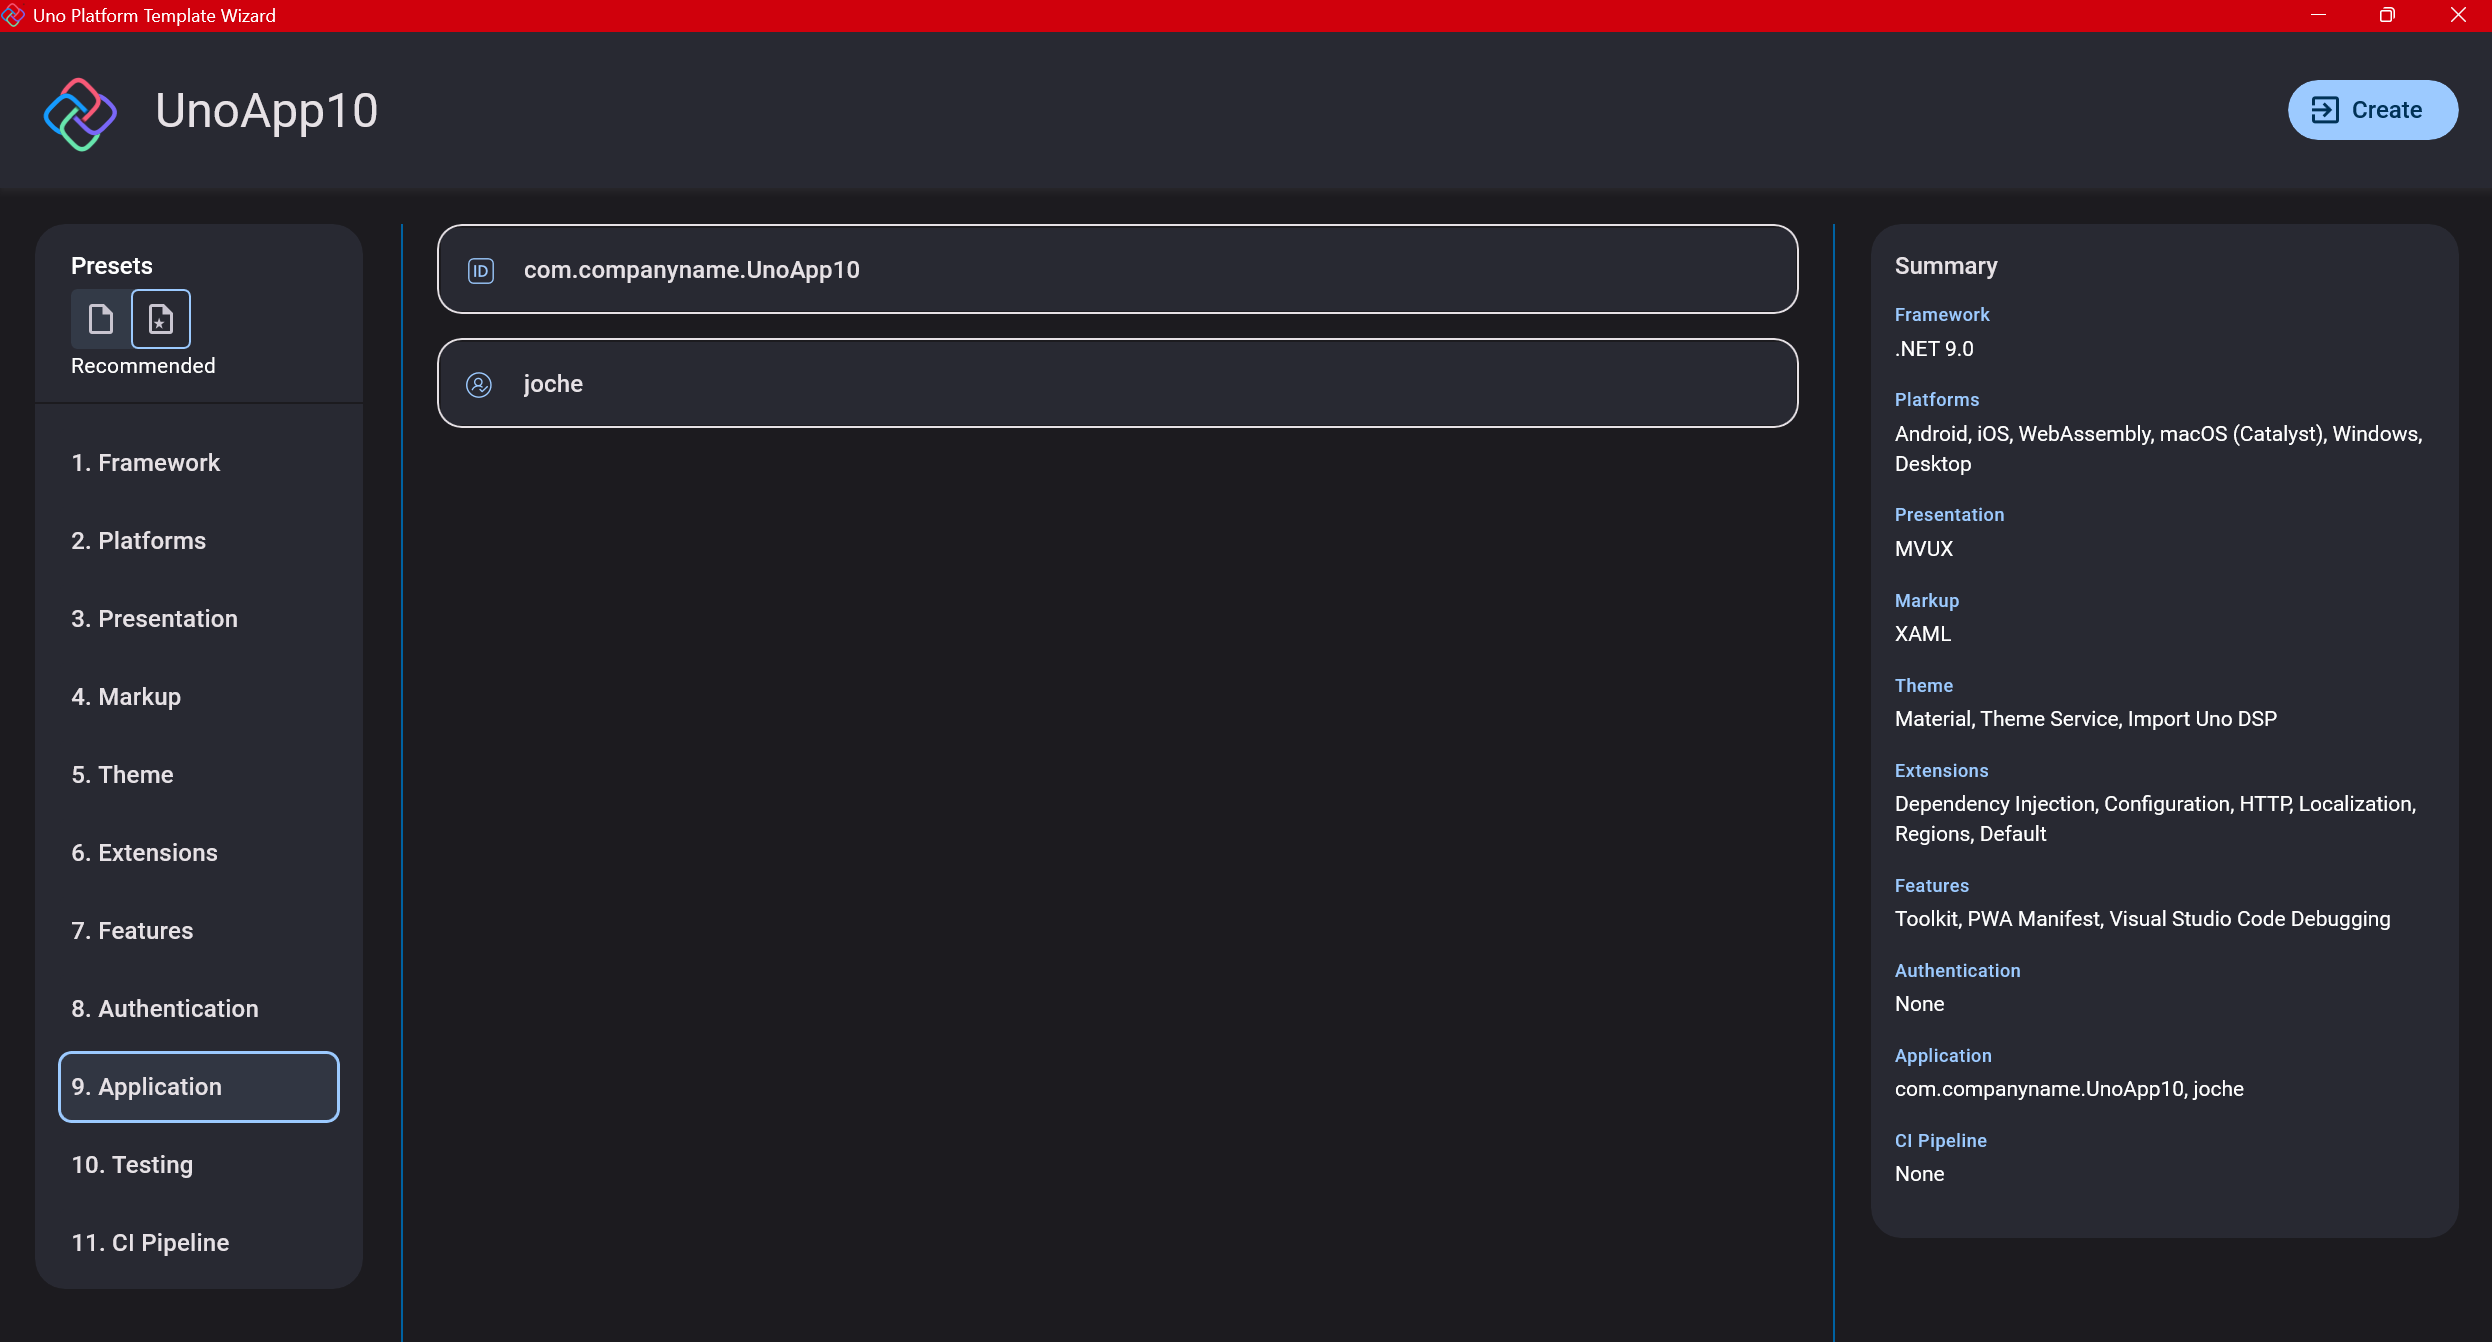
Step 11: Application ID
Next, you’ll need to provide an application ID. While I haven’t fully explored the purpose of this ID yet, I believe it’s needed when publishing applications to app stores like Google Play and the Apple App Store.
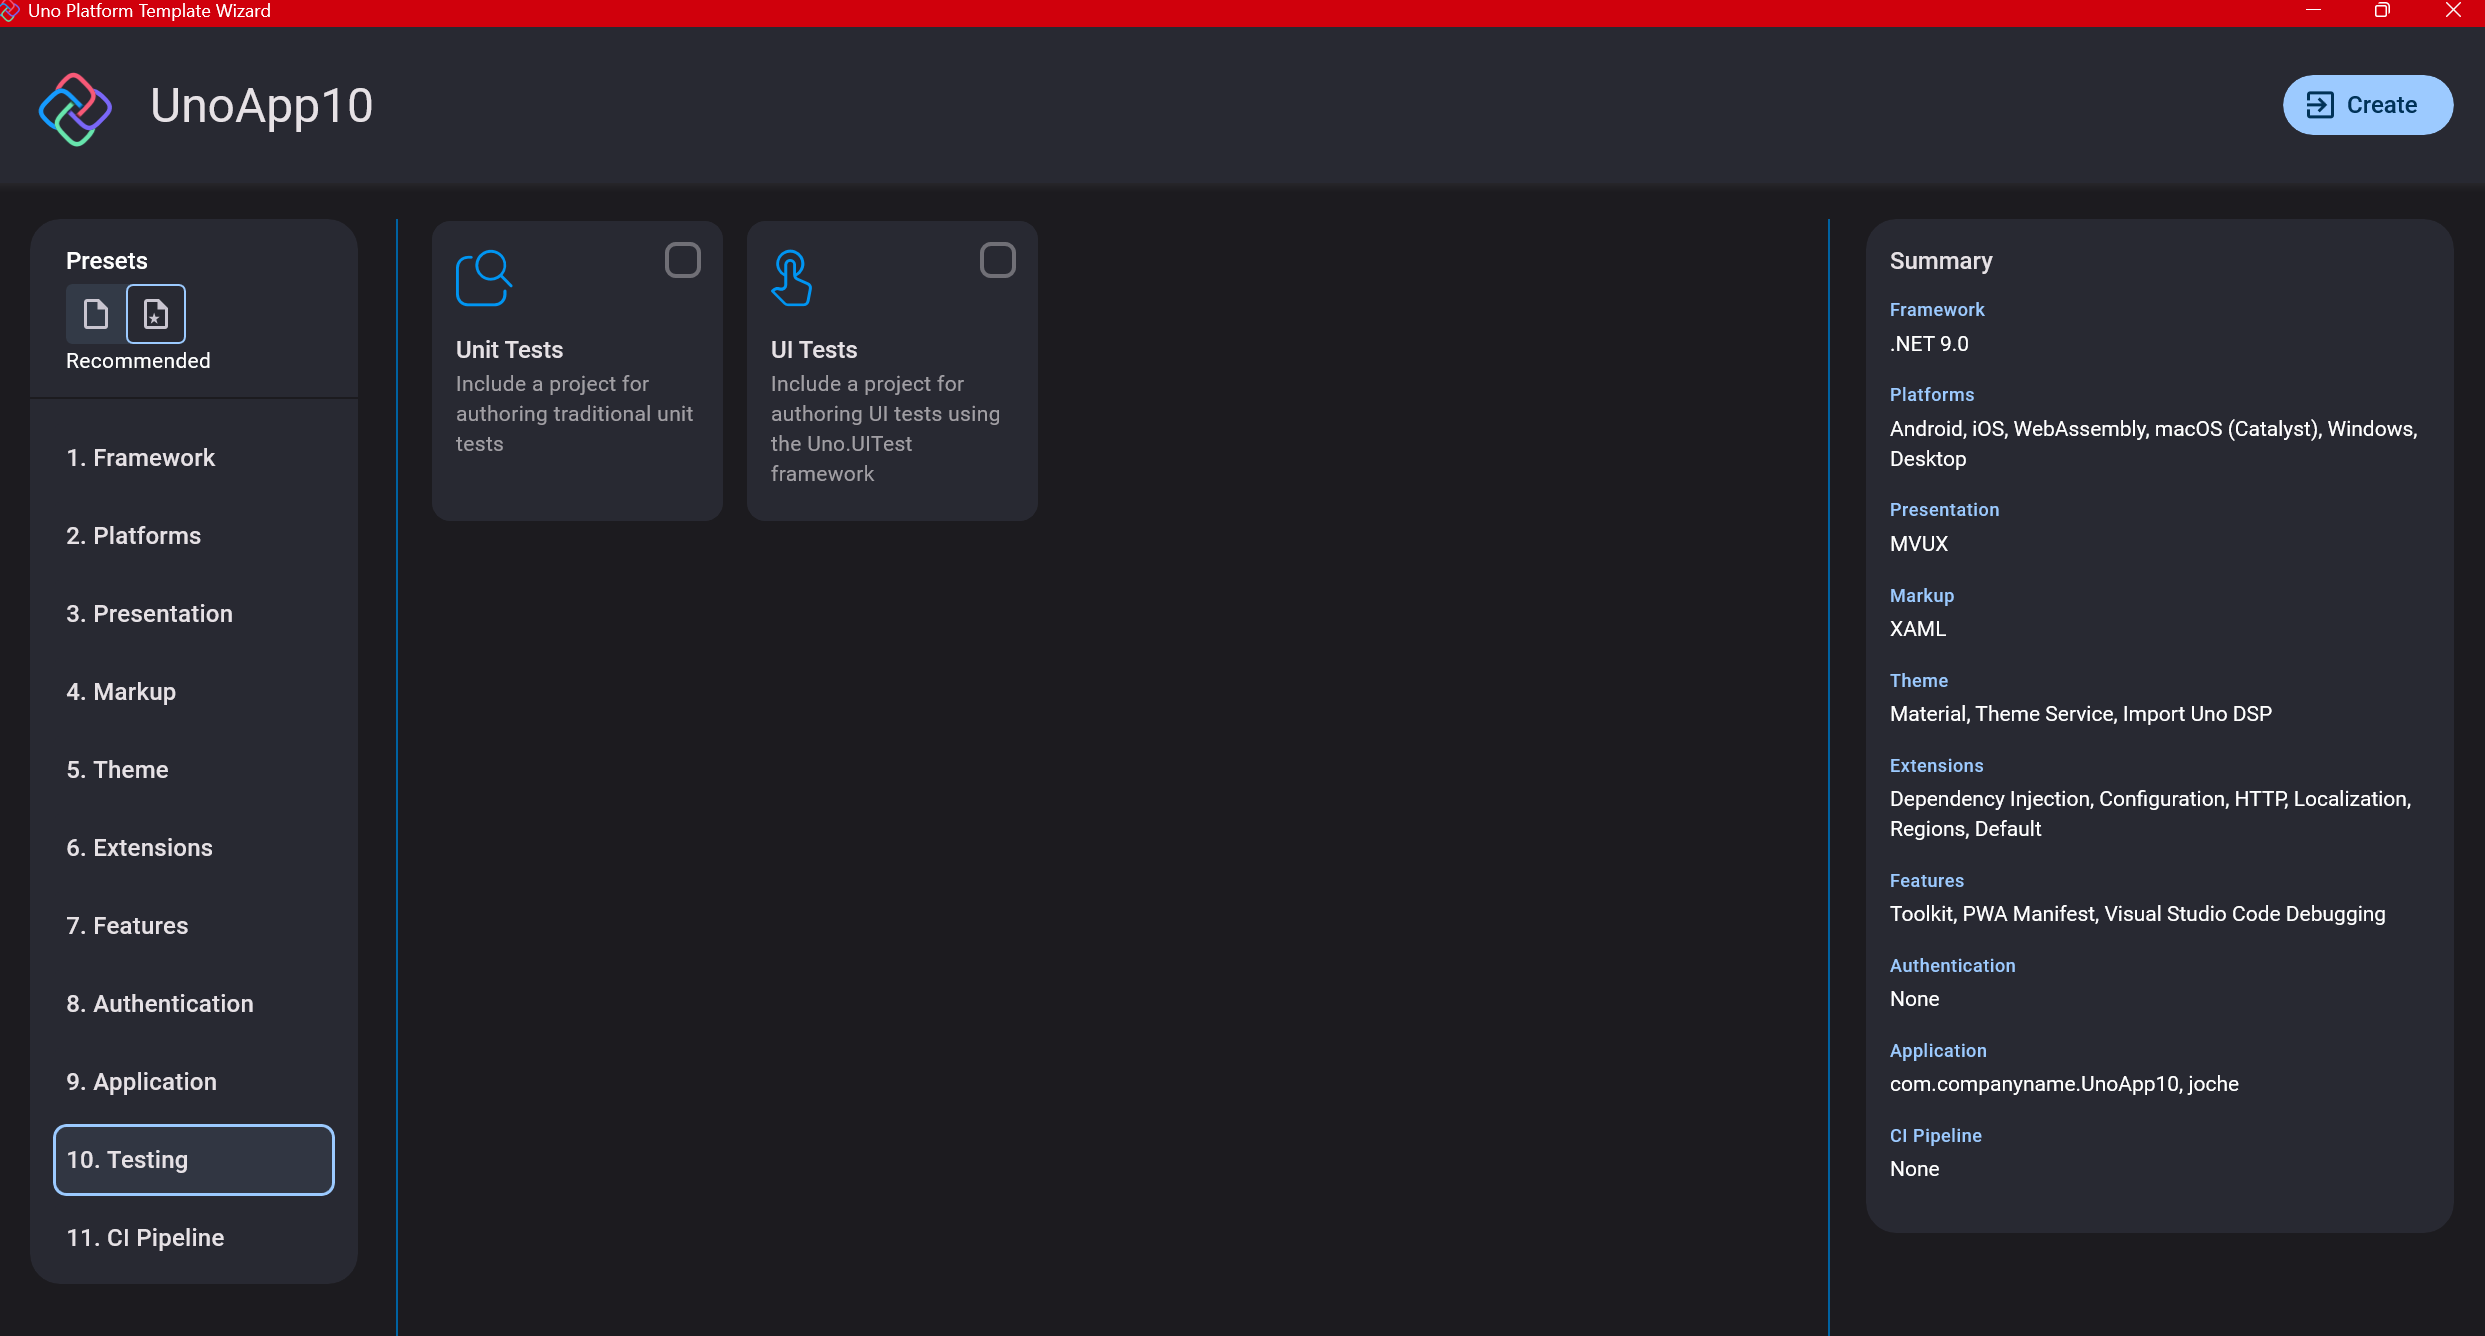
Step 12: Testing
I’m a big fan of testing, particularly integration tests. While unit tests are essential when developing components, for business applications, integration tests that verify the flow are often sufficient.
Uno also offers UI testing capabilities, which I haven’t tried yet but am looking forward to exploring. In platform UI development, there aren’t many choices for UI testing, so having something built-in is fantastic.
Testing might seem like a waste of time initially, but once you have tests in place, you’ll save time in the future. With each iteration or new release, you can run all your tests to ensure everything works correctly. The time invested in creating tests upfront pays off during maintenance and updates.
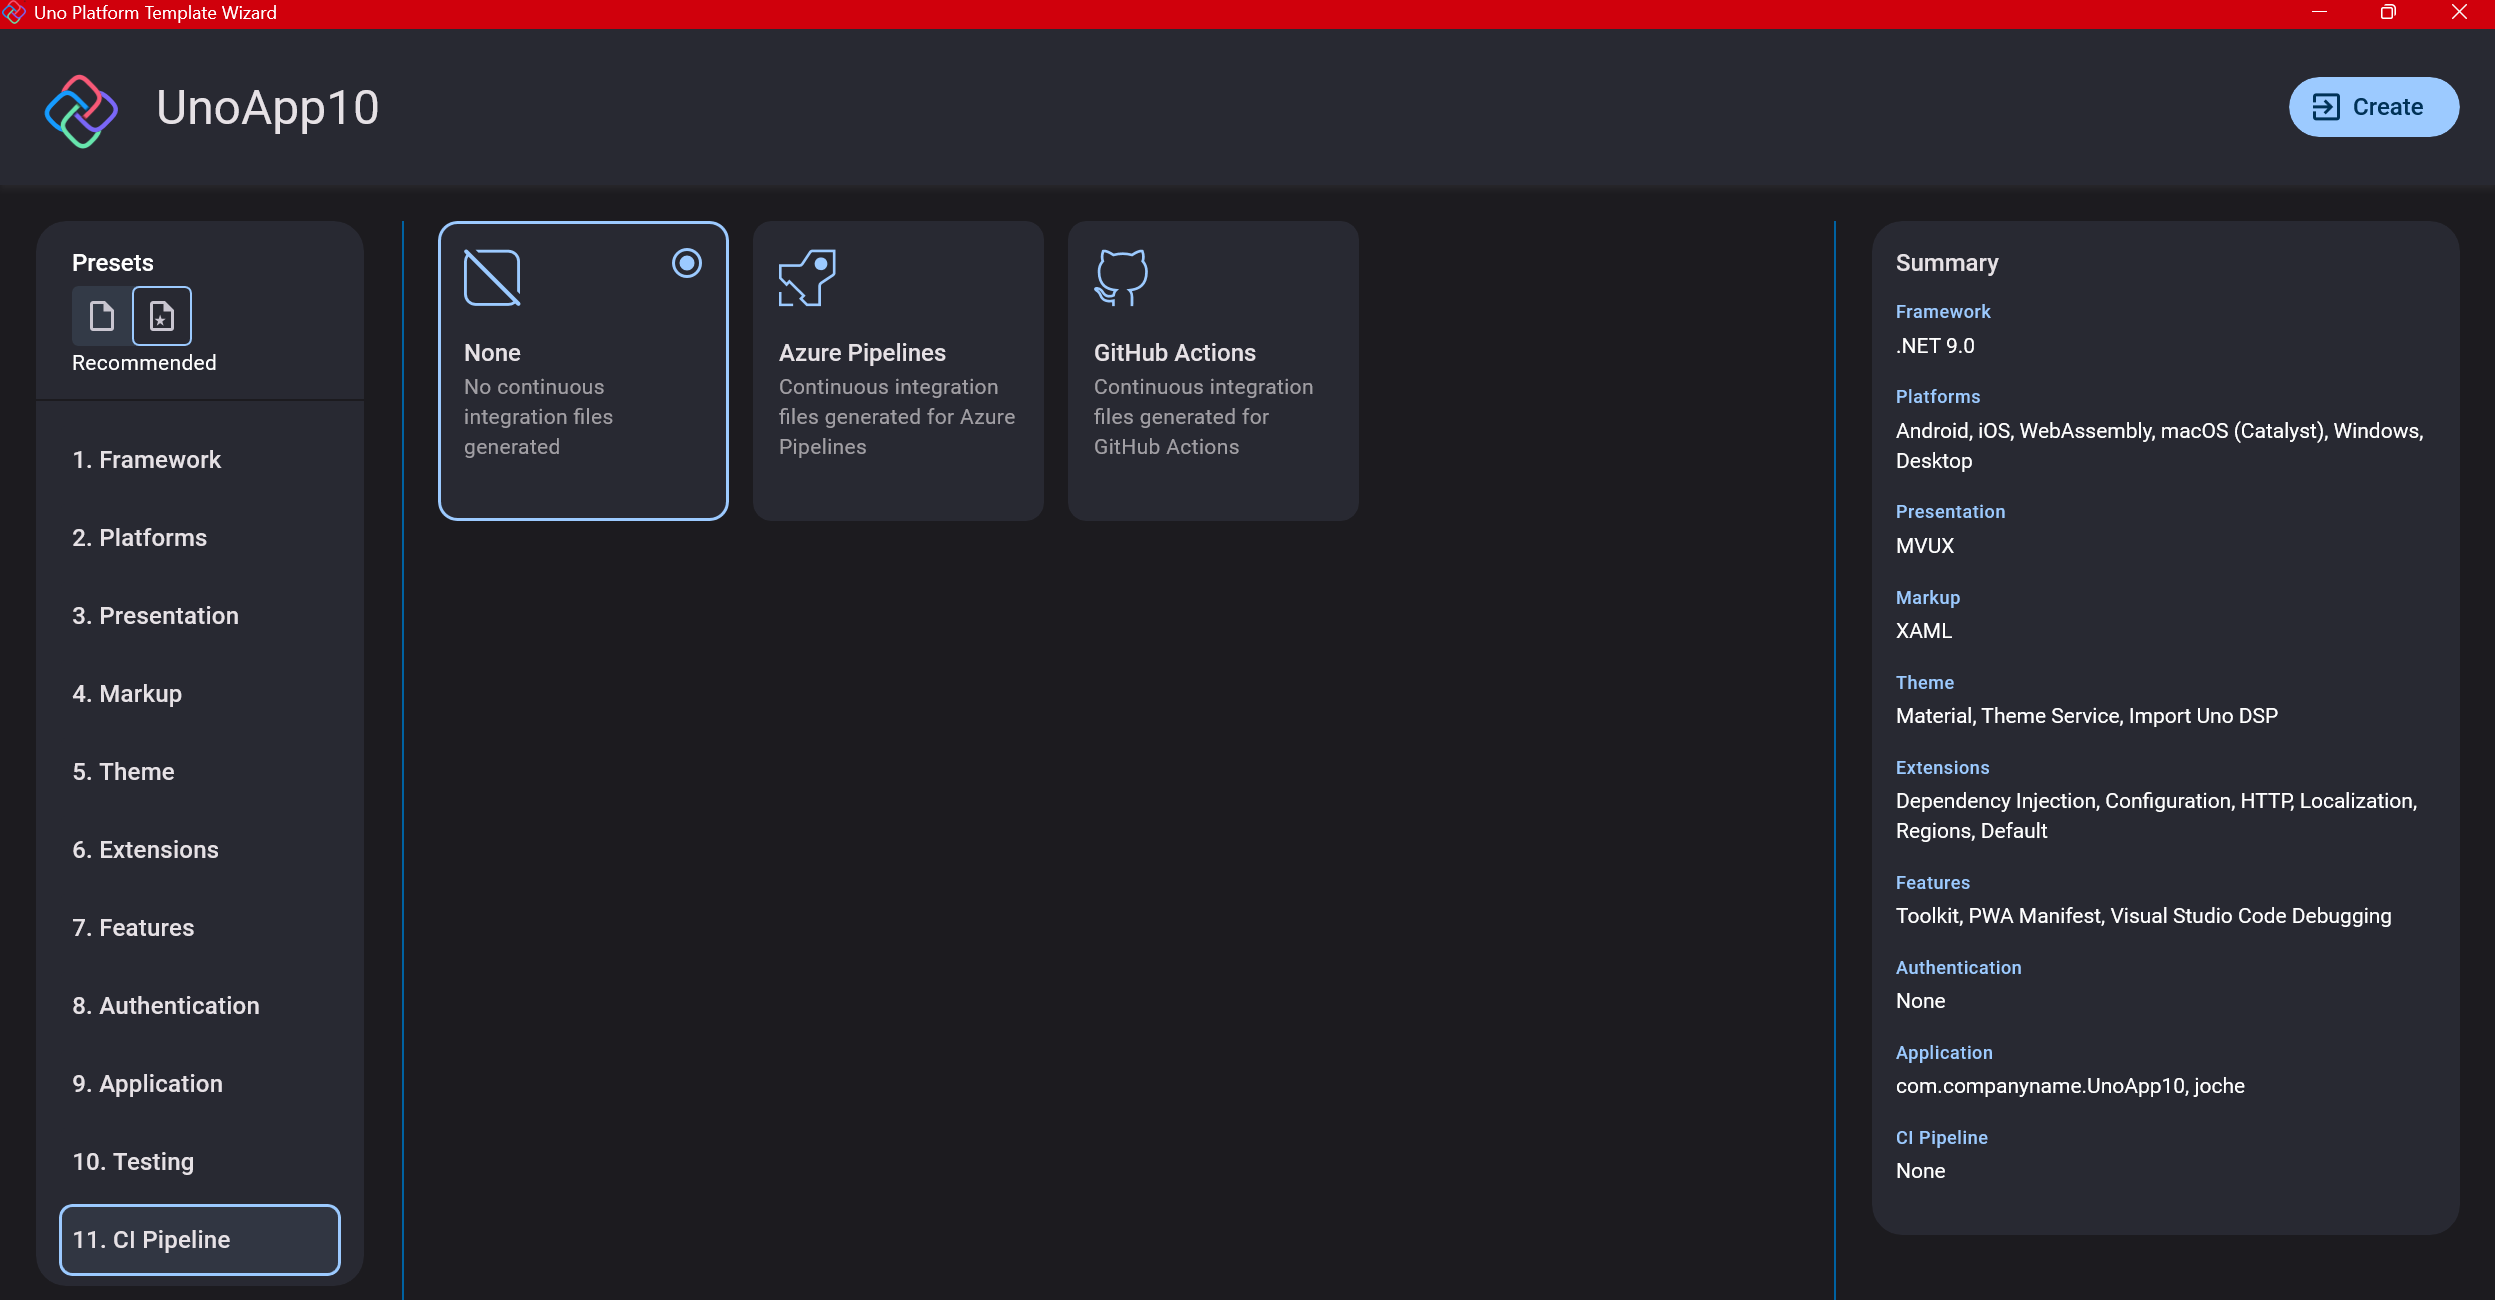
Step 13: CI Pipelines
The final step is about CI pipelines. If you’re building a test application, you don’t need to select anything. For production applications, you can choose Azure Pipelines or GitHub Actions based on your preferences. In my case, I’m not involved with CI pipeline configuration at my workplace, so I have limited experience in this area.
Conclusion
If you’ve made it this far, congratulations! You should now have a shiny new Uno Platform application in your IDE.
This post only covers the initial setup choices when creating a new Uno application. Your development path will differ based on the selections you’ve made, which can significantly impact how you write your code. Choose wisely and experiment with different combinations to see what works best for your needs.
During my learning journey with the Uno Platform, I’ve tried various settings—some worked well, others didn’t, but most will function if you understand what you’re doing. I’m still learning and taking a hands-on approach, relying on trial and error, occasional documentation checks, and GitHub Copilot assistance.
Thanks for reading and see you in the next post!
About Us
YouTube
https://www.youtube.com/c/JocheOjedaXAFXAMARINC
Our sites
Let’s discuss your XAF
https://www.udemy.com/course/microsoft-ai-extensions/
Our free A.I courses on Udemy