
by Joche Ojeda | Mar 12, 2025 | dotnet, http, netcore, netframework, network, WebServers
Last week, I was diving into Uno Platform to understand its UI paradigms. What particularly caught my attention is Uno’s ability to render a webapp using WebAssembly (WASM). Having worked with WASM apps before, I’m all too familiar with the challenges of connecting to data sources and handling persistence within these applications.
My Previous WASM Struggles
About a year ago, I faced a significant challenge: connecting a desktop WebAssembly app to an old WCF webservice. Despite having the CORS settings correctly configured (or so I thought), I simply couldn’t establish a connection from the WASM app to the server. I spent days troubleshooting both the WCF service and another ASMX service, but both attempts failed. Eventually, I had to resort to webserver proxies to achieve my goal.
This experience left me somewhat traumatized by the mere mention of “connecting WASM with an API.” However, the time came to face this challenge again during my weekend experiments.
A Pleasant Surprise with Uno Platform
This weekend, I wanted to connect a XAF REST API to an Uno Platform client. To my surprise, it turned out to be incredibly straightforward. I successfully performed this procedure twice: once with a XAF REST API and once with the API included in the Uno app template. The ease of this integration was a refreshing change from my previous struggles.
Understanding CORS and Why It Matters for WASM Apps
To understand why my previous attempts failed and my recent ones succeeded, it’s important to grasp what CORS is and why it’s crucial for WebAssembly applications.
What is CORS?
CORS (Cross-Origin Resource Sharing) is a security feature implemented by web browsers that restricts web pages from making requests to a domain different from the one that served the original web page. It’s an HTTP-header based mechanism that allows a server to indicate which origins (domains, schemes, or ports) other than its own are permitted to load resources.
The Same-Origin Policy
Browsers enforce a security restriction called the “same-origin policy” which prevents a website from one origin from requesting resources from another origin. An origin consists of:
- Protocol (HTTP, HTTPS)
- Domain name
- Port number
For example, if your website is hosted at https://myapp.com, it cannot make AJAX requests to https://myapi.com without the server explicitly allowing it through CORS.
Why CORS is Required for Blazor WebAssembly
Blazor WebAssembly (which uses similar principles to Uno Platform’s WASM implementation) is fundamentally different from Blazor Server in how it operates:
- Separate Deployment: Blazor WebAssembly apps are fully downloaded to the client’s browser and run entirely in the browser using WebAssembly. They’re typically hosted on a different server or domain than your API.
- Client-Side Execution: Since all code runs in the browser, when your Blazor WebAssembly app makes HTTP requests to your API, they’re treated as cross-origin requests if the API is hosted on a different domain, port, or protocol.
- Browser Security: Modern browsers block these cross-origin requests by default unless the server (your API) explicitly permits them via CORS headers.
Implementing CORS in Startup.cs
The solution to these CORS issues lies in properly configuring your server. In your Startup.cs file, you can configure CORS as follows:
public void ConfigureServices(IServiceCollection services) {
    services.AddCors(options => {
        options.AddPolicy("AllowBlazorApp",
            builder => {
                builder.WithOrigins("https://localhost:5000") // Replace with your Blazor app's URL
                       .AllowAnyHeader()
                       .AllowAnyMethod();
            });
    });

    // Other service configurations...
}

public void Configure(IApplicationBuilder app, IWebHostEnvironment env) {
    // Other middleware configurations...

    app.UseCors("AllowBlazorApp");

    // Other middleware configurations...
}
Conclusion
My journey with connecting WebAssembly applications to APIs has had its ups and downs. What once seemed like an insurmountable challenge has now become much more manageable, especially with platforms like Uno that simplify the process. Understanding CORS and implementing it correctly is crucial for successful WASM-to-API communication.
If you’re working with WebAssembly applications and facing similar challenges, I hope my experience helps you avoid some of the pitfalls I encountered along the way.
About Us
YouTube
https://www.youtube.com/c/JocheOjedaXAFXAMARINC
Our sites
Let’s discuss your XAF
https://www.udemy.com/course/microsoft-ai-extensions/
Our free A.I courses on Udemy

by Joche Ojeda | Mar 11, 2025 | http, MAUI, Xamarin
When developing cross-platform mobile applications with .NET MAUI (or previously Xamarin), you may encounter situations where your app works perfectly with public APIs but fails when connecting to internal network services. These issues often stem from HTTP client implementation differences, certificate validation, and TLS compatibility. This article explores how to identify, troubleshoot, and resolve these common networking challenges.
Understanding HTTP Client Options in MAUI/Xamarin
In the MAUI/.NET ecosystem, developers have access to two primary HTTP client implementations:
1. Managed HttpClient (Microsoft’s implementation)
- Cross-platform implementation built into .NET
- Consistent behavior across different operating systems
- May handle SSL/TLS differently than platform-native implementations
- Uses the .NET certificate validation system
2. Native HttpClient (Android’s implementation)
- Leverages the platform’s native networking stack
- Typically offers better performance on the specific platform
- Uses the device’s system certificate trust store
- Follows platform-specific security policies and restrictions
Switching Between Native and Managed HttpClient
In MAUI Applications
MAUI provides a flexible handler registration system that lets you explicitly choose which implementation to use:
// In your MauiProgram.cs
public static MauiApp CreateMauiApp()
{
    var builder = MauiApp.CreateBuilder();
    builder
        .UseMauiApp<App>()
        .ConfigureMauiHandlers(handlers =>
        {
            // Use the managed implementation (Microsoft's .NET HttpClient)
            handlers.AddHandler(typeof(HttpClient), typeof(ManagedHttpMessageHandler));

            // OR use the native implementation (platform-specific)
            // handlers.AddHandler(typeof(HttpClient), typeof(PlatformHttpMessageHandler));
        });

    return builder.Build();
}
In Xamarin.Forms Legacy Applications
For Xamarin.Forms applications, set this in your platform-specific initialization code:
// In MainActivity.cs (Android) or AppDelegate.cs (iOS)
HttpClientHandler.UseNativePlatformHandler = false; // Use managed handler
// OR
HttpClientHandler.UseNativePlatformHandler = true;  // Use native handler
Creating Specific Client Instances
You can also explicitly create HttpClient instances with specific handlers when needed:
// Use the managed handler
var managedHandler = new HttpClientHandler();
var managedClient = new HttpClient(managedHandler);

// Use the native handler (with DependencyService in Xamarin)
var nativeHandler = DependencyService.Get<INativeHttpClientHandler>();
var nativeClient = new HttpClient(nativeHandler);
Using HttpClientFactory (Recommended for MAUI)
For better control, testability, and lifecycle management, consider using HttpClientFactory:
// In your MauiProgram.cs
builder.Services.AddHttpClient("ManagedClient", client => {
    client.BaseAddress = new Uri("https://your.api.url/");
})
.ConfigurePrimaryHttpMessageHandler(() => new SocketsHttpHandler());

// Then inject and use it in your services
public class MyApiService
{
    private readonly HttpClient _client;

    public MyApiService(IHttpClientFactory clientFactory)
    {
        _client = clientFactory.CreateClient("ManagedClient");
    }
}
Common Issues and Troubleshooting
1. Self-Signed Certificates
Internal APIs often use self-signed certificates that aren’t trusted by default. Here’s how to handle them:
// Option 1: Create a custom handler that bypasses certificate validation
// (ONLY for development/testing environments)
var handler = new HttpClientHandler
{
    ServerCertificateCustomValidationCallback = (message, cert, chain, errors) => true
};
var client = new HttpClient(handler);
For production environments, instead of bypassing validation:
- Add your self-signed certificate to the Android trust store
- Configure your app to trust specific certificates
- Generate proper certificates from a trusted Certificate Authority
2. TLS Version Mismatches
Different Android versions support different TLS versions by default:
- Android 4.1-4.4: TLS 1.0 by default
- Android 5.0+: TLS 1.0, 1.1, 1.2
- Android 10+: TLS 1.3 support
If your server requires a specific TLS version:
// Force specific TLS versions
System.Net.ServicePointManager.SecurityProtocol = SecurityProtocolType.Tls12 | SecurityProtocolType.Tls13;
3. Network Configuration
Ensure your app has the proper permissions in the AndroidManifest.xml:
<uses-permission android:name="android.permission.INTERNET" />
<uses-permission android:name="android.permission.ACCESS_NETWORK_STATE" />
For Android 9+ (API level 28+), configure network security:
<!-- Create a network_security_config.xml file in Resources/xml -->
<?xml version="1.0" encoding="utf-8"?>
<network-security-config>
    <domain-config cleartextTrafficPermitted="true">
        <domain includeSubdomains="true">your.internal.domain</domain>
    </domain-config>
</network-security-config>
Then reference it in your AndroidManifest.xml:
<application android:networkSecurityConfig="@xml/network_security_config">
Practical Troubleshooting Steps
- Test with both HTTP client implementationsSwitch between native and managed implementations to isolate whether the issue is specific to one implementation
- Test the API endpoint outside your appUse tools like Postman or curl on the same network
- Enable logging for network calls
// Add this before making requests
HttpClient.DefaultRequestHeaders.TryAddWithoutValidation("User-Agent", "YourApp/1.0");
- Capture and inspect network trafficUse Charles Proxy or Fiddler to inspect the actual requests/responses
- Check certificate information
# On your development machine
openssl s_client -connect your.internal.server:443 -showcerts
- Verify which implementation you’re using
var client = new HttpClient();
var handlerType = client.GetType().GetField("_handler",
    System.Reflection.BindingFlags.Instance |
    System.Reflection.BindingFlags.NonPublic)?.GetValue(client);

Console.WriteLine($"Using handler: {handlerType?.GetType().FullName}");
- Debug specific errors
- For Java.IO.IOException: “Trust anchor for certification path not found” – this means your app doesn’t trust the certificate
- For HttpRequestException with “The SSL connection could not be established” – likely a TLS version mismatch
Conclusion
When your MAUI Android app connects successfully to public APIs but fails with internal network services, the issue often lies with HTTP client implementation differences, certificate validation, or TLS compatibility. By systematically switching between native and managed HTTP clients and applying the troubleshooting techniques outlined above, you can identify and resolve these networking challenges.
Remember that each implementation has its advantages – the native implementation typically offers better performance and follows platform-specific security policies, while the managed implementation provides more consistent cross-platform behavior. Choose the one that best fits your specific requirements and security considerations.
About Us
YouTube
https://www.youtube.com/c/JocheOjedaXAFXAMARINC
Our sites
Let’s discuss your XAF
https://www.udemy.com/course/microsoft-ai-extensions/
Our free A.I courses on Udemy

by Joche Ojeda | Feb 23, 2025 | A.I
I’ve been thinking about this topic for a while and have collected numerous notes and ideas about how to present abstractions that allow large language models (LLMs) to interact with various systems – whether that’s your database, operating system, word documents, or other applications.
Before diving deeper, let’s review some fundamental concepts:
Key Concepts
First, let’s talk about APIs (Application Programming Interface). In simple terms, an API is a way to expose methods, functions, and procedures from your application, independent of the programming language being used.
Next is the REST API concept, which is a method of exposing your API using HTTP verbs. As IT professionals, we hear these terms – HTTP, REST, API – almost daily, but we might not fully grasp their core concepts. Let me explain how they relate to software automation using AI.
HTTP (Hypertext Transfer Protocol) is fundamentally a way for two applications to communicate using text. This is its beauty – text serves as the basic layer of understanding between systems, meaning almost any system or programming language can produce a client or server that can interact via HTTP.
REST (Representational State Transfer) is a methodology for systems to communicate and either change or read the state of another system.
Levels of System Interaction
When implementing LLMs for system automation, we first need to determine our desired level of interaction. Here are several approaches:
- Human-like Interaction: An LLM can interact with your operating system using mouse and keyboard inputs, effectively mimicking human behavior.
- REST API Integration: Your application can communicate using HTTP verbs and the REST protocol.
- SDK Implementation: You can create a software development kit that describes your application’s functionality and expose this to the LLM.
The connection method will vary depending on your chosen technology. For instance:
- Microsoft Semantic Kernel allows you to create plugins that interact with your system through REST API, database, or SDK.
- Microsoft AI extensions require you to decide on your preferred interaction level before implementation.
- The Model Context Protocol is a newer approach that enables application exposure for LLM agents, with Claude from Anthropic being a notable example.
Implementation Considerations
When automating your system, you need to consider:
- Available Integration Options: Not all systems provide an SDK or API, which can limit automation possibilities.
- Interaction Protocol Choice: You’ll need to decide between REST API, HTTP, or Model Context Protocol.
This overview should help you understand the various levels of resolution needed to automate your application. What’s your preferred method for integrating LLMs with your applications? I’d love to hear your thoughts and experiences.

by Joche Ojeda | Jun 4, 2024 | Data Synchronization
In the world of software development, exception handling is a critical aspect that can significantly impact the user experience and the robustness of the application. When it comes to client-server architectures, such as the SyncFramework, the way exceptions are handled can make a big difference. This blog post will explore two common patterns for handling exceptions in a C# client-server API and provide recommendations on how clients should handle exceptions.
Throwing Exceptions in the API
The first pattern involves throwing exceptions directly in the API. When an error occurs in the API, an exception is thrown. This approach provides detailed information about what went wrong, which can be incredibly useful for debugging. However, it also means that the client needs to be prepared to catch and handle these exceptions.
public void SomeApiMethod()
{
    // Some code...
    if (someErrorCondition)
    {
        throw new SomeException("Something went wrong");
    }
    // More code...
}
Returning HTTP Error Codes
The second pattern involves returning HTTP status codes to indicate the result of the operation. For example, a `200` status code means the operation was successful, a `400` series status code means there was a client error, and a `500` series status code means there was a server error. This approach provides a standard way for the client to check the result of the operation without having to catch exceptions. However, it may not provide as much detailed information about what went wrong.
[HttpGet]
public IActionResult Get()
{
    try
    {
        // Code that could throw an exception
    }
    catch (SomeException ex)
    {
        return StatusCode(500, $"Internal server error: {ex}");
    }
}
Best Practices
In general, a good practice is to handle exceptions on the server side and return appropriate HTTP status codes and error messages in the response. This way, the client only needs to interpret the HTTP status code and the error message, if any, and doesn’t need to know how to handle specific exceptions that are thrown by the server. This makes the client code simpler and less coupled to the server.
Remember, it’s important to avoid exposing sensitive information in error messages. The error messages should be helpful for the client to understand what went wrong, but they shouldn’t reveal any sensitive information or details about the internal workings of the server.
Conclusion
Exception handling is a crucial aspect of any application, and it’s especially important in a client-server architecture like the SyncFramework. By handling exceptions on the server side and returning meaningful HTTP status codes and error messages, you can create a robust and user-friendly application. Happy coding!
by Joche Ojeda | Jul 17, 2023 | Blazor, C#, Data Synchronization, EfCore, WebAssembly
Last week, I decided to create a playground for the SyncFramework to demonstrate how synchronization works. The sync framework itself is not designed in a client-server architecture, but as a set of APIs that you can use to synchronize data.
Synchronization scenarios usually involve a client-server architecture, but when I created the SyncFramework, I decided that network communication was something outside the scope and not directly related to data synchronization. So, instead of embedding the client-server concept in the SyncFramework, I decided to create a set of extensions to handle these scenarios. If you want to take a look at the network extensions, you can see them here.
Now, let’s return to the playground. The main requirement for me, besides showing how the synchronization process works, was not having to maintain an infrastructure for it. You know, a Sync Server and a few databases that I would have to constantly delete. So, I decided to use Blazor WebAssembly and SQLite databases running in the browser. If you want to know more about how SQLite databases can run in the browser, take a look at this article.
Now, there’s still a problem. How do I run a server on the browser? I know it’s somehow possible, but I did not have the time to do the research. So, I decided to create my own HttpClientHandler.
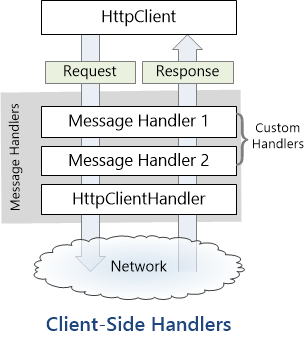
How the HttpClientHandler works
HttpClientHandler offers a number of attributes and methods for controlling HTTP requests and responses. It serves as the fundamental mechanism for HttpClient’s ability to send and receive HTTP requests and responses.
The HttpClientHandler manages aspects like the maximum number of redirects, redirection policies, handling cookies, and automated decompression of HTTP traffic. It can be set up and supplied to HttpClient to regulate the HTTP requests made by HttpClient.
HttpClientHandler might be helpful in testing situations when it’s necessary to imitate or mock HTTP requests and responses. The SendAsync method of HttpMessageHandler, from which HttpClientHandler also descended, can be overridden in a new class to deliver any response you require for your test.
here is a basic example
public class TestHandler : HttpMessageHandler
{
    protected override async Task<HttpResponseMessage> SendAsync(HttpRequestMessage request, CancellationToken cancellationToken)
    {
        // You can check the request details and return different responses based on that.
        // For simplicity, we're always returning the same response here.
        var responseMessage = new HttpResponseMessage(HttpStatusCode.OK)
        {
            Content = new StringContent("Test response.")
        };
        return await Task.FromResult(responseMessage);
    }
}
And here’s how you’d use this handler in a test:
[Test]
public async Task TestHttpClient()
{
    var handler = new TestHandler();
    var client = new HttpClient(handler);

    var response = await client.GetAsync("http://example.com");
    var responseContent = await response.Content.ReadAsStringAsync();

    Assert.AreEqual("Test response.", responseContent);
}
The TestHandler in this illustration consistently sends back an HTTP 200 response with the body “Test response.” In a real test, you might use SendAsync with more sophisticated logic to return several responses depending on the specifics of the request. By doing so, you may properly test your code’s handling of different answers without actually sending HTTP queries.
Going back to our main story
Now that we know we can catch the HTTP request and handle it locally, we can write an HttpClientHandler that takes the request from the client nodes and processes them locally. Now, we have all the pieces to make the playground work without a real server. You can take a look at the implementation of the custom handler for the playground here
Until next time, happy coding )))))