
by Joche Ojeda | Oct 5, 2025 | Blazor, Oqtane
I’m returning to work with Oqtane, and to be honest, we’re exploring new frameworks at the office that will help us expand our market reach. We specialize in a specific type of development and don’t want to move too far away from .NET in general. We’ve used Oqtane in the past—I’ve even installed it on Linux—but I want to conduct fresh research: try it again, get a feel for it, and potentially move some production-sized projects to it.
There’s a lot to understand about Oqtane, especially because it’s a truly layered development framework where you need to work across different layers. This will be the first article in a series that serves both as a guide and as personal mental notes of things I don’t want to forget the next time I develop prototypes or production sites with Oqtane.
The first topic we’ll review is how to install Oqtane and start it up. Here are the steps I usually follow.
Choosing Your Development Approach
The first question you should ask yourself is: How do you want to develop? There are a few ways to do it, and I’ve watched every video about Oqtane over the last two weeks. Here are your three main options:
Option 1: Clone or Download from GitHub (Main Branch)
The old way was to simply go to GitHub and clone or download the source from the main branch, which is actually the development branch. This approach allows you to see all the ins and outs of the framework—how each module is created and registered, how they use repositories, and so on.
However, this may be overwhelming at the beginning. To be honest, since Oqtane has several layers, I got confused many times and wrote code in the wrong layer more than once.
Option 2: Download a Specific Version from Releases
You can also download just the version you want from the releases section on GitHub. This gives you a stable, versioned codebase to work with.
Option 3: Use .NET Templates (Recommended for Beginners)
Now they have .NET new templates available. If you’re a beginner, I strongly suggest installing the .NET templates and using dotnet new because the structure is much more simplified.
However, if you want to understand the ins and outs of the application framework and how it works, I strongly recommend taking a look at the source code.
Installation Resources
Source Code Repository
You can get the source code at this GitHub repository:
https://github.com/oqtane/oqtane.framework
In the README of that repository, you’ll find instructions for installing the templates.
Using the Templates
Here’s an example of how to install and use the templates:
dotnet new install Oqtane.Application.Template
dotnet new oqtane-app -o MyCompany.MyProject
cd MyCompany.MyProject
dotnet build
cd Server
dotnet run
Release Versions
In the releases section, you can find the source code for each specific version:
https://github.com/oqtane/oqtane.framework/releases
Solution Structure
The solution structure differs depending on which installation method you choose:
Solution structure when created with the templates:
MyTests/
├── Client/                    # Blazor WebAssembly Client Project
├── Server/                    # ASP.NET Core Server Project
├── Shared/                    # Shared Models and Contracts
├── MyTests.sln               # Solution File
└── README.md                 # Solution Documentation
Solution structure when using the downloaded source:
OqtaneFramework/
├── .github/                      # GitHub configuration and issue templates
├── Oqtane.Application/           # .NET Template for creating new Oqtane apps
├── Oqtane.Client/                # Core Blazor WebAssembly client framework
├── Oqtane.Server/                # Core ASP.NET server framework
├── Oqtane.Shared/                # Shared contracts, models, and interfaces
├── Oqtane.Maui/                  # MAUI mobile application support
├── Oqtane.Package/               # NuGet packaging and distribution tools
├── Oqtane.Updater/               # Framework update/upgrade utilities
├── screenshots/                  # Marketing and documentation images
├── Oqtane.sln                    # Main solution file
├── Oqtane.Maui.sln              # MAUI solution file
├── Oqtane.Updater.sln           # Updater solution file
└── Configuration Files           # Build, deployment, and Git configs
In the source you will also find the source of around 27+ admin modules, which is a great way to learn how to create your own modules.
- Dashboard
- Files (file management)
- Jobs (background job scheduler)
- Languages (localization)
- Login/Register/Reset (authentication)
- Logs (system logging viewer)
- ModuleDefinitions (module registry)
- Modules (module instance management)
- Pages (page/route management)
- Profiles (user profiles)
- RecycleBin (soft delete management)
- Roles (role-based access)
- Search/SearchResults
- Settings (system configuration)
- Site/Sites (multi-tenancy)
- SQL (database query tool)
- SystemInfo (diagnostics)
- Themes (theme management)
- Upgrade (version upgrades)
- UrlMappings (URL rewriting)
- Users (user management)
- Visitors (analytics)
Wrapping Up
That’s it for this first article! We’ve covered the basics of getting Oqtane installed and understanding the different approaches you can take depending on your experience level and project needs.
In the next article, we’ll dive into starting up the application and picking a database provider. This is where things get interesting, as Oqtane supports multiple database options, and understanding how to configure them properly is crucial for getting your project off the ground.
Stay tuned, and happy coding!
This is part 1 of a series documenting my journey with Oqtane. Check back soon for the next installment.

by Joche Ojeda | Dec 2, 2024 | Blazor
Over time, I transitioned to using the first versions of my beloved framework, XAF. As you might know, XAF generates a polished and functional UI out of the box. Using XAF made me more of a backend developer since most of the development work wasn’t visual—especially in the early versions, where the model designer was rudimentary (it’s much better now).
Eventually, I moved on to developing .NET libraries and NuGet packages, diving deep into SOLID design principles. Fun fact: I actually learned about SOLID from DevExpress TV. Yes, there was a time before YouTube when DevExpress posted videos on technical tasks!
Nowadays, I feel confident creating and publishing my own libraries as NuGet packages. However, my “old monster” was still lurking in the shadows: UI components. I finally decided it was time to conquer it, but first, I needed to choose a platform. Here were my options:
- Windows Forms: A robust and mature platform but limited to desktop applications.
- WPF: A great option with some excellent UI frameworks that I love, but it still feels a bit “Windows Forms-ish” to me.
- Xamarin/Maui: I’m a big fan of Xamarin Forms and Xamarin/Maui XAML, but they’re primarily focused on device-specific applications.
- Blazor: This was the clear winner because it allows me to create desktop applications using Electron, embed components into Windows Forms, or even integrate with MAUI.
Recently, I’ve been helping my brother with a project in Blazor. (He’s not a programmer, but I am.) This gave me an opportunity to experiment with design patterns to get the most out of my components, which started as plain HTML5 pages.
Without further ado, here are the key insights I’ve gained so far.
Building high-quality Blazor components requires attention to both the C# implementation and Razor markup patterns. This guide combines architectural best practices with practical implementation patterns to create robust, reusable components.
1. Component Architecture and Organization
Parameter Organization
Start by organizing parameters into logical groups for better maintainability:
public class CustomForm : ComponentBase
{
    // Layout Parameters
    [Parameter] public string Width { get; set; }
    [Parameter] public string Margin { get; set; }
    [Parameter] public string Padding { get; set; }

    // Validation Parameters
    [Parameter] public bool EnableValidation { get; set; }
    [Parameter] public string ValidationMessage { get; set; }

    // Event Callbacks
    [Parameter] public EventCallback<bool> OnValidationComplete { get; set; }
    [Parameter] public EventCallback<string> OnSubmit { get; set; }
}
Corresponding Razor Template
<div class="form-container" style="width: @Width; margin: @Margin; padding: @Padding">
    <form @onsubmit="HandleSubmit">
        @if (EnableValidation)
        {
            <div class="validation-message">
                @ValidationMessage
            </div>
        }
        @ChildContent
    </form>
</div>
2. Smart Default Values and Template Composition
Component Implementation
public class DataTable<T> : ComponentBase
{
    [Parameter] public int PageSize { get; set; } = 10;
    [Parameter] public bool ShowPagination { get; set; } = true;
    [Parameter] public string EmptyMessage { get; set; } = "No data available";
    [Parameter] public IEnumerable<T> Items { get; set; } = Array.Empty<T>();
    [Parameter] public RenderFragment HeaderTemplate { get; set; }
    [Parameter] public RenderFragment<T> RowTemplate { get; set; }
    [Parameter] public RenderFragment FooterTemplate { get; set; }
}
Razor Implementation
<div class="table-container">
    @if (HeaderTemplate != null)
    {
        <header class="table-header">
            @HeaderTemplate
        </header>
    }

    <div class="table-content">
        @if (!Items.Any())
        {
            <div class="empty-state">@EmptyMessage</div>
        }
        else
        {
            @foreach (var item in Items)
            {
                @RowTemplate(item)
            }
        }
    </div>

    @if (ShowPagination)
    {
        <div class="pagination">
            <!-- Pagination implementation -->
        </div>
    }
</div>
3. Accessibility and Unique IDs
Component Implementation
public class FormField : ComponentBase
{
    private string fieldId = $"field-{Guid.NewGuid():N}";
    private string labelId = $"label-{Guid.NewGuid():N}";
    private string errorId = $"error-{Guid.NewGuid():N}";

    [Parameter] public string Label { get; set; }
    [Parameter] public string Error { get; set; }
    [Parameter] public bool Required { get; set; }
}
Razor Implementation
<div class="form-field">
    <label id="@labelId" for="@fieldId">
        @Label
        @if (Required)
        {
            <span class="required" aria-label="required">*</span>
        }
    </label>

    <input id="@fieldId"
           aria-labelledby="@labelId"
           aria-describedby="@errorId"
           aria-required="@Required" />

    @if (!string.IsNullOrEmpty(Error))
    {
        <div id="@errorId" class="error-message" role="alert">
            @Error
        </div>
    }
</div>
4. Virtualization and Performance
Component Implementation
public class VirtualizedList<T> : ComponentBase
{
    [Parameter] public IEnumerable<T> Items { get; set; }
    [Parameter] public RenderFragment<T> ItemTemplate { get; set; }
    [Parameter] public int ItemHeight { get; set; } = 50;
    [Parameter] public Func<ItemsProviderRequest, ValueTask<ItemsProviderResult<T>>> ItemsProvider { get; set; }
}
Razor Implementation
<div class="virtualized-container" style="height: 500px; overflow-y: auto;">
    <Virtualize Items="@Items"
                ItemSize="@ItemHeight"
                ItemsProvider="@ItemsProvider"
                Context="item">
        <ItemContent>
            <div class="list-item" style="height: @(ItemHeight)px">
                @ItemTemplate(item)
            </div>
        </ItemContent>
        <Placeholder>
            <div class="loading-placeholder" style="height: @(ItemHeight)px">
                <div class="loading-animation"></div>
            </div>
        </Placeholder>
    </Virtualize>
</div>
Best Practices Summary
1. Parameter Organization
- Group related parameters with clear comments
- Provide meaningful default values
- Use parameter validation where appropriate
2. Template Composition
- Use RenderFragment for customizable sections
- Provide default templates when needed
- Enable granular control over component appearance
3. Accessibility
- Generate unique IDs for form elements
- Include proper ARIA attributes
- Support keyboard navigation
4. Performance
- Implement virtualization for large datasets
- Use loading states and placeholders
- Optimize rendering with appropriate conditions
Conclusion
Building effective Blazor components requires attention to both the C# implementation and Razor markup. By following these patterns and practices, you can create components that are:
- Highly reusable
- Performant
- Accessible
- Easy to maintain
- Flexible for different use cases
Remember to adapt these practices to your specific needs while maintaining clean component design principles.
by Joche Ojeda | Dec 1, 2024 | Blazor
My journey with Microsoft Semantic Kernel marked the beginning of a new adventure: stepping out of my comfort zone as a backend developer to create applications with user interfaces, rather than just building apps for unit and integration testing.
I naturally chose Blazor as my UI framework, and I’ll be sharing my frontend development experiences here. Sometimes it can be frustratingly difficult to accomplish seemingly simple tasks (like centering a div!), but AI assistants like GitHub Copilot have been incredibly helpful in reducing those pain points.
One of my recent challenges involved programmatically including JavaScript and CSS in Blazor applications. I prefer an automated approach rather than manually adding tags to HTML. Back in the .NET 5 era, I wrote an article about using tag helpers for this purpose, which you can find here
However, I recently discovered that my original approach no longer works. I’ve been developing several prototypes using the new DevExpress Chat component, and many of these prototypes include custom components that require JavaScript and CSS. Despite my attempts, I couldn’t get these components to work with the tag helpers, and the reason wasn’t immediately obvious. During the Thanksgiving break, I decided to investigate this issue, and I’d like to share what I found.
With the release of .NET 8, Blazor introduced a new web app template that unifies Blazor Server and WebAssembly into a single project structure. This change affects how we inject content into the document’s head section, particularly when working with Tag Helpers or components.
Understanding the Changes
In previous versions of Blazor, we typically worked with _Host.cshtml for server-side rendering, where traditional ASP.NET Core Tag Helpers could target the <head> element directly. The new .NET 8 Blazor Web App template uses App.razor as the root component and introduces the <HeadOutlet> component for managing head content.
Approach 1: Adapting Tag Helpers
If you’re migrating existing Tag Helpers or creating new ones for head content injection, you’ll need to modify them to target HeadOutlet instead of the head element:
using Microsoft.AspNetCore.Razor.TagHelpers;

namespace YourNamespace
{
    [HtmlTargetElement("HeadOutlet")]
    public class CustomScriptTagHelper : TagHelper
    {
        public override void Process(TagHelperContext context, TagHelperOutput output)
        {
            output.PostContent.AppendHtml(
                "<script src=\"_content/YourLibrary/js/script.js\"></script>"
            );
        }
    }
}
Remember to register your Tag Helper in _Imports.razor:
@addTagHelper *, YourLibrary
Approach 2: Using Blazor Components (Recommended)
While adapting Tag Helpers works, Blazor offers a more idiomatic approach using components and the HeadContent component. This approach aligns better with Blazor’s component-based architecture:
@namespace YourNamespace
@implements IComponentRenderMode

<HeadContent>
    <script src="_content/YourLibrary/js/script.js"></script>
</HeadContent>
To use this component in your App.razor:
<head>
    <!-- Other head elements -->
    <HeadOutlet @rendermode="RenderModeForPage" />
    <YourScriptComponent @rendermode="RenderModeForPage" />
</head>
Benefits of the Component Approach
- Better Integration: Components work seamlessly with Blazor’s rendering model
- Render Mode Support: Easy to control rendering based on the current render mode (Interactive Server, WebAssembly, or Auto)
- Dynamic Content: Can leverage Blazor’s full component lifecycle and state management
- Type Safety: Provides compile-time checking and better tooling support
Best Practices
- Prefer the component-based approach for new development
- Use Tag Helpers only when migrating existing code or when you need specific ASP.NET Core pipeline integration
- Always specify the
@rendermode attribute to ensure proper rendering in different scenarios
- Place custom head content components after HeadOutlet to ensure proper ordering
Conclusion
While both approaches work in .NET 8 Blazor Web Apps, the component-based approach using HeadContent provides a more natural fit with Blazor’s architecture and offers better maintainability and flexibility. When building new applications, consider using components unless you have a specific need for Tag Helper functionality.

by Joche Ojeda | Oct 8, 2024 | A.I, Blazor, Semantic Kernel
Are you excited to bring powerful AI chat completions to your web application? I sure am! In this post, we’ll walk through how to integrate the DevExpress Chat component with the Semantic Kernel using OpenAI. This combination can make your app more interactive and intelligent, and it’s surprisingly simple to set up. Let’s dive in!
Step 1: Adding NuGet Packages
First, let’s ensure we have all the necessary packages. Open your DevExpress.AI.Samples.Blazor.csproj file and add the following NuGet references:
 <ItemGroup>
<PackageReference Include="Microsoft.KernelMemory.Abstractions" Version="0.78.241007.1" />
<PackageReference Include="Microsoft.KernelMemory.Core" Version="0.78.241007.1" />
<PackageReference Include="Microsoft.SemanticKernel" Version="1.21.1" />
</ItemGroup>
This will bring in the core components of Semantic Kernel to power your chat completions.
Step 2: Setting Up Your Kernel in Program.cs
Next, we’ll configure the Semantic Kernel and OpenAI integration. Add the following code in your Program.cs to create the kernel and set up the chat completion service:
    //Create your OpenAI client
    string OpenAiKey = Environment.GetEnvironmentVariable("OpenAiTestKey");
    var client = new OpenAIClient(new System.ClientModel.ApiKeyCredential(OpenAiKey));

    //Adding semantic kernel
    var KernelBuilder = Kernel.CreateBuilder();
    KernelBuilder.AddOpenAIChatCompletion("gpt-4o", client);
    var sk = KernelBuilder.Build();
    var ChatService = sk.GetRequiredService<IChatCompletionService>();
    builder.Services.AddSingleton<IChatCompletionService>(ChatService);
This step is crucial because it connects your app to OpenAI via the Semantic Kernel and sets up the chat completion service that will drive the AI responses in your chat.
Step 3: Creating the Chat Component
Now that we’ve got our services ready, it’s time to set up the chat component. We’ll define the chat interface in our Razor page. Here’s how you can do that:
Razor Section:
    @page "/sk"
    @using DevExpress.AIIntegration.Blazor.Chat
    @using AIIntegration.Services.Chat;
    @using Microsoft.SemanticKernel.ChatCompletion
    @using System.Diagnostics
    @using System.Text.Json
    @using System.Text


    @inject IChatCompletionService chatCompletionsService;
    @inject IJSRuntime JSRuntime;
This UI will render a clean chat interface using DevExpress’s DxAIChat component, which is connected to our Semantic Kernel chat completion service.
Code Section:
Now, let’s handle the interaction logic. Here’s the code that powers the chat backend:
    @code {

        ChatHistory ChatHistory = new ChatHistory();

        async Task MessageSent(MessageSentEventArgs args)
        {
            // Add the user's message to the chat history
            ChatHistory.AddUserMessage(args.Content);

            // Get a response from the chat completion service
            var Result = await chatCompletionsService.GetChatMessageContentAsync(ChatHistory);

            // Extract the response content
            string MessageContent = Result.InnerContent.ToString();
            Debug.WriteLine("Message from chat completion service:" + MessageContent);

            // Add the assistant's message to the history
            ChatHistory.AddAssistantMessage(MessageContent);

            // Send the response to the UI
            var message = new Message(MessageRole.Assistant, MessageContent);
            args.SendMessage(message);
        }
    }
With this in place, every time the user sends a message, the chat completion service will process the conversation history and generate a response from OpenAI. The result is then displayed in the chat window.
Step 4: Run Your Project
Before running the project, ensure that the correct environment variable for the OpenAI key is set (OpenAiTestKey). This key is necessary for the integration to communicate with OpenAI’s API.
Now, you’re ready to test! Simply run your project and navigate to https://localhost:58108/sk. Voilà! You’ll see a beautiful, AI-powered chat interface waiting for your input. ?
Conclusion
And that’s it! You’ve successfully integrated the DevExpress Chat component with the Semantic Kernel for AI-powered chat completions. Now, you can take your user interaction to the next level with intelligent, context-aware responses. The possibilities are endless with this integration—whether you’re building a customer support chatbot, a productivity assistant, or something entirely new.
Let me know how your integration goes, and feel free to share what cool things you build with this!
here is the full implementation GitHub

by Joche Ojeda | Jul 26, 2023 | Blazor, C#, Sqlite, WebAssembly
In the evolving panorama of contemporary web application development, a technology that has particularly caught attention is Microsoft’s Blazor WebAssembly. This powerful tool allows for a transformative approach to managing and interacting with client-side data, offering innovative capabilities that are shaping the future of web applications.
Understanding Blazor WebAssembly
Blazor WebAssembly is a client-side web framework from Microsoft. It allows developers to build interactive web applications using C# instead of JavaScript. As the name suggests, it uses WebAssembly, a binary instruction format for a stack-based virtual machine, providing developers with the ability to run client-side web applications directly in the browser using .NET.
The Power of SQLite
SQLite, on the other hand, is a software library that provides a relational database management system (RDBMS). It operates directly on disk files without the need for a separate server process, making it ideal for applications that need local storage. It’s compact, requires zero-configuration, and supports most of the SQL standard, making it an excellent choice for client-side data storage and manipulation.
Combining Blazor WebAssembly with SQLite
By combining these two technologies, you can unlock the full potential of client-side data handling. Here’s how:
Self-Contained and Cross-Platform Development
Both Blazor WebAssembly and SQLite are self-contained systems, requiring no external dependencies. They also both provide excellent cross-platform support. This makes your applications highly portable and reduces the complexity of the development environment.
Offline Availability
SQLite enables the storage of data directly in the client’s browser, allowing your Blazor applications to work offline. Changes made offline can be synced with the server database once the application goes back online, providing a seamless user experience.
Superior Performance
Blazor WebAssembly runs directly in the browser, offering near-native performance. SQLite, being a lightweight yet powerful database, reads and writes directly to ordinary disk files, providing high-speed data access. This combination ensures your application runs quickly and smoothly.
Full .NET Support and Shared Codebase
With Blazor, you can use .NET for both client and server-side code, enabling code sharing and eliminating the need to switch between languages. Coupled with SQLite, developers can use Entity Framework Core to interact with the database, maintaining a consistent, .NET-centric development experience.
Where does the magic happens?
The functionality of SQLite with WebAssembly may vary based on your target framework. If you’re utilizing .NET 6 and Microsoft.Data.SQLite 6, your code will reference SQLitePCLRaw.bundle_e_sqlite3 version 2.0.6. This bundle doesn’t include the native SQLite reference, as demonstrated in the following image
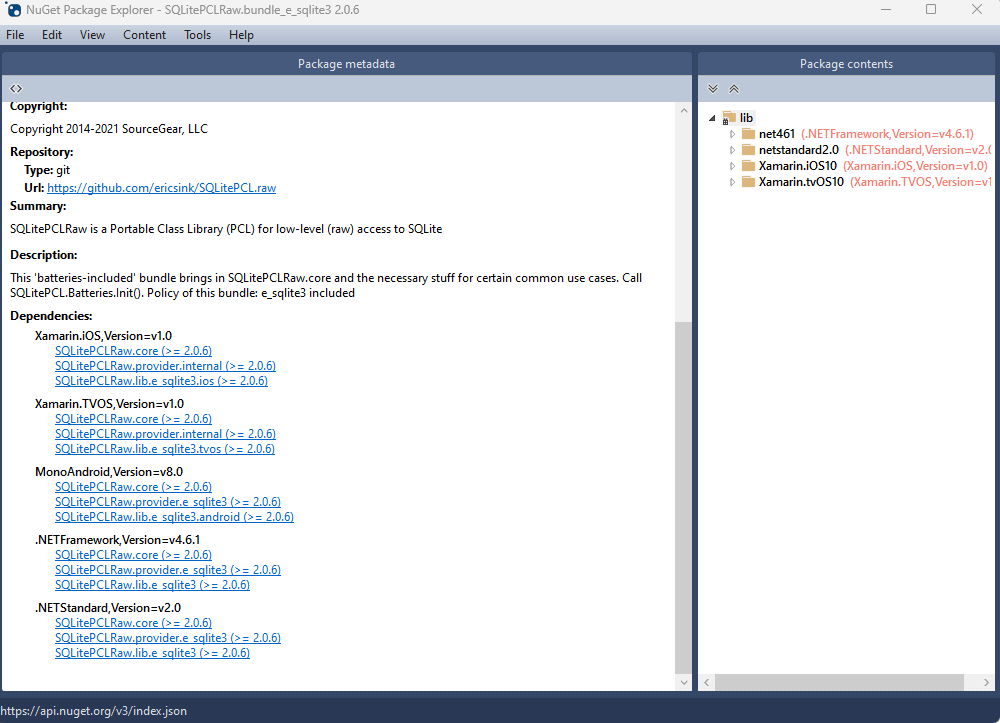
This implies that you’ll need to rely on .NET 6’s native dependencies to include your custom version of lib.e_sqlite3, compiled specifically for WebAssembly. For more detailed information about native dependencies, please refer to the provided links.
https://github.com/egarim/XpoNet6WasmSqlite
https://learn.microsoft.com/en-us/aspnet/core/blazor/webassembly-native-dependencies?view=aspnetcore-6.0
If you’re using .NET 7 or later, your reference from Microsoft.Data.SQLite will depend on SQLitePCLRaw.bundle_e_sqlite3 version 2.1.5. This bundle provides several targets for the native SQLite library (e_sqlite3), as can see in the accompanying image.
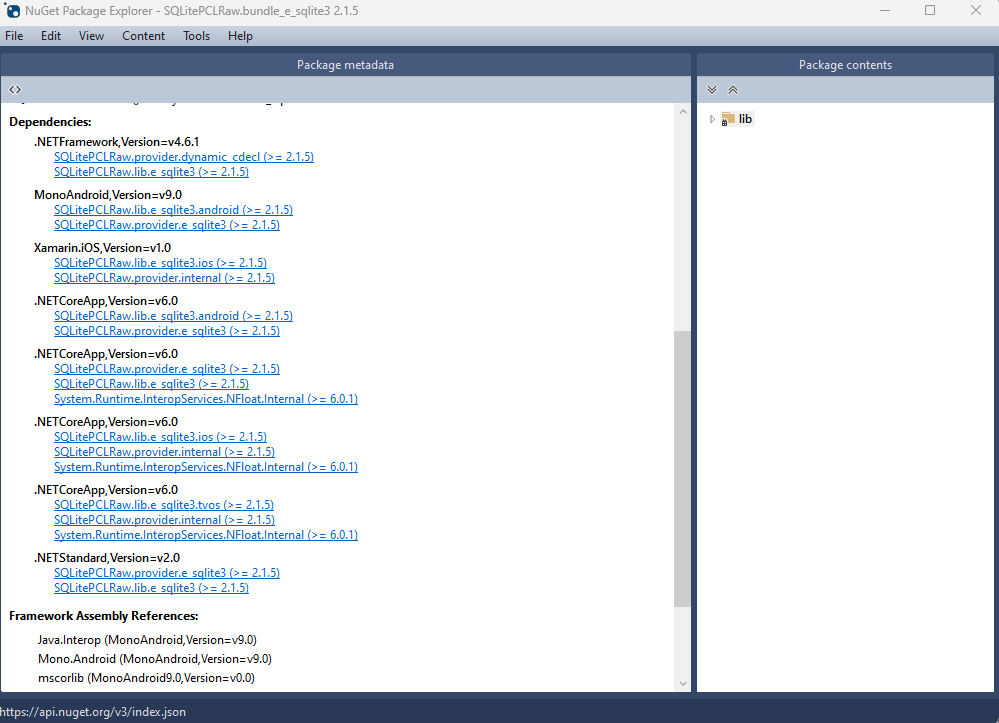
This indicates that we can utilize SQLite on any platform supported by .NET, provided that we supply the native reference for SQLite.
Conclusion
Blazor WebAssembly and SQLite together offer a compelling option for developers looking to leverage the power of client-side data. Their combination enables the development of web applications with high performance, offline availability, and a unified language platform.
This potent mix empowers developers to rethink what’s possible with web application development, pushing the boundaries of what we can achieve with client-side data storage and manipulation. In a world where user experience is paramount, the coupling of these technologies truly helps in unleashing the full potential of client-side data.
by Joche Ojeda | Jul 17, 2023 | Blazor, C#, Data Synchronization, EfCore, WebAssembly
Last week, I decided to create a playground for the SyncFramework to demonstrate how synchronization works. The sync framework itself is not designed in a client-server architecture, but as a set of APIs that you can use to synchronize data.
Synchronization scenarios usually involve a client-server architecture, but when I created the SyncFramework, I decided that network communication was something outside the scope and not directly related to data synchronization. So, instead of embedding the client-server concept in the SyncFramework, I decided to create a set of extensions to handle these scenarios. If you want to take a look at the network extensions, you can see them here.
Now, let’s return to the playground. The main requirement for me, besides showing how the synchronization process works, was not having to maintain an infrastructure for it. You know, a Sync Server and a few databases that I would have to constantly delete. So, I decided to use Blazor WebAssembly and SQLite databases running in the browser. If you want to know more about how SQLite databases can run in the browser, take a look at this article.
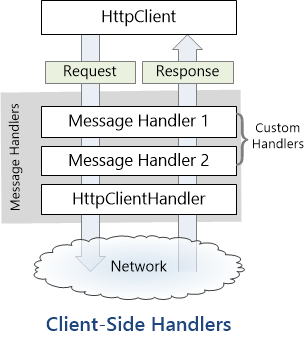
Now, there’s still a problem. How do I run a server on the browser? I know it’s somehow possible, but I did not have the time to do the research. So, I decided to create my own HttpClientHandler.
How the HttpClientHandler works
HttpClientHandler offers a number of attributes and methods for controlling HTTP requests and responses. It serves as the fundamental mechanism for HttpClient’s ability to send and receive HTTP requests and responses.
The HttpClientHandler manages aspects like the maximum number of redirects, redirection policies, handling cookies, and automated decompression of HTTP traffic. It can be set up and supplied to HttpClient to regulate the HTTP requests made by HttpClient.
HttpClientHandler might be helpful in testing situations when it’s necessary to imitate or mock HTTP requests and responses. The SendAsync method of HttpMessageHandler, from which HttpClientHandler also descended, can be overridden in a new class to deliver any response you require for your test.
here is a basic example
public class TestHandler : HttpMessageHandler
{
    protected override async Task<HttpResponseMessage> SendAsync(HttpRequestMessage request, CancellationToken cancellationToken)
    {
        // You can check the request details and return different responses based on that.
        // For simplicity, we're always returning the same response here.
        var responseMessage = new HttpResponseMessage(HttpStatusCode.OK)
        {
            Content = new StringContent("Test response.")
        };
        return await Task.FromResult(responseMessage);
    }
}
And here’s how you’d use this handler in a test:
[Test]
public async Task TestHttpClient()
{
    var handler = new TestHandler();
    var client = new HttpClient(handler);

    var response = await client.GetAsync("http://example.com");
    var responseContent = await response.Content.ReadAsStringAsync();

    Assert.AreEqual("Test response.", responseContent);
}
The TestHandler in this illustration consistently sends back an HTTP 200 response with the body “Test response.” In a real test, you might use SendAsync with more sophisticated logic to return several responses depending on the specifics of the request. By doing so, you may properly test your code’s handling of different answers without actually sending HTTP queries.
Going back to our main story
Now that we know we can catch the HTTP request and handle it locally, we can write an HttpClientHandler that takes the request from the client nodes and processes them locally. Now, we have all the pieces to make the playground work without a real server. You can take a look at the implementation of the custom handler for the playground here
Until next time, happy coding )))))


