Yesterday, I wrote about changing the runtime mode in Oqtane and how that allows you to switch between Blazor Server and Blazor WebAssembly functionality.
Today, I decided to explore how multi-tenancy works — specifically, how Oqtane manages multiple sites within the same
installation.
Originally, I wanted to cover the entire administrative panel and all of its modules in one post, but that would’ve been too big.
So, I’m breaking it down into smaller topics. This post focuses only on site functionality and how multi-tenancy works from the administrative side — basically, how to set up tenants in Oqtane.
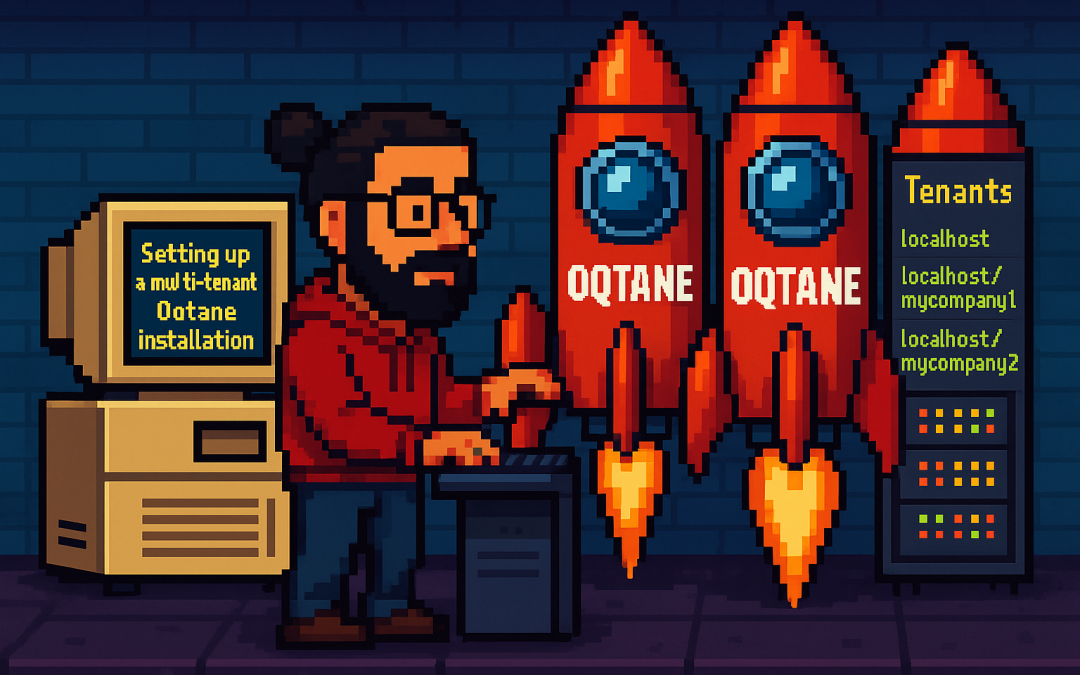
Setting Up a Multi-Tenant Oqtane Installation
To make these experiments easy to replicate, I decided to use SQLite as my database.
I created a new .NET Oqtane application using the official templates and added it to a GitHub repository.
Here’s what I did:
Set up the host configuration directly in appsettings.json.
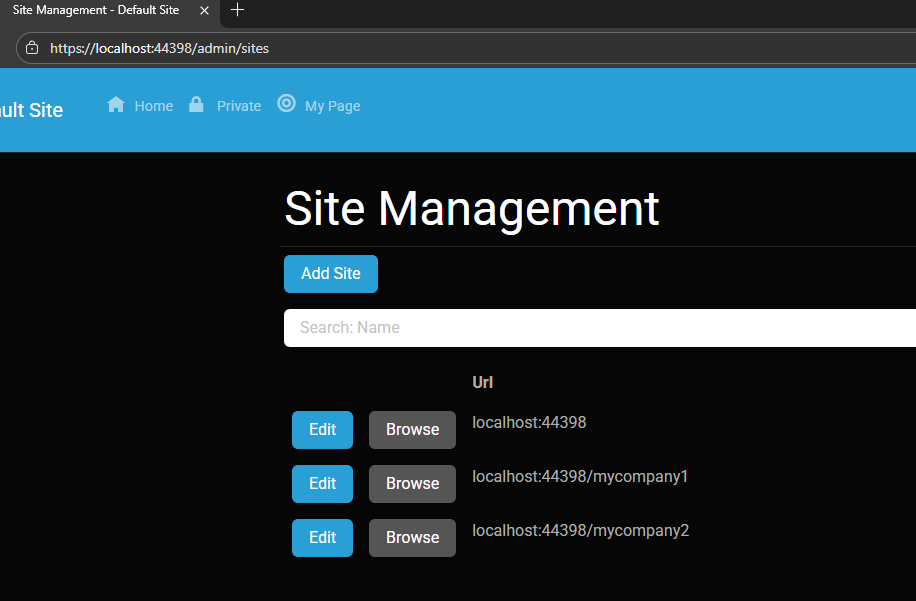
Ran the app, went to the admin panel, and created two additional sites.
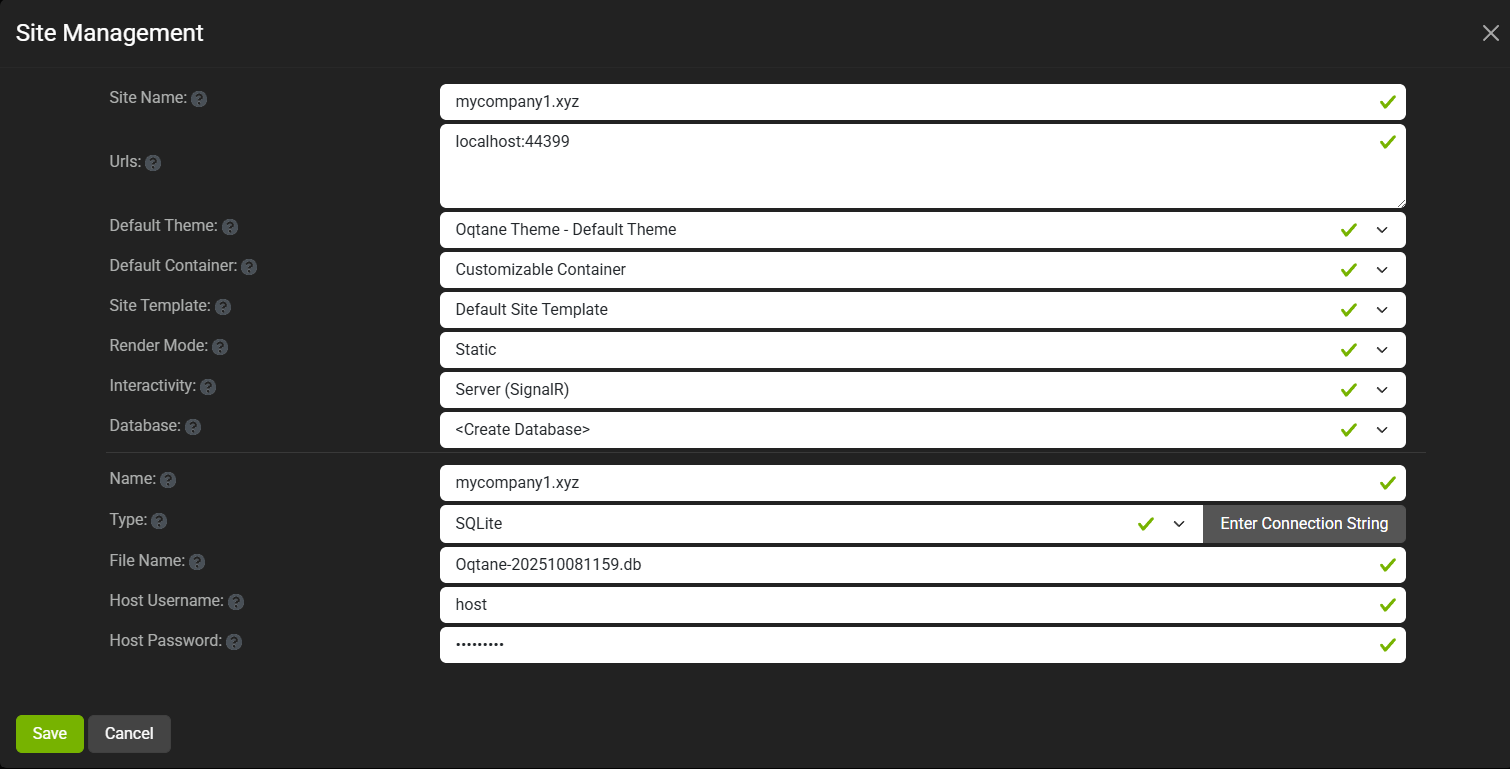
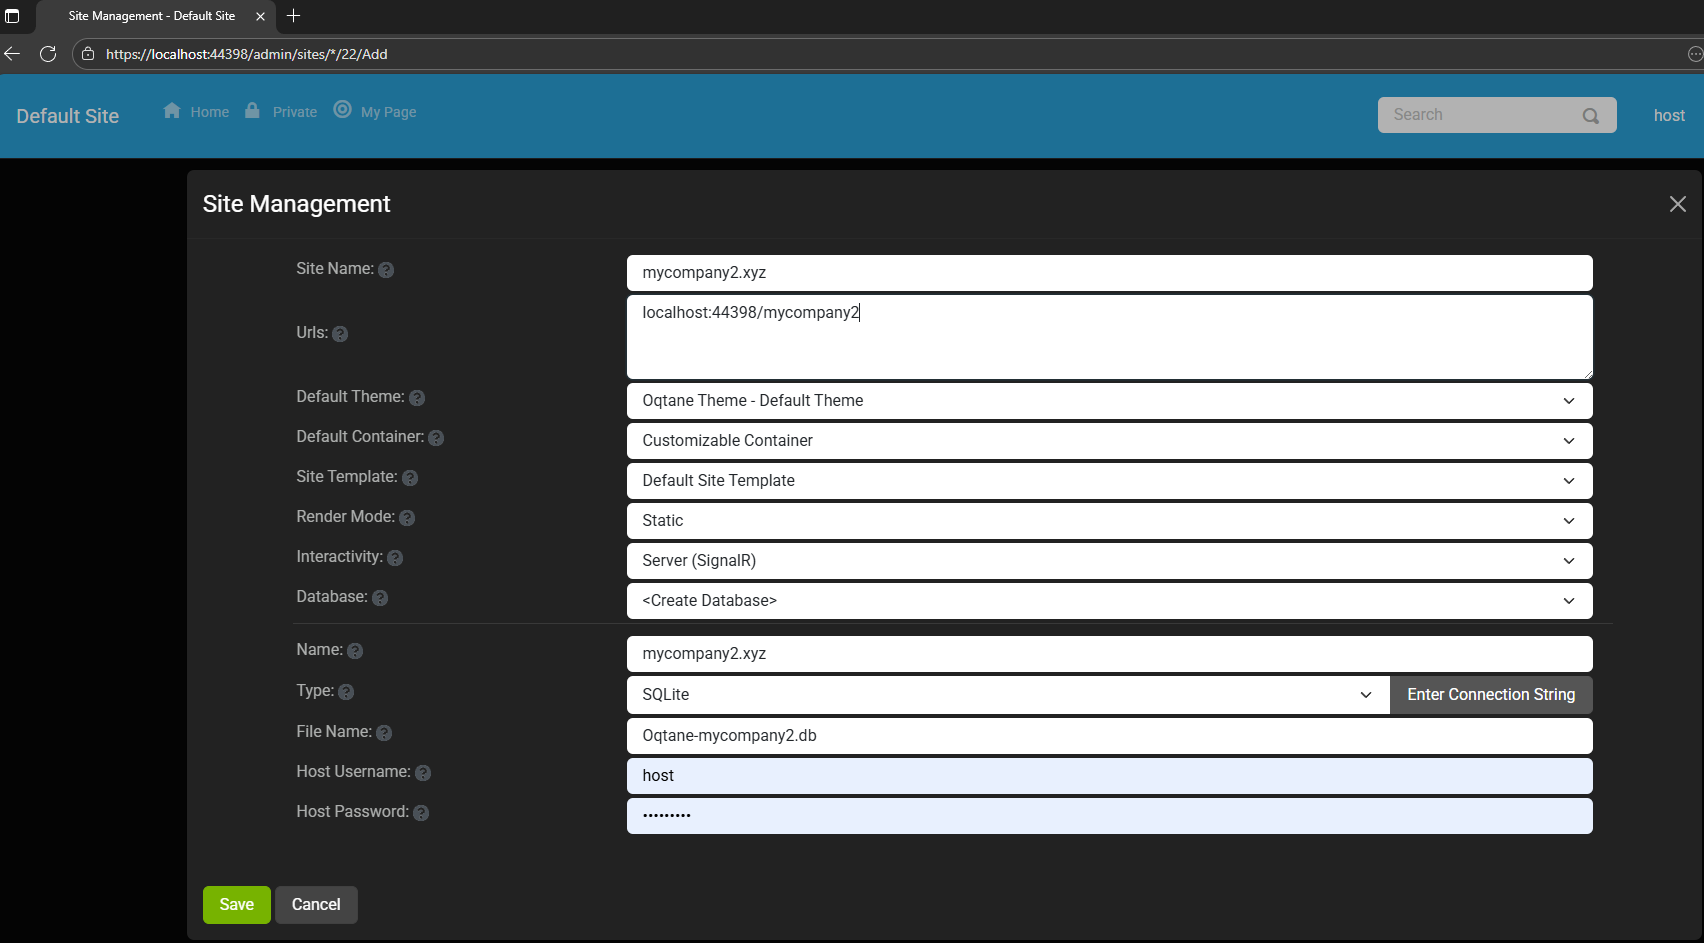
You can see the screenshots below showing the settings for each site.
At first, it was a bit confusing — I thought I could simply use different ports for each site (like 8081, 8082, etc.), but that’s not how Oqtane works. Everything runs in the same process, so all tenants
share the same port.
Instead of changing ports, you configure different URL paths or folders. For example:
http://localhost:8080/ → the main host
http://localhost:8080/mycompany1 → first tenant
http://localhost:8080/mycompany2 → second tenant
Site Managment
Site MyCompany1
Site MyCompany2
Each tenant can:
Use a separate database or share the same one as the host
Have its own theme
Maintain independent site settings
In the short GIF animation I attached to the repository, you can see how each site has its own unique visual theme — it’s really neat to watch.
When you add a new site, its connection string is also stored automatically in the application settings. So, if you download
the repository and run it locally, you’ll be able to access all the sites and see how the URLs and configurations work.
These blog entries are like my personal research notes — documenting what I discover while working with Oqtane.
I’m keeping each experiment small and reproducible so I can:
Share them with others easily
Download them later and reproduce the same setup, including data and configuration
What’s Next
In the next post, I’ll cover virtual hosting — how to use domain names that forward to specific
URLs or tenants. I’ve already done some research on that, but I don’t want to overload this post with too many topics.
For now, I’ll just attach the screenshots showing the different site configurations and URLs, along with a link to the GitHub
repository so you can try it yourself.
If you have any questions, feel free to reach out! I’ll keep documenting everything as I go.
One of the great things about Oqtane is that it’s open source — you can always dive into the code, or if you’re
stuck, open a GitHub issue. Shaun Walker and the community are incredibly helpful, so don’t hesitate to ask.
Thanks again to the Oqtane team for building such an amazing framework.
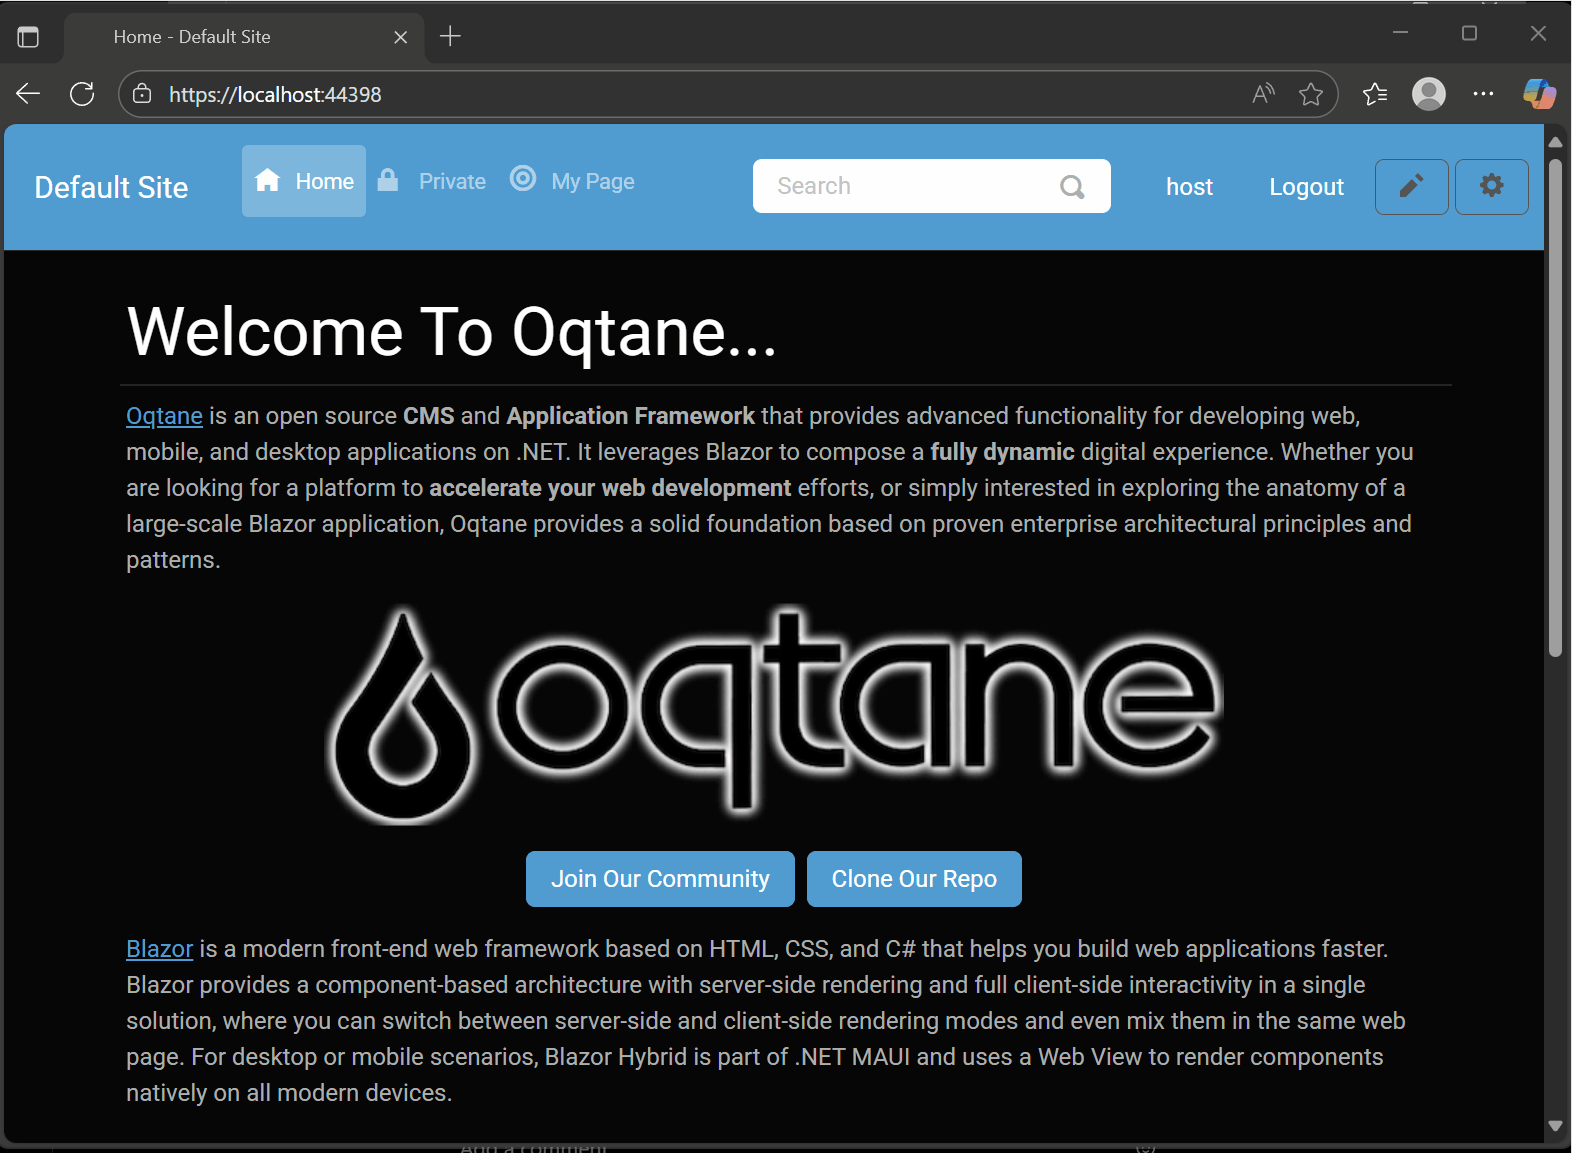
Oqtane Notes: Understanding Site Settings vs. App Settings
OK — it’s time for another blog post (or maybe just a mental note) about Oqtane.
I’ve been doing what feels like a million installations of it lately. Honestly, if the Oqtane team gets a notification every time I spin up a new instance, they’re probably tired of seeing my name by now. I’ve been spending nearly every free minute exploring the framework — I love diving into new technologies, digging into the source code, and figuring out how things really work.
One of the most beautiful parts about Oqtane is that it’s open source. You can simply go into the repository and inspect the source code yourself. Some parts might not be obvious at first glance, but the project’s creator, Shaun Walker, is incredibly responsive and helpful to the community. I think I’ve only posted a couple of issues over the years, but every single time I’ve woken up the next morning with a thoughtful response waiting — even though I’m usually several time zones ahead in Europe. He really knows Oqtane inside and out.
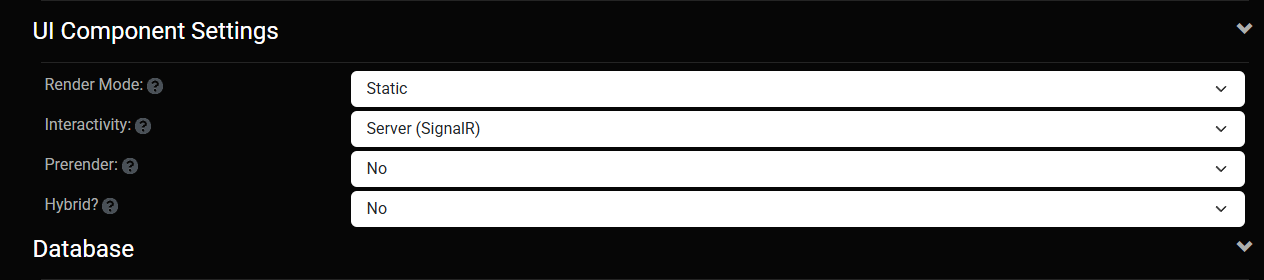
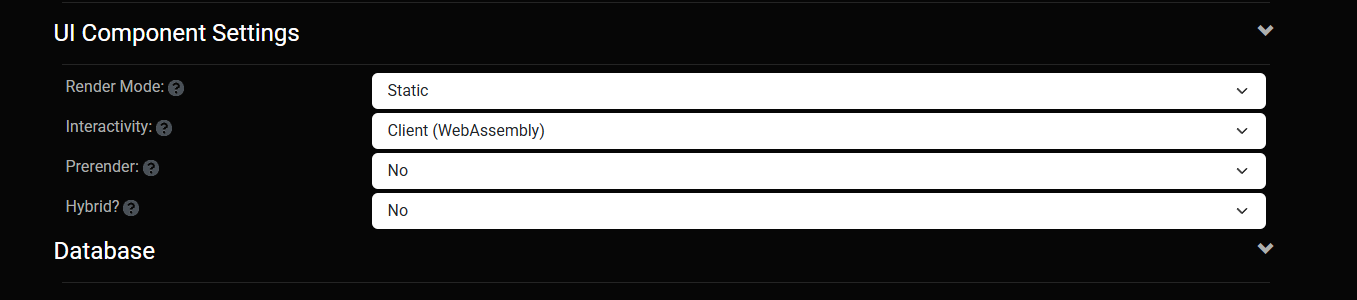
Hosting Models and Render Modes
As you probably know, one of Oqtane’s biggest strengths is its flexibility with Blazor hosting models. It can run as Server or WebAssembly, and you can switch between them with a simple configuration change.
On top of that, Oqtane supports different render modes for components: Interactive or Static. In simple terms, you can choose to render content on the server (similar to how PHP works) or make it fully interactive like a standard Blazor app where the state refreshes dynamically.
You can toggle these behaviors with just a few clicks in the admin backend — which is awesome once you understand how the settings are actually applied.
My Confusion (and the Lesson Learned)
This post was originally meant to be a follow-up to the previous one about database configuration, but I ran into an interesting issue while testing API controllers. I wanted to confirm that when I ran the application in WebAssembly mode, it would hit the API controllers correctly.
It didn’t — at least not at first.
I spent quite a while trying to figure out why. Oqtane has both app-level settings (in appsettings.json) and site-level settings (in the admin panel), and it wasn’t immediately clear which ones took priority. I initially thought I could just change the render and runtime options in appsettings.json, restart the app, and see the effect. But it didn’t work that way.
After some trial and error — and a helpful reply from Shaun — I realized my mistake. When you first spin up a new site, Oqtane uses the values defined in appsettings.json. But once that site exists, it maintains its own configuration separately. From that point forward, any runtime or render mode changes must be made in the site settings from the admin panel, not in the original configuration file.
Server Runtime
WebAssembly Runtime
The Takeaway
If you edit appsettings.json after your first site is already created, it won’t affect the existing site — those values only apply when a new site is initialized.
So, to summarize:
Before the first run → Configure defaults in appsettings.json.
After the site is running → Change settings from the admin backend.
That was the source of my confusion. Hopefully, this note saves someone else a few hours of head-scratching.
Thanks again to Shaun and the entire Oqtane team for keeping this project alive and so well supported.
These posts are just my personal notes, but I hope they help someone who’s following the same learning path.
In this article, I’ll show you what to do after you’ve obtained and opened an Oqtane solution. Specifically, we’ll go through two different ways to set up your database for the first time.
Using the setup wizard — this option appears automatically the first time you run the application.
Configuring it manually — by directly editing the appsettings.json file to skip the wizard.
Both methods achieve the same result. The only difference is that, if you configure the database manually, you won’t see the setup wizard during startup.
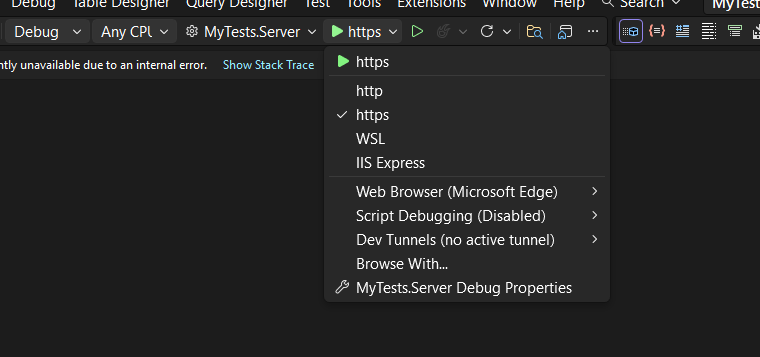
Step 1: Running the Application for the First Time
Once your solution is open in Visual Studio, set the Server project as the startup project. Then run it just as you would with any ASP.NET Core application.
You’ll notice several run options — I recommend using the HTTPS version instead of IIS Express (I stopped using IIS Express because it doesn’t work well on ARM-based computers).
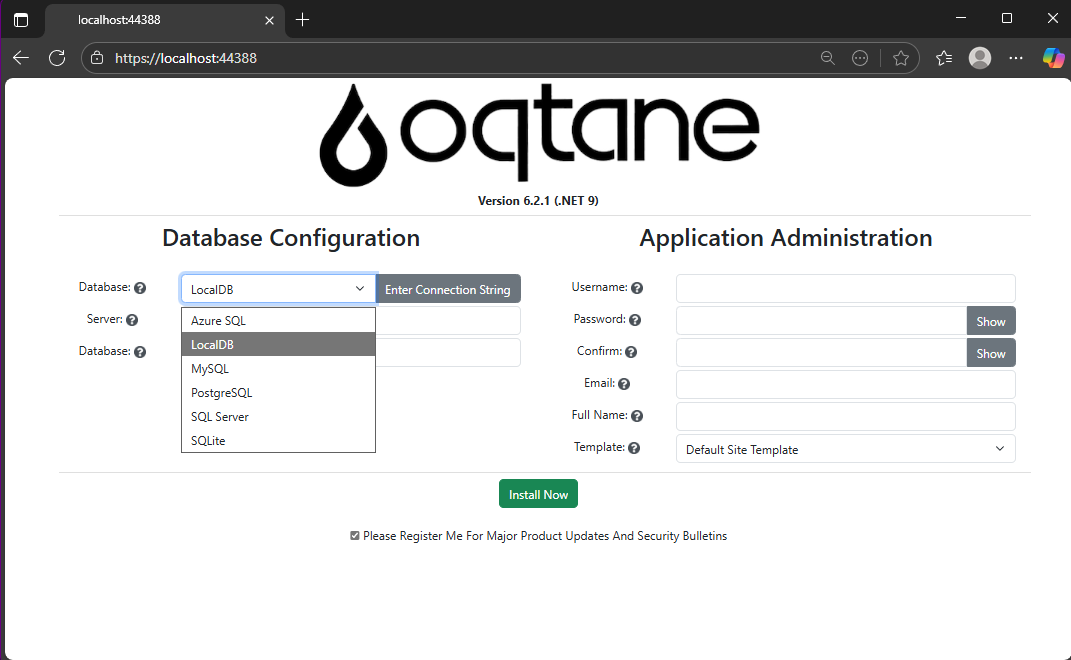
When you run the application for the first time and your settings file is still empty, you’ll see the Database Setup Wizard. As shown in the image, the wizard allows you to select a database provider and configure it through a form.
There’s also an option to paste your connection string directly. Make sure it’s a valid Entity Framework Core connection string.
After that, fill in the admin user’s details — username, email, and password — and you’re done. Once this process completes, you’ll have a working Oqtane installation.
Step 2: Setting Up the Database Manually
If you prefer to skip the wizard, you can configure the database manually. To do this, open the appsettings.json file and add the following parameters:
The database provider type (e.g., SQLite, SQL Server, PostgreSQL, etc.)
The connection string
The admin email and password for the first user — known as the host user (essentially the root or super admin).
This is the method I usually use now since I’ve set up Oqtane so many times recently that I’ve grown tired of the wizard. However, if you’re new to Oqtane, the wizard is a great way to get started.
Wrapping Up
That’s it for this setup guide! By now, you should have a running Oqtane installation configured either through the setup wizard or manually via the configuration file. Both methods give you a solid foundation to start exploring what Oqtane can do.
In the next article, we’ll dive into the Oqtane backend, exploring how the framework handles modules, data, and the underlying architecture that makes it flexible and powerful. Stay tuned — things are about to get interesting!
I’m returning to work with Oqtane, and to be honest, we’re exploring new frameworks at the office that will help us expand our market reach. We specialize in a specific type of development and don’t want to move too far away from .NET in general. We’ve used Oqtane in the past—I’ve even installed it on Linux—but I want to conduct fresh research: try it again, get a feel for it, and potentially move some production-sized projects to it.
There’s a lot to understand about Oqtane, especially because it’s a truly layered development framework where you need to work across different layers. This will be the first article in a series that serves both as a guide and as personal mental notes of things I don’t want to forget the next time I develop prototypes or production sites with Oqtane.
The first topic we’ll review is how to install Oqtane and start it up. Here are the steps I usually follow.
Choosing Your Development Approach
The first question you should ask yourself is: How do you want to develop? There are a few ways to do it, and I’ve watched every video about Oqtane over the last two weeks. Here are your three main options:
Option 1: Clone or Download from GitHub (Main Branch)
The old way was to simply go to GitHub and clone or download the source from the main branch, which is actually the development branch. This approach allows you to see all the ins and outs of the framework—how each module is created and registered, how they use repositories, and so on.
However, this may be overwhelming at the beginning. To be honest, since Oqtane has several layers, I got confused many times and wrote code in the wrong layer more than once.
Option 2: Download a Specific Version from Releases
You can also download just the version you want from the releases section on GitHub. This gives you a stable, versioned codebase to work with.
Option 3: Use .NET Templates (Recommended for Beginners)
Now they have .NET new templates available. If you’re a beginner, I strongly suggest installing the .NET templates and using dotnet new because the structure is much more simplified.
However, if you want to understand the ins and outs of the application framework and how it works, I strongly recommend taking a look at the source code.
Installation Resources
Source Code Repository
You can get the source code at this GitHub repository:
https://github.com/oqtane/oqtane.framework
In the README of that repository, you’ll find instructions for installing the templates.
Using the Templates
Here’s an example of how to install and use the templates:
dotnet new install Oqtane.Application.Template
dotnet new oqtane-app -o MyCompany.MyProject
cd MyCompany.MyProject
dotnet build
cd Server
dotnet run
Release Versions
In the releases section, you can find the source code for each specific version:
Solution structure when using the downloaded source:
OqtaneFramework/
├── .github/                      # GitHub configuration and issue templates
├── Oqtane.Application/           # .NET Template for creating new Oqtane apps
├── Oqtane.Client/                # Core Blazor WebAssembly client framework
├── Oqtane.Server/                # Core ASP.NET server framework
├── Oqtane.Shared/                # Shared contracts, models, and interfaces
├── Oqtane.Maui/                  # MAUI mobile application support
├── Oqtane.Package/               # NuGet packaging and distribution tools
├── Oqtane.Updater/               # Framework update/upgrade utilities
├── screenshots/                  # Marketing and documentation images
├── Oqtane.sln                    # Main solution file
├── Oqtane.Maui.sln              # MAUI solution file
├── Oqtane.Updater.sln           # Updater solution file
└── Configuration Files           # Build, deployment, and Git configs
In the source you will also find the source of around 27+ admin modules, which is a great way to learn how to create your own modules.
Dashboard
Files (file management)
Jobs (background job scheduler)
Languages (localization)
Login/Register/Reset (authentication)
Logs (system logging viewer)
ModuleDefinitions (module registry)
Modules (module instance management)
Pages (page/route management)
Profiles (user profiles)
RecycleBin (soft delete management)
Roles (role-based access)
Search/SearchResults
Settings (system configuration)
Site/Sites (multi-tenancy)
SQL (database query tool)
SystemInfo (diagnostics)
Themes (theme management)
Upgrade (version upgrades)
UrlMappings (URL rewriting)
Users (user management)
Visitors (analytics)
Wrapping Up
That’s it for this first article! We’ve covered the basics of getting Oqtane installed and understanding the different approaches you can take depending on your experience level and project needs.
In the next article, we’ll dive into starting up the application and picking a database provider. This is where things get interesting, as Oqtane supports multiple database options, and understanding how to configure them properly is crucial for getting your project off the ground.
Stay tuned, and happy coding!
This is part 1 of a series documenting my journey with Oqtane. Check back soon for the next installment.
It’s Sunday — so maybe it’s time to write an article to break the flow I’ve been in lately. I’ve been deep into researching design patterns for Oqtane, the web application framework created by Shaun Walker.
Today I woke up really early, around 4:30 a.m. I went downstairs, made coffee, and decided to play around with some applications I had on my list. One of them was HotKey Typer by James Montemagno.
I ran it for the first time and instantly loved it. It’s super simple and useful — but I had a problem. I started using glasses a few years ago, and I generally have trouble with small UI elements on the computer. I usually work at 150% scaling. Unfortunately, James’s app has a fixed window size, so everything looked cut off.
Since I’ve been coding a lot lately, I figured it would be an easy fix. I tweaked it — and it worked! Everything looked better, but a bit too large, so I adjusted it again… and again… and again. Before I knew it, I had turned it into a totally different application.
I was vibe coding for four or five hours straight. In the end, I added a lot of new functionality because I genuinely loved the app and the idea behind it. I added sets (or collections) — basically groups of snippets you can assign to keys 1–9. Then I added autosave, a settings screen, and a reset option for the collections. Every time I finished one feature, I said, “Just one more thing.” Five minutes turned into five hours.
When I was done, I recorded a demo video. It was a lot of fun — and the result was genuinely useful. I even want to create an installer for myself so I can easily reinstall it if I ever reformat my computer. (I used to be that guy who formatted his PC every month. Not anymore… but you never know.)
Lessons From Vibe Coding
I learned a lot from this little experiment. I’ve been vibe coding nonstop for about three months now — I’ve even used up all my Copilot credits before the 25th of the month more than once! Vibe coding is a lot of fun, but it can easily spiral out of control and take you in the wrong direction.
Next week, I want to change my approach a bit — maybe follow a more structured pattern.
Another thing this reminded me of is how important it is to work in a team. My business partner, José Javier Columbie, has always helped me with that. We’ve been working together for about 10 years now. I’m the kind of developer who keeps rewriting, refactoring, optimizing, making things faster, reusable, turning them into plugins or frameworks — and sometimes the original task was actually quite small.
That’s where Javier comes in. He’s the one who says, “José, it’s done. This is what they asked for, and this is what we’re delivering.” He keeps me grounded. Every developer needs that — or at least needs to learn how to set that boundary for themselves.
Final Thoughts
So that’s my takeaway from today’s vibe coding session: have fun, but know when to stop.
I’ll include below the links to:
James Montemagno’s original HotKey Typer repository
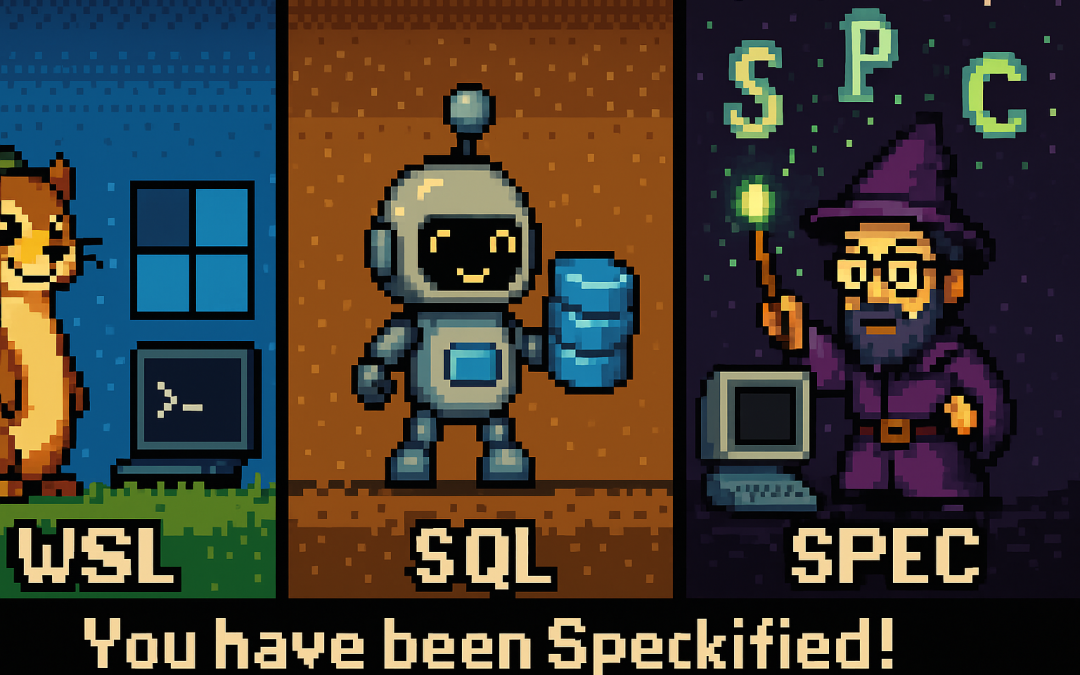
If you hang out around developers long enough, you’ll notice we don’t just use tools — we nickname them, mispronounce them, and sometimes turn them into full-blown mascots. Here are three favorites: WSL, SQL, and GitHub Copilot’s Spec Kit.
WSL → “Weasel”
English reality: WSL stands for Windows Subsystem for Linux.
Nickname: Said quickly as “double-u S L,” it echoes weasel, so the meme stuck.
Spanish (El Salvador / Latin America): In El Salvador and many Latin American countries, the letter W is read as “doble be” (not doble u). So WSL is pronounced “doble be, ese, ele.”
SQL → “Sequel”
English reality: SQL stands for Structured Query Language.
Pronunciation: Both “S-Q-L” and “sequel” are used in English.
Spanish (LatAm): Most developers say it letter by letter: “ese cu e ele.” Bilingual teams sometimes mix in “sequel.”
Spec Kit → “Speckified” (Spooky Spell)
English reality: GitHub Copilot’s Spec Kit helps scaffold code from specs.
Community fun: Projects get “speckified,” a word that mischievously echoes “spookified.” Our playful mascot idea is a wizard enchanting a codebase: You have been Speckified!
Spanish (LatAm): Phonetically, SPEC is “ese, pe, e, ce.” In casual talk many devs just say “espec” (es-pek) to keep the pun alive.
Quick Reference (Latin American / El Salvador Spanish)
Acronym
English Pronunciation
Spanish (LatAm / El Salvador) Phonetics
Nickname / Mascot
WSL
“double-u S L” (sounds like weasel)
“doble be, ese, ele”
Weasel
SQL
“S-Q-L” or “sequel”
“ese cu e ele”
Sequel Robot
SPEC
“spec” → “speckified”
“ese, pe, e, ce” (or “espec”)
Spec Wizard (spell)
Why This Matters
These playful twists — weasel, sequel robot, speckified wizard — show how dev culture works:
Acronyms turn into characters.
English vs. Spanish pronunciations add layers of humor.
Memes make otherwise dry tools easier to talk about.
Next time someone says their project is fully speckified on WSL with SQL, you might be hearing about a weasel, a robot, and a wizard casting spooky spec spells.
I thought vibe coding was chaotic at home. Try doing it while traveling halfway across the world.
Between layovers, hotel lobbies, and unpredictable Wi-Fi, I convinced myself I could keep momentum by letting AI carry the weight. Just toss it some prompts, let it generate code, and keep vibing in transit. Sounds good, right?
It wasn’t. Instead of progress, I found myself trapped in the same entropy loop as before—except now with added airport noise and bad coffee. It finally hit me: coding wasn’t the hard part anymore. The real challenge was lowering the chaos of my ideas into clear, executable requirements.
The Travel Chaos of Vibe Coding
While bouncing from Saint Petersburg to El Salvador, I leaned on vibe coding like a crutch. I threw half-formed prompts at the AI:
“Build me a service that works offline.”
“Hook this into a booking flow.”
“Make it sync when online again.”
And, of course, the AI delivered: endless snippets, scaffolds, and fragments. But none of it fit together. It was like watching a band jam without ever agreeing on the key. Six hours in, all I had was a disjointed mess—again.
Not long after, I tuned into the Merge Conflict podcast: All in on Spec-Driven Development (Episode 479), where James Montemagno and Frank Kruger broke down what spec-driven workflows really mean for developers.
Spec Kit showed me a different angle: instead of treating the AI like a mind reader, treat it like a contractor. Write clear specs, break them down into tasks, and then let the AI handle execution.
James and Frank went further. They contrasted waterfall (where everything is specified upfront) with agile (where progress is iterative and requirements evolve). Their point was simple but profound: no matter the methodology, you can’t skip requirements. Even agile depends on clarity at each iteration.
The Programmer’s True Role
That’s when it clicked: my job as a human programmer isn’t to crank out lines of code anymore. The AI can do that faster than I ever could. My job is to reduce entropy.
I take vague ideas, half-baked business rules, and chaotic travel thoughts—and refine them into something structured. That’s the blueprint AI thrives on. Without it, I’m asking the model to improvise a symphony from random notes. With it, I get clean, working solutions in minutes.
Why Requirements Are the Real Magic
Spec Kit and similar tools are amazing, but they don’t remove the hardest part—they expose it. Writing good requirements is the bottleneck. Once that’s done, the rest flows.
Think of it this way:
Vibe coding while traveling = chaos squared.
Spec-driven clarity = progress even in noisy, unpredictable environments.
It’s not about choosing waterfall or agile. It’s about embracing the timeless truth that clarity upfront—whether in a full spec or a tight user story—is what makes AI effective.
Conclusion
My journey from vibe coding on the road to spec-driven clarity taught me that code is no longer the hardest problem. The real magic lies in writing requirements that reduce chaos and give AI a fighting chance to deliver.
So next time you feel tempted to vibe code—whether at home or 30,000 feet in the air—pause. Write the requirement. Structure the idea. Then let the AI do what it does best: execute clarity at scale.
Because in the end, humans reduce entropy. AI executes it.
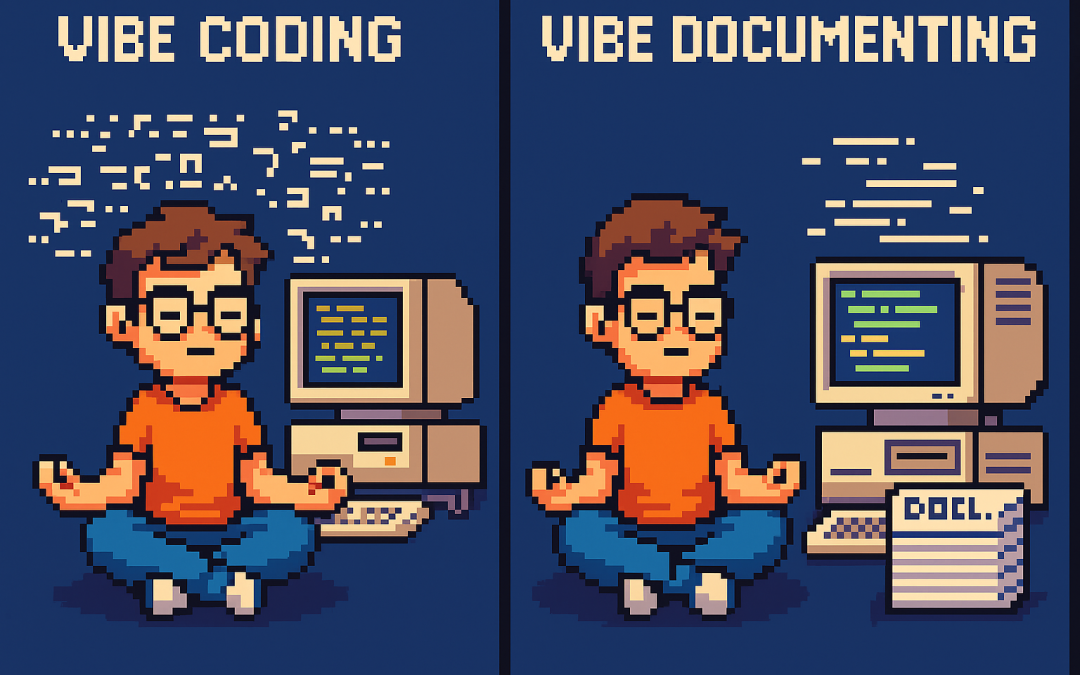
Most of us have fallen into the trap of what I like to call vibe coding. It’s that moment when you’re excited about an idea, you open your editor, call on your favorite AI assistant, and just… vibe. You throw half-baked requirements at the model, it spits out a lot of code, and for a while, it feels like progress.
The problem is, vibe coding usually leads to garbage code, wasted time, and mounting frustration. I know this because I recently spent six hours vibe coding a feature I could have completed in under ten minutes—once I stopped vibing and started documenting.
What Is Vibe Coding?
Vibe coding is coding without a plan. It’s asking an AI to build something from incomplete context, hoping it magically fills in the blanks.
It can look like:
Pasting vague prompts into an LLM: “Build me an activity stream module.”
Copy-pasting stack overflow snippets without really understanding them.
Letting AI hallucinate structures, dependencies, and business rules you never specified.
And it feels productive, because you see code flying across your screen. But what’s really happening is that the AI is guessing. It compiles imaginary versions of your system in its “head,” tries different routes, and produces lots of words that look like solutions but don’t actually fit your framework or needs. The result: chaos disguised as progress.
My Oqtane Activity Stream Story
Here’s a concrete example.
I wanted to build an activity stream—basically, a social-network-style feed—on top of Oqtane, a .NET-based CMS. Now, I know the domain of activity streams really well, but I decided to test how far I could get if I let AI build an Oqtane module for me as if I knew nothing about the framework.
For six hours, I vibe coded. I kept prompting the AI with fragments like:
“Make an Oqtane module for an activity feed.”
“Add a timeline of user events.”
“Hook this up to Oqtane’s structure.”
And the AI did what it does best: it generated code. Lots of it. But the code didn’t fit the Oqtane module lifecycle. It missed important patterns, created unnecessary complexity, and left me stuck in a trial-and-error spiral.
Six hours later, I had nothing usable. Just a pile of messy code and a headache.
The Switch to Vibe Documenting
Then I stepped back. Instead of continuing to let the AI guess, I wrote down what I already knew:
How an Oqtane module is structured.
What the activity stream needed to display.
The key integration points with the CMS.
In other words, I documented the requirements as if I were teaching someone new to Oqtane. Then, I fed that documentation to the AI.
The result? In about eight minutes, I had a clean, working Oqtane module for my activity stream. No trial and error. No hallucinated patterns. Just code that fit perfectly into the framework.
Why Documentation Beats Guesswork
The lesson was obvious: the AI is only as good as the clarity of its input. Documentation gives it structure, reducing the entropy of the problem. Without it, you’re effectively asking the AI to be psychic. With it, you’re giving the AI a blueprint it can execute on with precision.
Think about it this way:
Vibe coding = lots of code, little progress.
Vibe documenting = clear plan, fast progress.
The irony is that documentation often feels slower up front—but it saves exponential time later. In my case, it turned six wasted hours into eight minutes of actual productivity.
The Human Programmer’s Role
This experience reinforced something important: the human programmer isn’t going anywhere. Our role is to act as the bridge between vague ideas and structured requirements.
We’re the ones who take messy, half-formed thoughts and turn them into clear steps. That’s not just busywork—that’s the essence of engineering. Once those steps exist, the AI can handle the grunt work of coding far more effectively than it can guess at our intentions.
In other words: humans reduce chaos; AI executes clarity.
The Guru Lesson
I like to think of it as a guru’s journey. On one side, the vibe coder sits cross-legged in front of a retro computer, letting chaotic lines of code swirl around them. On the other, the vibe documenter floats serenely, armed with neat stacks of documentation, watching clean code flow effortlessly.
The wisdom is simple: don’t vibe code. Vibe document. It’s the difference between six hours of chaos and eight minutes of clarity.
Conclusion
AI coding assistants are incredible, but they’re not mind readers. If you skip documentation, you’ll spend hours wrestling with hallucinated code. If you take the time to document, you’ll unlock the real power of AI: rapid, reliable execution.
So the next time you feel the urge to vibe code, pause. Write down your requirements. Document your framework. Then let the AI do what it does best: build from clarity.
Because vibe coding wastes time—but vibe documenting saves it.
Great News for DevExpress and GitHub Copilot Users!
I have exciting news for developers using DevExpress and GitHub Copilot together.
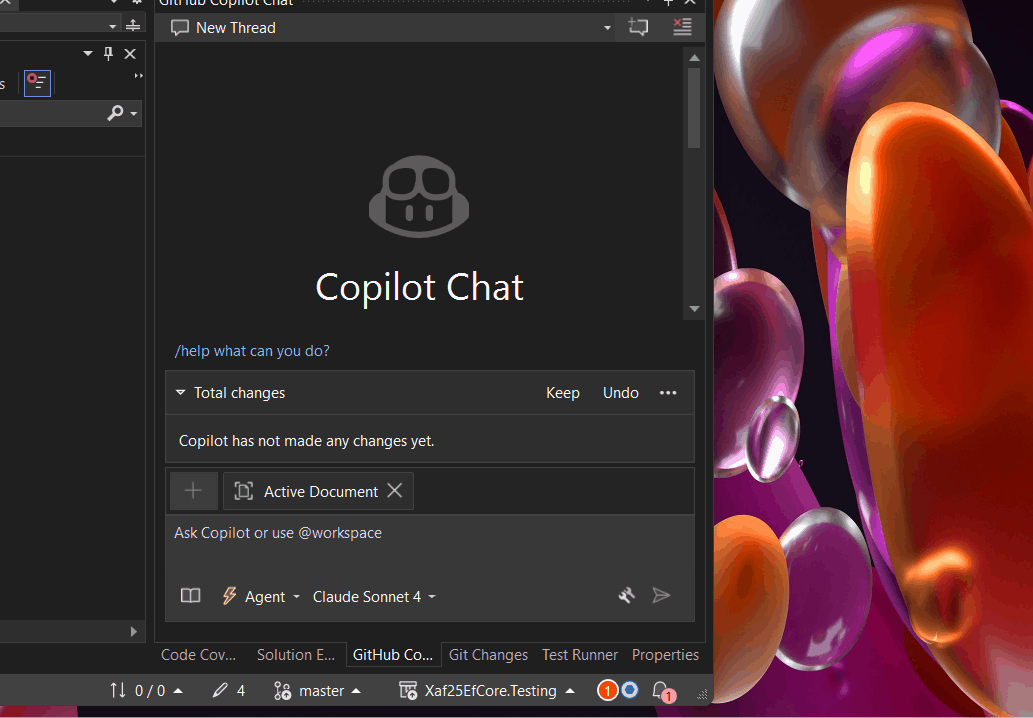
Lately, I’ve been writing a lot of code and absolutely love using GitHub Copilot for this work. I initially used it on VS Code – while I wasn’t a big fan of VS Code before, it’s always been Microsoft’s favorite child and consistently gets the newest and shiniest functionality first. Now Visual Studio (for serious development work, haha) is also getting love from Microsoft, and both IDEs have implemented agent mode.
Following up on this good news, today (August 5, 2025) I saw a post from Dennis Garavsky from DevExpress in our Facebook group (https://www.facebook.com/groups/701851593510732). He shared instructions on how to use the DevExpress Documentation MCP server – it’s basically just 3 simple steps:
Enable the MCP in your development environment (see the attached screenshot for reference).
How to Use It
Now you can add the phrase “Use dxdocs” to your prompts and voilà! The magic happens.
Example prompt:
“Create a domain object for a customer, add a code name and address property and validate for null using XAF validation rules. Use dxdocs”
Important Disclaimer from DevExpress
The DevExpress MCP Documentation Server is currently available as a preview. Certain DevExpress-related coding tasks may still need further server and prompt fine-tuning. Please share your experience in the comments – both with and without this MCP. Let us know what needs improvement, what additional steps you took to get better results with AI tools in general, and any other feedback you have.
Happy coding with your new AI-powered DevExpress development experience!